Transcription
ENSUUNTOGEKKOUSER’S GUIDE
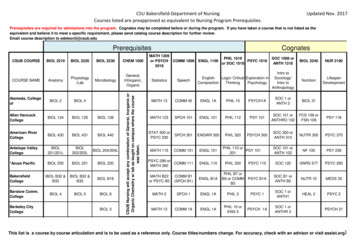
Indicators for the ScrollButtonsTemperatureWeek DayMode TextPersonal AdjustmentModeHigh Altitude ModeOxygen Percentage inNitrox ModeDo Not Fly IconBar Graph:- Mode Indicator- Consumed Botton Time- Oxygen Limit FractionDive Attention SymbolLogbook SymbolPresent DepthDive CounterOLFCBT F CTIMECEILINGDIVE TIMEDiveTime/Depth AlarmOn IndicatorDive TimeTimeMonth,DayLow Battery WarningIndicators for the SmartButtonThe Smart Button:- Activation- Mode OperationsCurrent Time DisplaySurface Interval TimeNo Flying TimeNo-Decompression TimeTotal Ascent TimeSafety Stop TimeBar Graph:- Ascent Rate Indicator- Battery Power Indicator- Logbook Page IndicatorFast Ascent Warning(SLOW)Safety Stop WarningSafety Stop IndicatorMaximum DepthCeiling Depth on DecompressionMandatory Safety Stop DepthAverage Depth on LogbookOxygen Partial PressureAM/PM IndicatorTime (alternative display) ButtonScroll Button (decrease value, descend)OPTIONSNO DEC TIMESELECTOKSLOAVGPO2 MAX WSTOP ASC TIMEQUITm ftNO O2%SURFDIVEDive Planning ButtonScroll Button (increase value, ascend)Arrows:- Decompression Stop at the Ceiling Depth- Mandatory Safety Stop Zone- Ascent Recommended- Must DescendQuick reference guide Gekko
DEFINITION OF WARNINGS, CAUTIONS AND NOTESThroughout this manual, special references are made when deemed important. Three classifications are used to separate these references by theirorder of importance.is used in connection with a procedure or situationthat may result in serious injury or death.CAUTIONis used in connection with a procedure or situationthat will result in damage to the product.NOTEis used to emphasize important information.WARNINGCOPYRIGHT, TRADEMARK AND PATENT NOTICEThis instruction manual is cop yrighted and all rights are reserv ed. It maynot, in whole or in part, be copied, photocopied, reproduced, translated, orreduced to any media without prior written consent from SUUNTO.SUUNTO, GEKKO, Consumed Bottom Time (CBT), Oxygen Limit Fraction(OLF), SUUNTO Reduced Gradient Bubble Model (RGBM), ContinuousDecompression and their logos are all registered or unregistered trademarksof SUUNTO. All rights are reserved.CEThe CE mark is used to mark conformity with the European Union EMCdirective 89/336/EEC.The instruments must be serviced by an authorized dealer every second yearor after 200 dives (whichever comes first).EN 13319EN 13319 “Diving accessories - Depth gauges and combined depth and timemeasuring devices - Functional and safety requirements, test methods” is aEuropean diving depth gauge standard. The GEKKO is designed to complywith this standard.1
ISO 9001SUUNTO Oy’s Quality Assurance System is certified by Det Norske Veritas to beaccording to the ISO 9001 in all SUUNT O Oy’s operations (Quality Certifi cateNo. 96-HEL-AQ-220).SUUNTO Oy does not assume an y responsibility for losses or claims by thirdparties, which may arise through the use of this device.Due to continuous product development, the GEKKO is subject to change withoutnotice.2
WARNING!READ THIS MANUAL! Carefully read this instruction manual in its entiretypaying close attention to all warnings listed below, including section 1.1. “SafetyPrecautions”. Make sure that you fully understand the use, displays and limitations of the dive computer because any confusion resulting from neglecting tofollow this instruction manual or from improper use of this device may causea diver to commit errors that may lead to serious injury or death.WARNING!NOT FOR PROFESSIONAL USE! Suunto dive computers are intended forrecreational use only . The demands of commercial or professional di vingmay expose the diver to depths and exposures that tend to increase the risk ofdecompression illness (DCI). Therefore, Suunto strongly recommends that thedevice be not used for commercial or professional diving activity.WARNING!ONLY DIVERS TRAINED IN THE PROPER USE OF SCUB A DIVINGEQUIPMENT SHOULD USE A DIVE COMPUTER! No dive computer canreplace the need for proper dive training. Insufficient or improper training maycause diver to commit errors that may lead to serious injury or death.WARNING!THERE IS ALWAYS A RISK OF DECOMPRESSION ILLNESS (DCI) FORANY DIVE PR OFILE EVEN IF YOU FOLLOW THE DIVE PLAN PRESCRIBED BY DIVE TABLES OR A DIVE COMPUTER. NO PROCEDURE,DIVE COMPUTER OR DIVE TABLE WILL PREVENT THE POSSIBILITYOF DCI OR OXYGEN TOXICITY! An individual’s physiological make up canvary from day to day. The dive computer cannot account for these variations.You are strongly advised to remain well within the exposure limits providedby the instrument to minimize the risk of DCI.As an added measure of safety,you should consult a physician regarding your fitness before diving.3
WARNING!SUUNTO STRONGLY RECOMMENDS THAT SPORT DIVERS LIMITTHEIR MAXIMUM DEPTH TO 40 M [130 FT] OR TO THE DEPTH CALCULATED BY THE COMPUTER BASED ON THE SELECTED O2% ANDA MAXIMUM PO2 OF 1.4 BAR!WARNING!DIVES WITH REQUIRED DECOMPRESSION STOPS ARE NOT RECOMMENDED. YOU SHOULD ASCEND AND BEGIN DECOMPRESSIONIMMEDIATELY WHEN THE DIVE COMPUTER SHO WS YOU THAT ADECOMPRESSION STOP IS REQ UIRED! Note the blinking ASC TIMEsymbol and the upward pointing arrow.WARNING!USE BACK-UP INSTRUMENTS! Make sure that you use back-up instrumentation including a depth gauge, submersible pressure gauge, timer orwatch, and ha ve access to decompression tables whene ver diving with thedive computer.WARNING!PERFORM PRECHECKS! Always acti vate and check the de vice beforediving in order to ensure that all Liquid Crystal Display (LCD) segments arecompletely displayed, that the de vice has not run out of battery po wer, andthat the oxygen, altitude and personal adjustments are correct. Also, exit thePC Settings (PC SET) sub-mode before diving, as the computer does not automatically revert to Dive mode from the PC Settings mode.WARNING!YOU ARE ADVISED TO AVOID FLYING ANY TIME THE COMPUTERCOUNTS DOWN THE NO-FLYING TIME. ALWAYS ACTIVATE THECOMPUTER TO CHECK THE REMAINING NO-FLY TIME PRIOR TOFLYING! The computer goes into the stand-by display automatically 5 minutesafter the dive has ended. The stand-by display shuts off after two hours. Flyingor traveling to a higher altitude within no-fly time can greatly increase the riskof DCI. Review the recommendations given by Diver’s Alert Network (DAN)4
in chapter 3.5.3. “FlyingAfter Diving”. There can never be a flying after divingrule that is guaranteed to completely prevent decompression illness!WARNING!THE DIVE COMPUTER SHOULD NEVER BE TRADED OR SHAREDBETWEEN USERS WHILE IT IS IN OPERATION! Its information will notapply to someone who has not been wearing it throughout a dive or sequenceof repetitive dives. Its dive profiles must match that of the user. If it is left onthe surface during any dive, it will give inaccurate information for subsequentdives. No dive computer can take into account dives made without the computer.Thus any diving activity up to four days prior to initial use of the computermay cause misleading information and must be avoided.WARNING!THE DIVE COMPUTER WILL NOT ACCEPT FRACTIONAL PERCENTAGE VALUES OF O XYGEN CONCENTRATION. DO NO T ROUND UPFRACTIONAL PERCENTAGES! F or e xample, 31.8% oxygen should beentered as 31%. Rounding up will cause nitrogen percentages to be understatedand will af fect decompression calculations. If there is a desire to adjust thecomputer to provide more conservative calculations, use the personal adjustment feature to affect decompression calculations or reduce the PO2 setting toaffect oxygen exposure.WARNING!SET THE CORRECT ALTITUDE ADJUSTMENT MODE! When diving ataltitudes greater than 300 m [1000 ft] the Altitude Adjustment feature mustbe correctly selected in order for the computer to calculate the decompression status. The dive computer is not intended for use at altitudes greater than3000 m [10000 ft]. F ailure to select the correct Altitude Adjustment settingor diving above the maximum altitude limit will result in erroneous di ve andplanning data.5
WARNING!SET THE CORRECT PERSONAL ADJUSTMENT MODE! Whenever itis believed that factors that tend to increase the possibility of DCI e xist, it isrecommended that you use this option to make the calculations more conservative. Failure to select the correct Personal Adjustment setting will result inerroneous dive and planning data.NOTE!You can change from Air mode to Nitrox mode at an y time. It is ho wever notpossible to revert back to Air mode from Nitrox mode before the instrument hascounted down the no-flying time.When planning both air and nitrox dives during the same dive series, you shouldset the instrument in Nitrox mode and modify the gas mix accordingly.6
TABLE OF CONTENTSWARNINGS .31. INTRODUCTION .91.1. SAFETY PRECAUTIONS .91.1.1. Emergency Ascents .101.1.2. Dive Computer Limitations .101.1.3. Nitrox .102. GETTING ACQUAINTED .122.1. FUNCTIONS .122.2. PUSH BUTTONS .122.3. WATER CONTACTS .143. DIVING WITH THE GEKKO .153.1 BEFORE DIVING .153.1.1.Activation and Prechecks.153.1.2.Battery Indication .173.1.2.1.Battery Power Indicator .173.1.3. Dive Planning [PLAN] .183.1.4. User Definable Functions and Alarms .193.2. SAFETY STOPS .193.2.1.Recommended Safety Stop .193.2.2.Mandatory Safety Stop .193.3. DIVING WITH THE GEKKO .203.3.1.Basic Dive Data .203.3.2.Bookmark .213.3.3.Consumed Bottom Time (CBT) .223.3.4.Ascent Rate Indicator .223.3.5.Decompression dives .233.4. DIVING IN NITROX MODE .273.4.1. Before Diving .273.4.2. Oxygen Displays .283.4.3. Oxygen Limit Fraction (OLF).293.5. AT THE SURFACE .303.5.1. Surface Interval .303.5.2. Dive Numbering .313.5.3. Flying After Diving .313.6. AUDIBLE AND VISUAL ALARMS.337
3.7. HIGH ALTITUDE DIVES ANDPERSONAL ADJUSTMENT .343.7.1.Altitude Adjustment .343.7.2.Personal Adjustment .353.8. ERROR CONDITIONS .364. MENU BASED MODES.374.1. MEMORY FUNCTIONS [1 MEMORY] .384.1.1.Logbook and Dive Profile Memory [1 LOGBOOK] .394.1.2.Dive History Memory [2 HISTORY] .424.1.3.PC Settings Mode [3 PC SET] .424.2. SET MODES [4 SET] .434.2.1.Dive Computer Model Settings[1 SET MODEL ] .434.2.1.1.Nitrox Oxygen Settings.434.2.2.Alarm settings [2 SET ALMS] .434.2.2.1.Dive Time Alarm Setting .444.2.2.2.Maximum Depth Alarm Setting .444.2.3.Setting Time and date [3 SET TIME] .444.2.4.Personal adjustments [4 SET ADJ] .445. CARE AND MAINTENANCE .465.1. IMPORTANT INFORMATION.465.2. CARE OF YOUR DIVE COMPUTER .465.3. MAINTENANCE .475.4. WATER RESISTANCE INSPECTION.475.5. BATTERY REPLACEMENT .486. TECHNICAL DESCRIPTION .526.1. OPERATING PRINCIPLES .526.2. SUUNTO REDUCED GRADIENT BUBBLEMODEL (RGBM).546.3. OXYGEN EXPOSURE .556.4. TECHNICAL SPECIFICATION .557. WARRANTY .598. SUUNTOSPORTS.COM .608.1. SYSTEM REQUIREMENTS .608.2. SUUNTOSPORTS.COM SECTIONS .608.3. GETTING STARTED .6189. GLOSSARY .62
1. INTRODUCTIONCongratulations on your purchase of the SUUNT O GEKK O di ve computer.The GEKKO builds on the Suunto tradition of deli vering feature-rich easy-usedive computers. Push button controls access a wide selection of choices and thedisplay is optimized for the dive mode chosen. This dive computer is a compactand sophisticated multipurpose di ve instrument, designed to gi ve you years oftrouble-free service.Choice of Operating Modes and Set-up OptionsUser options for the GEKKO are selected using the push buttons.Pre Dive configuration and setup options include: Choice of operating mode - Air / NitroxChoice of unit - Metric / ImperialMaximum depth alarmDive time alarmClock, calendarMix Oxygen fraction % (Nitrox mode only)Maximum PO2 (Nitrox mode only)Altitude adjustmentPersonal adjustmentContinuous Decompression with Suunto RGBMThe Suunto Reduced Gradient Bubble Model (RGBM) utilized in the GEKK Opredicts both dissolved and free gas in blood and tissues of divers. It is a significant advance on the classic Haldane models, which do not predict free gas. Theadvantage of Suunto RGBM is additional safety through its ability to adapt to avariety of situations and dive profiles.In order to optimize how to respond to different added risk situations an additionalcategory of stop, referred to as a Mandatory Safety Stop, has been introduced.Alsoa countdown for the Recommended Safety Stop is included. The combination ofstop types will depend on the specific dive situation.To get the most from the safety benefi ts be sure to read the summary of the Reduced Gradient Bubble Model in chapter 6.2.1.1. SAFETY PRECAUTIONSDo not attempt to use the dive computer without reading this instruction manualin its entirety, including all the warnings. Make sure that you fully understand the9
use, displays and limitations of the instrument. If you have any questions aboutthe manual or the di ve computer, contact your SUUNT O dealer before di vingwith the dive computer.Always remember that YOU ARE RESPONSIBLE FOR YOUR OWN SAFETY!When used properly, the dive computer is an outstanding tool for assisting properly trained, certifi ed divers in planning and e xecuting sport dives. It is NOT ASUBSTITUTE FOR CERTIFIED SCUBA INSTRUCTION, including trainingin the principles of decompression.Diving with enriched air mixtures (nitrox) exposes the user to risks different fromthose associated with di ving with standard air . These risks are not ob vious andrequire training to understand and a void. Risks include possible serious injuryor death.Do not attempt to di ve with an y gas mix other than standard air without fi rstreceiving certified training in this specialty.1.1.1. Emergency AscentsIn the unlikely event that the dive computer malfunctions during a di ve, followthe emergency procedures pro vided by your certifi ed dive training agenc y or,alternatively,STEP 1:STEP 2:STEP 3:Assess the situation calmly and then move promptly to less than 18 m[60 ft].At 18 m [60 ft], slow down your ascent rate to 10 m/min [33 ft/min]and move to a depth between 3 and 6 meters [10 to 20 ft].Stay there as long as you assess your air supply will safely allow. Afterreaching the surface stay out of the water for at least 24 hours.1.1.2. Dive Computer LimitationsWhile the dive computer is based on current decompression research and technology, you must realize that the computer cannot monitor the actual physiologicalfunctions of an individual diver. All decompression schedules currently known tothe authors, including the U.S. Navy Tables, are based on theoretical mathematical models, which are intended to serv e as a guide to reduce the probability ofdecompression illness.1.1.3. NitroxDiving with nitrox provides the diver with an opportunity to increase bottom timesor reduce the risk of decompression illness by reducing the nitrogen content inthe breathing gas mix.10
However, when the gas mix is altered, the oxygen content of the mix is generallyincreased. This increase exposes the diver to an oxygen toxicity risk not usuallyconsidered in recreational diving. In order to manage this risk, the dive computertracks the time and intensity of the oxygen exposure and provides the diver withinformation to adjust the dive plan in order to maintain oxygen exposure withinreasonably safe limits.In addition to the physiological effects of enriched air on the body there are operational considerations to be addressed when handling altered breathing mixes.Elevated concentrations of oxygen present a fire or explosion hazard. Consult themanufacturer of your equipment in regards to its compatibility with nitrox.11
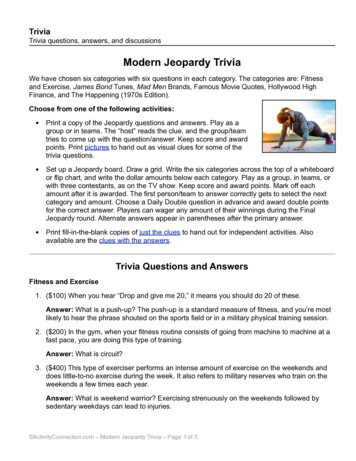
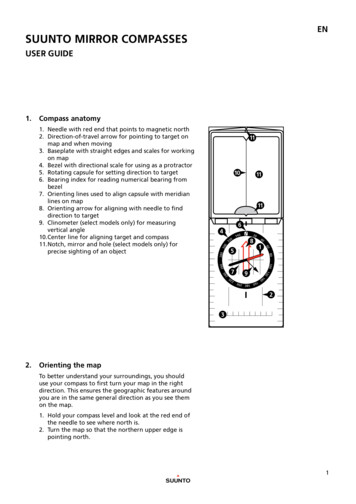
2. GETTING ACQUAINTED2.1. FUNCTIONSThe Suunto GEKKO can be set to function as a re gular air dive computer or asa nitrox dive computer.The GEKKO features tw o dive computer models (AIR, NITR OX), three mainoperating modes (TIME/ST AND-BY, SURFACE, DIVING), tw o menu basedmain modes (MEMORY, SET) and seven menu based submodes (review separateQuick Reference Guide).You can scroll through the modes using the push ubttons.The mode indicator at the left side and the mode text at the bottom of the displayindicate the selected mode.The timekeeping display is the default display of the instrument (Fig. 2.1.). If abutton is not pressed within 5 minutes, the dive computer beeps and returns tothe timekeeping display automatically (except in Diving mode). The timekeeping display shuts off after two hours, but pressing the PLAN or TIME buttonactivates it.Making the GEKKO PersonalFor best use of the GEKKO take some time and makeit YOUR computer.Set the correct time and date. Read this manual. Setdive alarms and make all the other settings listed inthe introduction in this manual. Install the GEKKOin your console or fit it on to your wrist.Fig. 2.1. Timekeepingdisplay. Pressing PLANor TIME button activatesdisplay.The SMART buttonThe PLAN, TIME andSCROLL buttonsFig. 2.2. Push buttons of thedive computer.12All this so you know your computer and have it setup as you want it before getting into the water.2.2. PUSH BUTTONSThe GEKKO has easy-to-use push b uttons and anadvisory display, which guides the user. The SMART(MODE) button is the k ey to the system. The twoscroll buttons, PLAN and TIME, are used for scrolling up and down the menus and to show the alternative displays. The dive computer is controlled withthese three push buttons as follows (see Fig. 2.2.).
Press the SMART (MODE) button To activate the dive computer.To change from the Surface Mode to themenu based modes.To select, confirm or quit a submode (shortpress).To immediately exit any submode to theSurface Mode (long press).Press the arrow up scroll (PLAN) button To activate the timekeeping display, if thedisplay is blank.To activate the Dive Planning in the SurfaceMode.To make a special bookmark in the profilememory during a dive.To scroll up the options (V, increase).Press the arrow down scroll (ALTER) button To activate the timekeeping display, if thedisplay is blank.To activate the alternative display(s).To scroll down the options (W, decrease).The dive computer is controlled with the SMART(MODE/On/Select/OK/Quit) and the PLAN V andTIME W push b uttons and with the w ater contactsas follows:ActivationDivePlanningMenu Modesbpress the SMART (On) buttonor immerse the instrumentin water for five (5) seconds.in the Surf ace Mode, press thePLAN (s) button.press the SMART (MODE)utton.13
SEOPThe water contacts control the automatic activationof the Dive Mode.ENC2.3. WATER CONTACTSLOBAFig 2.3. Depth sensor (A),water/data transfer contacts(B).Fig. 2.4. Active watercontacts are indicated by thetext AC.14The water and data transfer contacts are located onbottom of the case (Fig 2.3). When submerged thewater contacts are connected to the push b uttons(which are the other pole of the water contact) bythe conductivity of the water. The “AC” text (ActiveContacts, Fig. 2.4.) will appear on display . The ACtext will be sho wn until the w ater contact deactivates or the di ve computer enters the Di ve Modeautomatically.
3. DIVING WITH THE GEKKOThis section contains instructions on how to operatethe dive computer and interpret its displays.You willfind that this dive computer is easy to use and read.Each display sho ws only the data rele vant to thatspecific diving situation.3.1 BEFORE DIVING3.1.1. Activation and PrechecksDIVEm ftCEILINGSLOAVGPO2 MAX WNO O2%SURFSTOP ASC TIMEQUITOKTIMEOLFCBT F CSELECTNO DEC TIMEOPTIONSDIVE TIMEFig. 3.1. Startup I. All segments shown.The dive computer will activate if submerged deeperthan 0.5 m (1.5 ft). However, it is necessary to turnon the Dive Mode before diving to check the altitudeand personal adjustment settings, battery condition,oxygen settings etc. Press the SMART (Mode) button to activate the instrument.After acti vation all display elements will turn onshowing m ostly fi gure 8 ’s and graphi cal elements(Fig. 3 .1.). A f ew s econds l ater t he b attery p owerindicator is shown and the buzzer is activated (Fig.3.2. display a, b, c or d depending on the batteryvoltage). If set to Air mode the screen will enter theSurface mode (Fig. 3.3.) and if set to Nitrox mode theessential oxygen parameters are shown with the textNITROX (Fig. 3.20.) before the Surface mode.OKQUITFig. 3.2. Startup II. Batterypower indicator.15
At this time, perform your prechecks making surethat:m CDIVE TIMETIMEFig 3.3. Startup III. Surfacemode. Depth and dive timeare zero, current temperature, 20 C. Pressing TIMEbutton activates alternativedisplay of current time. And if set to Nitrox mode (refer to chapter 3.4 Divingin Nitrox mode), make sure that:m CDIVE TIME Fig. 3.4. Low BatteryWarning. Battery symbolindicates that the battery islow and battery replacementis recommended.DIVEMAXQUITNO DEC TIMEFig. 3.5. Dive Planning.Planning mode is indicatedby PLAN text. No-decompression time limit at 30.0m [100 ft] is 14 minutes inA0/P1 mode.16the instrument operates in the correct modeand provides a complete display (Air/Nitrox modes)the low battery indicator is not onthe altitude and personal adjustment settings are correctthe instrument displays correct units ofmeasurement (Metric/Imperial)the instrument displays correct temperatureand depth (0.0 m [0 ft])the buzzer beepsthe oxygen percentage is adjusted according to the measured Nitrox blend in yourcylinderthe oxygen partial pressure limit is set correctly.The dive computer is now ready for diving.
3.1.2. BATTERY INDICATION3.1.2.1. Battery Power IndicatorThis dive computer has a unique graphic Battery Power Indicator designed to giveyou an advance notice of impending need to change the battery.The Battery Power Indicator can always be seen when the Dive Mode is activated.The following Table and Figure show the various warning levels.TABLE 3.1. BATTERY POWER INDICATORDisplayOperationFigure 3.2BAT 4 segments OKNormal, full battery.aBAT 3 segmentsNormal, battery power is gettinglow or the temperature is low.bBattery replacement is recommendedif you are going to colder conditionsor if you are planning to make a dive trip.LOWBAT 2 segments low battery symbolBattery power is low and the batteryreplacement is recommended.The battery symbol is displayed.cLOWBAT 1 segment QUIT low battery symbolChange the battery!dReturns to the Time display.Activation and all functions are disabled.Temperature or an internal oxidation of the battery affects the battery voltage. If theinstrument is stored for a long period, the low battery warning may be displayedeven though the battery has enough capacity. The low battery warning may alsobe displayed at low temperatures, even though the battery has enough capacity inwarmer conditions. In these cases repeat the battery check procedure.After battery check the Low Battery Warning is indicated by the battery symbol(Fig. 3.4.).If the battery symbol is displayed in the Surf ace mode or if the display is f adedor weak, the battery may be too lo w to operate the di ve computer and batteryreplacement is recommended.17
3.1.3. Dive Planning [PLAN]To enter Planning Mode, press the PLAN button at any time during Surface Mode.After showing the text “PLAN” (Fig. 3.5.), the display will show the no-decompression limit for the depth of 9 m [30 ft]. By pressing the do wn arrow (W) (TIME)button, the dive computer will calculate and show the next deeper no-decompression limits in 3 m [10 ft] increments ending at 45 m [150 ft]. By pressing the uparrow (V) (PLAN) button, the next shallower depth will be shown again.The Planning Mode is canceled by pressing the SMART (QUIT) button.NOTE! The Planning mode is disabled in Error mode (see section 3.8. “ErrorConditions”).Higher Altitude and conservative Personal Adjustment Modes will shorten theno-decompression time limits. These limits at dif ferent Altitude and PersonalAdjustment Mode selections are shown in Table 6.1 and 6.2 in section 6.1. “Operating Principles”.The Planning mode also accounts for the following information from pre viousdives: any calculated residual nitrogenall dive history for the past four daysoxygen toxicity (Nitrox mode)The no-decompression times given for different depths will therefore be shorterthan before your first “fresh” dive.DIVE NUMBERING SHOWN DURING DIVE PLANNINGDives belong to the same repetitive dive series if the instrument was still countingdown the no-fly time at the beginning of the dive.The surface interval must be at least 5 minutes for a dive to be considered a repetitive dive. Otherwise, it is considered a continuation of the same di ve. The divenumber will not change and the dive time will continue where it left off (see alsosection 3.5.2. “Dive Numbering”).18
3.1.4. User Definable Functions and AlarmsThe GEKKO has several user definable functions and depth and time relatedalarms that you can set according to your personal preference.The dive computer model (Air/Nitrox) can be set in the MODE- SET- MODELsubmode. The dive alarms can be set under MODE- SET - SET ALARMS, thetime and date settings in MODE-SET-SET TIME, and the units (metric/imperial) as well as personal adjustments in the MODE- SET - SET ADJUSTMETSsubmode. Setting of the user definable functions and alarms are explained in detailin section 4.2. “Set Modes”.3.2. SAFETY STOPSSafety stops are widely considered “good diving practice” and are an integral part ofmost dive tables. Reasons to perform a safety stop include a reduction in sub clinicalDCI, microbubble reduction, ascent control, and orientation before surfacing.The GEKKO displays two different types of safety stops: Recommended SafetyStop and Mandatory Safety Stop.The Safety Stops are indicated by:-STOP label, when in the depth range 3 m - 6 m [10 ft - 20 ft] Recommended Safety Stop CountdownSTOP CEILING label, when in the depth range 3 m - 6 m [10 ft - 20 ft] Mandatory Safety Stop Time displaySTOP label, when deeper than 6 m Mandatory Safety Stop scheduled3.2.1. Recommended Safety StopWith every dive over 10 meters the instrument has a three minute countdown forthe recommended safety stop, to be taken in the 3 - 6 meter [10 ft - 20 ft] range.This is shown with the ST OP sign and a three-minute countdo wn in the centerwindow instead of the no-decompression time (Fig. 3.9.).The Recommended Safety Stop, as the name implies, is recommended. If it isignored, th
replace the need for proper dive training. Insuffi cient or improper training may cause diver to commit errors that may lead to serious injury or death. WARNING! THERE IS ALWAYS A RISK OF DECOMPRESSION ILLNESS (DCI) FOR ANY DIVE PROFILE EVEN IF YOU FOLLOW THE DIVE PLAN PRE-SCRIBED BY DIVE TABLES OR A DIVE COMPUTER. NO PROCEDURE,