Transcription
Sartorius analytic.A 120 S, A 200 S, A 210 PElectronic Analytical BalanceInstallation and Operating Instructions
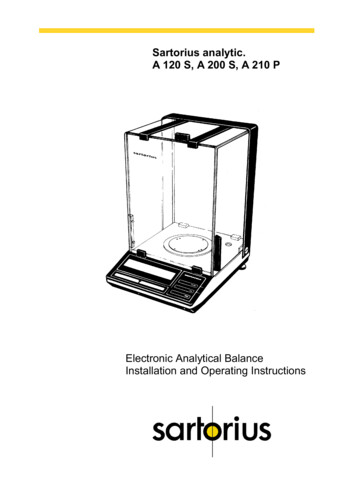
1 Weighing pan2 Protective ring3 Shield plate4 Power receptacle5 Level indicator6 Leveling foot7 ON/OFF key8 CAL key9 PRINT key (functions only if thebalance has a built-in interface)11 Tare control13 Manufacturer’s label210 Menu access switch12 Weight display
Sartorius analytic.A 120 S, A 200 S, A 210 P.With this Sartorius Top loading Balance, you have acquired a sophisticated, top-of-the-line electronic weighing Instrument that will easeyour daily work load.Please read these installation and operating instructions carefully before operating your new precision balance.Pursuant to the German Directive For the Implementation ofRegulations for Prevention of Accidents "Elektrische Anlagenund Betriebsmittel (VBG 4)" [Electrical Installations and Equipment] of April, 1986, it is hereby certified that the equipmentdelivered, "Electronic Analytical Balance, model A 120 S, A 200S or A 210 P," is manufactured and tested in compliance withthe following DIN/VDE regulations and with Article 10 of theLow Voltage Directive 72/23/EEC issued on February 19,1973,by the European Community:DIN IEC 348/VDE 041 1Safety requirements for electronic measuring apparatusDIN IEC 380/VDE 0806Safety of electrically energized Office machinesDIN IEC 601/VDE 0750Safety of medical electrical equipmentWhen you use electrical equipment in installations and underambient conditions requiring higher safety Standards, you mustcomply with the provisions as specified in the applicable regulations for installation in your countryContentsPageEquipment Supplied4Installation Instructions5Startup6Operation7Calibration9Balance Operating Program11Accessories (Options)14Specifications163
Equipment SuppliedDo not miss out on the benefits of our full warranty.Please complete the warranty registration card, indicating thedata of installation, and return the card to your Sartorius dealer.The equipment supplied includes the components shown on theleft, plus a dust cover.Save all parts of the packaging and the box because you mayneed to ship your scale. Before you pack your scale to ship it,unplug all connected cables to prevent damage.4
Installation InstructionsChoose a suitable place to set up your balancelt should not be exposed to the following:————heat radiationaggressive/corrosive substancesvibrationsdraftsYour Sartorius Balance will provide accurate readouts evenwhen it is exposed to unfavorable conditions. You can adapt itto your requirements simply by changing the menu code settings in the balance operating program. For this purpose, pleaseread pages 11 through 13.After connecting the balance to line power using the ACadapter, make sure to allow for initial warmup of at least 30minutes.Important Note:Unplug the AC adapter before you connect or disconnect peripherals.5
StartupInstall the components (3-1) in the weighing chamber one at atime in the order indicated.Your balance is powered by an AC adapter. Please make surethat the voltage rating printed on this unit is identical to your local line voltage rating.Plug the AC adapter cord into the power receptacle of the balance. Secure the connection by tightening the knurled collar.Now plug the AC adapter into a wall outlet.At the point of use, level the balance using the leveling feet (6)so that the air bubble is centered within the circle of the level indicator (5).6
OperationThe weight display shows the following special Statusmessages for your information:BUSYThe processor is still busy processing a function and will not accept any other commands to perform functions at this time.STANDBYThe display has been turned off with the ON/OFF key (7) andthe balance is now in the ready-to-operate mode so that it doesnot require warmup.POWER OFFThe balance was disconnected from line power (power failure oroutage, reconnection to line power after balance was unplugged).CALThe calibration function has been activated.In addition to grams, this balance gives you a variety ofother menu-definable international weight unit options.Select the weight unit you need from the table of menu optionsfor the balance operating program, and set the appropriate codeas described in the section "Balance Operating Program."7
Press the ON/OFF key (7) to turn the display on or off.You can also turn it on with the tare control (11).After the balance has been plugged into the AC adapter, theweight display will go out whenever you turn off the power withthe ON/OFF key.All other cirouits will remain energized (indicated by STANDBY).This means the balance is immediately ready to operate withoutrequiring warmup the next time you switch it on.After the power is turned on, a test of all essential electronicfunctions is run automatically.The self-test ends with the readout 0.0000 g(if the factory codesetting 51 1 is used).Now place your sample or object on the pan (1) to determinethe weight. Read off the weight indicated in the weight display(12) as soon as the weight unit (in this case "g") appears as thestability symbol.lf you wish to use a Container or if the weight display does notindicate 0.0000 g (or the equivalent with the weight unit of yourchoice), press the tare control to zero the display.8
CalibrationInternal Calibration:Unload the balance and tare.As soon as the display indicates 0.0000 g, press the CAL key(8). "C" will now be displayed.A bullt-in calibration weight is internally applied by Servomotorand automatically removed at the end ofthe calibration process.lf "CE" is displayed instead, zero the display by pressing thetare control and press the CAL key again.During calibration, the microprocessor uses the factor alreadystored to calculate the exact value of this calibration weight.How to Obtain a Calibration Weight Readout(models starting with with serial no. 37090001)You can obtain a readout of the calibration weight.To do so, select menu code 451 in the balance operating program.Press the CAL key to have the internal calibration weight automatically applied so you can obtain a readout in the display.To use the internal calibration function with this menu code setting, make sure to press the CAL key a second time to have thecalibration weight automatically removed before infernal calibration.Now you can press the CAL key once again for approx. 3 seconds to activate the internal calibration function.9
External Calibration:This is only possible with an accurate calibration weight(A 120 S -100 g; A 200 S and A210 P-150 g).Clear the weighing pan and press the tare control (11) for atleast three seconds until the calibration weight readout appearsin the display.Center the calibration weight on the pan.Now the weight unit symbol is displayed.An acoustic signal indicates the end of the calibration procedure.lf the display continues to indicate "CC" (internal calibration) orif the stability symbol "g" does not appear (external calibration),the balance cannot be calibrated on account of the momentaryStatus. Turn it off and on again with the ON/OFF key. The calibration procedure you started will now be cancelled.Possible causes for a readout of "CC":-The balance is still in the warmup phase.The weighing System is affected by a draft or Vibration.You can block access to the infernal and external calibrationfunctions - to find these menu codes, refer to the "Balance Operating Program." These functions are accessible whenever thebalance operating program is unlocked using the menu accessswitch (10).10
Balance Operating ProgramThe balance operating program lets you adapt your balance tovarious ambient conditions and to different weighing requirements, and select various weight units commonly used in yourcountry.At the factory, we have set the codes for a Standard program,which is protected by a locking function to prevent accidentalchanges.The "menu code" contains the information of the operating program, lt consists of three digits, known in "computerize" as thepage (1st digit), the line (2nd digit) and the word (3rd digit).How to access the menu of the balance operating program:With the display turned off (STANDBY state), hold down thetare control (11) and briefly press the ON/OFF key (7). Uponcompletion of the automatic self-test, release the tare control assoon as "CH5" is displayed. The Status of the balance operating program will be indicated in the weight display: "L" Standsfor the list mode. In this mode, you can check the code settings,but you cannot program new codes.lf you wish to change a program menu code, you must firstunlock the menu access switch to access the menu.To do so, remove the protective cap located on the front right ofyour balance, and slide the menu access switch (10) in the direction of the arrow.The display will now indicate "C," which Stands for the changemode, meaning you can now change the menu code settings.11
After you have accessed the menu of the operating program,the display will show a continuous sequence of numbers from 05 for the "page" or first digit of the code, in addition to the Statuscode letter "L" or "C."When the first digit of the code you wish to check or change appears, press the tare control (11). The "page" code number (1stdigit) now stops in the display, and a series of numbers for the2nd digit or "line" will begin to cycle. Press the tare control againto stop the code number of your choice in the display. Next, thenumbers for the "word" (last digit) will cycle in the display. Repeat the procedure to enter the last digit of the code.The "o" symbol that appears indicates the actual setting.To change any menu code settings ("C" mode), press the tarecontrol as soon as the appropriate numeric code is displayed.Brief display of BUSY and the "o" symbol confirms your selection, followed by a return to "zero" for the 2nd digit or "line."How to return to the weighing mode:Press the tare control each time a "0" appears in the numericalsequence (word, line, page). lf you have changed a menu code,it will be stored as soon as the display returns to the weighingmode. Lock the balance operating program using the menu access switch ("L" readout) and replace the protective cap.Auto ZeroThis balance has an automatic zero trackingfunction, known as "Auto Zero" (can be turned off by menucode).Any change off zero 2 digits per second will be set to zeroautomatically.12
List of the Programmable Menu Code SettingsC 1 3 1Pagest1 DigitAmbient ConditionsCodeCCCC1111LineWordndrd2 Digit 3 Digit11111234Very stableStableUnstableVery unstable!Special InformationCodeProgram LockOFFC 4 1 1ONC 4 1 lity Range0,25 digit0,5 digits1234Display FormatLast decimal ONLast decimal OFFLast decimal at stabilityAll decimals at stabilityCodeCCCC11113333CodeC 1 4 1C 1 4 2CodeC 1 5 1C 1 5 2CodeC 1 6 1C 1 6 2CodeC 1 7 1C 1 7 2Tare ParameterWithout stabilityAt stabilityC 4 3 1C 4 3 2Code!!!!External CalibrationAccessibleAccess blocked!ccccccccCCCCCCC555555555555555Acoustic SignalONOFF!Calibration weightReadoutAccessibleAccess blocked!1CodeAuto ZeroONOFFInternal CalibrationAccessibleAccess blockedC 4 5 1C 4 5 2!111111122222222123456712345678Weight Units )GramsKilogramsCaratsPoundsOuncesTroy ouncesParts/poundHong Kong taelsSingapore taelsTaiwan taelsGrainsPennyweightsMommesMilligramsAustrian KaratsgkgctlbozoztotltltlgrdwtoooC 5 2 0C 5 0Call Program LineCall program pageC 0End of Programming!!Additional Parameters for the data Output format at the interface port and for calculation programs are available on request.-Please refer to the “Accessories."1)You can choose any weight unit as long as it can be displayed in the particular weighing range youselected (for example do not set the code for "kg" when you are using a 0.1 mg balance).13
Accessories (Options)14Data printer withdate/time and statistics functionsYDP 02-*DV1Print speed approx. lines/sec.1,5Printer housing (W x D x H)in mmin inches150 x 138 x 435.5 x 5.4 x 1.7InterfaceYDO 01 A“LAB-PLUS“Package, integratable(incl. interface)— Specific gravity determination— Weighing in components acc. to %, ppm ormol— Weight of residue in%/change in %— Statistics— Net total/formulation & compounding— Filling toward "0"— 0ver/undercheckweighing/ sorting &classification— Automatic checkweigher— Calculation of the mean value— Parts counting— Mass unit conversion— Calculations by a factor— Accumulator memory— ID no. memory— Data communication with ComputersYDI 01A ***D
Remote display(can be plugged into the interface portof the balance)— LCD, reflective— LCD (for overhead projectorstransmissive7371 01A7371 02ACarrying caseYDB 01 AAntitheft locking device6087Density (specific gravity) determination kit 6080Vibrating spatula6025Balance tableYWT 01Special weighing pan devicefor magnetic/ferrous samplesSpecial pan (155 mm Ø) for weighingelectro statically charged samplesYWP 01 AYWP 01A-000115
SpecificationModelCapacityReadabilityTare range (by subtraction)Standard deviationMax. linearityStabilization time (typical)Display updateAdaption to ambient conditionsand application requirementsStability rangeAmbient temperature rangeSensitivity drift within 283 303 KDeviation of the readout when thebalance is tilted 1:1000Pan sizeClearance above panBalance chamber (W x D x H)Balance housing (W x D x H)Net weightPower requirements(voltage frequency)Power consumptionInterface (optional16gggggssA 120 SA 200 SA 210 0.0005212 0.0001 0.0001 0.0002 0.000230.1 – 0.8 (selectable) 0.0001/0.0002/0.0005 0.0001/0.0002/0.001By selection of one of 4 optimized filter levelsdK/KgmmmmmmmmkgVA0.25 . 64 (selectable)oooo283 – 313 ( 10 C . 40 C) (50 F . 104 F)-6 2 10 0.0001 0,0001 0,0001/0.0002/0.0005Ø 90 (3.5 in.)257 (10.1 in.)200 x 184 x 265 (7.9 x 7.2 x 10.4 in.)230 x 291 x 343 (9.1 x 11.5 x 13.5 in.)
Your Sartorius Balance will provide accurate readouts even when it is exposed to unfavorable conditions. You can adapt it to your requirements simply by changing the menu code set-tings in the balance operating program. For this purpose, please read pages 11 through 13. After connecting the balance to line power using the AC adapter, make sure to allow for initial warmup of at least 30