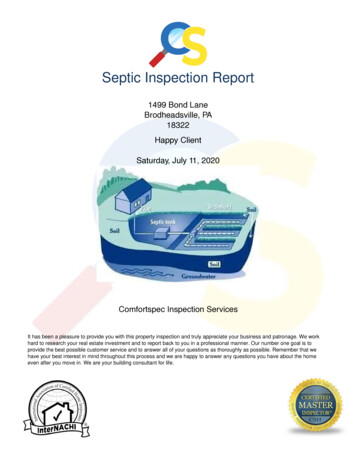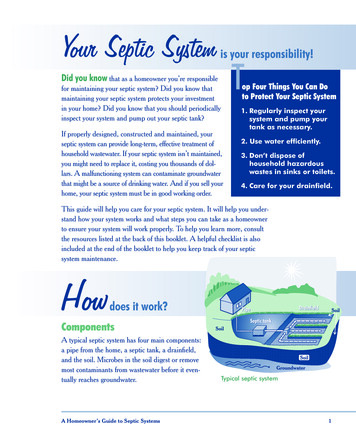
Transcription
SANDERS COUNTYENVIRONMENTAL HEALTHPO BOX 519406-827-69611111 MAIN STREET, THOMPSON FALLS, MT 59873sanitarian@sanderscounty.mt.govPROPERTY OWNERSEPTIC INSTALLATION BOOKLETThis booklet discusses some of the things to consider before andduring installation of your septic system.You will need a copy of the Sanders County Regulations forWastewater Treatment Systems and DEQ Circular 4, both availableon line. This booklet is to be used as a supplement to those regulations, as it is only a guide with some hints to consider. The mostimportant point is that you install your system so it functions properly and meets or exceeds all of our Government’s regulations. Aproperly installed septic system will help to protect groundwater andpublic health and give you years of trouble-free service.
Getting Started Apply for a Septic Permit from Sanders County EnvironmentalHealth office. An approved permit will come with a “stampedAPPROVED” site plan. The site plan and permit will show you thetype, size, location and orientation of the drainfield or absorptionarea. You must consider the placement of the septic systembefore you build your house. Before you start to build your home, find and stake the approvedlocation for the drain field areas and the well. Get the utilities locatedDEFINITIONSAS-BUILT A drawing which accurately locates the septic tank and drain field onyour property.AUTO LEVELER/SPEED LEVELER- Devise used to control the flow of effluent fromthe distribution box.EFFLUENT– Partially treated sewage from a septic tank or other treatment facility.GRAVELLESS ABSORPTION CHAMBERS- High density polyolefin or other plastic thatis used in lieu of pipe & washed rock in absorption trenches.INFLUENT– Wastewater flow stream prior to any treatment.LATERALS– Legs of an absorption area or the individual lines of perforated pipinglines in an absorption bed. Maximum length of a lateral is 100ft.MANIFOLD-Solid (non-perforated) main wastewater line that distributes effluent toindividual distribution pipes.PROPERTY OWNER– Legal title-holder of a parcel of land.PVC– Poly Vinyl Chloride pipe, comes in varies diameters & densities.REPAIR- Anything done to an existing system, either major or minor in construction.For Safety Use the correct Equipment:: Items you might need Levels, tape measures, marking paint, shovels rakes, gloves,rags, eye protection Sealant for the tank lids and risers Solvent and Colored Glue/Weld Accurate laser level, tripod, rod, and laser receiverSEPTIC PERMIT– A legal document allowing construction, repair, replacement, oralteration of an approved septic permit.SEPTIC TANK- Watertight storage tank receiving raw sewage, providing primarytreatment by settling, anaerobic digestion, and scum removal.SEWER LINE- The PVC pipe connecting the house to the septic.STANDARD TRENCH– An excavation that is 12-36 inches in depth & 2 feet wide forsystems utilizing gravity or dosed, 3 feet in width for systems utilizing pressuredistribution., using PVC pipe & drain rock as detailed in the regulations.SYNTHETIC DRAINAGE FABRIC- non-woven drainage fabric with a minimum weightper square yard of 4oz, a water flow rate of 100-200 gal per minute per squarefoot, and an apparent opening size equivalent to a #50—#110 sieve.UPGRADE– Addition of a component and/or treatment technology to an existingsystem beyond what was previously permitted.WASHED ROCK (drain rock)- washed stone of 3/4—2 1/2 in for absorption trenches. Recommend 1 1/2—2 1/2 in for gravity systems.WASTEWATER– Liquid waste discharged from any building; human excreta; or animal & vegetable matter in suspension or solution and included gray water.215
You should now have everything connectedglued/welded and ready for inspection.1Call the Sanders County Environmental Health Office 72 hours inadvance to schedule an inspection. Have your copy of the permit ready.2Make a drawing of your system, this will be the As-Built. You willhave received an As-Built/Statement of Accuracy sheet with anas-built drawing example. Your drawing should show all of thesame type measurements.3A Sanders County septic inspector will meet you on site for yourinspection. They will let you know any discrepancies that willhave to be fixed.Preparation Points to Remember Review the permit and approved site plan. Important details are contained within the Sanders County Septic Permit and on the Site Plan.The site plan will show you the correct location and orientation of theabsorption area. Be sure to call our office with any questions 8276961. It is very important to install the drainfield as shown on the approvedsite plan. Do not adjust the orientation, location or depth of the drain field areaas stated on the permit/site plan. Many times if the orientation doesnot agree with the slope it is so that the drainfield areas can dispersethe effluent in a manner that will least degrade State waters. Obtain the specifications for the septic tank and materials you will beworking with. If you are using a distribution box (d-box) get the dimensions for your calculations.4When you get approval you will be able to backfill.5When backfilling, mound all the backfill material over thetrenches as settling will occur. Figure the lengths, widths, depths and slopes for all parts of your system. Use the specification sheets from your supplier.6Protect your drainfield area and the replacement area. Someday you will have to replace the system, so do not plant anythingexcept grass in these areas, and do not build in these areas. Maximum length of a lateral is 100ft, in a gravity system. Lateral’s must be of equal length If the system exceeds 500 lineal feet you will have to hire a licensedinstaller. It is acceptable to go to 1/8” per foot out of the septic tank, if 1/4” perfoot will make your system too deep. It is preferable to design with a1/4” per foot drop if possible. You need 6” of “1 - 2 1/2” washed rock under your perforated pipe inthe drain field lateral. If you have a maximum trench depth of 36” you will need to figure yourtank placement based on the effluent pipe reaching the manifold at30” deep. Any doubts of how to properly install your system, we suggest you hirea licensed installer. Remember, do not drive or run livestock over these areas. Most types of trees should not be planted near the drainfield asroots could break the pipes. Your system requires care & maintenance. You will receive ahelpful Homeowner information sheet with your septic permit.143
Getting The Site Ready Verify your calculations with laser level and tape. Locate utilities. Check for slope variations and any variations noted on site plan. Should you come into a situation where you will be unable toinstall a standard gravity feed system you will have to hire a licensed installer. ( If a pump becomes necessary) Your excavation trench bottom can not exceed that specified onthe permit . Digging too deep will not be approved. Transfer the approved site plan directly to the ground. This willbe easy with a scaled plan. Use laser level, stakes, paint, tape,etc. to lay out your system. The more guide lines you have on the ground the easier it will beto follow the correct line.Figure all depths before you start to dig.FINISHING UP:1Install the determined length of Sch 40 or Sch 80 from thehouse to the tank. Place clean outs as designed for. Remembera 1/4 per ft slope. All PVC has to be color glued/welded Make clean straight cuts & remove all burrs & mold flash Make sure you have 4” separation between the Sch 40 andseptic tank baffles. Many times when the plumber joins thesewer line to the septic tank the Sch 40 will get pushed upagainst the baffle. Recheck that there is a 4” separationbetween the baffle and Sch 40.2Install the effluent filter, handle extending to ground surface3Place the risers over the effluent filter access hole of the septictank and seal them.4Install a minimum of 10 ft solid Sch 40 starting at the tank tothe manifold or d-box.If the well has not yet been installed, place a stake in the approvedlocation. You can measure from this stake and the well drillers willknow where to correctly place the well. The well must be at least100’ from the drainfield. If the well is already installed and lessthan 100’ from approved location— STOP AND CALL US!413
Distribution Boxes:A. Must be bedded to prevent settling. 2 or 3 inches of a beddingmaterial should work.B. Must have a minimum of 5 ft of schedule 35 PVC SOLID pipe forconnection to each lateral.C. Must have absorption trenches of equal length.D. Must have same concrete requirements as the septic tank.E. May need speed or auto levelers. These are inexpensive roundpieces of plastic with an offset hole that you place in the lateraland adjust to make sure that each lateral gets an even amountof effluent.F. Get a 5-gal bucket of water to water test to level the box andyour speed or auto levelers.Materials Needed:Gravelless Chambers Properly sized Septic Tank Risers Effluent Filter Inlet Baffle Proper diameter PVC pipe for the handle extension of the effluent filter screen. The handle of the screen has to extend to theground surface. This will ease maintenance of the filter as itshould be cleaned once a year. A minimum of 2 ten-foot sections of 4 inch SCH 40 or SCH 80for the lines IN and OUT of the tank. This is REQUIRED betweenthe house and the septic tank. Use Solid PVC pipe from— house to septic tank — tank to manifold or D box — manifold to gravelless chambers or, —- D box togravelless chambers. Any additional protection for insulation and driveway crossings. All elbows, caps, T’s, Y’s. ( You will know all of these when youput the site plan directly on the ground) All PVC must be joined with a glue/weld with color. This will provide a visible indication and eliminate wasteful reapplication. Sand— If septic tank location has large rock used to bed thetank. Weight must be evenly distributed so the tank does notcrack.G. Must be marked w/rebar to use as a locate for d-box.H. Must use a flow control device-a splash plate 90 degree elbow inthe d-box on the line from the tank to the d-box. This will stop theeffluent from feeding one lateral more than the others, especially if you have lateral feed directly across the box from the inlet.* If your baffling device will be completely submerged under thelevel determined with you water test, you might want to cut the elbow at such and angle that it breaks the surface tension. This willhelp prevent freezing. You can also use rigid foam insulation overthe lid.125
Materials Needed:Pipe & Gravel Properly sized Septic Tank Risers Effluent Filter Inlet Baffle Proper diameter PVC pipe for the handle extension of the effluent filter screen. The handle of the screen has to extend to theground surface. This will ease maintenance of the filter as itshould be cleaned once a year.13 Place chambers in trenches and connect according to manufacture's specifications. Filter fabric, untreated building paper (not Tar paper), or straw toplace over the absorption laterals.15 Punch out hole for PVC in end caps at beginning of trenches. A minimum of 2 ten-foot sections of 4 inch SCH 40 or SCH 80for the lines IN and OUT of the tank. This is REQUIRED betweenthe house and the septic tank. Any additional protection for insulation and driveway crossings.DO NOT BACKFILL: The laterals need to be inspected. All elbows, caps, T’s, Y’s. (You will know all of these when youput the site plan directly on the ground)Move on to the next lateral, complete as the first one. All PVC must be joined with a glue/weld with color. This will provide a visible indication and eliminate wasteful reapplication. Sand— If septic tank location has large rock used to bed thetank. Weight must be evenly distributed so the tank does notcrack.6Gravelless Chambers Installation14 Place end caps on at the end of each trench.16 Connect chambers to D-box or manifold, allowing extra PVC toslide into chambers in case minor shifting occurs during backfilling.17 Use a shovel to dump some dirt around outside edges of chambers to secure before backfilling with large rocks.11
11 Excavate a dranifield lateral. Use your laser transmitterthroughout the process. 1 For ease of moving around your siteyou may have to excavate and install one trench at a time.2 Make sure that you lateral trench excavation is level and thecorrect length. Do not exceed the maximum trench depth specified on the permit. 3 Laterals must be at least 7 ft apart pipe topipe. If you have plenty of room, 10 ft on center is easier towork around. 4 Place the excavated soil to the side of thetrench. You will have piles in between your trenches. * It is veryimportant to excavate your lateral trench level.12 Rake and scarify any smeared soil surfaces in the trenches.Pipe and Gravel InstallationWashed Rock - order the correct amount of washed rock at 3/4to 2 1/2 inches for the absorption trenches. Recommend 1 1/2—21/2 for gravity systems.Rock Conversions - This may help you figure how much you willneed to order. 3 feet 1 yard 1 square yard 9 square feet 1 cubic yard 27 cubic feet ( this will cover 27 square when thetrench depth is 12 inches)Square Or Rectangle: Length (in feet) x width (in feet) x depth (in inches) / 324 cubicyards Length (in feet) x width (in feet) x depth (in feet) / 27 cubicyards Example: 3 absorption laterals at 100 ft each, a trench width of24 in and a depth of 12 in —— Figure the cubic yards of 3/4 to 21/2 in washed rock by: 100’ x 2’ x 12” / 324 7.407 cubic yards per lateral For 3 laterals 3 x 7.407 22.221 cubic yards OR 100’ x 2’ x 1’ / 27 7.407 cubic yard per lateral For 3 laterals 3 x 7.407 22.221 cubic yards13 Place 6” of washed gravel in bottom of trench.14 Properly install the perforated PVC: use the solvent and weld,locate perforations at 5 o’clock and 7 o’clock. * The perforations have to face down, not up. Do not use the lettering as aguide it may not place your perforations at the 5 and 7 o’clock15 Use rakes to level the gravel as needed.16 Do not forget to connect the perforated PVC to the manifold before you start to dump washed rock on top of it. * If you are using a d-box you should have figured the layout with the d-box before you started digging.17 Cap the ends.* With the help of a co-worker place additional washed rockuntil there is at least 2” of it over the level perforated PVC.18 Roll out the filter fabric over the washed rock and secure it withsome rock. This will help keep the soil out of the washed rock.DO NOT BACKFILL: The laterals need to be inspected.Move on to the next lateral, complete as the first one.107
Excavation & InstallationThe Dirt Work If you are not familiar with the backhoe you may want to practicebefore you get started1 Good site preparation/marking is a key to good excavationStart at the foundation and excavate for the line to the tank,working out to where the tank will be located. The slope of thisline must be a 1/4 inch per foot. Identify the markers you used to lay out your system. Re-stakeand paint as necessary2Excavate to the depth you calculated for the septic tank. Haveall your calculations with you. Level, smooth and compact thebottom of hole. Some installers set the tank before they excavate the lateraltrenches to make sure of the correct depth3 Make clean straight PVC cuts and remove all burrs & mold flashHave the boom truck set the tank, you will want to be onsite forthis too. * Make sure it is level and the inlets and outlets are onthe right ends. Follow all instructions carefully on the solvents & welds. Production materials & methods may change with fittings & pipe.4Use the laser and tape to check that you set the septic tank atthe depth you calculated. Use plenty of rags to clean5 If it’s not already set, keep the sewer line “stub” out of thehouse as shallow as possible. The tank can then be set fairlyshallow for easier maintenance access in the future. With ashallow-set tank, your drainfield laterals can more easily be keptat the proper depth. With a basement you will probably need apump to lift the wastewater to the trenches.If you need to raise the tank you may want to do it before theboom truck leaves. Just in case have some bedding materialready to backfill on tank delivery day. If the tank is to be set onlarge rocks, sand bedding may be needed.6Excavate the effluent line to the manifold or distribution box.The line must have a slight slope to the manifold.7Excavate for the manifold or distribution box and lines. (If youare using a D-box see D-Box section). Make sure that you haveyour manifold trench level. If you do not get this level you willnot be able to distribute the effluent evenly. If one lateral is getting all the wastewater that means the other laterals (that youspent an equal amount of time and money on) are not gettingany. This will cause your system to fail prematurely.8Check and recheck that the manifold trench is level.9Place the necessary amount of bedding under you manifold: itshould be 6 inches if you are level. Assemble your manifold andhave it ready to connect to the absorption laterals as you complete each one. Do not put washed rock over your manifold yet.The septic inspector will have to check to ensure that it is level. If you set your septic tank too deep and you must reset thetank , backfill with sand. If the ground is too wet (soil ribbons easy) STOP and try againwhen it dries out.Remember the absorption lateraltrenches can only be excavated to a maximum of 36” or the depth specified on thepermit. In order for proper effluent treatment the soil under this depth must not bedisturbed. If you go too deep on the lateraltrenches you must get that replacementarea ready because you will have to use it.89
septic tank baffles. Many times when the plumber joins the sewer line to the septic tank the Sch 40 will get pushed up against the baffle. Recheck that there is a 4" separation between the baffle and Sch 40. 2 Install the effluent filter, handle extending to ground surface 3 Place the risers over the effluent filter access hole of the septic