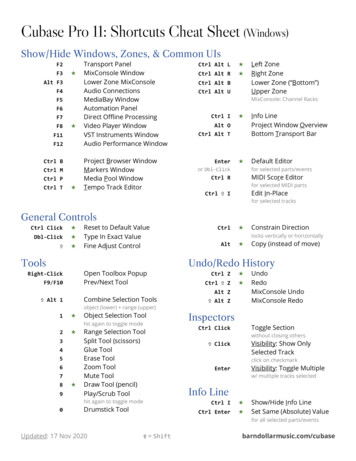
Transcription
Zoom Features & SettingsZoom Features & Settings1
Zoom Features & SettingsContentsOverview . 3Sign in to Zoom . 3Create a Zoom Meeting . 3Start a Zoom Meeting . 4Audio and Video Settings . 4Meeting Invitations . 5Recording Meeting. 5Sharing Your Screen . 6Ending the Meeting. 6Zoom Menu. 7Microphone and Video . 7Invite . 8Manage Participants . 9Polls . 10Share Screen . 11Annotate . 12Chat . 13Record . 14Breakout Rooms. 15Whiteboard . 16Raise Hand Feature . 17Remote Control Feature . 18Kaltura . 19Troubleshoot audio problems if they arise. 222
Zoom Features & SettingsOverviewThis job-aid provides information on how to get started with Zoom video conferencing software tocreate, join, record, end, and manage meetings.Sign in to Zoom Navigate to https://cpp.zoom.us/Click on Sign In Use your Bronco name and password to sign inCreate a Zoom Meeting Instantly create a meeting by clicking on Meetings And then click on Schedule a New MeetingEnter the meetings information including name, date & time, duration, time zone3
Zoom Features & Settings In the video settings area, be sure to select the radio on button’s for both the Host andParticipant to enable the use of video/webcam options. For large meeting of over 20 attendeesit is important to consider Click SaveStart a Zoom Meeting From the Meetings area, locate the meeting you are ready to startClick StartYou have a few options for audio when joining the meeting and can choose to join the meeting by usinga phone or a computer.Audio and Video SettingsAfter you have selected and connected your preferred audio option, you can easily mute your audio orturn off your webcam by clicking on the microphone or camera option from the menu on the bottom ofthe screen.When you have muted or turned off your video or audio, you will notice a red line on these iconsYou can find and adjust additional audio options from the pop-out menus4
Zoom Features & SettingsMeeting InvitationsLocate a meeting’s invitation details from the Meetings area by clicking on the Topic hyperlink for themeeting you want to see the details of. Next, click on the on the Copy the invitation hyperlinkFrom the pop-up, click the Copy Meeting Invitation buttonPaste the meeting details into your communication to invite others.Recording MeetingPress the record button from the bottom menu when you are ready to record your meeting5
Zoom Features & SettingsSharing Your ScreenWhen you are ready to share your screen with your attendees, click the Share Screen button from thebottom meuNext, you will see the option to select which screen or window to share with your attendees, select theoption which best meets the needs of your meeting.Ending the MeetingPress the End Meeting button from the bottom menu when you are ready to end the meeting.After you end the meeting, Zoom will automatically prepare and save the video recording in youdocuments area in a folder called Zoom.6
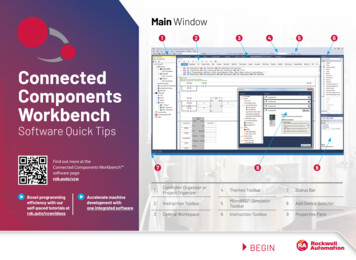
Zoom Features & SettingsZoom MenuAfter starting a Zoom meeting, if your camera and audio settings are off you will see the screen below.The menu with icons across the bottom autohides itself and it may be necessary to hover your mousecursor over it to see its options.Microphone and VideoThe red lines going diagonally through the audio and video icons indicate that both devices are turnedoff. Both these devices can be turned on by clicking on them.Access the device setting menu by clicking the small arrow to the right of the icon.7
Zoom Features & SettingsInviteInvite others to the meeting by clicking on the Invite icon.A pop-up window will display the options for inviting others to your Zoom meeting. A simple and quickway to invite others to meetings is to copy the meeting URL or invitation from the bottom left of thepop-up screen.Once copied, you will see a message indicating the URL or invitation is in your clipboard.8
Zoom Features & SettingsManage ParticipantsClick the Manage Participants icon to see a pop-out menu to the left.Hover your mouse over an attendee’s name to reveal more optionsClick More to see a menu of more attendee options9
Zoom Features & SettingsPollsYou can use Polls in your meetings by visiting the settings area of your account here:https://cpp.zoom.us/profile/settingOnce enabled, you will see the polls icon in your menu during Zoom meetings. Click on the icon to setupa Poll.A pop-up window will appear, click on either Edit or Add a Question to be taken to the Polls page withinyour online account.10
Zoom Features & SettingsShare ScreenThe Share Screen icon will enable you to choose an application window to share with your attendees.Once clicked, a pop-up window will allow you to select with application window you’d like to share.Click the desired application to share and the click Share Screen.While sharing your screen with others, you will notice that your menu bar will move from the bottom ofyour screen to the top.11
Zoom Features & SettingsAnnotateWhile sharing your screen, the Annotate icon is available. Annotate gives the ability to draw, stamp,erase, and other features.Once Annotate has been clicked, you’ll notice a secondary menu available. Hover over the differenttools to see more options.If you do not see the Annotate icon, you may need to enable it within your Zoom account settings. Youcan enable this feature by visiting: https://cpp.zoom.us/profile/setting12
Zoom Features & SettingsWhile using the Share Screen feature, you can find additional settings by clicking the small arrow to theright of the icon.ChatClick the Chat icon to see the meetings chats. A small pop-up window will appear.Click the More button within the chat window to find more chat settings13
Zoom Features & SettingsRecordYou can click the Record icon to start recording your meeting anytime.Once your recording has started, you will notice an indicator at the top left of the screen that allows youto pause or stop the recording.If you want all your meetings to automatically start recording once you’ve started a meeting, you canenable this feature from within your Zoom account Recording settings. You can enable this feature byvisiting: https://cpp.zoom.us/profile/setting?tab recording14
Zoom Features & SettingsBreakout RoomsZoom: Allow attendees to break into private groups while in your Zoom meetingClick the Breakout Rooms icon to start using this feature. Once clicked you will see a small pop-upwindow allowing you to either automatically or manually create the rooms.If you are manually assigning participants to the room, make your selections for each breakout. Thenclick Open All Rooms.Students will see a pop-up window and will need to click on join breakout room.As a facilitator, you can gain access to all of the breakout rooms to see how the conversation is goingand provide support. On the main page you will see the breakout list and click on join room to the rightof each group.15
Zoom Features & SettingsParticipants will be able to see you in their room as your camera or picture will be displayed on the topof the Zoom screen.Once in their breakout group, participants will be able to see the others in their group. If participantsneed support in their breakout room, they can click on the ask for help icon and the facilitator will benotified.Once their conversation is done, they can click on Leave Breakout Room, to return to the main Zoomwindow with the rest of the class.WhiteboardYou can use the built-in Whiteboard within Zoom while sharing your screen during a meeting. If you donot see the Whiteboard icon, you may need to enable it within your Zoom account settings. You canenable this feature by visiting: https://cpp.zoom.us/profile/setting16
Zoom Features & SettingsRaise Hand FeatureZoom: Allow attendees to raise their hand for questions and responses when classis in session.If you would like to see when attendees have raised their hands, click on the Manage Participants Iconon the zoom menu bar then turn your attention to the participant box.Attendees can raise their hands from the participants menu area by hovering the mouse on their nameand selecting the Raise Hand option. Attendees with raised hands are moved to the top of theparticipants list.Meetings hosts can lower an attendee’s hands by hover over their name.17
Zoom Features & SettingsRemote Control FeatureZoom: Give remote control to another attendee who is in the meetingWhile screen sharing, you can give control to an attendee who is in the meeting by clicking on theremote-control icon on the top Zoom menu bar.After clicking on the Remote-Control feature, you see a drop-down menu of the participant namesappear. Select the name of the person you want to pass the controls to.Once you are done with the remote-control feature, you can click, and have the participant stop movingthe mouse. You will then click on the remote control drop down and choose to take back control. Younow have control of your mouse.18
Zoom Features & SettingsKalturaKaltura is a product that creates accessible transcripts for videos. After Kaltura works it’s magic, yourvideo is made available in the cloud using a URL link, which you can share with others.To get started, navigate to https://streaming.cpp.edu/ Hover your mouse over the Guest icon on theleft of the screen and select LoginWhen prompted, enter you Bronco Name and password into the log in box.Click the Add New option next your name in the top left of the screenFrom the options menu, select the Media Upload feature19
Zoom Features & SettingsNext, drag and drop a video file or select the Choose a file to upload buttonOnce your video has been uploaded to Kaltura, you will see message at the top of the screen indicatingits completion. If you want your video to be viewable by anyone, select the option under PublishingSchedule that says: Unlisted - Media page will be visible to anyone with a link to the page and then clickSave.To view you new video, click Go To My Media, next to SaveFrom the My Media screen, you can click on the name of your video to view this content20
Zoom Features & SettingsJust below the video player, click the Share button to see shareable options for your video21
Zoom Features & SettingsTroubleshoot audio problems if they ariseZoom: Troubleshoot Audio Echo or Feedback in a MeetingIf you are hearing feedback or echoes in your meeting, that means there is a device in the meeting thatis channeling your audio back.There are 3 main causes of audio echo or feedback in a Zoom meeting:1. A participant has both the computer and telephone audio active2. The speakers on participants' computers or telephones are too close to each other3. There are multiple computers with active audio in the same conference roomCase 1: A participant has both the computer and telephone audio activeIf you join from a computer and call in from the telephone, please make sure you either:Enter your participant ID when calling in, or enter #participant ID# when already in the call Or, usethe Audio Settings caret to the right of the Mute/Unmute button to manually Leave Computer Audio.Case 2: Participants with computer or telephones speakers that are too close to each otherIf another participant is too close to you, and both of you have speakers on, either hang up one of thetelephone connections or select Leave audio conference on one of the computers.Case 3: Multiple computers with active audio in the same conference roomIf you are in a conference room with multiple devices, disconnect your computer audio from the otherdevices. Muting your speaker is not enough. On a PC or Mac: Select Audio Options Leave Computer AudioOn an Android or iPhone: Select DisconnectTo figure out which attendee is causing the echo: Mute Options:o The host can mute the attendees one at a timeo The host can mute all of the attendees at onceo Attendees can mute themselveso Un-mute one attendee at a time.22
A pop-up window will display the options for inviting others to your Zoom meeting. A simple and quick way to invite others to meetings is to copy the meeting URL or invitation from the bottom left of the pop-up screen. Once copied, you will see a message indicating the URL or invitation is in your clipboard. .