Transcription
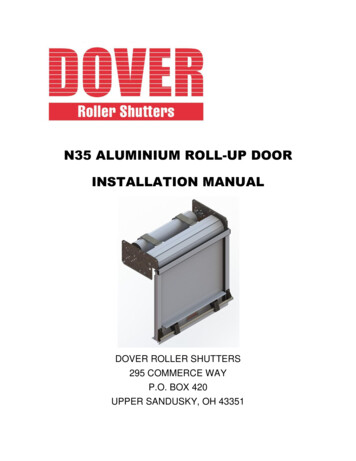
N35 ALUMINIUM ROLL-UP DOORINSTALLATION MANUALDOVER ROLLER SHUTTERS295 COMMERCE WAYP.O. BOX 420UPPER SANDUSKY, OH 43351
295 Commerce WayP.O. Box 420Upper Sandusky, OH 43351Phone: (419) 294-3373Doverrollershutters.comDover Roller Shutters wants to THANK YOU for your purchase of theN35 Aluminum Roll-Up Door!BEFORE INSTALLATION Please carefully read the instruction manual completely.Carefully unpack the contents with attention not to damage the door or itscomponents. Inventory parts. (SEE FIG. 1 Exploded Assembly)Please note: Mounting hardware is not included.TOOLS & FASTENERS NEEDED: Tape MeasurePliers / Vise GripsWire cutters / CrimpsPop Rivet GunRubber Head MalletFine tip marker Screw DriverDrillDrill Bits: (7/32”, 17/64”, 1/8”)Fasteners for brackets,guides & gutter2N35 –DRS / Rev N / 1/24/2013
295 Commerce WayP.O. Box 420Upper Sandusky, OH 43351Phone: (419) 294-3373Doverrollershutters.com Layout and Pre-Drill Mounting HolesDover recommends pre-drilling all door component locations before final installation. Ifholes are not pre-drilled they still must be drilled as the components are installed.(Option: Manufacture can stipulate hole mount placement.)Inspect the door for damaged slats. If any damages are noted then remove those slats from thedoor and place them at the top of the curtain. The top 4-6 slats are not visible when the door isclosed so this operation is acceptable.1) Install Head Platea. Body Mounting Bracket (supplied by the customer)Mounting brackets must be at least 12”x7”. Must be flush with the sideposts of the truck body and cannot be smaller than the maximum clearopening width. The top of the mounting bracket must be a minimum of3½” above the bottom of the header.b. Locate position, mark & mount head plates.1. Take the right hand head plate and temporarily locate it against thetop of your cabinet or to the bottom of the lowest ceiling obstruction.2. The front edge of the Head Plate must be 3/8” from the outside ofthe header face. Square boss slot must be up and the 4” nylonwheel to the front. (Note: the notch on the head plate typically mustbe flush with the bottom of the header but in some applications thehead plate could be moved up to a maximum of 2½” above thebottom of the header.) (See FIG 2)3. Hold the head plate in position where they will be mounted andmark the 4 mounting holes on the body mounting bracket.4. Remove the right hand head plate and repeat steps 1-3 for the leftside.5. Drill holes in the body mounting bracket for the head plates using a17/64” drill bit for (Recommended: Mono-bolt ¼” x grip range 5/8”)or stainless steel screw fastening. (Optional fastening: puddlewelds). Do not use standard aluminum rivets.6. Securely mount the head plates in the pre-determined position.3N35 –DRS / Rev N / 1/24/2013
295 Commerce WayP.O. Box 420Upper Sandusky, OH 43351Phone: (419) 294-3373Doverrollershutters.com2)Install Counter balance (CB) See FIG. 3a. Take the counter balance and position into thesquare bosses. (Note: the arrows on the counterbalance tube must be pointing up, when looking out ofthe compartment from the inside and the label isfacing you.)b. DO NOT REMOVE THE PIN WHICH HOLDSTENSION ON THE SPRING.c. Place the cotter pins into the top hole of the squarebosses so the roller axle cannot come out of thebosses.FIG. 33) Install Curtain (See FIG. 4)a. Un-roll approx. the top 12” of the curtain.b. Feed the top of the curtain over the nylonwheels.c. Attach the nylon straps to the counterbalance assembly by connecting the strapretainer section on the strap to the joiningsection on the tube.COTTER PINd. While firmly holding the curtain, you maynow remove the pin holding the spring tensionwith the weight of the door, which is locatedon the axle at the right side of the counterbalance tube when looking from inside of thecabinet out. (Note: removing the pin mayrequire rolling the counter balance forwardslightly to remove the pressure from the pin.)TENSION PINe. At this time the curtain will want to roll up,allow the curtain to slowly roll up onto the tubeuntil the bottom rail is just under the header.FIG. 44N35 –DRS / Rev N / 1/24/2013
295 Commerce WayP.O. Box 420Upper Sandusky, OH 43351Phone: (419) 294-3373Doverrollershutters.com4) Install Sill, Guides & Rain Guttera. Sill- (IF APPLICABLE) the guides will be used as reference forplacement of the sill. (See Fig. 5 for details)1. Carefully place the sill in the opening under the guides matchingboth ends of the sill to the outside edges of the guides.2. At this time, fix the sill securely using either rivets(recommended: 3/16” x ½” CSK “AK64-BS”) or Stainless steelscrews. (Recommended double sided tape under sill, also predrilling on the inside of the v-step 1” from each end and in thecenter of the sill using a 7/32” drill bit.)FIG. 55N35 –DRS / Rev N / 1/24/2013
295 Commerce WayP.O. Box 420Upper Sandusky, OH 43351Phone: (419) 294-3373Doverrollershutters.comb. Guides- Carefully slide left & right guides over the bottom rail on tothe jamb/opening, at the same time angling the guide to vertical. (Thismay require pulling the curtain down slightly and angling it out of theopening slightly.) See FIG. 6 the guides should have a 3/16” gap at thetop to allow for rain gutter installation. At this time, pre-drill using a7/32” drill bit & fix the guides securely using either Stainless steel boltpre-drilled with #21 drill bit with a 10-32 NC tap or bolts(recommended: SS PPHMS 10/24” x ¾” with a 10-24 Nylok nut).Repeat step for both sides.FIG. 6At this point the door should move freely up and down thru the guides onto theroller. It may be necessary to make some adjustments to the counter balance toassure proper tension. (Please see instructions for adjusting counter balancetension if this is needed.)6N35 –DRS / Rev N / 1/24/2013
295 Commerce WayP.O. Box 420Upper Sandusky, OH 43351Phone: (419) 294-3373Doverrollershutters.comc. Rain Gutter - The front face of the guides should be pre-cut 3/16”less than your overall opening. This gap between the front face of ourguide and your header is where the rain gutter is installed. Be surethat when drilling the body to attach rain gutter not to drill into theface of the door. Be sure to use fasteners short enough not toscratch or obstruct the door. (See FIG.7) It is recommended to slidegutter cap ends in place and pre-drill thru the cap ends and applyfasteners above door guides through the gutter end cap holes afterthey are installed (See FIG 8). At this time, pre-drill using a 7/32” drillbit, fix the rain gutter securely with rivets (recommended: long Multigrip 3/16” x ¾” “AD63-66-BS”) or Stainless steel screws. Then installfastener cover into slots to hide the fasteners. (NOTE: If fasteners areused anywhere over the face of the door, BE SURE to use shortfasteners so the door will not be damaged while rolling up.)FIG. 8FIG. 77N35 –DRS / Rev N / 1/24/2013
295 Commerce WayP.O. Box 420Upper Sandusky, OH 43351Phone: (419) 294-3373Doverrollershutters.com5) Install striker blocks (If not already installed) See FIG. 9a. With door held closed and bottom seal compressed, slide the strikerblock into position & mark the striker block mounting location. Shouldbe approx. ½” from the bottom of the guides to the bottom of the strikerblock. Pre-drill using 7/32” drill bit and fix securely with rivets (supplied)or screws.FIG. 9Dover Roller Shutters pre-winds the counter balance to the specs of each individualdoor according to its size. Should you accidentally allow the tension to come off thesprings or if you find you need more or less assistance with the shutter operation,please see the following instructions for adjusting the tension on the counter balanceassembly.8N35 –DRS / Rev N / 1/24/2013
295 Commerce WayP.O. Box 420Upper Sandusky, OH 43351Phone: (419) 294-3373Doverrollershutters.comAdjusting the Counterbalance Assembly (CB)Please read these instructions carefully, before you attempt to adjust the unit.This is for your safety as well as to protect the inner components of the CBassembly from getting damaged.Before you attempt to adjust the counter balance trouble shoot these possible causes ofincreased friction first:1) Check the compartment to be sure it’s square and the side walls areperpendicular to the overall opening. (Double check that the head plate widthmatches the overall opening width.)2) Check head plate alignment.3) Counter balance must be level or parallel to bottom of cabinet.4) Check the curtain width, if the opening is too narrow the edges of the door willrub inside the guides, increasing friction.Occasionally, you may need to adjust the tension on the counter balance assembly toimprove the function of the roller shutter. The roller shutter is tensioned / designed tobe neutral in any position. If the door opens with light force or requires heavy force toclose then there may be too much tension. As well as, if the door opens with heavyforce and closes with light force then the tension is not enough.1. If you can be in the compartment with the shutter in the down position,firmly hold counterbalance from spinning with your hands. Remove joining strapsand add one or two winds (in the direction of the arrows). Reconnect joiningstraps and test the balance of the door. Same can be done to reduce thetension, only in the opposite direction of the arrows.2. If the compartment is too small to enter, roll-up the curtain to the openposition then reach in the compartment and unwind the curtain from the counterbalance and let the door sag into the compartment (See FIG. 10, pg.8). Becareful not to let the curtain roll back up, the CB is under tension. After thecurtain is unrolled into a sagging position:a. Place the pin into the core end, thru the axle, while holding firmly to therolled shutter. This MUST be done before anything else. Do NOTremove the axle from the mounting brackets, nor the cotter pinssecuring the axle to the square bosses. Disconnect the joiningstraps from the CB tube and remove the curtain.b. Once the tension pin is securely in position and the shutter removed,hold onto the CB tube firmly, and carefully remove the pin.c. To increase the tension, turn the tube in the direction of the arrows, 1-2turns. To decrease the tension, turn the tube in the opposite directionof the arrows. Replace the tension pin while still holding the tube firmly.Once the pin is replaced, you may release the tube.d. Refasten the straps and curtain to the CB assembly.9N35 –DRS / Rev N / 1/24/2013
295 Commerce WayP.O. Box 420Upper Sandusky, OH 43351Phone: (419) 294-3373Doverrollershutters.come. While holding the rolled curtain firmly, you my now remove the pin andallow the CB to roll the door onto the tube, until the bottom is justabove the opening of the door.3. If options 1 & 2 are not available to you, you may have to remove theguides from the opening and remove the door.a. Roll-up the curtain to the open position then remove guides.b. Unwind the curtain from the counter balance slowly pulling the door outof the compartment. Be care full not to let the curtain roll back up,the CB is under tension. After the curtain is fully unrolled:c. Repeat previous steps from option 2. (2a – 2e).d. Feed the bottom of the door into the top of the guides and reattachguides to wall.REMINDERTo reduce the tension (slow the door down) turn the tube in the opposite direction of thearrows on the label. To increase the tension (speed the door up), turn the tube in thedirection of the arrows on the label. At this time, the door should move freely up anddown. IF YOU ACCIDENTLY RELEASED THE WINDS FROM THE COUNTERBALANCE, DO NOT PANIC. The formula to figure how many winds need to be putback on the door is: A WIND PER FOOT OF DOOR HEIGHT 3.PULL CURTAIN DOWNWARDTO OVERCOME TENSIONFIG. 1010N35 –DRS / Rev N / 1/24/2013
295 Commerce WayP.O. Box 420Upper Sandusky, OH 43351Phone: (419) 294-3373Doverrollershutters.comCleaning and MaintenanceIt is important to follow a simple maintenance program to keep the door in its originalcondition. Smooth opening & closing operation is the goal and simple cleaning regularlywill help achieve this.Anodized Aluminum- Anodized Aluminum is very durable and resistant, but it willneed to be properly maintained in order to keep factory finish. Use a mixture of waterand a mild non-abrasive soap product. Do not use a high-pressure sprayer in thecleaning process.Powder Coating- Our powder coating finish is also a very durable finish, but like theanodized material it also will need a simple cleaning and maintenance program. Use amixture of water and a mild non-abrasive soap product. Do not use a high-pressuresprayer in the cleaning process.Guides- The guides also will need to be routinely checked and cleaned to assuresmooth operation. Use a mixture of water and a mild non-abrasive soap product. Asilicone spray may be used to assist with smooth operation. Do not use a petroleumbased product, grease or lithium. These products attract dirt and will hinder theoperation more than help it. Lubrication should be completed on a preventivemaintenance program and each time the vehicle is washed.11N35 –DRS / Rev N / 1/24/2013
N35 ALUMINIUM ROLL-UP DOOR INSTALLATION MANUAL DOVER ROLLER SHUTTERS 295 COMMERCE WAY P.O. BOX 420 UPPER SANDUSKY, OH 43351 . 295 Commerce Way P.O. Box 420 Upper Sandusky, OH 43351 Phone: (419) 294-3373 Doverrollershutters.com 2 N35 -DRS / Rev N / 1/24/2013
