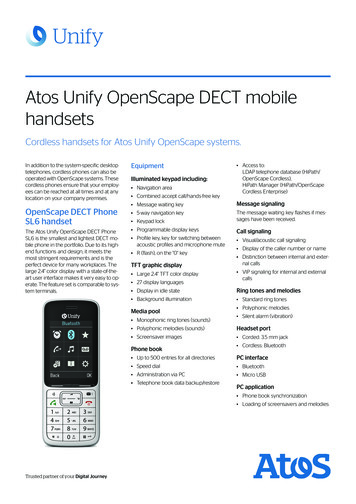
Transcription
OpenScape BusinessTutorialInteraction with Microsoft Exchange Server 2016Version 1.0
Table of Contents1. Introduction32. Configuration4Table of HistoryDateVersionChanges2016-06-101.0Initial Creation2OpenScape Business –Tutorial: Interaction with Microsoft Exchange Server 2016
1. IntroductionThe following steps describe how to connect an OpenScape Business V2 system to a Microsoft Exchange Server 2016 inorder to use the following OpenScape Business V2 features: Calendar Integration Public Folder Contacts search Send e-mails from OpenScape Business V2 to Microsoft Exchange Server 2016Preconditions: Microsoft Exchange Server 2016 Outlook Web Access (OWA) in use Public Folder Contacts in use Users with e-mail addresses assigned in use OpenScape Business V2 released software version with MS Exchange 2016Notes: Test was done with Microsoft Windows Server 2012 R2 Standard with Microsoft Exchange Server 2016. In this example the Microsoft Exchange Server 2016 has the following IP-address: 198.6.127.33. Please changethe IP-address to match customer’s environment settings. The user “UCServiceAccount” is used in this example as Service Account with the role privilege for“ApplicationImpersonation” which is used to give the OpenScape Business V2 access to the mailbox databaseof the Microsoft Exchange Server 2016. This user has to be added into customer’s Active Directory. It requiresalso a valid e-mail address. The OpenScape Business system IP-address in this example is “198.6.127.12”.3OpenScape Business –Tutorial: Interaction with Microsoft Exchange Server 2016
2. ConfigurationPerform these steps to grant OpenScape Business V2 access to MS Exchange Server 2016: Add the user “UCServiceAccount” to your Active Directory and assign a valid mail-address. E.g.:“UCServiceAccount@win2012dom.net”. In Microsoft Exchange management shell enter the following command line:New-ManagementRoleAssignment -Name:OpenScapeBusiness -Role:ApplicationImpersonation -User:UCServiceAccountSyntax description:New-ManagementRoleAssignment -Name:[ NameOfTheRole ] -Role:ApplicationImpersonation -User: [ privileged user ]Note: It might take a couple of minutes until Exchange configuration modifications are applied for the configuredUCServiceAccount user.4OpenScape Business –Tutorial: Interaction with Microsoft Exchange Server 2016
To enable the Public Folder search function additional changes are needed in the Microsoft Exchange Server 2016because only the root folder of the Public Folder environment is used in the application search: Log in with the Administrator user to the Microsoft Exchange Admin Center (ECP) https://198.6.127.33/ecpFormat: https:// Exchange-Server-IP-Address /ecp Navigate to “public folders” If no public folder configuration was done so far, this notification message will be shown:5OpenScape Business –Tutorial: Interaction with Microsoft Exchange Server 2016
Click on “public folder mailboxes” and use the “ ” button to add a new public folder mailbox as shown below: Open the “Exchange Management Shell” on the Microsoft Exchange Server 2016:6OpenScape Business –Tutorial: Interaction with Microsoft Exchange Server 2016
Enter the following command to check if the Administrator user has “owner” rights on the public folder in theroot:Get-PublicFolderClientPermission "\" In case the “owner” privilege is not set, please use the following command to add it:Add-PublicFolderClientPermission "\" -user Administrator -accessrights owner7OpenScape Business –Tutorial: Interaction with Microsoft Exchange Server 2016
With the Administrator account open Outlook connected to the Microsoft Exchange Server 2016 and navigateto “Folders” with the “ ” right next to “Tasks” in the bottom line:8OpenScape Business –Tutorial: Interaction with Microsoft Exchange Server 2016
Expand the public folder section and perform a right click on “All Public Folders”. In the context menu use“New Folder ” option:9OpenScape Business –Tutorial: Interaction with Microsoft Exchange Server 2016
Add a new “Contacts Items” public folder to the root folder structure as shown below:10OpenScape Business –Tutorial: Interaction with Microsoft Exchange Server 2016
This new contacts folder in the public folders root will be searched for contacts only:11OpenScape Business –Tutorial: Interaction with Microsoft Exchange Server 2016
To enable the Exchange Calendar Integration and the Exchange Public Folder Contacts search perform the followingsteps: In the OpenScape Business Assistant please navigate to:Setup UC Suite External Providers Config Calendar Providers ExchangeSetup UC Suite External Providers Config Contact Providers ExchangeAssign the Exchange Server configuration as shown in the example below according to customer’senvironment settings:Server URL:https://198.6.127.33/ews/exchange.asmxUser viceAccount user passwordSyntax description:Server URL:https:// MS Exchange 2016 IP /ews/exchange.asmxUser name:Privileged user set in Active Directory@domainnamePassword:Privileged user password set in Active DirectoryThese changes will enable access of the OpenScape Business V2 to the Microsoft Exchange Server 2016 for theExchange Calendar Integration and the Exchange Public Folder Contacts search.12OpenScape Business –Tutorial: Interaction with Microsoft Exchange Server 2016
The following configuration will enable SMTP (e-mail forwarding) access for OpenScape Business V2 to MicrosoftExchange Server 2016: In OpenScape Business V2 Assistant please navigate to:Service Center E-mail ForwardingAssign the Exchange Server configuration as shown in the example below according to customer’senvironment settings: Note: The port “2525” is the default port in the Microsoft Exchange Server 2016.To check if the same port is used in your environment please perform these steps:oLogon with the Administrator user to the Microsoft Exchange Admin Center (ECP)https://198.6.127.33/ecpFormat: https:// Exchange-Server-IP-Address /ecpoNavigate to “mail flow” and then to the sub item “receive connectors”.oSelect and edit the entry “Default ExchangeServerName ”.oIn the pop up select the menu point “scoping” and check the shown port number.13OpenScape Business –Tutorial: Interaction with Microsoft Exchange Server 2016
Finally the OpenScape Business client settings need to be installed and configured: Make sure that the Microsoft Office suite is installed and outlook is connected to customer’s MicrosoftExchange Server. Afterwards you can install the CommunicationsClients with “Outlook Integration” feature asminimum selection:Users can directly download the CommunicationsClients installation file from OpenScape Business via municationsClients.exeSyntax:https:// OpenScape Business UC ip-address low the setup wizard and select at least the option “Outlook Integration”: Open the Microsoft Outlook and log in with the user’s credentials to the OpenScape Business system as usualfor UC clients. More details about this you can find in the OpenScape Business documentation.NOTE:There is also a “Silent Installation” option to install the CommunicationsClients unattendend to the users computers.Please visit the OpenScape Business V2 Administrator documentation for more details about this. Chapter “12.2.8 Silentinstallation/Uninstallation for UC PC Clients” will show more details.14OpenScape Business –Tutorial: Interaction with Microsoft Exchange Server 2016
In the following steps the configuration for the OpenScape Business UC clients is explained. In the OpenScape Business UC client “myPortal for Outlook” please navigate to:Setup Personal Details My Personal DetailsAdd the user’s “e-mail” address if not already done (Mandatory!)Repeat this step for all configured UC users.Notes: This configuration option can also be applied from the “UC Suite User Directory” web page.To perform this action from the OpenScape Business Assistant, please navigate to:Setup UC Suite User DirectorySelect and edit the user related to the Microsoft Outlook user and add the e-mail address. Save changes. A valid configured e-mail address is needed for the Exchange Calendar Integration and also for the optional email notification when the user receives a voicemail message from OpenScape Business. OpenScape Business will automatically send a “Welcome” e-mail to all new configured e-mail addressesduring this configuration step.15OpenScape Business –Tutorial: Interaction with Microsoft Exchange Server 2016
Configuration of “Exchange Calendar Integration” feature from UC client side: In the OpenScape Business client “myPortal for Outlook” please navigate to:Setup My Preferences Outlook ConnectivitySelect “Exchange Calendar Integration”, enable “Automatically generate calendar appointments from my presencechanges” checkbox and select “Exchange PST” option (Mandatory!)Repeat this step for all configured UC users.Notes: These settings can also be applied from “UC Suite Profiles” wizard which allows the configuration of multipleusers concurrently. To perform this action from the OpenScape Business Assistant, please navigate to:Setup UC Suite ProfilesAdd a profile, configured required settings, save it and assign the profile to the respective UC users. More details about the usage of the Microsoft Exchange Calendar Integration feature can be found in the UCrelated documents of OpenScape Business V2.With the following configuration option „Auto back to office“ each user can decide, if his presence status should bechanged back to “Office” status, when the appointment time has ended: In the OpenScape Business client “myPortal for Outlook” please navigate to:16OpenScape Business –Tutorial: Interaction with Microsoft Exchange Server 2016
Setup My Preferences MiscellaneousSet the „Auto back to office“ option (Optional!)Repeat this step for all configured UC users.Notes: These settings can also be applied from “UC Suite Profiles” wizard which allows the configuration of multipleusers concurrently. To perform this action from the OpenScape Business Assistant, please navigate to:Setup UC Suite ProfilesAdd a profile, configured required settings, save it and assign the profile to the respective UC users. More details about the usage of the Microsoft Exchange Calendar Integration feature can be found in the UCrelated documents of OpenScape Business V2.With the following configuration option „VM Notification“ each user can decide, if e-mail notifications will be send fornewly arrived voicemails. Each user’s presence status can have different configuration for VM notification. In the OpenScape Business client “myPortal for Outlook” please navigate to:Setup Communications VM Notification17OpenScape Business –Tutorial: Interaction with Microsoft Exchange Server 2016
Set the „VM Notification“ configuration options for the user (Optional!)Repeat this step for all configured UC users.Notes: These settings can also be applied from “UC Suite Profiles” wizard which allows the configuration of multipleusers concurrently. To perform this action from the OpenScape Business Assistant, please navigate to:Setup UC Suite ProfilesAdd a profile, configured required settings, save it and assign the profile to the respective UC users.18OpenScape Business –Tutorial: Interaction with Microsoft Exchange Server 2016
With the following configuration option „Fax Notification“ each user can decide, if e-mail notifications will be send fornewly arrived faxes. Each user’s presence status can have different configuration for Fax notification. In the OpenScape Business client “myPortal for Outlook” please navigate to:Setup Communications Fax NotificationSet the „Fax Notification“ configuration options for the user (Optional!)Repeat this step for the other users also.Notes: These settings can also be applied from “UC Suite Profiles” wizard which allows the configuration of multipleusers concurrently. To perform this action from the OpenScape Business Assistant, please navigate to:Setup UC Suite ProfilesAdd a profile, configured required settings, save it and assign the profile to the respective UC users.If you have carefully followed all aforementioned steps, the full functionality should be available now.19OpenScape Business –Tutorial: Interaction with Microsoft Exchange Server 2016
How to test the newly added features (notes and hints): E-Mail Forwarding:o You can check the functionality with the “Check e-mail forwarding” option in the "E-Mail forwarding"section in the "Service Center" of the OpenScape Office Business Assistant. Enter a valid e-mailaddress as recipient and check test e-mail reception.Public folder contacts search:oThe public folder contacts search is restricted to the root level of the public folder structure only.Subfolders with contacts below the root level in the public folder structure are not queried.oTo test the public folder contacts search functionality, simply use the search feature in myPortal forDesktop or myPortal for Outlook and search for a contact.Exchange Calendar integration:oUnderstanding the function: When a user set appointments in his Microsoft Outlook calendar, theOpenScape Office Business system will automatically check for keywords in the calendarappointment subject like: “Meeting”, “Sick”, “Break”, “Out of Office”, “Holiday”, “Lunch” or “Home”. Ifsuch a keyword is found, the OpenScape Office Business will set the user’s presence statusautomatically when the appointment time is reached, even if the Microsoft Outlook session of thespecific user is not active anymore. The user simply configures his appointments with thesekeywords and OpenScape Office Business will automatically set his telephone presence status and asa result all calls will be routed to his voicemail or to his cell phone, depending on the configuredforwarding destinations. The user can also configure in miscellaneous settings, whether his presencestatus should be switched back to “Office” presence status when the appointment time hasended. Appointments can also be set from Outlook Web Access (OWA) instead.oA valid e-mail address for every user must be configured in all applications, as described inaforementioned steps respectively.oThe UC Suite users Voicemail language settings is used by OpenScape Business to understand thekeywords like: “Meeting”, “Sick”, “Break”, “Out of Office”, “Holiday”, “Lunch” or “Home", so forexample, German set Voicemail language can be used with the German keywords in theappointments subject like "Besprechung", "Krank", "Pause", "Außer Haus", "Urlaub", "Mittag" or "ZuHause" only.oIn case "Auto back to office" option is not used, the user’s presence status will be kept to theconfigured appointment status even if the appointment time elapses. As a result, the return timeshown to other users will be increased every 15 minutes. If the "Auto back to office" option is usedand the appointment time ends, the user’s presence status is automatically set to "Office" again.oImportant note for testing: Appointments set into a future date and time with less than 3 minutes areignored, because the system expects that the user creating an appointment can alter any optionwithin 3 minutes. The OpenScape Business checks for appointments in the user’s calendar every 30seconds. For this reason and for any possible delays impaired by the network between the OpenScapeBusiness and the Exchange Server 2016, please configure test appointments starting at minimumafter 3 and a half minutes or more.20OpenScape Business –Tutorial: Interaction with Microsoft Exchange Server 2016
oIf you want to test the Exchange Calendar Integration functionality when user is not logged in eitherin myPortal for Outlook or in myPortal for Desktop, you can simply use the Outlook isURL:"https:// YourExchangeServerAddress /OWA". Login with the user’s credentials and add theappointment with the appropriate keyword to the calendar. Check in another UC Suite user’s clientthat the presence status changes when the appointment time has reached.For further information to all of these features, please use the system manuals.21OpenScape Business –Tutorial: Interaction with Microsoft Exchange Server 2016
Copyright Unify Software and Solutions GmbH & Co. KG 2015Mies-van-der-Rohe-Str. 6, 80807 Munich/GermanyAll rights reserved.The information provided in this document contains merely general descriptions orcharacteristics of performance which in case of actual use do not always apply asdescribed or which may change as a result of further development of the products.An obligation to provide the respective characteristics shall only exist if expressly agreed inthe terms of contract.Availability and technical specifications are subject to change without notice.Unify, OpenScape, OpenStage and HiPath are registered trademarks of Unify Software andSolutions GmbH & Co. KG. All other company, brand, product and service names aretrademarks or registered trademarks of their respective holders.
With the following configuration option „Fax Notification" each user can decide, if e-mail notifications will be send for newly arrived faxes. Each user's presence status can have different configuration for Fax notification. In the OpenScape Business client "myPortal for Outlook" please navigate to: