Transcription
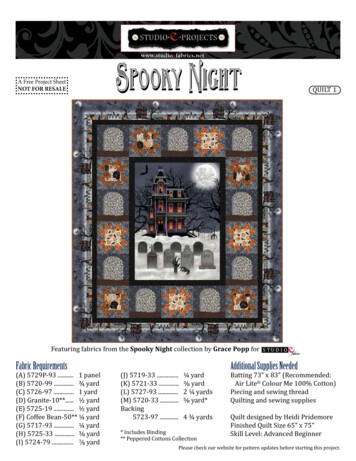
www.studioefabrics.netA Free Project SheetNOT FOR RESALESpooky NightQUILT 1PROCESS COLOR:Featuring fabrics from the Spooky Night collection by Grace Popp forFabric Requirements(A) 5729P-93 . 1 panel(B) 5720-99 . ¾ yard(C) 5726-97 . 1 yard(D) Granite-10**. ½ yard(E) 5725-19 . ½ yard(F) Coffee Bean-50** ¼ yard(G) 5717-93 . ¼ yard(H) 5725-33 . ⅜ yard(I) 5724-79 . ⅞ yard(J) 5719-33 .(K) 5721-33 .(L) 5727-93 .(M) 5720-33 .Backing5723-97 .¼ yard⅜ yard2 ¼ yards⅝ yard*GRAYSCALE:4 ¾ yards* Includes Binding** Peppered Cottons CollectionB/W:Additional Supplies NeededBatting 73” x 83” (Recommended:Air Lite Colour Me 100% Cotton)Piecing and sewing threadQuilting and sewing suppliesQuilt designed by Heidi PridemoreFinished Quilt Size 65” x 75”Skill Level: Advanced BeginnerPlease check our website for pattern updates before starting this project.
STUDIO e PROJECTS Page 2 of 8www.studioefabrics.netFabrics in the CollectionDamask PumpkinsBlack/Orange – 5717-93Spooky Damask StripeBlack – 5718-99Tossed Pumpkins and CrowsEcru/Orange – 5719-33Spooky Small DamaskOrange – 5720-33Spooky Small DamaskBlack – 5720-99Damask Candy CornOrange – 5721-33Damask Candy CornBlack – 5721-99Tossed CrowsGray – 5722-91Spooky HousesMidnight – 5723-97Tossed BatsInk – 5724-79Pumpkin VineGray – 5725-19Pumpkin VineOrange – 5725-33Moonlight TreesMidnight – 5726-97Spooky Night BorderBlack/Orange – 5727-93Spooky Night BlocksBlack/Orange – 5728-93Spooky Night PanelBlack/Orange – 5729P-93Select Fabrics from Just Color! and Peppered CottonsJust Color!Stone1351-StonePeppered CottonsGraniteGranite-10Peppered CottonsCoffee BeanCoffee Bean-50
Cutting Instructions STUDIO e PROJECTS www.studioefabrics.netCuttingPage 3 of 8Please note: All strips are cut across the width of fabric (WOF) from selvage to selvage edge unless otherwise noted.WOF Width of Fabric LOF Length of FabricFabric A (5729P-93 Spooky Night Panel Black/Orange): Fussy cut (1) 27 ½” x 37 ½” rectangle, centered on the panel.Fabric B (5720-99 Spooky Small Damask – Black), cut: (2) 2 ½” x 37 ½” WOF strips. (2) 2 ½” x 31 ½” WOF strips. (3) 2” x WOF strips. Sew the strips together end to end with diagonal seams and cut (2) 2” x 60 ½” strips. (3) 2” x WOF strips. Sew the strips together end to end with diagonal seams and cut (2) 2” x 53 ½” strips.Fabric C (5726-97 Moonlight Trees – Midnight), cut: (3) 10 ½” x WOF strips, sub-cut (9) 10 ½” squares.Fabric D (Granite-10 Peppered Cottons – Granite), cut: See instructions to cut (9) Tombstone Sides.Fabric E (5725-19 Pumpkin Vine – Gray) cut: See instructions to cut (9) Tombstones.Fabric F (Coffee Bean-50 Peppered Cottons – Coffee Bean), cut: See instructions to cut (9) Grounds.Fabric G (5717-93 Damask Pumpkins – Black/Orange), cut: (1) 5 ½” x WOF strip, sub-cut (5) 5 ½” squares.Fabric H (5725-33 Pumpkin Vine – Orange), cut: (3) 3” x WOF strips, sub-cut (40) 3” squares.Fabric I (5724-79 Tossed Bats – Ink), cut: (6) 3” x WOF strips, sub-cut (36) 3” x 5 ½” strips. (3) 3” x WOF strips, sub-cut (36) 3” squares.Fabric J (5719-33 Tossed Pumpkins and Crows – Ecru/Orange), cut: (1) 5 ½” x WOF strip, sub-cut (4) 5 ½” squares.Fabric K (5721-33 Damask Candy Corn – Orange), cut: (3) 3” x WOF strips, sub-cut (32) 3” squares.Fabric L (5727-93 Spooky Night Border – Black/Orange), cut: (2) 6 ½” x 79” LOF strips. (2) 6 ½” x 69” LOF strips.Fabric M (5720-33 Spooky Small Damask – Orange), cut: (7) 2 ½” x WOF strips for the binding.Backing (5723-97 Spooky Houses – Midnight), cut: (2) 83” x WOF strips. Sew the strips together and trim to 73” x 83” to make the back.
STUDIO e PROJECTS Page 4 of 8www.studioefabrics.netSewingSew using a ¼” seam allowance with right sides together (RST) unless otherwise indicated. Alwayspress towards the darker fabric while assembling, unless otherwise noted by the arrows.Block AssemblyNote: The arrows in figures represent the fabric print direction. Pay attention to the fabric and unitorientations when assembling the various components.Center BlockB1. Sew (1) 2 ½” x 37 ½” Fabric B strip to each side of the 27 ½” x 37 ½” Fabric A panel.Sew (1) 2 ½” x 31 ½” Fabric B strip to the top and to the bottom of the Fabric A panel toAmake the Center Block (Fig. 1). Trim the block to measure 30 ½” x 40 ½”.B2. Place (1) 3” Fabric H square on the left side of (1) 3” x 5 ½” Fabric I strip, right sidestogether (Fig. 2). Sew across the diagonal of the square from the upper right corner tothe lower left corner (Fig. 2). Flip open the triangle formed and press. Trim away theexcess fabric from behind the triangle, leaving a ¼” seam allowance (Fig. 3).Trim blockto measure30 ½” x 40 ½”AFTER addingFabric B bordersFig. 1 B3. Place another 3” Fabric H square on the right side of the 3” x 5 ½” Fabric I strip, right sides together(Fig. 4). Sew across the diagonal of the square from the upper left corner to the lower right corner (Fig. 4).Flip open the triangle formed and press. Trim away the excess fabric from behind the triangle, leaving a ¼”seam allowance to make (1) Unit 1 strip (Fig. 5).4. Repeat Steps 2-3 to make (20) Unit 1 strips total.5. Repeat Steps 2-3 and refer to Figure 6 for fabric identification, placement and seam direction to make(16) Unit 2 strips.IIFig. 7GUnit 1IIBlock Twomake 4IUnit 27. Sew (1) 3” Fabric I square to each end of (1) Unit 2 strip tomake the top row. Repeat to make the bottom row. Sew (1)Unit 2 strip to each side of (1) 5 ½” Fabric J square to makethe middle row. Sew the (3) rows together lengthwise to make(1) Block Two square (Fig. 8). Repeat to make (4) Block Twosquares total.Fig. 6Block Onemake 5Unit 16. Sew (1) 3” Fabric I square to each end of (1) Unit 1 stripto make the top row. Repeat to make the bottom row. Sew (1)Unit 1 strip to each side of (1) 5 ½” Fabric G square to makethe middle row. Sew the (3) rows together lengthwise to make(1) Block One square (Fig. 7). Repeat to make (5) Block Onesquares total.Fig. 5IFig. 8JUnit 2IUnit 2Fig. 4Unit 1Fig. 3Unit 1Fig. 2Unit 2make 16KKIUnit 2Unit 1make 20HHIIB
STUDIO e PROJECTS Page 5 of 8www.studioefabrics.net8. Following the manufacturer’s instructions, trace the listed number of each template onto the paper side ofthe fusible web. Roughly cut out each template about 1/8” outside the drawn lines.9. Press each template onto the wrong side of the fabrics as listed on the templates. Cut out each template onthe drawn lines.10. Refer to Figure 9 to arrange and press (1) Fabric D Tombstone Side and (1) Fabric E Tombstone onto(1) 10 ½” Fabric C square.Unit 3Block Threemake 9make 911. Finish the raw edges of each shape with a decorative stitchCsuch as a buttonhole or satin stitch to make (1) Unit 3 square.D12. Repeat Steps 10-11 to make (9) Unit 3 squares total.13. Repeat Steps 10-11 and refer to Figure 10 for componentidentification, placement and orientation to add (1) Fabric FGround strip to the bottom of (1) Unit 3 square to make (1) BlockThree Square. Repeat to make (9) Block Three Squares total.Unit 3EFFig. 9Fig. 1014. Sew together (1) Block One square, (1) Block Three square, (1) Block Two square and (1) Block Threesquare, in that order from top to bottom, to make (1) Side Border (Fig. 11). Repeat to make a second SideBorder.Side Bordermake 2Top Border15. Sew together (1) Block Three Square,(1) Block One square, (1) Block Threesquare, (1) Block Two square and (1)Block Three square, in that order from leftto right, to make the Top Border (Fig. 12).16. Sew together (1) Block One Square,(1) Block Three square, (1) Block Twosquare, (1) Block Three square and (1)Block One square, in that order from leftto right, to make the Bottom Border(Fig. 13).Quilt Top Assembly133Fig. 1223Fig. 111132331Bottom Border32Fig. 13(Follow the Quilt Layout while assembling the quilt top.)17. Sew (1) Side Border to each side of the Center Block. Sew the Top Border and Bottom Border to the topand to the bottom of the Center Block.18. Sew (1) 2” x 60 ½” Fabric B strip to each side of the Center Block. Sew (1) 2” x 53 ½” Fabric B strip to thetop and to the bottom of the Center Block.
STUDIO e PROJECTS Page 6 of 8www.studioefabrics.net20. Repeat Step 19 to sew (1) 6 ½” x 69” Fabric L strip to the top and to thebottom of the Center Block, making sure to stop and start ¼” away from eachend of the block. To miter each corner, fold the Center Block on a diagonal,wrong side together. This should line up the strips from adjacent sides(Fig. 14).21. Starting at the sewn seam (represented by the arrow in Figure 14), drawa 45-degree line to the edge of the fabric. Sew on the drawn line. Trim theexcess fabric leaving a ¼” seam. Repeat this step with the remaining cornersto make the quilt top.Layering, Quilting and FinishingQF uth old ilt Te ed opDiag ononal19. Center (1) 6 ½” x 79” Fabric L strip on (1) side of the Center Block and pin in place. Start sewing thestrip a ¼” from the top edge of the block and stop a ¼” from the bottom edge. DO NOT TRIM THE EXCESS.Repeat with the opposite side.Fig. 1422. Press the quilt top and 73” x 83” backing well. Layer backing (wrong side up), batting, pressed quilt top(right side up) and baste. Quilt as desired and trim excess batting and backing when quilting is complete.BindingL23. Cut the ends of the (7) Fabric Mbinding strips at a 45-degree angleand sew end to end to make (1)continuous piece of binding. Fold inhalf lengthwise and press wrong sidestogether.24. Sew the binding to the front ofthe quilt, raw edges together. Turnthe folded edge to the back, and handstitch in place.BLBCenter BlockBLQuilt LayoutBL
STUDIO e PROJECTS www.studioefabrics.net100% Reversed TemplatesPage 7 of 8Tombstone SideTrace 9Fabric D1” squarefor scaleTombstoneTrace 9Fabric E
STUDIO e PROJECTS www.studioefabrics.netPage 8 of 8100% Reversed TemplateGroTra undFa ce 9bricF1” squarefor scaleEvery effort has been made to ensure that all projects are error free. All the information is presented in good faith, however no warranty can be given nor results guaranteedas we have no control over the execution of instructions. Therefore, we assume no responsibility for the use of this information or damages that may occur as a result. Whenerrors are brought to our attention, we make every effort to correct and post a revision as soon as possible. Please make sure to check www.studioefabrics.net for patternupdates prior to starting the project. We also recommend that you test the project prior to cutting for kits. Finally, all free projects are intended to remain free to you andare not for resale. 2020 Studio e Fabrics
Spooky Night Panel Black/Orange – 5729P-93 Just Color! Stone 1351-Stone Peppered Cottons Granite Granite-10 Peppered Cottons Coffee Bean Coffee Bean-50. www.studioe fabrics.net STUDIO e PROJECTS Page 3 of 8 Cutting Cutting Instructions Please note: All strips are cut across the width of fabric (WOF) from selvage to selvage edge unless otherwise noted. WOF Width of Fabric LOF .