Transcription
White paperCisco publicCisco UCS and Intel SGXwith Fortanix ConfidentialComputing Manager 2022 Cisco and/or its affiliates. All rights reserved.Page 1 of 56
ContentsExecutive summary3Introduction3Solution design6Hardware BIOS configuration10Software configuration17Elasticsearch and secure enclaves28MariaDB and secure enclaves41Appendix54Conclusion55For more information56 2022 Cisco and/or its affiliates. All rights reserved.Page 2 of 56
This document describes a proof-of-concept configuration and deployment of Intel Software Guard Extensions (SGX) with Fortanix Confidential Computing Manager (CCM)on Cisco Unified Computing System Manager (UCSM), Cisco Intersight Managed Mode(IMM), and Cisco Integrated Management Controller (CIMC). In addition, instructionshave been provided for securing and deploying Elasticsearch and MariaDB containerizedapplications into secure enclaves onto UCS X-Series blade servers, UCS B-Series bladeservers, and UCS C-series rack servers.Executive summaryThis document describes a proof-of-concept configuration and deployment of Intel Software Guard Extensions(SGX) with Fortanix Confidential Computing Manager (CCM) on the Cisco Unified Computing System(Cisco UCS). It provides the necessary configuration steps for enabling Intel SGX in multiple Cisco UCSmanagement solutions and hardware platforms, including Cisco UCS Manager (UCSM) with UCS B-Seriesblade servers, Cisco UCS Intersight Managed Mode (IMM) with UCS X-Series blade servers, and CiscoIntegrated Management Controller (CIMC) with UCS C-Series rack servers.This paper will review multiple use cases utilizing the Fortanix Confidential Compute Manager solution to easilyconvert non-secured versions of Elasticsearch and MariaDB containerized applications into secured imagesrunning in Intel secure SGX enclaves.Cisco UCS with Intel SGX and Fortanix Confidential Compute Manager outlined in this paper provides a startingpoint and learning experience for quickly and easily implementing confidential computing into your environment.IntroductionConfidential ComputingWhat is confidential computing and why is it used? The definition from the Confidential Computing Consortium(CCC) is as follows: confidential computing protects data in use by performing computation in a hardwarebased trusted execution environment. These secure and isolated environments prevent unauthorized access ormodification of applications and data while they are in use, thereby increasing the security level of organizationsthat manage sensitive and regulated data.The CCC defines a Trusted Execution Environment (TEE) as an environment that provides a level of assuranceof data integrity, data confidentiality, and code integrity by utilizing hardware-backed techniques for achievingthese security guarantees. TEEs can also provide code confidentiality, authenticated launch, programmability,recoverability, and attestability.Existing encryption technologies have focused on encrypting data-at-rest and data-in-transit; confidentialcomputing extends this encryption to data-in-use. 2022 Cisco and/or its affiliates. All rights reserved.Page 3 of 56
Intel SGXWhat is Intel Software Guard Extensions (Intel SGX)?The definition from Fortanix is as follows: Intel SGX is an extension to the x86 architecture that allows runningapplications in completely isolated secure enclaves. Intel SGX applications are isolated from other applicationsrunning on the same system, but also from the operating system, the hypervisor, the system managementmodule as well as the BIOS, and the firmware. The memory of secure enclaves is also encrypted to thwartphysical attacks. These security guarantees prevent even system administrators with physical access to theSGX nodes from tampering with the application once it is started. Intel SGX supports data sealing, which allowsenclaves to persist data securely such that the data can only be read by the enclave. Through remoteattestation, Intel SGX enables third parties to verify that an application is indeed running inside an enclave andthe application has not been tampered with.Cisco UCS and Intel SGXCisco UCS supports Intel SGX on the Intel Ice Lake–enabled UCS B-Series and X-Series blade servers and CSeries rack servers. Additionally, Cisco UCS management platforms including Cisco Intersight, UCS Manager,and Cisco Integrated Management Controller have the necessary BIOS tokens available for configuring IntelSGX accordingly.Fortanix Confidential Computing ManagerFortanix is a data-first multicloud security company. As the industry’s first and largest provider of confidentialcomputing solutions, Fortanix decouples data security from infrastructure. Fortanix solutions empowerorganizations with centralized controls to secure data spread across clouds, applications, SaaS, databases, anddata centers. Over a hundred enterprises worldwide, especially in privacy-sensitive industries such ashealthcare, fintech, financial services, government, and retail use Fortanix for cloud security and privacy.Fortanix implements Intel SGX across a range of its products. The Fortanix Data Security Manager implementsIntel SGX in its Key-Management Service (KMS), which provides secure generation, storage, and use ofcryptographic keys, certificates, and secrets. Runtime Encryption Technology provides a comprehensiveenvironment for developing, operating, and maintaining Intel SGX enclaves and other enclave technologies.Enclave OS is the runtime environment for code to run inside enclaves, based on simply repackaging existingimages without requiring any changes to application binaries. The ability to run existing software withoutmodification dramatically reduces the time, cost, and complexity associated with deploying it in a confidentialcomputing environment. Enclave OS operates a root of trust established in the CPU to create a region ofmemory that is inaccessible to any process outside the application itself, regardless of privilege level. 2022 Cisco and/or its affiliates. All rights reserved.Page 4 of 56
Fortanix solutionThe Fortanix Confidential Computing Manager is a cloud-native SaaS environment that provides a single paneof glass for managing secure enclaves and confidential computing nodes, on premises or in any cloud or hostedenvironment with supported hardware. It controls the enclave lifecycle, including enablement for policyenforcement on running applications. The Confidential Computing Manager also performs highly efficientattestation services, with minimal burden placed on developers.The Enclave Development Platform (EDP) is an open-source environment for writing Intel SGX enclaves fromscratch, using the Rust programming language. The design of the EDP is optimized by years of in-house use byFortanix to develop various products, making it exceptionally efficient and developer friendly. Rust combineshigh computational performance with built-in code safety measures, especially for safe concurrency andmemory safety.AudienceThis proof of concept is targeted toward technical engineers, administrators, and architects who are interestedin a hands-on introduction to the various components needed for successfully running applications withinsecure enclaves. It is assumed that the audience has a working knowledge of the following technologies:1. Cisco UCS IMC (standalone), UCS Manager, and/or Cisco Intersight service/server profiles2. Red Hat Enterprise Linux3. Docker Hub or other container repositories4. Docker and/or Podman container technologies 2022 Cisco and/or its affiliates. All rights reserved.Page 5 of 56
Solution designSolution overviewThe architecture for this solution is relatively simple in order to highlight the confidential computing technologiesbeing utilized. The systems tested include UCS M6 series (B-Series, X-Series, and C-Series) supporting theIntel Ice Lake processor family, which is needed to support the current implementation of Intel SGX. ServerBIOSs have been configured with Intel SGX technologies enabled utilizing Cisco UCS Manager Service profilesand BIOS policies, Cisco Intersight Managed Mode using server profiles and BIOS policies, and CiscoIntegrated Management Controller BIOS policies. The systems have been loaded with Red Hat 8.x OperatingSystems. Fortanix Confidential Computing / Runtime Encryption has been loaded onto these systems with twoexample applications implemented: Elasticsearch and MariaDB.Additionally, we have demonstrated the Elasticsearch and MariaDB container implementations using twodifferent market leading container technologies: Podman, which is the native container technology included withRed Hat 8.x, and Docker, the container technology that preceded Podman on Red Hat. We provide installationsteps and commands utilizing both container technologies in this paper.Solution overviewSolution flowThe solution setup consists of multiple parts. It covers basic setup of the UCS policies and profiles, postoperating system installation configuration including Intel SGX and attestation driver installation, Fortanix CCMinstallation, repository configuration, Elasticsearch and MariaDB image conversion, and container deploymentand testing. The high-level flow of the solution setup follows:1. Install and configure Intel SGX BIOS tokens on Cisco UCS M6 B-Series, C-Series, or X-Seriesutilizing UCSM, Intersight, or CIMC.2. Deploy Red Hat Enterprise Linux and install Intel SGX and attestation drivers and Fortanix agents.3. Test basic functionality of Intel SGX to confirm that secure enclaves and attestation are working.4. Utilize Fortanix CCM to convert the Elasticsearch application to a secure image, then load and test.5. Utilize Fortanix CCM to convert MariaDB application to a secure image, then load and test. 2022 Cisco and/or its affiliates. All rights reserved.Page 6 of 56
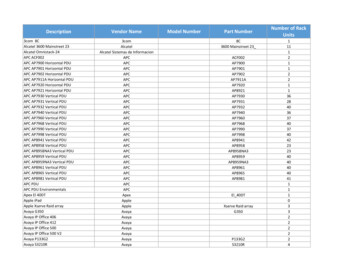
RequirementsThe following sections detail the physical hardware, software revisions, and firmware versions required to installIntel SGX Fortanix on Cisco UCS. The hardware requirements are general and can deviate based on thespecifications given below. One physical Cisco UCS M6 system is required for this implementation; the systemcan be either B-Series or X-Series blade servers or C-Series rack servers (standalone or Fabric Interconnectattached). Please see below the list of valid Intel Ice Lake CPUs offered by Cisco at the time of this writing. Thefirmware, operating system, drivers, and application versions are specific to this white paper, and deviationshave not been tested and may not work as expected.Table 1.Hardware components used in this white paperComponentModelQuantityCommentsCisco UCS serversCisco UCS C220 M6S12 x Intel Xeon Platinum 8368 (2.4 GHz, 38 cores,512 GB SGX Enclave Capacity)2-TB MemoryM.2 RAID Controller with 2x240GB Drives(System/Data)Or1 x VIC 1467Cisco UCS B200 M612x Intel Xeon Platinum 8368 (2.4 GHz, 38 cores,512 GB SGX Enclave Capacity)1-TB MemoryOr12Gb SAS/SATA RAID Controller with 2x480GBSATA SSCisco UCS X210C M611 x VIC 14401x Intel Xeon Gold 6348 (2.6 GHz, 28 cores, 64GB SGX Enclave Capacity256 GB MemoryM.2 RAID Controller with 2x240GB Drives(System/Data)1x VIC 14425UCS Fabric6454Interconnect (for B or XSeries blade servers)2Intel CPU options (SGX Enclave Capacity (per processor))**8380, 8368, 8352S, 5318S512 GB8362, 8360Y, 8358, 8352Y, 8352M, 8351N, 6354, 6348, 6346, 6342, 6338T, 6338N, 6338, 6336Y,6334, 6330N, 6330, 6326, 6314U, 6312U, 5320T, 5320, 5318Y, 5318N, 5317, 5315Y64 GB8358P, 8352V, 4316, 4314, 4310T, 4310, 4309Y8 GBSGX Enclave Capacity is the size of the private memory region that makes up the secure enclave. The size of the enclave capacity has adirect correlation to the size of the application that can be loaded into the enclave at any one time. 2022 Cisco and/or its affiliates. All rights reserved.Page 7 of 56
Software componentsTable 2.Software versionsLayerComponentVersion or releaseCisco UCS C220 M6SFirmware version4.2(1a)Cisco UCS B200 M6Firmware version4.2(1f)Cisco UCS X210C M6Firmware version5.0(1d)SoftwareRed Hat Enterprise Linux8.3 (rhel-8.3-x86 64-dvd.iso)SoftwareIntel SGX DCAP Driver1.36.2SoftwareIntel SGX Multi-Package Registration Agent1.12.100.3SoftwareFortanix CCM Node 3.1Website accessIt is necessary to create accounts on the following websites to successfully complete this proof of concept. It isrecommended that this be completed prior to beginning the Fortanix and application installations to avoiddelays during configuration steps.Docker Repository – Navigate to https://hub.docker.com and sign up for a free Docker Hub account. This willbe utilized for storing and pulling the secure images created within this proof of concept.Fortanix Confidential Computing Manager (CCM) – Navigate to https://ccm.fortanix.com and sign up for afree CCM account. This will be utilized for registering secure compute nodes, securing images, and managingthe secure infrastructure. User ID creation and confirmation can take up to 24 hours. 2022 Cisco and/or its affiliates. All rights reserved.Page 8 of 56
Physical topologyTopology overviewThe solution contains three possible topology configurations consisting of UCS M6 series (B-Series, X-Series,or C-Series). These servers can either be connected to UCS Fabric Interconnects or directly connected toCisco Nexus Ethernet network switch(es) (the type of Ethernet network switch is not a dependency). EachCisco UCS server has a minimum of 10Gb Ethernet connectivity and has internet connectivity. As this is a proofof concept, high availability and high performance have not been designed into the solution; however, these canbe implemented if desired. Red Hat Enterprise Linux (RHEL) 8.3 with a registered Red Hat subscription isrequired.Data center topologyNetwork designThe network design for this proof of concept is very basic and only requires a single vNIC being created withinternet access. Intersight, UCS Manager, and Cisco Integrated Management Controller network and VLANcreation and configuration are out of the scope for this document, and it is assumed that the reader canconfigure the necessary service/server profiles to establish internet access to the server running the Red HatEnterprise Linux operating system.Naming scheme and DNSDomain Name System (DNS) for querying Fully Qualified Domain Names (FQDNs) has been configured for theRed Hat Enterprise Linux server. The FQDN has been added to the RHEL /etc/hostname file that is noted in theRHEL configuration section below. 2022 Cisco and/or its affiliates. All rights reserved.Page 9 of 56
Hardware BIOS configurationUCS BIOS configuration / Intel SGX enablementCisco Integrated Management Controller / C240M6 BIOS ConfigurationEnable Runtime Encryption in the BIOSAssuming your system is compatible with SGX (UCS M6 with compatible Intel CPU – see above for theapplicable CPUS), the following lists the options needed for SGX enablement in BIOS:At BIOS POST, click F2 BIOS Setup when prompted.Go to the Advanced tab and click Socket Configuration. 2022 Cisco and/or its affiliates. All rights reserved.Page 10 of 56
In Advanced/Socket Configuration, navigate to the menu items below, and configure accordingly (see thescreenshots below):Common RefCode Configuration- UMA-Based Clustering [Disable (All2All)]Memory Configuration- Memory RAS Configuration- ADDDC Sparing [Disabled]Processor Configuration- Total Memory Encryption (TME) [Enabled]Processor Configuration- SW Guard Extensions (Intel SGX) [Enabled]Processor Configuration- PRMRR Size – 8GProcessor Reserved Memory Range Registers (PRMRR) - The size of the protected region in the systemsDRAM. The maximum size of the PRMRR field in the BIOS configuration will match the amount of theSGX Enclave Capacity value for the Intel CPU being utilized.Processor Configuration- SGXLEPUBKEYHASHx Write Enable [Enabled]Processor Configuration- Enable/Disable SGX Auto MP Registration Agent [Enabled] 2022 Cisco and/or its affiliates. All rights reserved.Page 11 of 56
2022 Cisco and/or its affiliates. All rights reserved.Page 12 of 56
When the BIOS token configurations have been completed, press F10 to save and reset the system. Please goto the Software Configuration section below for operating system installation and configuration.Cisco UCS Manager / B200 M6 BIOS Policy ConfigurationCreate a Server BIOS Policy with SGX specific configurations:Servers/Policies/root/BIOS Policies/policy nameAdvanced Processor SW Guard Extensions (SGX) EnabledAdvanced Processor Total Memory Encryption (TME) EnabledAdvanced Processor SGX Write Enable Enabled*Advanced Processor PRMRR Size 8G*Note: At the time of this writing, the Processor Reserved Memory Range Registers (PRMRR) token is notcurrently available within UCS Manager BIOS Policy; it is necessary to configure this token through theF2 BIOS setup. Once the above Server BIOS Policy has been configured and applied to the server, opena KVM window to this server and see the prior section “Cisco Integrated Management Controller” forconfiguring the PRMRR Size token.Advanced Processor SGX Auto MP Registration Agent EnabledAdvanced RAS Memory Memory RAS configuration Maximum PerformanceAdvanced RAS Memory UMA Clustering Disable (All2All) 2022 Cisco and/or its affiliates. All rights reserved.Page 13 of 56
2022 Cisco and/or its affiliates. All rights reserved.Page 14 of 56
Cisco Intersight / X210C M6 Server BIOS Policy ConfigurationCreate a Server BIOS Policy with SGX specific configurations: Configure Policies BIOS policy name create/edit Memory Memory RAS Configuration maximum performance Memory UMA Based Clustering Disable (All2All) Trusted Platform Software Guard Extensions (SGX) enabled Total Memory Encryption (TME) enabled SGX Auto MP Registration Agent enabled SGX Write Enable enabled 2022 Cisco and/or its affiliates. All rights reserved.Page 15 of 56
*PRMRR Size – 8GThe size of the protected region in the systems DRAM. The maximum size of the PRMRR field in the BIOSconfiguration will match the amount of SGX Enclave Capacity value for the Intel CPU being utilized.*Note: At the time of this writing, the Processor Reserved Memory Range Registers (PRMRR) token is notcurrently available within the Intersight Server BIOS configuration; it is necessary to configure this token throughthe F2 BIOS setup. Once the above Server BIOS Policy has been configured and applied to the server, open aKVM window to this server and see the prior section “Cisco Integrated Management Controller” forconfiguring the PRMRR Size token through the F2 Setup. 2022 Cisco and/or its affiliates. All rights reserved.Page 16 of 56
Software configurationRed Hat Enterprise Linux / Intel SGX / Fortanix configuration and enablementThis proof of concept has been tested utilizing Red Hat Enterprise Linux version 8.3 (rhel-8.3-x86 64-dvd.iso).It is assumed that the server hardware has been configured, RHEL 8.3 has been installed, the license has beenregistered with Red Hat, Ethernet connectivity has been configured, internet access has been established, andthe operating system is at the login or command prompt.The following options were chosen during the RHEL 8.3 operating system installation utilized in this paper:Software selection: The base environment chosen during installation was “Server – An integrated, easy-tomanage server.”Installation Destination: Local Standard Disk (single disk or RAID disk)Network interface was configured using nmtui, with IP address, subnet, gateway, and DNS specified.Hostname was configured by editing the /etc/hostname file.Document command syntax/conventionsCommands are listed after the # symbol within the gray boxes.Copy-and-pasting of the commands is recommended to avoid errors.Commands may include variables within brackets example ; please replace the bolded text and remove thebrackets within the commands.Commands within the gray boxes may wrap to the next line. Copy-and-pasting should capture all necessaryspacing. If manually typing the commands, please be careful to include any necessary spacing, which may notbe obvious between wrapped lines.For the most accurate copy-and-pasting of commands, and to avoid errant spacing between commands thatspan multiple lines, utilize a PDF reader such as Adobe Acrobat Reader for reading and utilizing this document.Validate BIOS Runtime EncryptionValidate that the BIOS Runtime Encryption is correctly enabled by downloading and running the sgx-detectutility as shown below:# wget gx-detect# chmod x sgx-detect# ./sgx-detectIf the BIOS has been configured correctly, the output of the sgx-detect command will resemble the outputbelow. If the SGX instruction set is not all green (as shown in the output below), please review the BIOSconfiguration steps given above before proceeding. 2022 Cisco and/or its affiliates. All rights reserved.Page 17 of 56
The remaining sections of the sgx-detect output will turn from red x’s to green checks as we progress throughthis document.Prerequisites for SGX on Red Hat Enterprise LinuxFull documentation for the RHEL SGX prerequisites can be found at the link below. We have included, below,simplified instructions for implementing these erAttestationPrimitives/tree/DCAP 1.10.3/driver/linuxAs an example, the instructions in the prerequisites are as shown below.Matching kernel headersTo check if matching kernel headers are installed:# ls /usr/src/kernels/ (uname -r)arch certs drivers fs init Kconfig lib Makefile.rhelver Module.symvers samples security System.map usrvmlinux.id block crypto firmware include ipc kernel Makefile mm net scripts sound tools virtA directory listing like the one shown above is displayed if the correct headers are already installed.If the above command has no results, the headers are not installed. The correct headers to match the currentkernel can be installed using the following command:# sudo yum install -y "kernel-devel-uname-r (uname -r)" 2022 Cisco and/or its affiliates. All rights reserved.Page 18 of 56
Rerun the following command, and the directory listing should now produce the following results:# ls /usr/src/kernels/ (uname -r)arch certs drivers fs init Kconfig lib Makefile.rhelver Module.symvers samples security System.map usrvmlinux.id block crypto firmware include ipc kernel Makefile mm net scripts sound tools virtIf the latest headers are preferred or the above command is not successful, the following commands will installthe latest headers and the latest kernel (this step is not needed if the matching headers are already installed):# sudo yum install kernel-develAfter the above command, if the matching headers are still missing in /usr/src/kernels, try updating the kerneland reboot using the commands below. Then choose the updated kernel on the boot menu.# sudo yum install kernel# sudo rebootInstalling additional packages# sudo yum install -y elfutils-libelf-devel# sudo yum groupinstall -y 'Development Tools'# sudo yum update -y libmodulemdSetup EPEL REPO and enable DKMSDKMS (Dynamic Kernel Module Support) ensures that the SGX driver is automatically updated after each kernelupdate.# sudo yum install -y -latest-8.noarch.rpm# sudo yum install -y dkmsInstall Python# yum install -y python3Installing Docker or updating PodmanThe default container technology in Red Hat 8.0 is Podman. This paper will provide instructions for bothPodman and Docker container technologies. If Podman is preferred, please follow the steps for updatingPodman. If Docker is preferred, it will be necessary to first de-install Podman and then install Docker.Updating Podman to latest releaseIf Podman is preferred, follow these steps to update both Podman and conmon components:# yum update podman -y# yum update conmon -yDeinstalling Podman and installing DockerIf Docker is preferred, follow these steps to deinstall Podman and install Docker. 2022 Cisco and/or its affiliates. All rights reserved.Page 19 of 56
Deinstall Podman:# sudo yum remove docker \docker-client \docker-client-latest \docker-common \docker-latest \docker-latest-logrotate \docker-logrotate \docker-engine \podman \runcInstall Docker:# dnf config-manager --add-repo .repo# dnf install docker-ce --nobest -y# systemctl start docker# systemctl enable dockerThe Podman de-installation/Docker installation instructions given above can also be found at the followingDocker link: ling SGX componentsInstall DCAP driverIntel Software Guard Extensions Data Center Attestation Primitives (DCAP) provides SGX attestation supporttargeted for data centers, cloud services providers, and enterprises for Intel Ice Lake servers.# wget ux/distro/rhel8.2server/sgx linux x64 driver 1.36.2.bin# chmod x sgx linux x64 driver 1.36.2.bin# ./sgx linux x64 driver 1.36.2.binSteps to confirm successful DCAP driver install:# lsmod grep sgxResults:intel sgx573444 2022 Cisco and/or its affiliates. All rights reserved.Page 20 of 56
SGX-Detect checkpointRunning ./sgx-detect at this point will show the following results:Download and install Intel Registration Service AgentThe SGX Multi-Package Registration Agent performs SGX technology discovery and collection of SGX attributeson an SGX enabled platform (single-socket/multi-socket). The registration is required to support remoteattestation of the SGX machine with Intel's attestation service.# wget linux/tools/SGXMultiPackageAgent/rhel8.2server/sgx rpm local repo.tgz# tar -zxvf sgx rpm local repo.tgzInstall yum-utils:# yum install -y yum-utilsTo add the local RPM package repository to the system repository configuration, you can use the followingcommand. You need to replace PATH TO LOCAL REPO FILE with the path and the name of the directorycreated where the sgx rpm local repo.tgz was uncompressed above.# sudo yum-config-manager --add-repo file:/// PATH TO LOCAL REPO FILE e.g. # sudo yum-config-manager --add-repo file:///root/sgx rpm local repo# sudo yum --nogpgcheck install -y libsgx-ra-network libsgx-ra-uefi sgx-ra-service 2022 Cisco and/or its affiliates. All rights reserved.Page 21 of 56
To confirm that PLATFORM ESTABLISHMENT or TCB RECOVERY passed successfully. run the followingcommand and check the output:# cat /var/log/mpa registration.logThe output should be like the following:[12-11-2021 03:06:32] INFO: SGX Registration Agent version: 1.12.100.3[12-11-2021 03:06:32] INFO: Starts Registration Agent Flow.[12-11-2021 03:06:32] INFO: Registration Flow - Registration status indicates registration iscompleted successfully. MPA has nothing to do.[12-11-2021 03:06:32] INFO: Finished Registration Agent Flow.Install libsgx-enclave-common# sudo yum --nogpgcheck install -y libsgx-enclave-commonInstall and run the AESMD-DCAPArchitectural Enclave Service Manager (AESM) is the system services management agent for SGX enabledapplications. The container provides the implementation of this service with support for the DCAP protocol.Instructions are provided for both Podman and Docker installations.Podman:# mkdir -p /var/run/aesmd# sudo podman run --privileged --detach --restart always --device /dev/sgx/enclave --volume/var/run/aesmd:/var/run/aesmd --name aesmd docker.io/fortanix/aesmd-dcap:latestDocker:# mkdir -p /var/run/aesmd# docker run --detach --restart always --device /dev/sgx/enclave --volume/var/run/aesmd:/var/run/aesmd --name aesmd docker.io/fortanix/aesmd-dcap:latest 2022 Cisco and/or its affiliates. All rights reserved.Page 22 of 56
SGX-Detect checkpointRunning ./sgx-detect at this point will show the following results:Installing Fortanix componentsIt is necessary to register for a Fortanix Confidential Computing Manager (CCM) user ID (“userid” in whatfollows) and install the Fortanix CCM Node Agent. The CCM node agent assists with the following: Verification of hardware and platform software running on compute nodes Enabling registration of compute nodes to Fortanix CCM when installed on a compute node Assisting with application attestation and visibility for Fortanix CCMCreate a ccm.fortanix.com useridCreate a ccm.fortanix.com userid and password following steps 1 and 2 of the Confidential Computing ManagerQuickstart Guide at the following link: 043484152Quickstart-Guide 2022 Cisco and/or its affiliates. All rights reserved.Page 23 of 56
Retrieve join token from ccm.fortanix.comThe join token is a unique identifier associated with a Fortanix CCM account that is utilized for registering acompute node to CCM.Log in to ccm.fortanix.com,From the dashboard, navigate to Infrastructure,and click “ ENROLL COMPUTE NODE”. 2022 Cisco and/or its affiliates. All rights reserved.Page 24 of 56
Click “Copy” to copy the join token that will be used for installing the CCM Node Agent.Install and run the CCM node agentReplace join token in the podman or docker command below with the join token previously copied.Podman:# mkdir -p /var/opt/fortanix/em-agent# sudo podman run --restart always --detach --privileged --volume /dev/sgx:/dev/host/sgx --volume/var/run/aesmd:/var/run/aesmd --volume ent -eAGENT MANAGER AUTH BASIC TOKEN join token -e ATTESTATION TYPE DCAP -p 9092:9092 --name em-agentdocker.io/fortanix/em-agent:latest*Note: Currently there is a bug with the Podman “restart always” parameter; this bug is targeted to be resolvedin Podman 3.4.x. Please see appendix A for instructions on configuring systemd to restart the aesmd andem-agent con
Fortanix implements Intel SGX across a range of its products. The Fortanix Data Securit y Manager implements Intel SGX in its Key -Management Service (KMS), which provides secure generation, storage, and use of cryptographic keys, certificates, and secrets. Runtime Encryption Technology provides a comprehensive
