Transcription
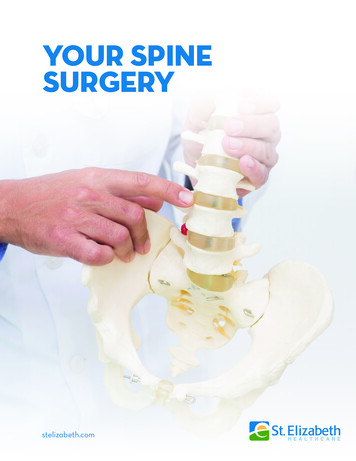
1SPINE SURGERY BOOK4620 East Baseline Road, Mesa 85206Call (480) 824-1229 or (480) 824-1306 to registerIP006 R2 1/20
2AuthorChristopher J. Shaw RN, MNContributorsVivan Standage, RN, MS, ANPKristy Hufford, PT, DPTStephanie Potter RN, BSNHeather Lorig, CMDavid Wasserbeck, PTRevised: January 2020
3Table of ContentsPageIntroduction4Preparing For Your Surgery5Post-Op (Immediately After Surgery)8Post-Op Day One (First Day after Surgery)10Post-Op Day Two (Second After Surgery)11Physical Therapy12Activity Level13Using Your Walker14Assistive Devices16Activities After Spine Surgery17Anatomy19Anterior Cervical Decompression and Fusion21Anterior and/or Posterior Spinal Fusion22Laminectomy23Prevention of a Blood Clot24Medication for your stay at Arizona Spine and Joint Hospital25Pain27Going Home28AppendicesAppendix A-Preparing Your HomeAppendix B-Home AssistanceAppendix C-Extended Care FacilitiesAppendix D-Transportation OptionsAppendix E-Meal Preparation OptionsAppendix F-Home Health (Medical) ProvidersAppendix G-Frequently Asked QuestionsAppendix H-Hotels/MotelsAppendix I-Telephone NumbersGlossaryNotes2930313233343437383839
4IntroductionThe staff of Arizona Spine and Joint Hospital (ASJH) would like to take this opportunity to thank you forselecting us to perform your spine surgery. We realize there are many factors that enter into your decision andappreciate your confidence in our staff.The dedicated staff of ASJH will insure you are comfortable and knowledgeable about every aspect of yoursurgery and recovery. Our ultimate goal is to help you learn to care for yourself after discharge so you mayregain maximum independence.The staff of ASJH have found that patients who actively participate in their care and rehabilitation have the bestlong-term outcomes after surgery. To this end, we believe that teamwork is the key to success with spinesurgery. Your team includes the following members:1.2.3.4.5.6.7.YouYour familyYour surgeonYour doctorYour nursesYour physical therapistYour case managerPlease take some time to carefully review the contents of this booklet when you arrive home after the spinesurgery class. Should you have any further questions or concerns after reviewing the material please don’thesitate to call any of the numbers listed on Appendix I.Remember – Arizona Spine and Joint Hospital is a non-smoking campus. This includes electronic cigarettes.If you smoke, try to stop. If you can not stop, cut down. This will help with the healing process and speed yourrecovery. If you would like smoking cessation assistance or information, please ask your nurse or casemanager.
5Preparing For Your SurgeryThe following information is provided to assist you in preparing for surgery. Please review the informationvery carefully. Address any of the issues or complete any of the tasks that are pertinent to you within thespecific time period. Doing so will make you more knowledgeable about the many aspects of your surgery andrecovery, thus ensuring a very relaxed process.One Month Prior To Your Surgery1. Some patients may require a blood transfusion after surgery. If you have any religious or personalissues concerning a transfusion, please speak with your spine surgeon.2. Your spine surgeon may recommend you see your primary care physician (PCP) or other specialist formedical clearance for surgery. Please discuss this issue with your spine surgeon.Two Weeks Prior To Your Surgery1. Make an appointment to attend the total joint/ spine class at the Arizona Spine and Joint Hospital bycalling (480) 824-1229 or (480) 824-1306. Classes are held every Monday except for holidays from 8a.m. to 10:30 a.m.2. Begin eating a well-balanced diet that includes breads, cereals, vegetables, fruits, meat, dairy products,and plenty of fluids. This is not the time to go on a “diet.”3. Prepare meals for yourself ahead of time and freeze them.4. Your surgeon will instruct you on which medications to stop taking prior to surgery. Some examplesare: aspirin, ibuprofen/Motrin Advil, naproxen/Aleve, any blood thinners, herbal supplements, andVitamin E. Your surgeon may also prescribe multivitamins, Vitamin C and/or iron pills to start takingprior to surgery.5. Compile a complete listing of all of the medications that you take. This includes prescriptionmedication, over-the-counter medication, supplements, herbs, vitamins, and home remedies. Be sure toinclude: Amount of the tablet/medication (e.g. 20 mg, etc.) Exactly how you take the medication (e.g. whole tablet or half tablet) When you take the medication (e.g. daily, twice a day, weekly, etc.) At what time you take the medication (e.g. at 6 a.m., etc.)6. After surgery you may need a front-wheeled walker. This item is usually covered by insurance. If youdo not have one, the Physical Therapist will obtain one for you.7. If you already have a walker have it brought to the hospital the day after your surgery by a familymember (so it can be checked for proper sizing and safety)8. After surgery, you may potentially need additional equipment such as a raised toilet seat or a showerchair/bench. See Appendix A for more information.
69. Please make sure that you have someone who will help you for the first several days after discharge.You should not stand for long periods of time after surgery. Therefore, you will need to plan for mealpreparation, housework, and personal care after you return home from the hospital. You will want toenlist the help of family, friends, or private pay assistance once you have determined your needs. (For alist of private resources, please see Appendix B).10. Most patients are discharged directly home after their hospital stay. Some patients are not due to theneed for additional rehabilitation before going home. If this is the case, your surgeon will recommendyou go to an extended care facility (ECF). You may want to contact your insurance provider todetermine if they cover a short-term stay at an ECF and if there is a specific facility you must use inyour area. Additionally, you may wish to visit several ECFs within your area in advance (see AppendixC). If you need to be admitted to an ECF, your case manager will arrange this for you.11. You will not be allowed to drive for approximately 6 weeks or longer after your surgery. You shouldarrange for transportation from the hospital and for your follow up appointment (which is typically 2weeks after your surgery). If you do not have a family member or friend to assist you, please seeAppendix D (Transportation Resources).12. Safety while using a walker is very important. Ensure all walkways in your home are free of throw rugsor hazards, such as extension cords, to prevent falls. (See Appendix A for suggestions and information).Make sure pathways are wide enough for your walker to maneuver in (width of the walker being thebase plus the size of the wheels).13. If you have pets, you may need to plan for their care during your hospital stay and possibly during yourrecovery. Please inform your orthopedic surgeon that you have a pet as this may increase your risk ofinfection after surgery.14. You may want to install a moveable showerhead and grab bar/rails in your bathroom before surgery.Please ensure that the grab bars/rails are installed into wall studs, and not simply into the drywall.15. It would be a good idea to make sure you have a chair to sit in at home that has sturdy armrests. Thiswill make it easier for you to get in and out of the chair after your surgery.16. Where is the bedroom located that you sleep in? If it is located on the second floor, is it possible that youcould stay in a bedroom on the first floor for the first couple of days after you return home?One Week Prior To Your Surgery1. Complete all the issues or tasks you have been working on up to this point.2. Your surgeon’s office may require you to have an EKG, chest x-ray, and lab tests performed inpreparation for surgery.3. Continue eating a well-balanced diet and keeping your bowels regular.4. Clean your house, do your laundry, and complete any yard work.5. Put frequently used items in the kitchen and bathroom at waist height.
76. Compile a complete list of all doctors and specialists you have seen in the last five years. Please includetheir phone numbers and bring this with you on the morning of surgery.7. Make a copy of your Living Will/Advanced Directives if you have one, bring this with you on themorning of surgery.8. Gather your insurance cards, prescription cards, and any other medical cards (e.g. pacemaker ID card,etc.) to bring with you.9. Bring any other forms your physician has given you.10. Pack a small bag of your personal items and include a set of loose fitted clothing and a good pair ofwalking shoes for discharge. Do NOT buy new shoes. Make sure the shoe has a rubber sole and there isa back around the shoe (i.e. no flip-flops or open backed sandals).11. If you use urinary incontinence pads, please bring them with you.12. If you wear hearing aids, please wear them to the hospital and bring an extra set of batteries. Please wearyour glasses and/or dentures as well. Bring the containers for all of these labeled with your name (this isimportant).13. If you use a CPAP/BiPAP machine for breathing at home, please bring that with you to the hospital.14. DO NOT bring large amounts of cash, credit cards, or jewelry to the hospital. Arizona Spine and JointHospital cannot be responsible for valuables brought to the hospital.15. DO NOT bring in any extension cords or personal fans.The Morning of Surgery1. Starting at midnight before surgery DO NOT eat or drink anything. This includes food, water, gum,candy, alcohol, and tobacco. Only take approved medications with a small sip of water. If your surgeonhas not instructed you on what medications to take the night before and the morning of surgery, pleasecall the office.2. Take a shower at home, using regular soap. DO NOT use any perfume, powder, facial moisturizers orlotions after your shower. DO NOT shave. DO NOT wear any make-up especially eye makeup.3. You may brush your teeth, but DO NOT drink any water.4. Limit the jewelry that you wear to only what you cannot take off.5. When you arrive at the hospital, go directly to the front desk and check in. Check in does not begin priorto 5am, as 5am is when the lobby opens.6. Once you are checked in, the staff will escort you to the pre-surgical area where a nurse will prepare youfor surgery and you will speak with the anesthesiologist.7. Notify the surgeon and/or staff if you have any current cuts, illness, vomiting, fever greater than 100degrees, insect bites, or dental issues.
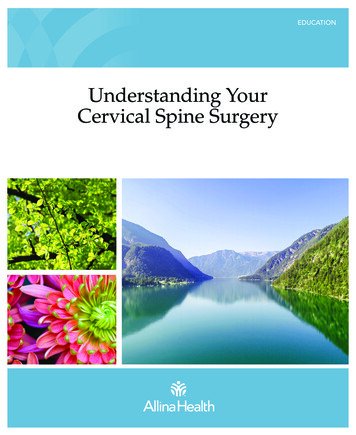
88. When all preparations for surgery are completed, you will be taken to the operating room.9. Your family may wait in the waiting area. If they choose to leave during your surgery, we ask that theynotify someone at the front desk. When your surgery is complete, the surgeon will come to the waitingarea and explain how your surgery went and answer any questions your family/friends may have.Post-Op (Immediately After Surgery)1. After surgery you will spend approximately 1 hour in the recovery room. Since everyone is different,this is just a guideline. The front office staff will notify your family once they can come over to yourinpatient room.2. Once your vital signs are stable and you’re not having any complications you will be transferred by bed,to the inpatient nursing unit where you will spend the next 1 to 2 days.3. The nursing staff will monitor your vital signs (temperature, pulse, pain, breathing, and blood pressure)and check your dressing frequently for the first 4 hours that you are on the nursing unit.4. You will have an IV and receive antibiotics for the first 24 hours to prevent any possible infection.5. If necessary, your surgeon will place a very fine drainage tube in the surgical wound. This drainage tubeis connected to a collection device where the fluid it collects is measured then wasted.6. To reduce swelling, lower your risk for a blood clot (DVT), and improve circulation we may placedifferent devices on your legs/feet. These may be ace wraps, support stockings (TEDs), SequentialCompression Device (SCDs), or Plexi Pulses. Each of these items will be removed and reapplied onceor twice a day for skin care unless your surgeon orders otherwise.7. You may receive oxygen for the first 12 to 24 hours via a nasal cannula or mask to ensure your lungs areproperly oxygenated. A small monitor (pulse oximeter) will be clipped to one of your fingers so thenurse will know your pulse and blood oxygen level at any given minute.8. Fluid can collect in the lungs after surgery. To help clear your lungs, the nursing staff will teach youdeep breathing exercises using an incentive spirometer (IS). These exercises must be done 5 times everyhour while awake to prevent respiratory problems, such as pneumonia. To complete the exercisescorrectly follow the steps below:STEP 1. EXHALE Relax and breathe out, completely emptying lungs.STEP 2. PLACE LIPS AROUND MOUTHPIECE Make sure to hold the device upright and not tilted. Tightly seal lips around mouthpieceSTEP 3. INHALE Breathe in slowly and deeply through the mouthpiece Inhale as much air as possible while keeping the indicator hovering between the arrows.STEP 4. REPEAT Repeat breathing exercise 5 times every hour, or as instructed by a member of yourhealthcare team.
99. It is very common for patients to experience nausea after surgery. To help alleviate this problem thenursing staff will first give you ice chips and clear liquids. Once you can tolerate liquids without nausea,you will be advanced to a regular diet once cleared by your nurse10. If you experience any pain, nausea, itching, or difficulty sleeping be sure to tell your nurse so they mayadminister the appropriate medication to resolve the problem. Sleeping medications are not usuallyadministered the night of surgery due to the anesthesia and high doses of pain medication administered.11. Sometimes after surgery patients are not able to urinate as a side effect of anesthesia. Should this occur,the nurse will place a catheter in your bladder to drain it and then remove it once the bladder is drained.This may be repeated in 4 hours. If still unable to void in another 4 hours, a Foley catheter may beplaced then removed the next day.12. Your surgeon will prescribe any medication you routinely take and medication that is specific to yoursurgical procedure. Please be aware that some of your medication that you regularly take may not beordered right away. This is all dependent on your condition and other factors. If you have any questions,please ask the nurse.13. A “Hospitalist” or an “Internal Medicine” doctor may see you while you are here. They are responsiblefor your medical care outside the surgeon’s scope of care.14. Hand hygiene is one of the most important ways to prevent the spread of infections (flu, surgical siteinfections, etc.)How can hands be cleaned?Either by washing with soap and water for at least 20 seconds, or using alcohol hand gel. Alcohol hand gelis located in the dispensers on the walls in patient rooms and in the hallways. No water is required when thealcohol hand gel is used. You will be provided with hand sanitizing gel packets to use while you are here.When should caregivers clean their hands?Hands should be cleaned before and after any contact with a patient. This means that before and after yourcaregiver provides care, their hands should be cleaned. A caregiver can be a nurse, doctor, the persondrawing your blood, or anyone who helps take care of you. If your caregiver is wearing gloves, their handsshould be cleaned before putting the gloves on and after they take them off.What should you do if you are unsure your caregiver cleaned their hands?It is your right to ask your caregiver if they have cleaned their hands. At Arizona Spine and Joint Hospital,we want you to take an active role in your care. We want you to ask questions and participate as we care foryou. Please notice the handwashing reminder sign that are in your room. They are there to remind you to askif we have cleaned our hands.When should you clean your hands?Everyone should clean his or her hands often. This means after using the restroom, before eating, aftersneezing or coughing, or any time they are dirty. You can use soap and water or alcohol hand rubs. Either ofthese is a good choice to protect your health. Let your visitors, family, friends, and children know when theyshould wash their hands too. Family and friends who visit should not touch the surgical wound or dressings.
10Post-Op Day One (First Day after Surgery)1. Your first day after surgery is called “Post Op Day 1.” You will often hear the staff referring to yourstay as “Post Op Day 1, or 2” while you are here. We number your days in this manner, to track howyou are progressing after your surgery.2. If you experience any of the following symptoms: pain, nausea, itching, difficulty sleeping,constipation, or have any concerns please notify the nursing staff so the appropriate treatment or actionscan be initiated.3. Your pain medication is changed from IV to oral pills. The object is to maintain a comfort level thatwill allow you to perform in physical therapy and get proper rest. It is essential that you tell your nursewhen you are having pain so your pain is well controlled at all times.4. Your diet will be advanced from clear liquids to a regular diet if you are not experiencing any nausea orvomiting.5. Your IV fluids may be stopped if you are tolerating food and liquids and if you are producing adequateurine.6. Physical therapy will assist you in performing your strengthening exercises and walking twice a day.After walking you will be expected to sit in a chair for approximately one (1) hour before you areassisted back to bed. Pain is an unfortunate consequence of increased activity at this stage of yourrecovery; therefore we recommend you ask for pain medication prior to therapy. Pain medication isnormally given every four hours upon request.7. You will be encouraged to tend to your personal hygiene as much as possible. It is considered part ofyour rehabilitation. You will be given as much assistance as you need with a morning sponge bath.(Some of the surgeons will not allow you to take a shower for 10-14 days after surgery).8. While you are in bed, the nursing staff will periodically assist you in turning from side to side andrepositioning yourself for comfort.9. Your support stockings (TEDs) will be removed and reapplied once or twice a day.10. If you have a drain it may be removed by the surgeon or the nursing staff when ordered by the surgeon.11. If you have a Foley catheter in your bladder it will be removed 12 to 24 hours after surgery.12. If your blood oxygen level remains above 92%, the nasal canula and finger monitor will bediscontinued.13. In the early A.M., the lab tech or nurse will draw blood from you so your surgeon and doctor can followyour blood levels.14. Preventing Falls, You must have a staff member with you every time to get out of bed or out of thechair. This includes walking to the bathroom or commode and for the return trip. Family, friends andguests CAN NOT replace a staff member during ambulation. Please call so you won’t fall.
1115. Bathroom Safety, You are not allowed to stand up from the toilet or commode without a staffmember at your side. This includes wiping yourself and flushing. Patients can become very weakafter sitting on the toilet. Even standing on your own can be difficult without assistance.Post-Op Day Two (Second Day after Surgery)1. With assistance from the nursing staff and physical therapy you will increase your activity level,walking, and sitting each day.2. You will eat all of your meals sitting up in a chair.3. Some patients have difficulty sleeping after surgery because of pain or the change in their environment.Whatever the reason, tell the nursing staff and they will place you in a position of comfort andadminister pain or sleeping medication if desired.4. Many patients experience constipation after surgery as a result of the pain medication, decreasedactivity, alterations in their diet, and use of Iron. To prevent constipation you will be given stoolsofteners prophylactically starting the night of your surgery. You should drink plenty of fluids andincrease your fiber intake. If constipation persists, your nurse will administer laxatives to assist you inhaving a bowel movement. You need to have a bowel movement before you are discharged from thehospital. You may continue to experience constipation after discharge. You may need to continue takingstool softeners and/or laxatives at home.
125. Continue use of your incentive spirometer (IS) and deep breathing exercises.6. Continue to wear your support stockings (TED hose).7. The nurse may change your dressing every day (as ordered by your surgeon) after the original surgicaldressing has been removed. Newer forms of dressing may not require changing. Your nurse will teachyou and your family how to care for your incision after discharge. It is normal to have some swellingand bruising. Please ask your nurse if you have any questions.8. If the Foley catheter in your bladder has not been removed, it is removed and nursing staff will assistyou to the bathroom or bedside commode. Bedpans are NOT allowed. You are having this surgery toregain your independence, not to be dependent.9. You will be encouraged to tend to your personal hygiene as much as possible. It is considered part ofyour rehabilitation. You will be given as much assistance as you need with a morning sponge bathPhysical TherapyYou will receive physical therapy twice a day.During your hospital stay physical therapy is responsible for teaching you the following: How to walk using a front wheeled walker (FWW), if one is needed. The proper technique of getting out of bed without using any assistive devices in preparation fordischarge home. How to get in and out of a chair and on and off a toilet using proper body mechanics. You will be educated on the mechanism of disability (protective response) and how to manage this.The “Protective Response” your body initiates following surgery is pain and swelling. Thiscombination is intended to protect your body from further injury if trauma occurs. Your bodyequates surgery with trauma. Our job is to assist the body in reducing the “protective response” aswe introduce activity. As the “protective response” decreases we will have freer movement andincreasing strength allowing for better mobility.The duration of your therapy will increase as you become stronger and more independent each day.
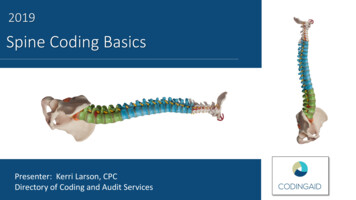
13Activity LevelThe nursing and physical therapy staff are responsible for teaching and assisting you with the following: The proper technique of getting in and out of bed using the Log Roll method. How to use a front wheeled walker (FWW) if one is needed. Walking 3-5 times per day, with each walk being progressively longer. Sitting up in a chair for all meals.Log RollGetting Out of Bed using the “Log Roll” Tighten your stomach muscles. Roll onto your side. Raise your body as one unit, DO NOT twist. Scoot to the edge of the bed. Use your arms to push up off of the bed. Press down with your arms to raise your body as you gentlyswing both legs to the floor. Place one foot slightly behind the other. Keep your stomach muscles tight. Then use your thigh muscles to raise your body up.Getting Into Bed using the “Log Roll” Back up until the edge of the bed touches the back of your legs. Tighten your stomach muscles. Bend forward slightly from the hips Use your thigh muscles to lower your body onto the bed. Using your arm for support, lower your body onto its side. Move your body as a unit, allowing your feet to lift onto the bed. Roll onto your back without twisting your waist.
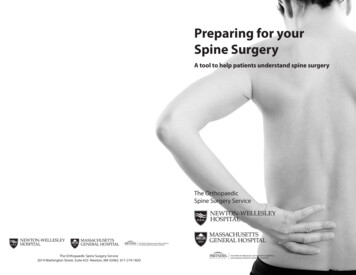
14Using Your WalkerThe physical therapist or the nursing staff will ensure your walker is properly adjusted and explain some safetyrequirements the first time you use your walker.Fitting the Walker1. Safety – Walkers are designed to fold flat so they are transportable. You will hear a click when youopen each side of the walker. This click indicates the locking mechanism is in proper position and thewalker is safe to use.2. Proper Fit – To ensure the walker is the proper height for you, stand in the walker with the cross bar infront of you. When your arms are relaxed at your sides the handgrips of the walker should beapproximately level with your wrists. When grasping the handgrips, your shoulders should be level andrelaxed and both arms should be just slightly bent at the elbows. All four legs of the walker areadjustable and the fitting process takes only a few minutes.3. Your own Walker – If you have your own walker that you would like to use at home, please havesomeone bring the walker to the hospital the day of surgery. Leave it in the car and have someone bringit in once you are to the inpatient room. This will ensure the physical therapists have the time needed toevaluate the walker for proper fit and condition.To Stand Using A Walker1. To stand, use one hand to push up from the bed or chair, your other hand to push down on the walkerwhile at the same time pushing up with your non-surgical leg.2. Once you are standing, place both hands on the walker handgrips and try to stand straight for a fewmoments to gain your balance.
15Walker Safety Before you take each step you must ensure that all four (4) legs of the walker are on the floor. Your body must be inside the walker before you move to take each step. Your toes should never pass the front crossbar of the walker to prevent losing your balance. Move the walker a comfortable arms length in front of you. If you feel like you are reaching or bendingforward to take a step, the walker is too far forward. Wear well fitting shoes. Never wear sandals, thongs, flip-flops, or high heels. Your footwear should have a back or strap thatgoes around the back of your foot/heel. Make sure your footwear has a rubberized sole (something to create resistance between your feet andthe floor). Wear shoes that you have worn before, do not wear new shoes. You do not want to learn how towalk with a new joint while breaking in a new pair of shoes. If you wear athletic shoes, your can use elastic shoe laces or use ¼ inch sewing elastic in place ofyour regular shoe laces. It will eliminate the hassle of tying your shoes. Clear all walkways in your home of throw rugs, phone cords, and extension cords to prevent falls. If you have transition areas in your house where the floor surfaces change (i.e. carpet to tile orlinoleum), ensure the surfaces are secured to the floor. Be careful not to trip or fall over thesetransitions. If you must climb stairs in your home, tell the physical therapist so you can practice before you aredischarged home. When you are climbing up you must lead with your non-surgical leg and step downusing your surgical leg. You will be taught how to use the stairs while you are here.
16Assistive DevicesAfter surgery bathing, dressing, and toileting may appear to be a major undertaking but with the rightequipment and skills you will be able to adapt very easily. There are a great many assistive devices on themarket today. The nursing staff and the physical therapist will demonstrate how to use certain assistive devicesthat can increase your independence following discharge from the hospital.Dressing DevicesDressing should be done in a seated position with the surgical leg dressed first. When undressing, the surgical leg should beundressed last).*Long-Handled Reacher*Sock Aid*Dressing StickBathing Devices*Long Handled Sponge*Hand Held Shower Head*Shower Chair or BenchToileting Devices*Commode*Elevated Toilet Seat
17Activities after Spine Surgery*** Your surgeon has the final say on any and all activities. ***Activities you can EXPECT to perform after spine surgery: Stationary bicycling Nordic Track (stationary skiing) Ballroom dancing Square dancing Golf Swimming WalkingMost of the activities listed above are aerobic in nature, therefore, good for the heart.Recommended activities after spine surgery: Gardening/Yard work Table Tennis (Ping Pong) Cross-country skiing Bicycling (street) Bowling Fencing Hiking Speed WalkingAlthough prior experience and skill is required for most of these activities, they are quite safe. If youwould like to try any of the above activities and have no experience, it is recommended that you speakwith your surgeon first. Also, it is recommended that you receive lessons from a qualified instructor.Activities Requiring Surgeon Approval: Aerobic exercise Calisthenics Canoeing Downhill skiing Horseback riding Ice-skating In-line skating Jazz dancing Tennis–doublesWhile safe in most cases, your surgeon should approve your participation in any of the above activities.Recovery from spine surgery is unique for each person. There may be precautions for you to knowabout before you participate in these activities.
18Activities after Spine Surgery (con’t)Activities to be avoided: Baseball Basketball Football Handball Jogging Racquetball/squash Soccer Softball Step machines Tennis-singles VolleyballThe activities listed above should be avoided because of the undue stress and twisting motions that occur. Someof these activities have potential for sudden, high impact movement, which can interfere with your recovery.
19AnatomyIn order to better understand the most common injuries and diseases of the spine, it is essential to have afundamental understanding of spine anatomy and its role in the body. The human spine is a remarkable structureand it performs a number of important functions: It provides protection for the spinal cordIt provides the support needed to walk uprightIt allows the torso to bend and twistIt s
SPINE SURGERY BOOK 4620 East Baseline Road, Mesa 85206 Call (480) 824-1229 or (480) 824-1306 to register IP006 R2 1/20 . 2 Author Christopher J. Shaw RN, MN Contributors Vivan Standage, RN, MS, ANP Kristy Hufford, PT, DPT Stephanie Potter RN, BSN Heather Lorig, CM David Wasserbeck, PT