Transcription
Essex Silver-LineSL1218 & SL1218OVS Parts DiagramRead This BookThis book has important information for the use and safe operation of this equipment. Failure to read thisbook prior to operating or attempting any service or maintenance procedure for your Silver-Line machinecould result in injury to you or to other personnel: damage to the machine or to other property could occur aswell. You must have training in the operation of this machine before using it. If you or your operator(s)cannot read English, have this manual explained fully before attempting to operate this machine.All directions given in this book are seen from operator’s position at the rear of the machine.Essex Silver-Line Corporation, 1118 Lakeview Ave. PO Box 40, Dracut, MA 01826www.essex-silver-line.com(December 2011)
RefinishingThe Silver-Line Way(Visit our website www.essex-silver-line.com under consumer tips for complete information)Job Preparation:Remove the furniture, wall hangings, etc. Clear the room out!Remove the old carpet, carpet pad and carpet strip (where necessary)Locate & Reserve only Silver-Line Sanders & Edgers from your local rental storeWatch the Silver-Line “How to” VideoInspect the floor for and remove Staples from the carpet padNails from the tackstripNails protruding from the floor (countersink these nails)Make sure you are very diligent when completing this task, protect the rental machine!You may be liable for damage to the drum and disc pad on the rental equipment!Protect the rest of your house from sawdust, sweep the floor and vacuum, and pick up the equipment!Sanding the Floor:What are you trying to accomplish during this project? First, you want to level the floor, and remove the old finish. The remaining cuts or passes are to remove the scratch marksmade by the previous cuts. Do not skip too many grits when sanding the floor, as the finer grits may not be able to remove the heavier scratches.Start the process with the highest grit possible to complete the first cut, leveling and removing the finish. If a 36 or 40 grit will accomplish the task, then do not use 20 grit orheavier. If it seems to be taking too long, drop down and use the heavier grit. By doing this you will probably save time.Break the room down into two sections, 1/3 to 2/3 and sand the larger area first. Complete the 2/3 section and turn around to sand the remaining 1/3. Do this with all the grits.Offset where you stop and start the sanding so you do not end up with a line across your floor at the end of the project.SandFirst2/3Floor SandedLevel w/SL-81/3SandSecondBring thislevel to wallw/SL-73
Use the SL-8 sander for the main section of the floor and then follow with the SL-7 edger. This method will allow you to set the level you want in the main section of the floor andthan bring it out to the edge of the room with the SL-7.To use the Silver-Line SL-8 correctly, you sand forward and backward on the same line with the SL-8 sander. Be sure to lift up on the handle with enough force to keep the drumpressure constant on the floor. Feather the sander so the drum comes off the floor while moving forward or backward when you reach an area that you need to stop.The following grits are recommended for a professional looking sanding job. Again, you want to start with the least aggressive grit to complete the leveling and finish removal andproceed up through the grits.20, 36 or 40, 60 and finally 100Note: If you trip a beaker or blow fuse, turn off the equipment off, then reset the breaker or replace the fuse.Note: Remove all sawdust from the house as you empty the dust bags. Empty your sander bags when they are ½ full, this will help with the dustpick up. Sawdust can be flammable and you do not want it in your house.Note: When using the SL-7 edger, sand from right to left and let the edger do the work. A properly aligned edger, with a disc pad in goodcondition will function well without the user exerting additional pressure. Let the edger do the work; don’t put extra pressure on the machine.Work at a pace you are comfortable with, and take frequent rests.If the cutting action of you sander seems to slow or diminish, it is probably time to change the sandpaper. In an effort to save money, don’t tryto extend the life of the paper, replace it as needed. If you skimp on the amount of paper you use on this project it will affect the end result.Don’t look at the cost at the time of sanding, but rather over the life of the floor. Replace abrasives to get the same type of cut across thefloor.After you sand the floor with the SL-8, SL8V2 & SL-7 it is time to scrape corners, door jambs, etc. Use our 12 wood handle scraper with a 1”Red Devil blade, available from the rental store, to accomplish this task. Hand sand the areas you scraped.If you have areas such as baseboard heat, radiators or toekicks that could not be reached by the SL-7, use the Silver-Line U2 underradiatorsander to clean up these areas. It uses 5” abrasive (either PSA or Hook & Loop) discs and is also available at the rental store.When your done sanding your floor return your sanders to the rental store. Remember to return the cords, wrenches, bags and unused supplies.Note: After sanding you should screen the floor before you apply any finish or stain to achieve the best possible finish. A professional floorsander will screen his work; spend the time and money to screen your floor.4
Proper Application & Use of12, 16, 20* grit Sheets & DiscsSilver-Line AbrasivesFor removing old surface coatings and leveling uneven floors36, 40* grit Sheets & DiscsFor intermediate sanding of floors following rough sanding.For initial sanding of moderately worn floors60*, 80, 100* grit Sheets & DiscsFor finish sanding of all floors prior to applying new coatingsFor removing light scratches, sanding marks and minor surface damage60, 80, 100, 120, 150 & 180 grit SandscreensFor removing fine scratch marks prior to applying new coatingsFor light sanding between surface coatings*Indicates most popular rental grits for sanding floors. 60 & 100 grit should be used in succession for proper finish. Never skip more than twogrits when sanding a floor.Example: Do not jump from 36 grit to 80 or 100 gritAlways start your sanding project with the highest possible grit that will cut and level your floor. If the grit will not cut the finish or level thefloor, go down one grit size to complete the cut!White* Thick Nylon PadsBuffing, for polishing floors where highest luster is desiredGreen Thick Nylon PadsScrubbing, for general duty scrubbing and spot removal on floorsBlack Thick Nylon PadsStripping, for heavy duty wet stripping of floors* White pads should be used under the padlocks when using sand screens on rotary and orbital polishers. They are used for driving sandpaper onOrbital Polishers.5
Notes:6
7
Diagram#QTYItemDescriptionList h,R9B, R9C,R15) 185.50D14D14D14-101R10R10-Handle Nut (1/4-28 Stop Nut) 1.37D14D14D14-111R11R11-Strainer Reliever Nut (Inside Handle) 0.53D141R12R12-Strain Reliever Washer (Inside Handle) 0.53D14D14-131R13R13-Back Plate 8.56D14D14D14-R13A-S1R13A-SR13A-S (Set of Screws for Back Plate) 1.05D14D14D14-141R14R14-Handle Cover 7.79D14D14D14-152R15R15-Handle Grip 6.91D141R15-SR15-S (Set of 2) 13.59D14R14R14-161R16R16-Latch Assembly 31.50R14R14R14-16A1R16AR16A-Latch loop 3.50R14R14R14-16B1R16BR16B-Latch Spring 8.75R14R14R14-16C1R16CR16C Latch Bar 19.25R14D14D14-171R17R17-Toggle Guard/Back Plate Fasteners (set) 1.99D14D14D14-181R18R18-Cord Grommet 1.66D14D14D14-21R2R2-Switch (SL1218R) 24.33D141R2:R2(N)R2 Hex Nut for R2 Switch 0.18D14D14D14-31R3R3-Toggle Guard 19.25D14D14D14-3-S1R3-SR3-S Toggle Guard Screws (Set of 2) 1.05D14D14D14-41R4R4-Strain Reliever 24.61D14D14D14-51R5R5-Short Cord(upper)(14/3-600V 18') 4.38D14D14D14-61R6R6-Twist Lok (male) 14.99D14D14D14-71R7R7-Twist Lock (Female) 22.99D14D14D14-81R8R8-Short Cord(Lower)(14/3-300V 24') 6.32D14D14D14-9A1R9AR9A Handle Bolt (1/4-28 x3 1/2) 3.33D14D14D14-9B1R9BR9B Bolt Support SL1218R fits 3/4" Hole 7.00D14D14D14-9C1R9CR9C Handle/Chassis Spacer (2) 2.80D148
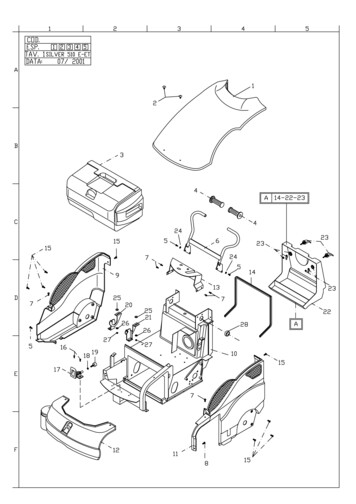
Diagram#D15D15-19D15D15QTYItemDescriptionList PriceDiagram1R19R19-Bottom Plate (SL001) 280.00D15D15-201R20R20-Rubber Boot (RD0911) 50.75D15D15-218R21R21-Tower Spacer (Metal) 2.98D15D15D15-228R22R22-Tower Spacer (Rubber) 0.79D15D15D15-238R23R23-Inner Tower Spacers (Rubber) (ITS) 0.61D15D15D15-248R24R24-Tower Rubbers 5.78D15D15D15-254R25R25-Tower Bolt(1/4-28x5-1/4 Hex Head Cap) 3.68D15D15D15-264R26R26-Tower Bolt Acorn Nut 1.93D15D15D15-521R52R52-Tower Rebuilt Kit(1set/Machine) 57.75D159
10
Diagram#QTYItemDescriptionList PriceDiagramD16D16-271R27R27-Machine Base/Chassis 665.00D16D16D16-281R28R28-Motor Shroud 169.75D16D16D16-28A1R28AR28A-Motor Shroud Fasteners(4/set) 10.50D16D16D16-291R29R29-Shroud Grommet 2.45D16D16D16-312R31R31-Wheel 15.75D16D16D16-31S1R31-SR31-S Wheel (Set of 2) 29.99D16D16D16-32W2R32WR32W-Wavey Washer 3.68D16D16D16-32W-S1R32W-SR32W-S Wavey Washer (Set of 2) 7.25D16D16D16-332R33R33-Wheel Washer (1/2 SAE Flat) 0.60D16D16D16-33-S1R33-SR33-S Wheel Washer (1/2 SAE Flat) (Set of 2) 1.05D16D16D16-342R34R34-Wheel Bolt 3.68D16D16D16-24S1R34-SR34-S Wheel Bolt (Set of 2) 6.99D16D16D16-361R36R36-Lift Handle 21.00D16D16D16-36A1R36AR36A-Lift Handle Fasteners(2washer,2bolts/set) 2.80D16Diagram#QTYItemDescriptionList PriceDiagramD17D17-201R20R20-Rubber Boot (RD0911) 50.75D17D17D17-371R37R37-Flywheel(1750)Slow Speed 168.00D17D17D17-37A1R37AR37A-Flywheel Set Screw 0.53D17D17D17-381R38R38-Motor 1Hp (Baldor) 630.00D17D17D-17-391R39R39-Motor Reset Thermal Overload Switch(RED) -Protector 42.00D17D17D17-401R40R40-Motor Shaft Key 0.53D17D17D17-421R42R42-Motor Bell (Fan Cover) 50.75D17D17D17-441R44R44-Capacitor Box 17.50D17D17D17-454R45R45-Motor Bolts (4/Set) 2.10D17D17D17-462R46R46-Flywheel Bearing (6009LL) 28.00D17D17D17-46S1R46-SR46-S Flyweel Bearings (Set of 2) 54.99D17D17D17-471R47R47-Motor Cord 4.38D17D17D17-481R48R48-Right Angle Wire Holder 5.29D17D17D17-491R49R49-Carpet (12 x 18 w/5 Holes) 35.00D17D17D17-61R6R6-Twist Lok (male) 14.99D1711
12
Diagram#QTYItemDescriptionList PriceDiagramD18D18-191R19R19-Bottom Plate (SL001) 280.00D18D18D18-201R20R20-Rubber Boot (RD0911) 50.75D18D18D18-248R24R24-Tower Rubbers 5.78D18D18D18-271R27R27-Machine Base/Chassis 665.00D18D18D18-371R37R37-Flywheel(1750)Slow Speed 168.00D18D18D18-381R38R38-Motor 1Hp (Baldor) 630.00D18D18D18-38W1R38WR38W Washer 4.55D18D18D18-451R45R45-Motor Bolts (4/set) 2.10D18D18D17846S1R46-SR46-S Flyweel Bearings (Set of 2) 54.99D18D18D18-471R47R47-Motor Cord 4.38D18D18D18-491R49R49-Carpet (12 x 18 w/5 Holes) 35.00D18D18D18-61R6R6-Twist Lok (male) 14.99D1813
Diagram#QTYItemDescriptionList PriceDiagramD19D19-R27OVS1R27OVSR27OVS Chassis for SL1218OVS 544.99D19D19D19-R28D121R28D12R28D12 Combo Motor Cover/Plate/Bracket 364.00D19D19D19-R28 131R28D13R28D13 Risers (Set of 4) for Fan Assembly 39.99D19D19D19-R28 151R28D15R28D15 Fan Housing Grommet 21.99D19D19D19-R28 31R28D3R28D3 Fan Plate OVS 91.89D19D19D19-R28DS1R28DSR28DS Dustless Skirt 299.99D19D19D19-R38OVS1R38OVSR38OVS 1.5HP Motor 725RPM-SL1218OVS 899.00D1914
Diagram#QTYItemDescriptionList PriceDiagramD19AD19A-R28D11R28D1R28D1 Fan Cover OVS 94.50D19AD19AD19A-R28D1A1R28D1R28D1A Cover Bolt (Set of 15) 21.99D19AD19AD19A-R28D111R28D11R28D11 Al Front Lift Handle OVS 56.00D19AD19AD19A-R28131R28D13R28D13 Risers (Set of 4) for Fan Assembly 39.99D19AD19AD19A-R2813A1R28D13AR28D13A Bolt Set for R28D13 Risers (Set of 4) 13.99D19AD19AD19A-R28D161R28D16R28D16 - Small Pulley SL1218OVS Fan Assembly 62.99D19AD19AD19A-R28D171R28D17R28D17 - Large Pulley SL1218OVS 6" 92.99D19AD19AD19A-R28D21R28D2R28D2 Fan Housing OVS 140.00D19AD19AD19A-R28 31R28D3R28D3 Fan Plate OVS 61.16D19AD19AD19A-R28D82R28D8R28D8 Side Lift Handle OVS 31.99D19AD19AD19A-R28D8A2R28D8AR28D8A Nut & Washer Set for R28D8 5.69D19AD19AD19A-R28 D91R28D9R28D9 Fan Belt OVS 21.99D19A15
Diagram#QTYItemDescriptionList Price2.09DiagramD19BD19B-R28D1B13R28B1BR28D1B - Clip for OVS Cover D19BD19BD19B-R28D1B-S1R28B1B-SR28D1B - Set of Clips for OVS Cover (13) 21.99D19BD19BD19B-R28D102R28D10R28D10 Bracket Vacuum Wheel OVS 42.00D19BD19BD19B-R28D12B-S2R28D12B-SR28D12B-S (Set of Bolt & Washers for D12L or D12R) 7.29D19BD19BD19B-R28D12L1R28D12LR28D12L 1218OVS Polyurethane Dust Collector (Left) 166.25D19BD19BD19B-R28D12R1R28D12RR28D12R 1218OVS Polyurethane Dust Collector (Right) 166.25D19BD19BD19B-R28D141R28D14R28D14 Dust Bag 25.99D19BD19CD19C-R28151R28D15R28D15 Fan Housing Grommet 21.99D19CD19CD19C-R28D312R28D31R28D31 - 7" Vac Hose 1-1/2" Dia 14.99D19CD19CD19C-R28DC2R28DCR28DC Cuff for SL1218OVS @ Vac 21.99D19CD19CD19C-R28DC23R28DC2R28DC2 Straight Hose Cuff for OVS Hose System 20.99D19CD19CD19C-R28DC32R28DC3R28DC3 90 Degree Hose Cuff for OVS Hose System 21.99D19CD19CD19C-R28DC41R28DC4R28DC4 "T" Connector for OVS Hose System 19.99D19CD19CD19C-R28DC51R28DC5R28DC5 Adapter for OVS Hose System 19.99D19C16
Essex Silver-Line Corporation1118 Lakeview AvePO Box 40Dracut, MA 01826Phone (978) 957-2116, Fax (978) 957-6989, Toll Free 800 451-5560Visit us on the World Wide Web at:www.essex-silver-line.comEssex Silver-Line CorporationLimited One Year WarrantyEssex Silver-Line Corporation warrants the floor sanding equipment for a period of one year from the date of original purchase. We will repair or replace at our option, any part orparts of the products under this warranty which examination proves to be defective in workmanship or materials during the warranty period. For repair, return machine or parts toEssex Silver-Line Corporation transportation prepaid. This warranty does not apply to repair or replacement required due to misuse, abuse, normal wear and tear and/or repairsattempted or made by other than our service center. For the purpose of this warranty, damage resulting from accident, use of defective or inadequate wiring at the installation inwhich used, improper cleaning or operation, fire, floods or act of God, are not covered. No other warranty implied or expressed is offered and under no circumstances shall EssexSilver-Line Corporation be liable for an incidental or consequential damage.17
9 Diagram # QTY Item Description List Price Diagram D15 D15-19 1 R19 R19-Bottom Plate (SL001) 280.00 D15 D15 D15-20 1 R20 R20-Rubber Boot (RD0911) 50.75 D15