Transcription
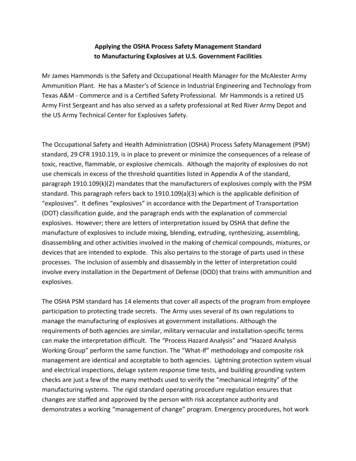
1.1 Safety in the ScienceClassroomSafe practice in the science lab includes knowing how to behave safely during labactivities and what to do in an emergency. Lab safety rules restrict certain kinds ofactivities, such as horsesplay or eating during a lab. But they also make it possiblefor you to safely carry out investigations that contain an element of risk. Warninglabels are used on commercial, industrial, and home products that contain hazardouschemicals. Several labelling systems are used, including the Workplace HazardousMaterials Information System (WHMIS).Words to Knowhazard symbolWHMISWelcome to the science laboratory! In this unit, you will gain experienceobserving and controlling changes in matter. Experimenting is a centralpart of science, and no study of chemistry is complete without it (Figure1.1). In all activities, you must make safety the first priority. Remember tostay alert in experiments and watch out for your safety and the safety ofothers.Make Safety Your First PriorityYou need to be careful and considerate in the laboratory. But more thangood behaviour is required. To be able to work safely and withconfidence, you must have the right kind of knowledge, an awareness ofwhat is happening, and an ability to act.You need to know safety rules before you start a science activity. Thisknowledge helps you prevent accidents. For example, to prevent brokenglass or a chemical damaging your eyes, wear safety eyewear.Know and follow the safety rules in your lab and know what to do inan emergency. General rules about safety are explained in this section.Your teacher will helpyou apply the rules toyour science classroom.You need to beaware of safeprocedures while youare doing your labactivity. Be careful ofwhat you are doing andalso of what others aredoing.Figure 1.1 Manydiscoveries in chemistry arebased on experiments donein laboratories.8MHR Unit 1 Atoms, Elements, and Compounds
You can put your knowledge and awareness to good use by acting toprevent or deal with an accident. Most accidents can be prevented. Whenyou spot an emergency, first call out a general warning loud and clear,such as “Fire!” or “Help!”—and then take action.In an emergency, you do not need permission to use emergencyequipment—just recognize the emergency and take action. Always actfirst to protect yourself and others from harm. To do this, you need toknow where the emergency equipment is in your lab and how to use it.Your teacher will show you.1-1AScience Lab SafetyDid You Know?Accident rates for workers inBritish Columbia are highest foryoung and newly hiredemployees. This is because safeskills need to be learned andpractised until they becomesecond nature.Think About ItSafe lab procedures include anticipating dangers andrecognizing them when they occur. In this activity, youwill identify unsafe practices shown in the illustration.Some are obvious, while others are more subtle. Try tofind as many as you can.2. Make a three-column table. In the first column, listthe unsafe practices you have identified. In thesecond column, list an injury that might occur as aresult of each practice. In the third column, suggest asafer, better way to carry out each procedure.What to DoWhat Did You Find Out?1. Work with a partner. Identify as many unsafepractices as you can find in the illustration.1. Share your observations with your class.2. Add to your list any observations another groupmade that you had not already identified.Chapter 1 Atomic theory explains the composition and behaviour of matter. MHR9
Rules to Help You Stay SafeRules for safe conduct in the lab are based on common sense andknowledge of safe lab practices and procedures. Keep in mind that carefuland orderly behaviour is not just good manners, it protects you andothers from dangerous situations that might occur.Here is a list of safety rules that apply to all lab work in science.Safety Rules for the Science LabGeneralGlassware1. Always work under supervision and only onapproved activities. Never change aprocedure without your teacher’spermission.10. Never use broken or chipped glassware.Dispose of it in a “sharps” bucket or asyour teacher directs. Use clean glassware,and after use wash it, or put it in anapproved place to soak.2. Make sure you know the procedure andhave read it over before you start anexperiment.3. Make sure you know how to use your labequipment properly before you start anexperiment.4. Always use appropriate protectiveequipment, such as a lab apron or protectiveeyewear. Tell your teacher if you are wearingcontact lenses.5. Do not wear loose clothing, sandals, oropen-toed shoes.Chemicals11. Know the safety precautions and hazardsfor all chemicals you are using before youstart your lab.12. If you come in contact with a substance,wash the affected area immediately andthoroughly with water. If you get anythingin your eyes, do not touch them. Washthem immediately and continuously for15 minutes and inform your teacher.6. Do not eat, drink, or chew gum in thelaboratory.7. Never engage in horseplay.8. Know the location and use of all emergencyequipment and emergencyexits (Figure 1.2).9. In case of an emergency, follow proceduresyour teacher has taught you. Use whateveremergency equipment is appropriate torespond to the emergency. Act immediatelyto protect people first and then equipment.Figure 1.2 Knowwhen to use a firealarm. Know where thefire extinguisher is inyour classroom.10MHR Unit 1 Atoms, Elements, and Compounds
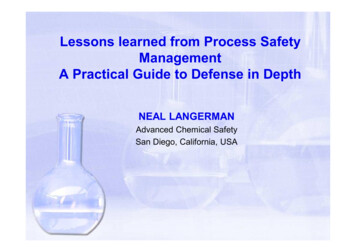
13. Hold containers away from your facewhen pouring liquids.14. Read labels on containers. Never use achemical from a container that does nothave a readable label. Take it to yourteacher.15. When in the lab, never put anything inyour mouth such as fingers, equipment,hair, pencils, or chemicals that you areworking with, even if they are food items.16. Never return a chemical to its originalcontainer. Doing this could contaminatethe original stock.17. Never put any chemical down the sink orinto the garbage without permission.18. Clean up any spills according to yourteacher’s instructions.19. If you are asked to smell a substance,never smell it directly. Hold the containerat arm’s length and waft fumes towardyou. Gradually bring the container closerto your nose until you can smell the fumessafely (Figure 1.3).20. When diluting a concentrated acid withwater, add the acid to the water, not thewater to the acid. This prevents suddenoverheating of the water.Hot Plates and Open Flames21. Handle hot objects carefully. Be especiallycareful with a hot plate even if it looks asthough it has cooled down.22. Know how to light and operate a Bunsenburner.23. Tie back long hair and avoid fuzzyclothing and long sleeves when you are inan area with open flames.24. Never leave an open flame unattended,even for a moment. Assign someone elseto watch it, or turn the flame off.Electrical Equipment25. Make sure your hands are dry whentouching electrical cords, plugs, orsockets.26. Pull the plug, not the cord, whenunplugging electrical equipment.27. Report frayed cords and any otherdamaged equipment to your teacher.28. If any electrical component becomes hotduring an activity, disconnect the circuitimmediately.Figure 1.3 Never smell anything in the lab directly.Always waft the fumes toward your nose.Reading Check1. What do you need to know before you start a science activity?2. What should you do if you begin using a piece of glassware and thendiscover it has a small chip or nick in it?3. Explain what is incomplete about the following rule: Never taste achemical.4. What should you do with a chemical container that has a label youcannot read?5. Describe the safe way to smell a substance.Chapter 1 Atomic theory explains the composition and behaviour of matter. MHR11
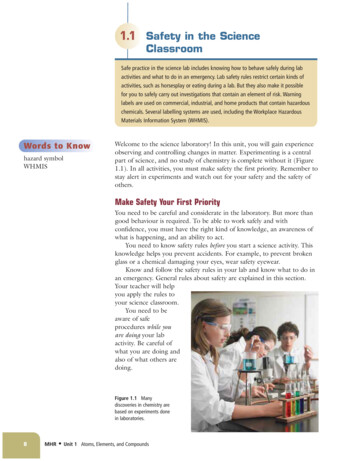
WHMIS SymbolsAn important safety step when using any chemical, whether around thehome, in the lab, or in the workplace, is to check the warning symbols onthe container. The Workplace Hazardous Materials InformationSystem (WHMIS) is used to ensure that everyone has access toappropriate safety information about any hazardous substance they mayencounter that is manufactured and sold. In this system, eight symbolsprovide easy-to-read warnings. A chemical container may have one ormore of the symbols shown in Figure 1.4.Compressed gasFlammable andcombustiblematerialOxidizingmaterialPoisonous materialcausing other toxiceffectsBiohazardousinfectious materialCorrosivematerialPoisonous and infectiousmaterial causing immediateand serious toxic effectsDangerouslyreactive materialFigure 1.4 WHMIS symbolsOther Safety Hazard SymbolsMany products ranging from household cleaners to spray paints arelabelled with another type of safety hazard symbol (Figure 1.5). You mayhave noticed these symbols on products used at home in the laundryroom or with garden equipment. Each hazard symbol provides two kindsof warnings: whether the hazard is the container or its contents, shown by theshape of the border the type of hazard—explosive, corrosive, flammable, or poisonous—shown by an image at the centre of the symbolThe BordersThe HazardsDangerous ContainerThe border that looks like atraffic yield sign means thatthe container is dangerous.ExplosiveThis symbol means that thecontainer can explode. If it ispunctured or heated, piecescan cause serious injuries,especially to the eyes.FlammableThis symbol means that theproduct will catch on fireeasily if it is near sparks,flames, or even heat.Dangerous ProductThe border that looks likea traffic stop sign meansthat the contents of thecontainer are dangerous.CorrosiveThis symbol means that theproduct inside the containerwill burn the throat orstomach if swallowed and willburn skin or eyes on contact.PoisonousThis symbol means that theproduct will cause illness ordeath if you eat or drink it. Forsome products, just smelling orlicking them is enough tocause serious harm.Figure 1.5 Watch for these symbols on products you use at home as well as those you see in the lab.12MHR Unit 1 Atoms, Elements, and Compounds
Reading Check1. What does WHMIS stand for?2. Name the hazard that each WHMIS symbol below identifies.(a)(b)(c)3. Identify each of the following hazard symbols.(a)(b)(c)1-1B Safety Guidelines for Your LabIn this activity, you will select a safety rule listed onpages 10 and 11 or one provided by your teacher andcreate a poster illustrating the rule. Share your posterwith your classmates and then develop safety guidelinescustomized for your classroom.What to DoPart 11. Select a safety rule. Think about a way to show therule visually, such as using an image similar todirection signs in airports or using a short phrase.2. On a sheet of paper, draw a poster that has strongvisual impact and will be a good reminder of oneparticular rule. Make sure the poster can be readfrom at least 3 m away.3. Present your poster to the class, explaining the ruleand your choice of illustration.There is a Material SafetyData Sheet (MSDS) forevery chemical used inschool classrooms. Find outwhat an MSDS is. Read theMSDS for bleach oranother chemical of yourchoice. Start your researchat www.bcscience9.ca.Think About ItPart 24. Work in pairs or small groups to develop a set ofsafety guidelines that could be used as a safetycontract for the students in your classroom. Yourguidelines should incorporate the following. information from the class posters andBC Science 9 information specific to your class about locationof safety equipment and procedures forevacuation other information to ensure safe and responsibleways of working in your class5. Share your contract with several other groups.What Did You Find Out?1. How could you improve your safety poster?2. (a) How could you improve your safety contractbased on what other groups have included intheir contracts?(b) Make your refinements and sign your contract.Chapter 1 Atomic theory explains the composition and behaviour of matter. MHR13
WHMIS Symbols An important safety step when using any chemical, whether around the home, in the lab, or in the workplace, is to check the warning symbols on the