Transcription
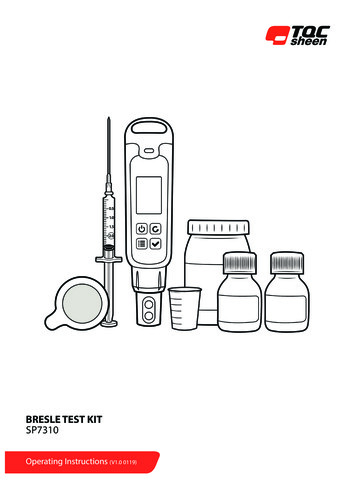
BRESLE TEST KITSP7310Operating Instructions (V1.0 0119)
INDEX11.11.21.31.4Instrument DataProduct DescriptionName/ArticleStandardsScope of Supply42Instrument Layout and Functions533.13.23.3PreparationsDetermine Test AreaInstrument PreparationsCalibration4Use5ISO 11127-6116Maintenance117When Something Goes Wrong118Disclaimer116/78/103
1 INSTRUMENT DATA1.1 Product DescriptionThe TQC Sheen Bresle Kit complies with the ISO 8502-6 and ISO 8502-9standards that describe the Bresle Method to assess the level of soluble saltsusing a Bresle patch or Bresle sampler, distilled water and a conductivitygauge. The conductivity is mainly directly proportional to the concentrationof dissolved chloride ions in the solution. The kit includes all the necessaryequipment to execute a Bresle test that will indicate the contamination ofsoluble salts on blast-cleaned surfaces prior to coating. Inside the BresleKit is a conductivity gauge used for the assessment of soluble salt ions aschlorides, sulphates and nitrates.1.2 Name / ArticleSP7310Bresle Test Kit1.3 StandardsISO 8502-6, ISO 8502-9, ISO 11127-61.4 Scope of SupplyCaseDigital Conductivity MeterBresle Patches, 25 piecesDeionised WaterCleansing SolutionCupSyringeManual 4Calibration Solution
2 INSTRUMENT LAYOUT AND FUNCTIONSBattery CompartmentSelected Measurement Method (Cond-TDS-Salt)Battery IndicatorIndication of Unit ( μS/cm of mS/m)Measured ValueTemperatureOn ButtonMenu Button (in menu mode ‘Scroll‘ button)Temperature ElectrodeCalibration Button (in menu mode ‘Exit‘ button)Enter Button (in menu mode ‘Accept‘ button)EC/Conductivity Electrode5
3 PREPARATIONS3.1 Determine Test AreaSelect the section on the steel surface to be used as the test area forassessment of the total surface density of salts. It should preferably be dryand with no loosely adherent rust, dirt or moisture (dampness), so that thepatch frame can properly adhere to the surface. The Bresle patch can beplaced in almost every position, vertical, horizontal, slanting or on surfacesthat are not completely flat.It is recommended to test more than one spot to catch thevariations of the contamination level!3.2 Instrument Preperation1Turn on the Digital Conductivity Meter.2Check whether ‘COND’ is shown at the topleft. If so, perform the measurement. If not,go through the following steps:Click on menu button.Scroll with the ‘menu / scroll’ button until ‘measure’ is selected.Confirm with the ‘enter / accept’ button.Scroll with the ‘menu / scroll’ button until ‘COND’ is selected.Confirm with the ‘enter / accept’ button.Press ‘calibration /return’ button to return to the measurement screen.COND is shown at the top left. 6
3.3 CalibrationCalibration prior to each use is desirable for a reliable measurement.1Remove the plastic cap from the measuringcell.2Place the gauge flat on a flat surface.3Fill up the syringe with deionised water.4Turn on the Digital Conductivity Meter.5Inject the deionised water in the measuringcell.6Push the CAL button. Wait until themeasurement is stabilized.7The display shows CALwas successful.8Push the enter button to return to thenormal display., the calibration7
4 USE1Remove the protective backing of the Breslepatch with its inner protective paper anddispose.2Place the Bresle patch with the adhesiveside to the test surface.3Take care to trap as less air as possible in thepatch.4Press firmly in order to create a tight seal.5Fill up the syringe with deionised water.6Empty the syringe until there is 2,5 ml leftto take care that there are no air bubbles inthe syringe.7Turn on the Digital Conductivity Meter.8Inject the deionised water in the measuringcell until it runs over.9A value is shown on the display. 8
10 Write down the value as blank value.11 Empty the syringe.12 Empty the meter.13 Fill up the syringe with deionised water.14 Empty the syringe until there is 2,5 ml leftto take care that there are no air bubbles inthe syringe.15 Insert the 2,5 ml of deionised water intothe Bresle patch by injecting it through thefoam at an angle of 30º from the surface.16 Dissolve the salts by tapping themembrane for 90 seconds.*17 Extract the water from the patch andreinject into the patch 4 times.Inserting through the transparent partof the Patch or though the bottom sidecould cause leakage!* ISO 8502-6 recommended time is 10 minutes.Most users test at 90 seconds. Always agree on testtime prior to testing.9
18 When finished, extract the entire volumeof water into the syringe and remove thesyringe from the Bresle Patch.19 Turn the Digital Conductivity Meter back on.20 Inject 1,5 ml of this water into themeasuring cell of the Conductivity Meter.21 A value is shown on the display.22 Write down the measured value.23 Calculate the difference between themeasured value and the blank value.(measured value - blank value).The total surface density of soluble salts/contaminants (S) in mg/m2 soluble saltsmeasured as Sodium Chloride is 1 x(measured value – blank value).(All salts are considered as NaCl or SodiumChloride) . “Sample Value” and “ZeroReference” are in microSiemens (μS) percentimeter.If an interpretation of just the chloridesor cl- is required the multiplier will be 0.6instead of 1! 10
5 ISO 11127-67 WHEN SOMETHING GOES WRONGDetermination of the water soluble salts in mineral abrasives,conform ISO 11127-6.When the instruments doesn’t perform the way you expected, usuallyyou can solve it yourself easily. Therefore read this part thoroughly beforeclaiming warranty.Collect a number of samples , minimum 5, of the abrasive at random atdifferent places.Mix them well and take 100 g from this mix into a 100 ml. beaker.Pour 100 ml. distilled water into a 250 ml. beaker which has beencleaned before with distilled water.Take a reading of this water with the conductivity gauge and note thevalue. This is the “Zero Reference”Add 50 g of abrasives to the 100 ml distilled water in the 250 ml. beaker.Shake the mixture well for about 5 minutes and leave it for one hour.Shake again for 5 minutes.The value measured isunstablePossible cause: Pollution?Clean the measuring cell with a dampsoft cloth and rinse the measuring cellthoroughly with demiwater afterwards.Display failsPossible cause: Insufficientbattery power.Replace batteriesCalibration failsPossible cause: Dirtymeasuring cell or old /polluted calibration standard.Always use a ‘fresh ‘ calibrationstandard. Once opened the calibrationstandard will not keep.Decant some of the water into a clean beaker and measure theconductivity.Contact the paint-manufacturer, abrasive supplier or project-manager for themaximum acceptable conductivity level6 MAINTENANCE8 DISCLAIMERMaintenance of the conductivity meter is minimal, because it’s quite easy toperform a measurement. Nevertheless the technology inside the instrumentis very advanced.The right of technical modifications is reserved.The information given in this sheet is not intended to be exhaustive andany person using the product for any purpose other than that specificallyrecommended in this sheet without first obtaining written confirmationfrom us as to the suitability of the product for the intended purpose doesso at his own risk. Whilst we endeavour to ensure that all advice we giveabout the product (whether in this sheet or otherwise) is correct we haveno control over either the quality or condition of the product or the manyfactors affecting the use and application of the product. Therefore, unlesswe specifically agree in writing to do so, we do not accept any liabilitywhatsoever or howsoever arising for the performance of the product orfor any loss or damage (other than death or personal injury resulting fromour negligence) arising out of the use of the product. The informationcontained in this sheet is liable to modification from time to time in thelight of experience and our policy of continuous product development.Depending on the frequency of use, a thin film may occur on the probe.Use a damp cloth to remove this.After each use the instrument should be rinsed with tap water anddemineralized liquid. Make sure the probe stays clean.A blinking battery indicator indicates the batteries need to be replaced.Open the battery compartment cover. Note polarity facing up andremove the old batteries. Replace with fresh ones with the samepolarity. facing up as the old ones.11
www.tqcsheen.com
The TQC Sheen Bresle Kit complies with the ISO 8502-6 and ISO 8502-9 standards that describe the Bresle Method to assess the level of soluble salts using a Bresle patch or Bresle sampler, distilled water and a conductivity gauge. The conductivity is mainly directly proportional to the concentration of dissolved chloride ions in the solution.