Transcription
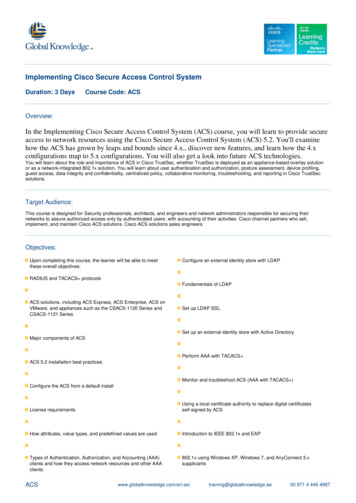
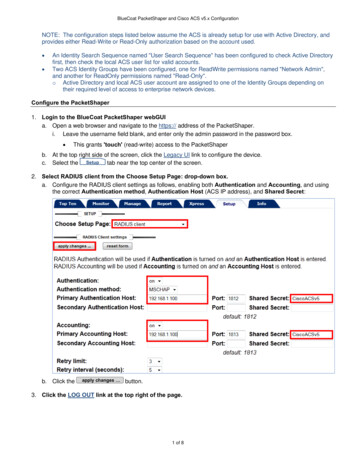
BlueCoat PacketShaper and Cisco ACS v5.x ConfigurationNOTE: The configuration steps listed below assume the ACS is already setup for use with Active Directory, andprovides either Read-Write or Read-Only authorization based on the account used. An Identity Search Sequence named "User Search Sequence" has been configured to check Active Directoryfirst, then check the local ACS user list for valid accounts.Two ACS Identity Groups have been configured, one for ReadWrite permissions named "Network Admin",and another for ReadOnly permissions named "Read-Only".o Active Directory and local ACS user account are assigned to one of the Identity Groups depending ontheir required level of access to enterprise network devices.Configure the PacketShaper1. Login to the BlueCoat PacketShaper webGUIa. Open a web browser and navigate to the https:// address of the PacketShaper.i. Leave the username field blank, and enter only the admin password in the password box. This grants 'touch' (read-write) access to the PacketShaperb. At the top right side of the screen, click the Legacy UI link to configure the device.c. Select the Setup tab near the top center of the screen.2. Select RADIUS client from the Choose Setup Page: drop-down box.a. Configure the RADIUS client settings as follows, enabling both Authentication and Accounting, and usingthe correct Authentication method, Authentication Host (ACS IP address), and Shared Secret:b. Click theapply changes button.3. Click the LOG OUT link at the top right of the page.1 of 8
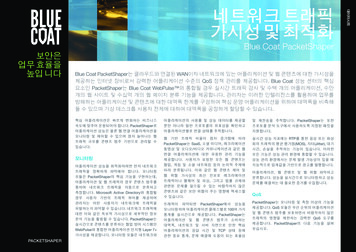
BlueCoat PacketShaper and Cisco ACS v5.x ConfigurationConfigure the Cisco ACS v5.x (GUI)1. Login to the Cisco ACS web GUI2. Navigate to System Administration Configuration Dictionaries Protocols RADIUS RADIUS VSAa. Create the BlueCoat Vendori.Click theCreatebutton at the bottom of the page and use the following information:Click theSubmitbutton at the bottom of the page3. Navigate to System Administration Configuration Dictionaries Protocols RADIUS RADIUS VSA BlueCoata. Create the required custom attribute for ACS permissionsi.Click theCreatebutton at the bottom of the page and use the following information:Click theSubmitbutton at the bottom of the page2 of 8
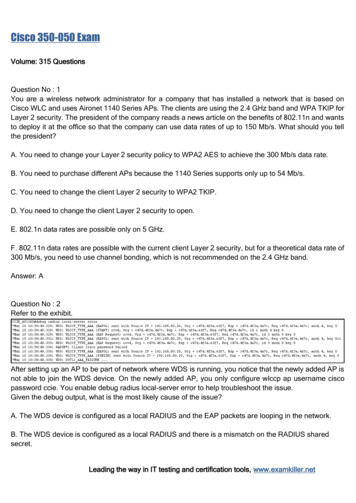
BlueCoat PacketShaper and Cisco ACS v5.x Configuration4. Navigate to Policy Elements Authorization and Permissions Network Access Authorization Profilesa. Create the BlueCoat Read-Write authorization profilei.Click theCreate Select the General tab Select the RADIUS Attributes tabClick theii.button at the bottom of the pageClick theAdd Submitbutton above the Attribute fieldbutton at the bottom of the page3 of 8
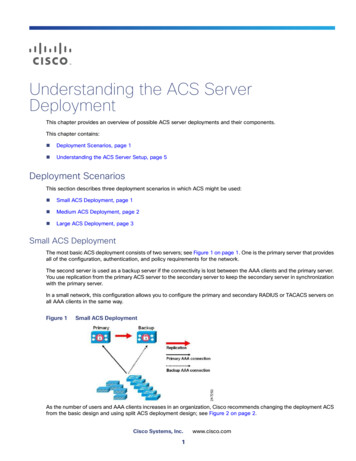
BlueCoat PacketShaper and Cisco ACS v5.x Configurationb. Create the BlueCoat Read-Only authorization profilei.Click theCreate Select the General tab Select the RADIUS Attributes tabClick theii.button at the bottom of the pageClick theAdd Submitbutton above the Attribute fieldbutton at the bottom of the page4 of 8
BlueCoat PacketShaper and Cisco ACS v5.x Configuration5. Navigate to Access Policies Access Services Service Selection Rulesa. Filter by Device IP Addressi.Click theClickCustomizebutton at the bottom right of the page and set the following:OKb. Create the BlueCoat RADIUS rulei.c.Click theCreateClick theOKbutton at the bottom of the page and set the following, using the correct BlueCoat IP :button at the bottom of the pageCheck the box next to the BlueCoat service selection policy, then use thepage to move the policy to position #1 (top) in the list.d. Click theSave Changesbutton at the bottom of the page5 of 8 button near the bottom of the
BlueCoat PacketShaper and Cisco ACS v5.x Configuration6. Navigate to Access Policies Access Services Default Network Accessa. Configure Group Mapping for the policyi. Select the General tab Check the box next to Group Mapping (Applies to Active Directory configurations)ii.Select the Allowed Protocols tab and check the following boxes: ClickSubmit7. Navigate to Access Policies Access Services Default Network Access Identitya. Set the ACS to authenticate using the User Search Sequence (Active Directory and Local Users)i. Ensure the radio button next to Single result selection is selected, then set to whatever Identity Sourceyou are currently using. In this example, we have setup an Identity Store Sequence that checks ActiveDirectory and local ACS user accounts, and have named it "User Search Sequence" :ii.Click theSave Changesbutton at the bottom of the page6 of 8
BlueCoat PacketShaper and Cisco ACS v5.x ConfigurationNOTE: This section only applies if you use Active Directory integration:8. Navigate to Access Policies Access Services Default Device Admin Group Mappinga. Select the radio button for Rule based result selection, and clickOKon the pop-up dialog box.b. Create the Read-Write Rulei.Click theCreatebutton at the bottom of the page1. Under General, name the new rule Read-Write, and ensure it is Enabled2. Under Conditions, check the box next to Compound Condition, then set Dictionary: AD-AD1,Attribute: ExternalGroups, and Value: Active Directory Domain /ReadWrite group as shown:mydomain.com/Group Accounts/ReadWrite3. Click Add V to add the condition to the Current Condition Set4. Under Results, set the Identity Group field to the All Groups: Network Admin group5. Click thec.OKbutton at the bottom of the pageCreate the Read-Only Rulei.Click theCreatebutton at the bottom of the page and repeat the steps with the highlighted changes:1. Under General, name the new rule Read-Only, and ensure it is Enabled2. Under Conditions, check the box next to Compound Condition, then set Dictionary: AD-AD1,Attribute: ExternalGroups, and Value: Active Directory Domain /ReadOnly group:3. Click Add V to add the condition to the Current Condition Set4. Under Results, set the Identity Group field to the All Groups: Read-Only group5. Click thed. Click theOKSave Changesbutton at the bottom of the pagebutton7 of 8
BlueCoat PacketShaper and Cisco ACS v5.x Configuration9. Navigate to Access Policies Access Services Default Network Access Authorizationa. Use Identity Groupsi.Click the Customizebutton at the bottom right of the pageUnder Customize Conditions, select Identity Group from the left window, click theadd it, then click the OK button to close the window button tob. Create the BlueCoat-RW Authorization Rulei.c.Click theCreatebutton at the bottom of the page Under General, name the new rule BlueCoat-RW, and ensure it is EnabledUnder Conditions, check the box next to Identity Group, and set it to All Groups: Network AdminUnder Results, set the Authorization Profile to BlueCoat-RW Click theOKbutton at the bottom of the page to close the windowCreate the BlueCoat-RO Authorization Rulei.Click the Createbutton at the bottom of the page and repeat the steps with the highlighted changes:Under General, name the new rule BlueCoat-RO, and ensure it is EnabledUnder Conditions, check the box next to Identity Group, and set it to All Groups: Read-OnlyUnder Results, set the Authorization Profile to BlueCoat-ROClick the OK button at the bottom of the page to close the windowd. Verify that both rules are listed before the 'Default' rule at the bottom, then clickSave Changes10. Verify successful configuration by logging into the BlueCoat web GUI using an Active Directory account.8 of 8
b. Create the BlueCoat RADIUS rule i. Click the button at the bottom of the page and set the following, using the correct BlueCoat IP : Click the button at the bottom of the page c. Check the box next to the BlueCoat service selection policy, then use the button near the bottom of the page to move the policy to position #1 (top) in the list. d.