Transcription
UC Suite Web Client User’s GuideNDA-31744Issue 1.0
Contents of this manual are subject to change without prior notice at the discretion of NECCorporation of America. This document has been prepared for the use of employees andcustomers of NEC Corporation of America and may not be reproduced without prior writtenapproval of NEC Corporation of America.UNIVERGE is a trademark of NEC Corporation of America. Internet Explorer is a registeredtrademark of Microsoft Corporation. Apple, Mac and Safari are registered trademarks ofApple Inc. Google Chrome is a trademark of Google Inc. Mozilla and Firefox are registeredtrademarks of Mozilla Foundation. Excel is a registered trademark of Microsoft Corporation.Linux is a registered trademark of Linus Torvalds.Copyright 2016NEC Corporation of America3929 W. John Carpenter FreewayIrving, TX 75063-9406Communications Technology Group
TABLE OF CONTENTSIntroduction. 1-1System Requirements . 1-1Licensing . 1-1Logging into the Web Client. 1-2UC Suite Screen Layout. 1-3Main Control Menu . 1-4Search Function . 1-6Home (Buddy List) Search . 1-6Contact View Search . 1-6Active Call Area . 1-7Incoming Calls . 1-7Outgoing Calls . 1-8Handling Calls .1-10Answering a Call .1-10Forwarding a Call to Voice Mail .1-10Ignoring a Call .1-11Transferring a Call .1-12Initiating a Conference Call .1-13Placing a Call on Hold .1-14Ending a Call .1-14Parking Calls (Attendant Only) . 1-15Understanding Call Park Zones .1-15Parking a Call .1-15Retrieving a Parked Call .1-16Viewing Details about a Parked Call .1-16Paging . 1-16SV9100 UC Suite Web Client User’s Guidei
Issue 1.0Current View . 1-17Main Menu Bar. 1-18Views Control Options . 1-20Home View (Buddy Lists) . 1-20Contacts . 1-21Accessing Contact Lists . 1-22Selecting Columns to Show or Hide . 1-22Adding a Contact to the Company Directory (Attendant User) . 1-23Editing Your Contact Information in the Company Directory (Attendant) . 1-24Adding/Removing a Contact to/from a Business/Personal Directory . 1-25Adding a Contact .1-26Removing Contacts .1-27Exporting Contact Information . 1-27Searching the Company Contact List . 1-28Call History . 1-29Managing Call History Records . 1-30Sorting/Resizing Columns .1-30Rearranging Column Order .1-31Selecting Columns to Show or Hide .1-32Removing Records .1-32Exporting Call History Information . 1-34Chats View . 1-35Accessing Contacts for Chat Sessions . 1-35Participating in Chat Session from the Main Menu Bar . 1-36Managing Text Messages from Previous Chat Sessions . 1-38Telephony Options . 1-39Dial Control . 1-39Dialing a Number or Entering a Contact Name with the Dial Pad . 1-39Hiding/Showing the Dial Pad . 1-41Paging . 1-42Accessing Paging .1-42Assigning Paging Zones .1-43iiTable of Contents
Issue 1.0Toggle Answer-Mode . 1-44Set System Night Mode (Attendant Only) . 1-44Feature Selection Main Menu Bar Options . 1-45Presence . 1-46Limited Availability Notifications . 1-47Accessing the Presence Screen . 1-48Understanding the Presence Screen . 1-49Managing Your Presence Status . 1-50Changing Your Presence Status .1-50Defining Presence Profiles .1-52Using an Existing Presence Profile .1-53Changing Existing Profile Settings .1-54Scheduling Events . 1-55Adding an Event .1-55Viewing Scheduled Events .1-56Managing Mobility (Multi-Device Group) . 1-59Accessing Mobility (Multi-Device Group) .1-59Adding Additional Phone Numbers .1-60Editing Phone Numbers in your Multi-Device Group .1-61Deleting Individual Phone Numbers from your Multi-Device Group .1-62Deleting All Phone Numbers from your Multi-Device Group .1-62Buddy Lists . 1-63Understanding Buddy Lists . 1-63Understanding Buddy List Labels . 1-64Accessing the Buddy List . 1-66Creating Buddy Lists (Attendant User) . 1-69Removing Buddy Lists (Attendant User) . 1-70Selecting a Buddy List as Your Favorite (Attendant User) . 1-71Adding Members to a Buddy List (Attendant User) . 1-72Adding Members to a Buddy List (Non-Attendant User) . 1-73Deleting Members from Buddy Lists (Attendant User) . 1-74Deleting Members from Buddy Lists (Attendant/Non-Attendant User) . 1-75Settings Option . 1-76Accessing Settings Options Screen . 1-77Resetting All Settings to Default . 1-78SV9100 UC Suite Web Client User’s Guideiii
Issue 1.0Resetting Individual Settings Screen Options to Default . 1-79Changing Personal Profile Settings . 1-80Accessing Personal Profile Settings .1-81Updating the Photo .1-82Changing the Photo . 1-82Removing the Photo . 1-82Adding Other Numbers .1-83Accessing the Other Numbers Input Screen . 1-83Adding Alternate Contact Numbers . 1-84Editing an Existing Number . 1-85Deleting a Number . 1-85Changing Home Page Settings . 1-86Accessing Home Page Settings .1-87Resetting Options to Default Settings Screen .1-87Showing/Hiding Filter or Search Bar .1-89Changing Employee Label Format .1-90Showing/Hiding Extension Number in Employee View .1-91Enabling/Disabling Compressed Employee View .1-92Hiding/Showing Off-Line Users .1-93Selecting Column Layout for Display .1-94Switching Buddy List on incoming Calls to DID (Attendant Only) .1-95Changing Telephony Settings . 1-96Accessing Telephony Settings .1-97Showing/Hiding Dialer in Toolbar .1-97Showing/Hiding Call Park Controls in Toolbar .1-98Showing/Hiding Call Park Valet in Toolbar (Attendant/Licensed Option) .1-99Showing/Hiding Call Park Monitor Controls in Toolbar (Attendant/Licensed Option) .1-99Assigning Park Orbits in Toolbar (Attendant/Licensed Option) .1-100Showing/Hiding Page Control in Toolbar (Attendant/Licensed Option) .1-101Assigning Buddy List to Switch on Incoming DID Calls (Attendant/Licensed Option) .1-101Selecting Headset or Handset for Calls .1-102Setting System Night Mode (Attendant/Licensed Option) .1-103Setting Call Features .1-104Changing Notifications Settings . 1-105Accessing Notifications Settings .1-106Changing Audio Settings .1-106Incoming Chats/Incoming Calls . 1-106Changing Visual Notifications .1-107Showing/Hiding Presence State of Other Users . 1-107Showing/Hiding Notifications for Missed Calls . 1-108ivTable of Contents
Issue 1.0Changing Chats Settings . 1-109Accessing Chats Settings .1-110Changing Tone Settings .1-110Assigning Enter Key as a Short-Cut Key .1-111Changing Video Settings . 1-112Accessing Video Settings .1-113Enabling/Disabling Video Call Features .1-113Showing/Hiding your Self-View .1-114Selecting a Presence Profile Used During Video Call .1-115Changing Miscellaneous Settings . 1-116Accessing Miscellaneous Settings .1-116Showing/Hiding Presence Prompt on Sign Out Setting .1-117Showing/Hiding Progress on Dialed Calls .1-118Enabling/Disabling Email Client Setting .1-119Showing/Hiding Hidden Internal Contacts (Attendant Only) .1-120Sign Out . 1-121Help . 1-122About . 1-123Icons Used in Web Client . 1-124SV9100 UC Suite Web Client User’s Guidev
Issue 1.0viTable of Contents
LIST OF FIGURESFigure 1Login Screen .1-2Figure 2UC Suite Main Menu - Landscape Mode .1-4Figure 3UC Suite Main Menu - Portrait Mode .1-5Figure 4Home View - Search Field .1-6Figure 5Contacts View - Search Fields .1-6Figure 6Incoming Call Popup Screens .1-7Figure 7Outgoing Call Popup Menu .1-8Figure 8Park Zones .1-15Figure 9Main Menu Bar .1-18Figure 10Views Control Options .1-20Figure 11Buddy List Label Icons .1-20Figure 12Contacts View .1-21Figure 13Business/Personal Directory View .1-25Figure 14Adding/Deleting Contacts .1-25Figure 15Export Contact CSV File Example .1-27Figure 16Call History View .1-29Figure 17Export Call History CSV File Example .1-34Figure 18Chats View .1-35Figure 19Dial Control Options .1-39Figure 20Feature Selection Drop Down Menu .1-45Figure 21Presence Screen .1-46Figure 22Presence Messages - Limited Availability .1-47Figure 23Empty Personal Buddy List Message .1-63Figure 24Buddy List Display (Home View) .1-64Figure 25Buddy List Label (Home View) .1-64Figure 26Access Buddy List from Drop Down Menu (Attendant/Non-Attendant) .1-66Figure 27Access Buddy List from Empty Personal Buddy List Message Screen (Non-Attendant) .1-66Figure 28Attendant/Non-Attendant Level User Add Buddy List Screen .1-67Figure 29Attendant/Non-Attendant Level User Edit Buddy List Screen .1-68Figure 30Setting Options Menu .1-76SV9100 UC Suite Web Client User’s Guidevii
Issue 1.0Figure 31Settings - Personal Profile Screen . 1-80Figure 32Settings - Home Page Settings Screen . 1-86Figure 33Settings - Telephony Screen . 1-96Figure 34Settings - Notifications Screen . 1-105Figure 35Settings - Chats Screen . 1-109Figure 36Settings - Video Screen . 1-112Figure 37Settings - Home Page Screen . 1-116viiiList of Figures
INTRODUCTIONWelcome to the UC Suite Web Client for the SV9100 telephone system. UC Suite provides extensivetelephone functionality within one versatile application. Through this application, you have access tomany of features of the SV9100 telephone system. You can access their features while sitting at youroffice desk, working in a conference room or traveling out of the office.UC Suite allows you to control many of the functions on your SV9100 deskset telephone through simplePC controls. In many instances, you can complete phone conversations, transfer calls and hold multiparty conferences without ever having to touch the phone. In addition, you can see if other employeesare in the office, on another call or unavailable. This information can save you valuable time when tryingto connect with your co-workers.UC Suite Web Client allows you to launch the UC Client within an Internet browser window. Thebrowser-based client provides many of the features available with the UC Suite Desktop client. Thisbrowser-based client can be accessed from a variety of platforms such as, PCs, Macs and Linux .SYSTEM REQUIREMENTSThe following are the minimum requirements for using UC Suite Web Client. You can use Internet Explorer 11 , Google Chrome 41 (recommended browser), Mozilla Firefox 37 andApple Safari 5.0.6 . NOTEIf the browser you use does not support all of theapplication functionality, a warning message isdisplayed on the Login Screen. The image to theright shows an example of the warning message.As an example, Chrome may display buttons onsome pages that are not shown in InternetExplorer. In this document, screen shots are takenfrom both Internet Explorer and Chrome, so youmay notice some slight differences in the displays. SV9100 system must be equipped with system software version 3.0 or higher UC Suite software version 3.0 or higherLICENSINGLicensing may determine the feature set that you have available. This document provides instructionsfor all of the features. If you do not have some of the features presented in this document, contact yourSystem Administrator.SV9100 UC Suite Web Client User’s Guide1
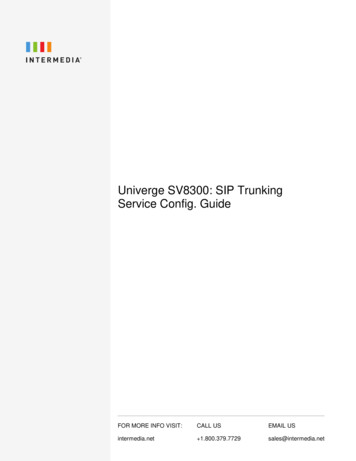
LOGGING INTO THE WEB CLIENTTo access the Web Client, launch the client from your web browser. For example:https://192.168.1.100/ucsuiteTo log in:1.When the Login screen is displayed, enter your User name and Password. The user name and password are assigned by your system administrator.NOTE2.Click Sign in. The UC Suite Main Control Menu is displayed. Refer to Main Control Menu on page 4.Figure 1 Login ScreenEnter UserName andPasswordClick to Login2SV9100 UC Suite Web Client User’s Guide
UC SUITE SCREEN LAYOUTThe main page is comprised of the following sections. Main Control MenuThis area includes the Product Name, Views, Dial Control function, MyAvailability function and Feature Menu option. Call Park and PageFunctionsThis area provides access to the call park and paging functions. Search FunctionThe search function is used to filter the current display to quickly locate amember of your Buddy List or Contact.Note:By default, the Search function is not displayed. Access the Settings menu toturn on the display. Active Call AreaThe active call area displays entries for each call that is being controlledby the application. This screen displays during active calls. Current ViewThis area displays the contents of the currently selected view, such as aBuddy List, Contacts, Call History or Chat.SV9100 UC Suite Web Client User’s Guide3
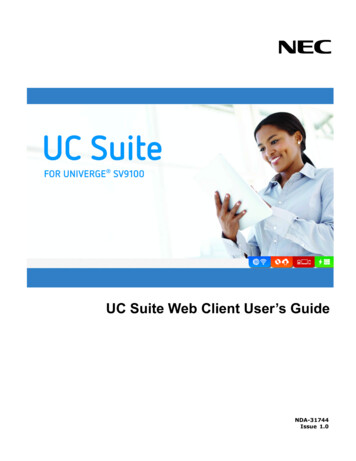
Main Control MenuYou can resize your browser window to display in landscape or portrait mode. When you resize, thescreen layout adjusts accordingly.When the screen displays in landscape mode, as shown in Figure 2 UC Suite Main Menu - LandscapeMode, the Buddy List displays in three columns and the View Control selection buttons are located at thetop of the screen in the Main Control Menu bar along with the Telephony and Feature Menu options.When the screen displays in portrait mode, as shown in Figure 3 UC Suite Main Menu - Portrait Mode onpage 5, the Buddy List displays in two columns and the View Control selection buttons are located at thebottom of the screen. The Telephony and Feature Menu options are displayed in the Main Control Menubar area at the top of the screen. Multiple column display is the system default setting.NOTEFigure 2 UC Suite Main Menu - Landscape ModeCurrent ViewOptionsMain ControlMenu BarCurrent View(DisplaysSelected ViewOption)Active Call AreaIncoming/Outgoing CallPopup Menu(Visible while dialing orincoming call ringing)Active Call AreaActive Call Display Screen(Visible while on a call; displaysnear the top of the Main Menuscreen)4SV9100 UC Suite Web Client User’s Guide
Figure 3 UC Suite Main Menu - Portrait ModeMain ControlMenu BarCurrent View(DisplaysSelected ViewOption)Active Call AreaIncoming/Outgoing CallPopup Menu(visible while dialing orincoming call ringing)Active Call AreaActive Call Display Screen(visible while on a call;displays near the top of theMain Control Menu screen)Current ViewOptionsSV9100 UC Suite Web Client User’s Guide5
Search FunctionThe Search function is visible within the Home (Buddy List) and Contacts views. NOTEBy default, the Search function is not displayed. Access the Home page option on the Settings menu to displaythe search bar. Refer to Showing/Hiding Filter or Search Bar on pag
SV9100 UC Suite Web Client User's Guide 1 Welcome to the UC Suite Web Client for the SV9100 telephone system. UC Suite provides extensive telephone functionality within one versatile application. Through this application, you have access to many of features of the SV9100 telephone system. You can access their features while sitting at your