Transcription
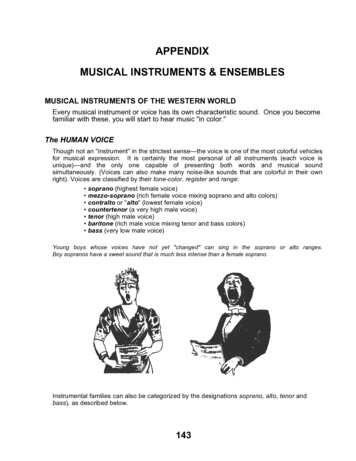
AD-01PSlave PSTN Auto Dialer - Installation &Programming guidePlease read these instructions before you start the installationFeatures LCD displayAutoDialer Dual Triggers Programmable 9 x 32 digit phone numbers for each trigger. .Programmable as Silent Alarm (dial only) or Audible (siren dialer) Cancel Message and Alarm at remote telephone using * Key orcancel message only using # KeyMIC 10 second duration recordable message for each trigger Built in memory for telephone numbers and programmed settingsContents 1 x Auto Dialer 1 x Telephone cable 1 x Fixing kit and Installation & Programming guidePreparationTools required: Small cross head screw driver Large cross head screw driver Number 6 masonry drill bit Hammer drill Small hammer Pencil, ruler and spirit levelThe Auto Dialer.Important: before you install the Auto Dialer please take these into consideration.1. Position the Auto Dialer near a phone socket.2. Before you start to drill holes check for hidden wires and pipe work.3. Keep the Auto Dialer out of reach of small children.
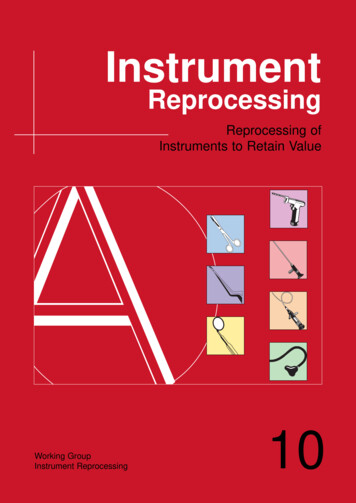
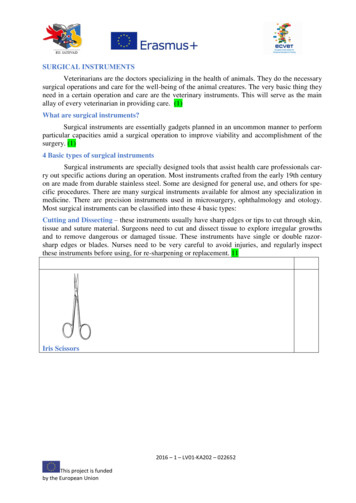
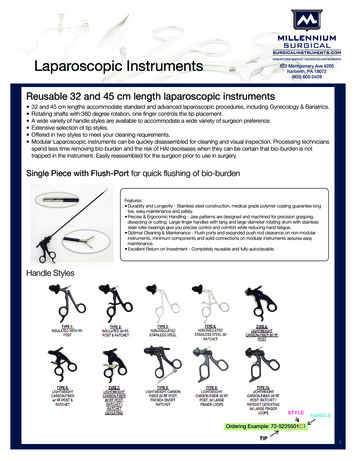
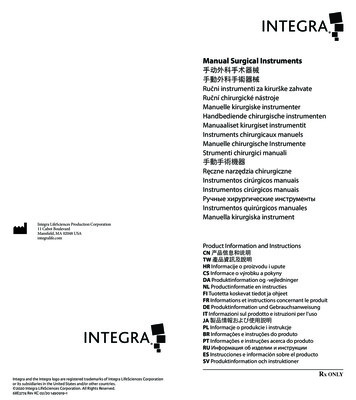
InstallationHow to install the Auto Dialer1.Remove the small screw from the battery compartment cover and keep safe.2.Mark and drill two holes on a horizontal line 160 mm apart.3.Insert the masonry plugs; screw the two fixing screws in the plugs leaving 2 mm protruding.4.5.Run a cable from the Alarm Control Panel to the Auto Dialer.Trigger 1 alarm switched neg. and anti-tamper, switched neg.6.7.Trigger 2 alarm switched neg.Tamp Connect to N.C. (normally closed) tamper inputs of the Alarm Control Panel8.Connect phone line from the LINE on the Auto Dialer to an existing Phone Socket, if this is in use you willhave to purchase a double adaptor. If you want to plug into an existing Telephone you will have to purchasean RJ11 to RJ11 cable, connect one end into PHONE on the back of the Auto Dialer and the other into theTelephone.9.Install 1 x 9V back up battery (if required) to the terminals, making sure they are the correct polarity. Usually,back up power would be supplied from the alarm panel battery to which the dialer is connected.10.11.The auto Dialer will beep once.Replace the battery compartment cover.12.13.14.Connect the 12V power supply.Place the Auto Dialer onto the wall, making sure the tamper switch is pressed in.You can now start to program the Auto DialerHow to make the Connections on the Auto Dialer.The Trigger terminals are for connection to a switched negative output of an Alarm System’sBell or Siren (Fig 1 below). If such switched negative triggers are not available, connect thetrigger inputs to a N.O. (normally open) relay output with the relay common to OV (Fig 2).The Power terminals are for connection to a 12V power supply, either directly to an AlarmControl Panel’s 12V supply or else via a 500mA mains power ad aptor.The Tamper terminals are for connection to the N.C. (normally closed) tamper inputs on anAlarm Control Panel. If they are not being used, please fit a loop of cable as shownFig 1TAMPTR2TR10V12V LINE12V 500mA Inputswt -swt – (bell/siren switched negative, this unit will not operate off a switched ground)PHONE
Fig 2How to program the Auto Dialer(If no key is pressed for 30 seconds, the Dialer will automatically exit the programming mode)IMPORTANT: THE DIALER MUST BE IN THE OFF MODE FOR ALL PROGRAMMING.SINCE THE DIALER WILL AUTOMATICALLY TURN ITSELF ON WHEN POWER IS FIRST CONNECTED ORRECONNECTED, YOU NEED TO TURN THE DIALER OFF (ENTER CODE, DEFAULT 1234 AND THENPRESS EXIT KEY) BEFORE YOU CAN START PROGRAMMING AS BELOW.Programming Sections:1.2.3.4.5.6.7.Select Audible or Silent Alarm on trigger (Default – Silent Alarm)Duration of Audible Alarm on trigger (Default – 3 Minutes)Add or Delete Phone Numbers that are dialed out on trigger (Default – Memory empty)Select a Delay between Trigger and Dial out (Default – No delay, instant dial out)Select a Delay between the Dialer being turned on/armed and becoming active (Default – No delay)Assign the 9 dial out Tel no’s to trigger 1 and/or 2 ( Default – All Tel no’s assigned to both trigger 1 & 2)Select an Audible Arm Delay sound (Default – No sound)Record. Record the two voice messagesPlay.Play back the two voice messagesPassword. Change the Default Password of 1234NOTE: Only Programming Section 3, plus the Record, Play and Password Sections are essential toprogramme. For most applications, the other sections can be left in their default settings.Programming Section 6 can also be left in its default setting (activation of either trigger will mean ALLtelephone numbers that have been programmed into the dialer are dialed) unless you need to sendthe Trigger 1 message to different phone numbers than those for Trigger 2.NOTE: You must record at least One Voice Message and programme at least One Telephone numberinto section 6 for the Dialer to work.
Essential Programming SectionsHow to Record the Voice Messages :Quick guide: Press 1 2 3 4 RECORD 1 ENTER Record message now ENTER.1) Key in the four digit user PASSWORD code (factory default 1234).2) Press RECORD.3) Press 1 (to record the message for Trigger 1) or 2 (to record the message for Trigger 2).4) Press ENTER to start recording the message. You now have 10 seconds to record your message.5) Press ENTER to stop the recording and save, or wait for the 10 seconds to end.How to Play Back the Voice Messages :Quick guide: Press 1 2 3 4 PLAY 1 ENTER to play back the recorded messages.1) Key in the four digit user PASSWORD code (factory default 1234).2) Press PLAY.3) Press 1 (to listen to the message recorded for Trigger 1) or 2 (to listen to the message for Trigger 2).4) Press ENTER to start listening to the message.5) Press ESC to stop listening at any time or wait until the messages stops playing.How to change the User PASSWORD : (factory default 1234)Quick guide: Press 1234 PASSWORD New Code Reconfirm New Code1. Key in the four digit user PASSWORD code. Factory default 1234.2. Press PASSWORD.3. The LCD will change to n-p.4. Key in your new four digit PASSWORD code.5. The LCD will change to c-p.6. Key in your new four digit PASSWORD code again.7. The LCD will change to acc.How to Program Phone Numbers – Section 3:You can enter a maximum of nine telephone numbers for the triggers, each number can be a maximum of 32digits. Quick guide: Press 1 2 3 4 PROGRAM 3 ENTER 1 ENTER Telephone number ENTER1. Key in the four digit user PASSWORD code (factory default 1234).2. Press PROGRAM 3 ENTER 1. The number you press after the ENTER button will select the position inthe sequence you want that telephone number to dial (1 1st number called, 2 2nd number called).3. Press ENTER again and then Key in the first telephone number. Press ENTER to save and. Programmingmode is now exited.4. Repeat the process until you have entered all the numbers you wish the Auto Dialer to call once it hasbeen triggered (maximum 9 different numbers).How to Delete Phone Numbers – Section 3 :Quick guide: Press 1 2 3 4 PROGRAM 3 ENTER 1 ENTER ESC1. Key in the four digit user Password code (factory default 1234).2. Press PROGRAM 3 ENTER. Select the position for the telephone number you want to delete (1 1stnumber called, 2 2nd number called), press ENTER.3. Press ESC to Delete that number. Programming mode is now exited.IMPORTANT: Pressing ESC at stage 3 will Delete a telephone number. Do NOT press ESC if you aretrying to program numbers into the dialer.
How to designate Telephone Numbers to TRIG 1 and TRIG 2 – Section 6 :Quick guide: Press 1 2 3 4 PROGRAM 6 ENTER X ENTER N ENTER1) Key in the four digit user PASSWORD code (factory default 1234)2) Press PROGRAM 6 ENTER.3) Press 1 (for TRIG 1), or press 2 (for TRIG 2). Press ENTER4) You will now see numbers 123456789 illuminated. This indicates that all 9 telephone numbers (or as many ashave been programmed into the dialer) will be called on that trigger.5) Press 1 - 9 to de-select that phone number from being dialed. You will now see a blank “-“ where that numberwas previously. Press ENTER to save the setting.5) Repeat the process until you have designated all the numbers to each trigger. Remember that you candesignate all 9 numbers to each trigger or only some to one and some to the other.IMPORTANT : The numbers shown on the LCD display are the phone numbers assigned to that trigger. Pressingbuttons 1 to 9 will toggle the numbers on/off on 1-9 respectively. If a number is not shown, then it means that itwill not be called.Example: 123—67-9 means that telephone numbers 1,2,3,6,7 and 9 only will be dialed for that particular trigger.Other Programming SectionsHow to Program the Auto Dialer to give a local Audible Alarm as well as sending a voice message –Section 1: (Default setting is alarm OFF)Quick guide: Press1 2 3 4 PROGRAM 1 ENTER 1 ENTER1) Key in the four digit user PASSWORD code. (Factory default 1234)2) Press PROGRAM 1 ENTER 1 ENTER(Please note 0 without Audible Alarm, 1 with Audible Alarm)How to Set the Time the Audible local Alarm will sound on activation – Section 2 : (Default time is 3 mins)Quick guide: Press 1 2 3 4 PROGRAM 2 ENTER Time ENTER (Alarm sound time is from 1M-99M.)1) Key in the four digit user PASSWORD code. (Factory default 1234).2) Press PROGRAM 2 ENTER Time ENTER.TIME 1 1 min, 99 99 min (max TIME 99 min). We recommend you do not exceed a 20 minAlarm duration.How to set Trigger Delay Delay times: (Default is 0 seconds - instant) – Section 4Set trigger delay time between 0, 30 and 60 seconds: As a false alarm prevention feature, this is the delaybetween a trigger being activated and when the dialer starts to dial out. Default setting is 0 secs.Quick guide: Press 1 2 3 4 PROGRAM 4 ENTER N ENTER1. Key in the four digit user Password code (factory default 1234)2. Press PROGRAM 4 ENTER N ENTER.(Note: N 0, instant; N 3, 30 sec; N 6, 60 sec.)
How to set Arm Delay times: (Default set at 0 seconds, instant) – Section 5Set arm delay time between 0, 30 and 60 and 90 seconds: This is the delay between the dialer being armed orprimed and the time the triggers are active or ON. Default setting is 0 seconds, or no arm delay. Note that if anarm delay time is programmed, then the ON symbol on the LCD display will flash throughout the programmedtime delay period.Quick Guide Press 1 2 3 4 PROGRAM 5 ENTER n ENTER1. Key in the four digit user Password code (factory default 1234).2. Press PROGRAM 4 ENTER N ENTER.(Note: N 0, instant; N 3, 30 sec; N 6, 60 sec; N 9, 90 sec)How to set an Arm Delay Sound: (Default setting without sound) – Section 7Quick guide: Press 1 2 3 4 PROGRAM 7 ENTER 0 ENTER1. Key in the four digit user Password code (factory default 1234).2. Press PROGRAM 7 ENTER N ENTER.(Notice" 0 without sound; 1 with sound.)How to turn the Dialer On/Off locally or remotelyHow to Turn the Auto Dialer ON : (Default On. That means the Dialer will always be active or ON whenpower is first applied or re-applied to it. Turn Off to programme and then turn back On and leave On)Quick guide: Press 1 2 3 4 ENTER1. Check that the voice message and at least one phone number has been programmed into the Dialer.2. Press 1 2 3 4 ENTER. The Dialer will show “ON" on the display.3. The triggers will become active after the delay time you have set has expired. (Default set at 0 seconds,instant)How to Turn Dialer OFF or to stop it dialing out after it has been triggered :Quick guide: Press 1 2 3 4 ESCTo turn the Auto Dialer OFF or to stop it from dialling out after either the tamper switch (if connected andactive) or a trigger input has been activated, key in the Password following by ESC. The Auto Dialer willrevert to the "OFF" mode and must be re-set to the "ON" mode as above.How to stop the dialer dialing the telephone numbers in sequence :Quick guide: When the phone is answered, press # or * on the telephone keypad to stop the dialingsequence.When the Auto Dialer starts dialing, it will dial the first telephone number and repeat the pre-recorded voicemessage five times. If there is no response from the phone, then it will hang up and dial the next number until allthe programmed numbers for that trigger are dialed. It will repeat this dial sequence three times and display "NOANSWER" if there is no response from any of the phone numbers. To stop this dial sequence, press the * keyon the telephone keypad that is receiving the call. At that time, the Auto Dialer will stop its dialing sequence andthe alarm (if programmed) will stop. If the local alarm has been programmed as active, then pressing the # keywill stop the dialing sequence, but the alarm will continue to sound until timed out. In both cases, the Dialer willremain ON, waiting for any further Trigger.
How to reset the Auto DialerRemove the power supply and the telephone line. Take the Auto Dialer down from the wall and remove the 9Vbattery (if used). Inside the battery compartment is a switch, move it to the ERASE position, place the power backonto the system then press DELETE on the keypad twice, there will be a 2 short beeps from the Auto Dialer.Remove the power supply again, place the switch back to the NORMAL position, then restore the power again,including replacing the battery (if required). The Auto Dialer will now have returned back to factory default settings.Replace the telephone line and place the Dialer back onto the wall.Note of caution1. A leaking battery will result in poor performance and could damage the system. It is recommended that thebatteries be periodically checked. Change the battery at least once a year to maintain the system.2. Do not mount the Auto Dialler in areas that are exposed to extreme heat or moisture, as this could adverselyaffect the performance of the system.3. Use only a damp cloth and general household cleaning agent to wipe the unit clean. Do not use turpentine,thinner, gasoline or similar substances to clean the unit.Trouble ShootingQ: I have connected the Dialer to an Alarm Panel. The panel has activated, but there is no image appearing onthe Dialer’s LCD display and it is not dialing out.A: Check the following carefully.i)Does the Dialer have a 12V supply – either from the panel or via a 500ma 12V mains adaptor ?ii) Have you made the correct connections to the Trigger 1 and 2 inputs (either switched negative or relay) ?iii) Is the Dialer On/Armed ? (If you have been programming, then it will have been in the Off mode and youwill have to turn it back to On/Armed mode again). Enter your 4 digit code Enter to turn ON/Arm.Q: The Dialer’s input has been activated correctly and the image “Trig 1” or “Trig 2” appears on the LCD displayto indicate this. However, the voice message is not being received by the number it is meant to be dialing.A: Check the following carefully.i)Have you activated the correct Dialer trigger ? You may have programmed different numbers to call outfor Trigger 1 and Trigger 2.ii) Have you entered the correct telephone number to call and/or entered a wrong digit by mistake?iii) If you think the Dialer should be calling a particular number, have you actually de-selected that number forthat trigger by mistake ? Go to Programming Section 6. To check the numbers that are being dialed insequence for Trigger 1, press 1234 (code) Program 6 Enter 1. You should now see variousnumbers between 1 and 0 illuminated. If a number is unlit, it means it is not being dialed for Trigger 1.Toggle numbers on/off by pressing that number on the keypad. A number must be lit in Section 6 if it isbeing dialed for that trigger.
Q: The Dialer’s input has been activated correctly and the image “Trig 1” or “Trig 2” appears on the LCD displayto indicate this. However, it is not then dialing out and an error message is appearing on the LCD display.A: Check the following carefully.i)Have you recorded at least 1 message and programmed at least 1 telephone number to the Dialer ?ii) Have you deleted a telephone number by mistake ? Go to Programming Section 3. To check whether the1st telephone number you think you have programmed in is in the Dialer’s memory correctly, Press1234 (code) Program 3 Enter 1 Enter. You should now see that telephone number. PressEnter again to Exit programming. If you don’t see a telephone number there, enter the number againand press Enter to exit. Do NOT press ESC to exit as this will delete that number.iii) Have you de-selected a number to be dialed out in sequence for that trigger by mistake ? Go toProgramming Section 6. To check the numbers that are being dialed in sequence for Trigger 1, press1234 (code) Program 6 Enter 1. You should now see various numbers between 1 and 0illuminated. If a number is unlit, it means it is not being dialed for Trigger 1. Toggle numbers on/off bypressing that number on the keypad. A number must be lit in Section 6 if it is being dialed for thattrigger.Q: I can’t cancel the remote dial-out remotely by pressing, on the remote telephone hand-set either * (cancel dialout and alarm sound if programmed) or #’ (cancel dial out only, alarm sound will continue until time out)A: Have you waited until the message has ended ? You cannot cancel until it has been played to you at leastonce.
10. The auto Dialer will beep once. 11. Replace the battery compartment cover. 12. Connect the 12V power supply. 13. Place the Auto Dialer onto the wall, making sure the tamper switch is pressed in. 14. You can now start to program the Auto Dialer How to make the Connections on the Auto Dialer.