Transcription
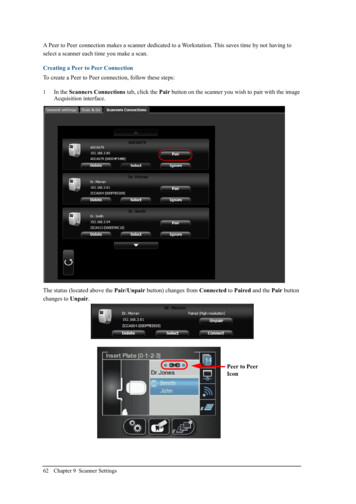
A Peer to Peer connection makes a scanner dedicated to a Workstation. This saves time by not having toselect a scanner each time you make a scan.Creating a Peer to Peer ConnectionTo create a Peer to Peer connection, follow these steps:1In the Scanners Connections tab, click the Pair button on the scanner you wish to pair with the imageAcquisition interface.The status (located above the Pair/Unpair button) changes from Connected to Paired and the Pair buttonchanges to Unpair. Peer to PeerIcon62 Chapter 9 Scanner Settings
The Peer to Peer icon appears in the scanner.Note: If you change the resolution on the Scanner LCD, the change inresolution will only take place upon next scan or image acquisition.Disconnecting a Peer to Peer ConnectionDisconnecting a Peer to Peer Connection may be done from the image Acquisition interface or from theScanner interface.To Unpair the Scanner, follow these steps:1In the Scanner interface, pressThe Scanner Settings menu opens.Settings. 2Pressto select Pairing, and press The Pairing status screen opens and shows a Paired status.CS 7600 User Guide (8J4071) Ed07 63
3Pressand press The Pairing status screen shows an Unpaired status.Clearing Scanner MemoryThe scanner’s storage capacity is 25 images. Images are stored in the scanner’s memory in the followingcases: When No ID is selected in the scanner’s Select patient screen. ( When the destination workstation is not available due to network problems and so forth. When the scanner’s memory nears its limit, the scan number icon changes to red.When memory is full, error 071: Memory full. Retrieve images from workstation is displayed.64 Chapter 9 Scanner Settings
To clear the scanner’s memory, follow these steps:1Start the CS 7600 image Acquisition interface.2Open the exam acquisition to which the images belong, or alternatively create a new temporary examacquisition in which you will save these images.3Select the scanner; it is indicated by the following full memory/error state icon:4In the Scanner List, select the desired scanner and clickThe list of No ID images for this scanner is displayed.5In the scanner memory panel select the image you wish to clear, and drag to the desired frame in theimages area template or delete by dropping to the Images Gallery.6To delete all the images in the Images Gallery, click7To confirm, click YES. All the images are removed from the Images Gallery. The scanner icon becomes highlighted greenthe small arrow. indicating that the scanner is ready for use.CS 7600 User Guide (8J4071) Ed07 65
66 Chapter 9 Scanner Settings
10MaintenanceImaging Plate CareIf used with care, the imaging plates can be used indefinitely until physically damaged. However, theimaging plates will show wear over time due to continuous use. Inspect the imaging plates regularly andreplace them if they are scratched and/or show signs of excessive wear.CAUTION: To prevent damage to the imaging plates and the possibilityof image artifacts, avoid contact between the imaging plates and thefollowing materials/solutions/solvents: Isopropyl alcohol, hydrogenperoxide and other peroxides, citrus-based cleaners, hand lotions andwater-less hand sanitizers, as well as surfactants and lubricants.Handling and Storage of Imaging Plates Imaging plates should be stored in their original packing or storage box when they are not in use.Always store imaging plates in a dark and dry place. Do not expose the imaging plates to light for long periods as this can have a degrading effect. Do not store imaging plates in hot or moist conditions. Do not fold, crease, or bend the imaging plates. Avoid touching the active side of the imaging plates, and be careful not to drag the active side of theimaging plate across any surface as this will damage the imaging plate. Do not leave imaging plates where they can become damaged by liquid or chemical spills. Do not autoclave.CS 7600 User Guide (8J4071) Ed07 67
Cleaning the Imaging PlateCAUTION: Read and follow the instructions in the Safety Data Sheets(SDS) for Screen Cleaner P/N 1030428.Clean the imaging plate to remove dirt, dust particles, finger prints and so forth that could affect imagequality.Cleaning Materials Clean, dry non-abrasive, lint-free wipes or cloths Screen Cleaner P/N 1030428 (Ask your Carestream Dental representative)Cleaning MethodTo clean the imaging plates, follow these steps:1Fold a non-abrasive, lint-free wipe or cloth and dampen with a small amount of the solution. Be carefulnot to pour the solution directly on the imaging plate. Excessive amounts of the screen cleaner maydamage the imaging plate.2Wipe the imaging plate thoroughly dry with a clean, dry, non-abrasive, lint-free cloth to remove residualcleaner. DO NOT LEAVE THE imaging plate TO AIR-DRY. Apply pressure to remove persistent dirt,if necessary.68 Chapter 10 Maintenance
Disinfecting the Hygienic Sheath and the Imaging PlatesCAUTION: Do not soak the hygienic sheath in any cleaning ordisinfecting solutions. Do not autoclave; autoclaved hygienic sheaths mustbe discarded.Frequency of DisinfectionThe hygienic sheath is the primary means of infection control and protection from contaminated imagingplates.Disinfect the imaging plate after every use (after the image plate is scanned), before it is inserted in thehygenic sheath for the next use.Disinfection SolutionsTo disinfect, use either a self-prepared solution, or a commercially prepared product that adheres to thefollowing specifications and restrictions: Diluted bleach solution: dilute one part 5.25% sodium hypochlorite with ten parts of water. A commercially prepared equivalent solution of diluted bleach that does not contain anyingredients (Isopropyl alcohol, hydrogen peroxide and other peroxides, citrus-based cleaners, handlotions and water-less hand sanitizers, as well as surfactants and lubricants) that can cause damageto the hygienic sheaths and imaging plates.Disinfection MethodCAUTION: If a commercially prepared equivalent solution of dilutedbleach is used, follow the manufacturer’s specifications and warnings.To disinfect the hygienic sheaths and imaging plates, follow these steps:1Moisten thoroughly (but not dripping) a non-abrasive, lint-free cloth with the prepared diluted bleachand wipe the hygienic sheath clean.2After one minute wipe off the bleach residue with a new, soft, lint-free cloth dampened with water.3Wipe dry with a non-abrasive, lint-free cloth.Disposing of the Imaging PlateImportant: The imaging plate contains Barium and should beconsidered hazardous or special waste in specific conditions at the end ofits useful service life. For disposal or recycling information, contact yourlocal authorities.CS 7600 User Guide (8J4071) Ed07 69
Scanner CareCleaning the Scanner BodyUse disinfection wipes for medical equipment to clean the scanner body thoroughly from all sides, includingthe tray.WARNING: It is the user’s responsibility to disinfect the imaging platestray daily to prevent cross contamination.Cleaning the Detachable Insertion PanelsThe CS 7600 makes use of three insertion panel sizes according to the inserted plates size (0, 0–3, and 4).The maintenance procedure is identical for both insertion panels.WARNING: It is the user’s responsibility to disinfect the detachableinsertion panel(s) daily to prevent cross contamination.CAUTION: Do not autoclave; autoclaved detachable insertion panel(s)must be discarded.To clean and disinfect the insertion panels, follow these steps:1Remove the installed insertion panel by inserting a finger in the designated removal depression at thebottom of the insertion panel (A) and lifting out the insertion panel (B).AB2Use disinfection wipes for medical equipment to clean the detachable insertion panels thoroughly fromall sides including the slot.70 Chapter 10 Maintenance
3The scanner displays a prompt to put in place an insertion panel, either a size 0 (left figure in prompt),size 0-3 (middle figure in prompt) or a size 4 (right figure in prompt) insertion panel.4Install the cleaned and disinfected insertion panel by positioning the insertion panel at a 45 degree angleto the right side of the insertion panel’s housing (A) and pressing the insertion slot panel in from right toleft (B) until it’s completely inserted (C). BCAThe scanner displays an insertion confirmation.5For size 0, press6For size 1-3, pressthe left function button to confirm and return to the main screen.the right function button to confirm and return to the main screen.CS 7600 User Guide (8J4071) Ed07 71
If insertion Panel 4 is inserted, the scanner displays the following insertion confirmation.7For size 4, press72 Chapter 10 Maintenancethe middle function button to confirm and return to the main screen.
Cleaning the Scanner RollersNote: Before you perform this procedure, make sure you have the rollerscleaning plate.The scanner rollers should be cleaned in the following cases: When the scanner prompts to clean the rollers (after every 1000 cycles). When there are dirt-related artifacts on the scanned image.To clean the scanner rollers, follow these steps:Note: Cleaning the rollers requires using the size 4 insertion slot1If the size 4 insertion slot is not installed, replace the insertion slot with the size 4 insertion slot. (Seepage 70.)2Press the scanner’s left function button to access the Settings menu.3Select Rollers Cleaning.CS 7600 User Guide (8J4071) Ed07 73
4Pressthe middle function button to confirm the Rollers Cleaning message. The Rollers Cleaning screen appears.5Peel the adhesive protective sheet from the rollers cleaning plate.74 Chapter 10 Maintenance
6Insert gently the rollers cleaning plate into the size 4 insertion slot with the adhesive side first and theblack stripe facing downwards until the rollers draw the rollers cleaning plate in. When the cleaning procedure is completed the scanner displays a message that the roller cleaning isdone.7Remove the roller cleaning plate from the insertion slot.Tip: The cleaning procedure is to be repeated 3 times to ensure the rollers arethoroughly cleaned.CS 7600 User Guide (8J4071) Ed07 75
Scan & Go Device CareCleaning the Scan & GoUse disinfection wipes for medical equipment to clean the Scan & Go device thoroughly from all sides.Replacing the Battery (Scan & Go Generation 1)For Scan & Go Generation 1 models released before June 2012.Scan & Go devices after June 2012 do not have a battery.Important: Replace only with a Carestream Dental genuine BL-5Cbattery.To replace the Scan & Go battery, follow these steps:1Press the On/Off button for 5 seconds to turn off the Scan & Go device (A).(The blue LED will flash quickly 3 times (B) and then the device is powered off.) Disconnect the Scan& Go device’s USB cable (C).x3B5sAC76 Chapter 10 Maintenance
2Open the battery compartment by carefully pressing the clip outwards and lifting out the cover (A, B).ACDB3Extract the battery as shown in the figure above (C, D) using the removal depression to lift the batteryout.4Insert the new battery by first pressing its contacts against the battery housing terminals (A) and thenplace it in the housing (B).BADC5Press the cover firmly to close it (C, D in above figure).6Connect the USB cable to the computer.CS 7600 User Guide (8J4071) Ed07 77
7Charge for 3 hours.129363 hrsBA8Verify the device operates: press the On/Off button for 1 second and verify that the LEDs function asdescribed in the “Scan & Go Overview” on page 9.9Dispose of the old battery in accordance with all applicable federal, state, and local regulations.78 Chapter 10 Maintenance
11TroubleshootingQuick TroubleshootingThe quick troubleshooting guides you through actions you need to take to correct malfunctions you mayencounter and that do not require authorized technical support. For errors and malfunctions not detailed inthis section, contact technical support.The following table lists the malfunctions that are displayed on the scanner’s LCD and in the imageAcquisition interface, and details the corrective action.Table 1Quick TroubleshootingMalfunctionPossible Cause mp and/orActionoron scanner display in the image AcquisitioninterfaceLimited or no connectionto scanner (physicalconnection is intact, butthe IP address is notcorrect). No connection to scannerafter launching imageAcquisition interface. Scanner Error # 071Scanner memory full.Check the network cable is connected to itsRJ45 port in both the scanner and workstationcomputer.Check the local network connectivity.Check the computers’s firewall settings anddisable the firewall.Replace the network cable.Check the scanner’s network configuration.Check that the scanner’s power supply isconnected.Check the network cable is connected to itsRJ45 port in both the scanner and workstationcomputer.Check the local network configuration.Check the computers’s firewall settings anddisable the firewall.Exit the image Acquisition interface andrelaunch the application.Check the scanner’s network configuration bychecking in the scanner’s Settings-IP Setupscreen if DHCP is enabled or not and consultwith your system administrator what thescanner configuration should be.Replace the network cable.If the scanner icon frame does not change togreen within 40 s, restart the scanner byturning it off and then on again.See “Clearing Scanner Memory” on page 64.Also See “Brightness Control” on page 52CS 7600 User Guide (8J4071) Ed0779
Table 1Quick Troubleshooting (Continued)MalfunctionScanner Error # 073Possible CauseActionImaging plate loadingfailure.Press the middle function button to eject theimaging plate and then reinsert the imaging plateagain.Replace imaging plate if reinsertion does notwork. Important: Do not insert any toolsinto the scanner. If any tool isinserted into the scanner thewarranties are null and void.To retrieve a fallen imaging plate, follow thesesteps: Turn off the scanner and disconnect thescanner from the mains power source. Disconnect the scanner from the network. Unscrew the crosshead screw which is holdingthe rear service cover. Open the rear service cover, and put it to oneside. Gently insert your hand and remove the fallenplate, as shown in picture belowScanner Error # 087Imaging plate insertedincorrectlyImportant: If the plate is not in thelocation shown in the above picture,do not continue to look for theplate, call service. 80 Chapter 11 TroubleshootingAfter the imaging plate has been removed,replace the rear service cover and reinstall thecrosshead screw firmly so that there is nopossibility of light penetration.Connect the scanner to the mains powersupply.Reconnect the scanner to the network.Replace the cover over the network and powersockets.Turn on the scanner.Wait for the “Insert Plate” message. The scanner is ready for useIn case Error 41 appears, check that therear service cover is closed properly.
Table 1Quick Troubleshooting (Continued)MalfunctionPossible CauseAction Either imaging plateinserted incorrectly, orthe imaging platehygienic sheath isinserted in the wrongdirection.Scanner Error # 008 Make sure you are using Carestream Dentalimaging plates.Make sure you follow the preparations andscanning instructions in the Acquiring Imagesprocedures to prevent incorrect insertion of theimaging plates.Reinsert the imaging plate in the rightdirection: with the active side facing outwards.Turn the hygienic sheath around to switchbetween the open side of the sheath with thefoam strip to the sealed side, then position itcorrectly into the insertion slot.Scanned images do not populateframe.The scanned image wasrouted to the scanner’smemory.Use the image Acquisition interface to check theselected scanner’s unclaimed images and retrieve therequired images. In addition, the system can beinterfaced with patient data management softwareapplications. For more information, see ScannerArea in“Image Acquisition Interface Key” onpage 29.Imaging plate is blocked wheninserting an imaging plate into theinsertion panel.Incompatible insertionpanel size.Check if the insertion panel size is compatible to theimaging plate size.Artifacts (black dots or smeared lines) Scanner rollers haveon scanned image.accumulated grime.See “Cleaning the Scanner Rollers” on page 73. For Scan & Go configurations only,image Acquisition interface displays:No USB connection toScan & Go device. Press the Scan & Go device On/Off button for1.5 s. If the icon color changes from red towhite, connection is established.Disconnect the USB cable from the Scan & Godevice and reconnect it. If the icon color changes from red to white,connection is established.Insert the Scan & Go device in an alternativeUSB port in your workstation. If this is the firsttime the Scan & Go device is detected. Whenthe icon color changes from red to white,connection is established.Reinstall the image Acquisition interface andleave the Scan & Go connected.Retrieving a Fallen Imaging PlateImportant: Do not insert any tools into the scanner. If any tool is insertedinto the scanner all warranties are null and void.To retrieve a fallen imaging plate, follow these steps:CS 7600 User Guide (8J4071) Ed0781
1Tap the Settings button.2Select Move Head Up and press OK.The optical head moves up and the scunner shuts down.82 Chapter 11 Troubleshooting
3Position the scanner so that you have access to the service door and cable compartment.4Remove the cable compartment cover.CS 7600 User Guide (8J4071) Ed0783
5Unscrew the Phillips screw that attaches the service door to the rear cover, using the Phillips PH2screwdriver and remove the service door. 6Tilt the scanner backwards, until the plate falls out of the scanner into your hand.Important: If the plate is not in the location shown in the above picture, donot continue to look for the plate. Please call service.7After the imaging plate has been removed, replace the rear service cover and reinstall the crossheadscrew firmly so that there is no possibility of light penetration.8Connect the scanner to the mains power supply.9Reconnect the scanner to the network.10Turn on the scanner.84 Chapter 11 Troubleshooting
11Wait for the Insert Plate message. The scanner is ready for use.Important: In case Error 41 appears, check that the rear service cover isclosed properly.CS 7600 User Guide (8J4071) Ed0785
86 Chapter 11 Troubleshooting
Appendix:CS 7600 Consumables & AccessoriesConsumables & AccessoriesP/NDescriptionQuantity1014364CS 7600 hyg. sheaths size 0200 pcs.1014372CS 7600 hyg. sheaths size 1200 pcs.1014380CS 7600 hyg. sheaths size 2200 pcs.1014398CS 7600 hyg. sheaths size 3200 pcs.1014406CS 7600 hyg. sheaths size 4200 pcs.1059955CS 7600 smart plate size 04 pcs.1059963CS 7600 smart plate size 14 pcs.1059989CS 7600 smart plate size 24 pcs.1059997CS 7600 smart plate size 34 pcs.1060011CS 7600 smart plate size 42 pcs.1014513CS 7600 imaging plate transport box & pad11015098CS 7600 imaging plate pad11044445CS 76000 slot panel size 0 only11023704CS 7600 slot panel size 0-311023712CS 7600 slot panel size 411014497CS 7600 wall mount adapter11018894CS 7600 Roller cleaning plate11020338CS 7600 battery for Scan & Go device, for Scan & GO released 1before June 20121030428Carestream X-Omat screen cleaner177 mL, 6 Fluid Ounces11023720CS 7600 quality control tool1CS 7600 User Guide (8J4071) Ed07 87
Scanner ManagerThe scanner manager is mainly for use by technicians or under direct supervision of a dental servicetechnician.Note: For information on the Scanner Manager for technicians, see the CS7600 Service Guide.Accessing the Scanner ManagerTo access the Scanner Manager, perform the following steps:1On the desktop, double-click on theScanner Manager icon. OR Click Start Programs IP Image Acquisition Scanner Manager The Scanner Manager opensTip: To create a desktop shortcut for the Scanner Manager, click Start Programs IP Image Acquisition Scanner Manager and drag and dropthe Scanner Manager to the desktopFigure 1Scanner Manager.Note: The connected scanner or scanners are shown in the Scanner List2Select a scanner from the Scanner List. If the message Scanner not found appears, Please check scanner connectivity, See “QuickTroubleshooting” on page 79.The following functions can be selected from the Scanner Manager window: “Scanner Info” on page 89 – Presents General system information “Scanner Setup” on page 90 – Enables Setting of Scanner name, user language, time &date88 Chapter Appendix:
“Update Scanner” on page 91– Upgrades the scanner’s embedded software version to the latestversion “Collect Info” on page 93 – Enables you to collect the necessary log files from the scanner andfrom the work station for inspectionScanner InfoYou may provide this information to your Carestream Dental distributor upon request.To open the Scanner Info screen:1In the Settings Screens area, select the Scanner Info checkbox.2Click Open Selected Screen. The Scanner Info screen opens.Figure 2Scanner Info screenCS 7600 User Guide (8J4071) Ed07 89
Scanner SetupTo open the Scanner Setup screen:1In the Settings Screens area, select the Scanner Setup checkbox.2Click Open Selected Screen. The Scanner Setup screen opens.Figure 3Setup screenNote: Scanner serial number cannot be changed.The Scanner Setup screen enables you to set the following: Scanner Serial Number, Scanner Name, and LCD User Interface language Scanner Date and Time Backup and Restore User settings (File name is - CS7600 UserBackup.tar.gz.Important: Restoring Scanner settings is to be performed under directsupervision of a dental service engineer.90 Chapter Appendix:
Update ScannerImportant: Updating the Scanner is to be performed under directsupervision of a dental service engineer.Note: Not all USB devices are recognized by the scanner. Therefore wesuggest that you update the scanner using the scanner manager tool.There are two options for updating the scanner embedded software: Using USB storing device plugged into the USB socket located at the back of the system. Not allUSB devices are recognized by the scanner By using the scanner manager toolUpdating the Scanner using the USB Storage DeviceTo upgrade the scanner by using a USB storage device proceed with the following steps:Note: Before starting this procedure make sure that the system is turned off. Not all USB devices are recognized by the scanner.1Copy the file Reader Embedded xxx.upgrade from the Installation disc located in the UPGScannerfolder or from CS 7600 folder at http://infotec.carestreamdental.com to USB storage device. Make sureto use only the relevant file from the installation disc.2Press simultaneously on the On/Off button, and on the extreme left and right navigation buttons of thescanner.3Wait until Starting appears on the LCD display and then release the buttons.4The process starts automatically and continues until you are requested to reset the scanner.5In order to check that the scanner is updated to the desired software version, click on the right buttonsign with “?”6Disconnect the USB storage device, and continue to work with normal operation mode.CS 7600 User Guide (8J4071) Ed07 91
Updating the Scanner using the Scanner Manager ToolThe Scanner version (Embedded software) can be updated by the scanner manager tool by selecting theUpdate Scanner button.To upgrade the scanner perform the following steps:1Select the scanner and click Update Scanner. Wait while the scanner updates. The file named Reader Embedded xxx.tar is copied from the UPGScanner folder to the scanner The process starts and takes approximately one minute. Then the Reboot screen appears2Click OK and reboot the scanner. After the scanner is restarted, the scanner has been updated.3By pressing the right navigation button sign with “?”, the scanner info screen with the new versionappears. After the update process is completed, the scanner is ready for scanning92 Chapter Appendix:
4If the scanner is already up to date, the following message appears, click OK.Collect InfoThis tool is collecting the necessary log files from the Scanner and from the work station, and then theDSE/User is able to save the zip file on the local PC and send it for inspection.1Select the scanner and click Collect Info.2Create new folder with the Scanner name (Recommended). A browse window opens.3Click on the folder and press OK. The process begins and takes few minutes until it is completed. Upon completion you are able to send the file for inspection. The zip file that was created by this tool is called "CollectInfo.tar.gz"CS 7600 User Guide (8J4071) Ed07 93
4Select a destination folder for the information to be stored and click OK. Wait a few minutes as the Information is being collected.Information CollectedSuccessfully5When the Collect Information is done message appears, click OK. The information is stored in the selected destination folder.Diagnose ConnectionImportant: Diagnose connection is to be performed under directsupervision of a dental service engineer.To diagnose the connection between the scanner and computer:1Click Diagnose Connection. After a few minutes the following message appears:Note: If more than 3% of packets are lost, a Network Test Failed appears,click OK and contact your system administrator.2Click OK.Activate Scanner1Click Activate.The CS -licensing is launched.2Follow the activation process.94 Chapter Appendix:
A Peer to Peer connection makes a scanner dedicated to a Workstation. This saves time by not having to select a scanner each time you make a scan. Creating a Peer to Peer Connection To create a Peer to Peer connection, follow these steps: 1 In the Scanners Connections tab, click the Pair button on the scanner you wish to pair with the image