Transcription
Supplement for ArcGIS 10.2Fifth EditionGIS Tutorial for Health, fifth edition, teaches GIS and analysis skills tohealth professionals and students. Using health-care scenarios, the bookdemonstrates how to process and visualize health data to better manageservices and support health-care policy.Wilpen L. Gorr is a professor of public policy and management information systems at the H. John Heinz IIISchool of Public Policy and Management at Carnegie Mellon University, where he teaches and researchesGIS applications.Kurland GorrKristen S. Kurland is a professor of architecture, information systems, and public policy at H. John Heinz IIICollege and School of Architecture, Carnegie Mellon University, where she teaches and researches GIS,building information modeling (BIM), computer-aided design (CAD), 3D visualization, and infrastructuremanagement.FifthEditionGIS Tutorial for Health includes lessons and exercises on mapping basics,including creating map layers, editing features, and using spatial data. Thefifth edition is compatible with ArcGIS 10.2 for Desktop. Exercise data isavailable for download. Instructor resources are available separately.GIS Tutorial for HealthGIS Tutorial for HealthGIS TutorialHealthforFifth EditionForArcGIS10.2138903WLSW2.5M5/15Printed in the USAKristen S. KurlandWilpen L. Gorr
Cover map designed by Kristen Kurland; cover photograph courtesy of Nattika/Shutterstock.Esri Press, 380 New York Street, Redlands, California 92373-8100GIS Tutorial for Health Supplement for the fifth editionCopyright 2014 EsriAll rights reserved. Fifth edition 2014The information contained in this document is the exclusive property of Esri unless otherwise noted. This work is protected under United Statescopyright law and the copyright laws of the given countries of origin and applicable international laws, treaties, and/or conventions. No part of this workmay be reproduced or transmitted in any form or by any means, electronic or mechanical, including photocopying or recording, or by any informationstorage or retrieval system, except as expressly permitted in writing by Esri. All requests should be sent to Attention: Contracts and Legal ServicesManager, Esri, 380 New York Street, Redlands, California 92373-8100 USA.The information contained in this document is subject to change without notice.U.S. Government Restricted/Limited Rights: Any software, documentation, and/or data delivered hereunder is subject to the terms of the LicenseAgreement. The commercial license rights in the License Agreement strictly govern Licensee’s use, reproduction, or disclosure of the software, data, anddocumentation. In no event shall the US Government acquire greater than RESTRICTED/LIMITED RIGHTS. At a minimum, use, duplication, or disclosureby the US Government is subject to restrictions as set forth in FAR §52.227-14 Alternates I, II, and III (DEC 2007); FAR §52.227-19(b) (DEC 2007) and/orFAR §12.211/12.212 (Commercial Technical Data/Computer Software); and DFARS §252.227-7015 (DEC 2011) (Technical Data – Commercial Items) and/orDFARS §227.7202 (Commercial Computer Software and Commercial Computer Software Documentation), as applicable. Contractor/Manufacturer is Esri,380 New York Street, Redlands, CA 92373-8100, USA.@esri.com, 3D Analyst, ACORN, Address Coder, ADF, AML, ArcAtlas, ArcCAD, ArcCatalog, ArcCOGO, ArcData, ArcDoc, ArcEdit, ArcEditor, ArcEurope,ArcExplorer, ArcExpress, ArcGIS, ArcGlobe, ArcGrid, ArcIMS, ARC/INFO, ArcInfo, ArcInfo Librarian, ArcLessons, ArcLocation, ArcLogistics, ArcMap,ArcNetwork, ArcNews, ArcObjects, ArcOpen, ArcPad, ArcPlot, ArcPress, ArcPy, ArcReader, ArcScan, ArcScene, ArcSchool, ArcScripts, ArcSDE, ArcSdl,ArcSketch, ArcStorm, ArcSurvey, ArcTIN, ArcToolbox, ArcTools, ArcUSA, ArcUser, ArcView, ArcVoyager, ArcWatch, ArcWeb, ArcWorld, ArcXML, AtlasGIS, AtlasWare, Avenue, BAO, Business Analyst, Business Analyst Online, BusinessMAP, CityEngine, CommunityInfo, Database Integrator, DBI Kit, EDN,Esri, Esri — Team GIS, Esri — The GIS Company, Esri — The GIS People, Esri — The GIS Software Leader, FormEdit, GeoCollector, Geographic DesignSystem, Geography Matters, Geography Network, GIS by Esri, GIS Day, GISData Server, GIS for Everyone, JTX, MapIt, Maplex, MapObjects, MapStudio,ModelBuilder, MOLE, MPS — Atlas, PLTS, Rent-a-Tech, SDE, SML, Sourcebook·America, SpatiaLABS, Spatial Database Engine, StreetMap, Tapestry, theARC/INFO logo, the ArcGIS logo, the ArcGIS Explorer logo, the ArcPad logo, the Esri globe logo, the Esri Press logo, the GIS Day logo, the MapIt logo,The Geographic Advantage, The Geographic Approach, The World’s Leading Desktop GIS, Water Writes, arcgis.com, esri.com, geographynetwork.com, gis.com, gisday.com, and Your Personal Geographic Information System are trademarks, service marks, or registered marks in the United States,the European Community, or certain other jurisdictions. CityEngine is a registered trademark of Procedural AG and is distributed under license by Esri.Other companies and products or services mentioned herein may be trademarks, service marks, or registered marks of their respective mark owners. Askfor Esri Press titles at your local bookstore or order by calling 800-447-9778, or shop online at esri.com/esripress. Outside the United States, contact yourlocal Esri distributor or shop online at eurospanbookstore.com/esri.
ContentsIntroduction1Part 2: Preparation of map dataChanges for chapter 4: Projecting, downloading, and using spatial data 2Changes for chapter 5: Downloading and preparing spatial and tabular data11
IntroductionThis supplement contains changes and corrections for GIS Tutorial for Health,fifth edition (Esri Press, 2014). Resources (e.g., websites) and technology (e.g.,ArcGIS software) we refer to in the book have changed since the publication ofthe fifth edition, requiring us to update workbook steps or readings. In addition,this supplement gives us the opportunity to correct errors or unclear workbookinstructions found by users, such as yourself.If you find additional errors or problems, please e-mail either author (gorr@cmu.edu or kurland@cmu.edu) and you will get a quick response.How to use this supplementFirst, download the latest version of the exercise data for this workbook, availableon the Esri Press “Book Resources” webpage, esripress.esri.com/bookresources.Click the appropriate book title, and then click the data link under “Resources” todownload the latest version of the exercise data.Before working through a chapter of the workbook, compare your workbookto the supplement. The tutorial number and name are listed at the top of eachpage of the supplement to guide you. (We do not list page numbers because content in the print and digital versions of this book may appear on different pages.)Once you come to a place in the workbook where a change occurs, write theword “Change” in your workbook. This will remind you when you need to consultthe supplement. Alternatively, just keep both the workbook and the supplementopen, checking for changes as you work.1
Tutorial 4-4: Projecting, downloading, andusing spatial dataChapter 4Projecting, downloading,and using spatial dataThe following are changes and corrections for chapter 4. Changes to the text andfigures are highlighted in yellow.Tutorial 4-4Downloading internationalHIV/AIDS dataIn the following exercises, you will log on to the HIV Spatial Data Repository website and download subnational HIV prevalence data for Zambia, a country inAfrica.Download and extractHIV data for Zambia1In a web browser, go tohttp://spatialdata.dhsprogram.com/home/.2In the box “Attention ESRIGIS Tutorial for HealthUsers:”, click “Download theZambia DHS 2007 data fortutorial 4-4.“ New figure.u3Browse to your Chapter 4MyExercises folder, and savethe compressed file ZMDHS 07 GIS Tutorial forHealth.zip. Note that theFinishedExercises folder doesnot include this file and youmust download it from thewebsite.2
Tutorial 4-9: Downloading USGS raster mapsTutorial 4-9Downloading USGS raster mapsThe United States Geological Survey (USGS) has major responsibility for creating,maintaining, and providing basemaps of the United States. It recently launcheda new seamless version of The National Map Viewer, which you can use to download GIS basemaps. “Seamless” means that all basemaps are available for viewing across the entire country, so one option for downloading is from the currentextent of the viewer, and that extent may cut across several map tiles, counties, or states. The only limitation of the system is that “shipping” of the desiredbasemap is delayed; you are notified by e-mail when it’s ready and given a link todownload a compressed file, often with substantial delays. In any event, it’s valuable to use a seamless download site for spatial data because of the website’s convenience and reliability. If you have trouble downloading the files in this tutorial,copies are saved to the USGS folder in the Chapter4 folder in FinishedExercises.Use The National Map Viewer1In a web browser, go to http://viewer.nationalmap.gov/viewer/. USGS rec-ommends using Firefox as the browser. The images in the book may differfrom what you see on the website.2At the top of the map, click the Reset Zoom (Initial Extent) button3If the Overlays window is not displayed at the left side, click the Overlays expander and click the Content button at the top of the window.(See next page.)3.
Tutorial 4-9: Downloading USGS raster mapsOverlaysexpander4Expand and select Governmental Unit Boundaries,and then expand Labels and then Features. Clearthe check boxes for all expanded layers exceptUnincorporated Place and Unincorporated Placelabels (leave these two selected). u5From the GIS Toolbox, click the Standard taband the Zoom In button. If the toolbox is not displayed, click the Show Toolbox link at the topright corner of the page.Zoom Inbutton6Zoom in on Pennsylvania and then Pittsburgh.Pittsburgh is at the western side of the state.4
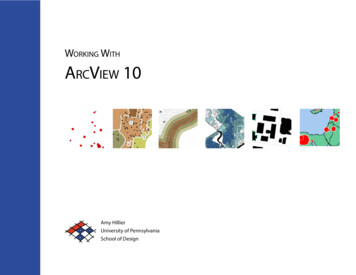
Tutorial 4-9: Downloading USGS raster maps7Use the Map Navigation buttonand other navigation tools to zoomin on downtown Pittsburgh and Fort Pitt, where Pittsburgh’s three riversmeet. New figure below.8At the upper-right corner of the map, click the Imagery buttontosee an orthophoto. Make sure your map scale is on the order of 1:4,000 ormore ( for example, 1:2,000) so that the files you download are not too large.The scale is shown at the bottom of the map. Be sure to include Pittsburgh’sfootball stadium (where the Pittsburgh Steelers play) and the baseball stadium as shown in the figure. Note that the zoom scale in the figure is 1:2,257.(See new figure on the next page.)5
Tutorial 4-9: Downloading USGS raster mapsMap scaleExperiment using different Base Data layers, turning them on and off. Hint: You mayneed to zoom in to see certain basemaps better. If you do, use the Zoom to LastExtent buttonto return to your Downtown Golden Triangle/North Shore extent.Order data for downloadThere are several options to download data by geographic area. In this exercise,you will use the simplest, by current extent.1Click the Download Data button2In the “Download options” dialog box, click the “Click here” link todownload by current map extent. The default data type for vector maps is.File Geodatabase 9.2, which works fine with ArcGIS 10.2.3Select the Orthoimagery check box and click Next.6
Tutorial 4-9: Downloading USGS raster maps4Select Mar2012 0.3m Color Orthoimagery - Pittsburgh, PA and click Next.New figure below.5Click the Checkout button.6Type your e-mail address twice and click the Place Order button.You will get a message saying that your order has been placed and to checkyour e-mail. Later, you’ll get an e-mail message summarizing your order andtelling you that a link will arrive in the future, which you can use to download the order.7Click OK and close your browser.Download dataAt some point, you’ll get an e-mail message containing a link to download thedata. It is likely the data is large enough to be divided into multiple “chunks.” Yourmessage from the USGS will reflect this. If this is the case, you will download andextract the data one chunk at a time.7
Tutorial 4-9: Downloading USGS raster maps1Click the link in your e-mail to download the data. You will see the follow-ing messages in succession: “Current order status . . . Adding your requestto the queue. . . . Extracting data . . . The data extraction has completed. . . .Please wait for the data to be returned.”2Click Save File and save the downloaded file to the USGS folder in yourChapter4 folder in MyExercises.3In Windows Explorer, double-click the compressed file, click “Extractall files”, browse through your Chapter4 folder to the USGS folder, andclick OK. Then click Extract. A folder that has a unique number is created,containing all the files that are needed to display the raster image properly inthe correct projections.4Use Windows Explorer to view these files. Close Windows Explorer whenyou are finished. New figure below.If your message from the USGS listed several “chunks,” repeat steps 1–4 to download all the remaining files.Import the raster image into the file geodatabaseIn addition to vector files, you can also import raster images into a filegeodatabase.1Click the Catalog window button and browse to your Chapter4 folder.2Right-click Chapter4.gdb and click Import Raster Datasets.3In the “Raster To Geodatabase (multiple)” dialog box, click the Browsebutton for Input Rasters, browse through your Chapter4 folder to theUSGS folder, and double-click the first downloaded folder. Click thedownloaded .tif file and click Add. This step adds the TIFF image file to theinput panel.8
Tutorial 4-9: Downloading USGS raster maps4Browse to the remaining folders and add each remaining TIFF image file.Click OK. Be patient while the image files are imported. New figure below.Browse through the file geodatabase and notice that ArcMap renamed each JPGimage file.Add the raster image to the mapThe orthophoto raster image you will add next has a spatial reference. So, whenyou add it to the map document and data frame, ArcMap reprojects it on the flyinto state plane coordinates.1If necessary, start ArcMap and open Tutorial4-8YourName.mxd.2On the Standard toolbar, click Add Data, go to Chapter4.gdb, click thefirst JPG image file, and click Add and then Yes if prompted. ArcMap cre-ates raster pyramids for your file. Be patient during this process.3In the table of contents, right-click the new image layer and click ZoomTo Layer.4In the table of contents, right-click the image layer, click Properties, andclick the General tab.5In the Scale Range box, select the “Don’t show layer when zoomed”option, click the “Out beyond” arrow, and click 1:10,000.6Click the Source tab, scroll down in the property panel, and observe thatthe image layer has UTM zone17N coordinates. Click OK to close theProperties window.9
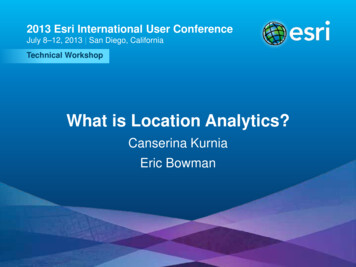
Tutorial 4-9: Downloading USGS raster mapsAdd the remaining JPG images, turn off the Rivers layer, and zoom in to PointState Park where the three rivers meet. Create a spatial bookmark called PointState Park. New figure below.Save the map document1On the File menu, click Save As.2Save your map document as Tutorial4-9YourName.mxd to your Chapter4folder in MyExercises. Do not close ArcMap.On the USGS website, try downloading another USGS image or layer.10
Tutorial 5-1: Downloading and preparingspatial and tabular dataChapter 5Downloading and preparingspatial and tabular dataThe following are changes and corrections for chapter 5. Changes to the text andare highlighted in yellow.Tutorial 5-1Downloading spatial data from theUS Census BureauYou can download census-related map layers that have unique identifiers forpolygons such as census tract IDs, but they do not include census attribute datasuch as population, age, sex, race, income, and so on. You’ll need to downloadthe census demographic data separately, from the bureau’s American Fact Finderwebsite; do some data preparation; and then join the data to the correspondingmap layer.Download TIGER/Line shapefilesThe end results of this tutorial are downloaded shapefiles. Because Internet siteschange often, some of the screen captures that follow may look different fromwhat you find on the website. If you have difficulty downloading the CensusTIGER shapefiles, they are available in the Chapter5 folder in FinishedExercises.1From Internet Explorer or another web browser, go tml2On the resulting TIGER Products page, click the TIGER/Line Shapefileslink then the 2010 tab. The TIGER/LINE Shapefiles link name may varyslightly based on recently uploaded TIGER shapefiles.11
Fifth Edition Kristen S. Kurland Wilpen L. Gorr GIS Tutorial 138903 WLSW2.5M5/15 Printed in the USA . Agreement. The commercial license rights in the License Agreement strictly govern Licensee's use, reproduction, or disclosure of the software, data, and documentation. In no event shall the US Government acquire greater than RESTRICTED .