Transcription
ProdigyTalking MeterOwner’s ManualDear Prodigy Owner:Thank you for choosing the Prodigy AutoCode Talkingblood glucose monitoring system. Please read this manualcarefully as it contains important information about your newProdigy system. A warranty registration card is included withyour system. Please return the completed card to us.Prodigy meters are designed to help you and yourhealthcare professionals monitor your blood glucose levels.This owner’s manual will help you learn how to use theProdigy AutoCode Talking Meter effectively. Technicalsupport is available 24 hours/7 days a week by calling1-800-243-2636. All questions about interpreting theresults should be directed to your healthcare professionals.The Prodigy AutoCode is the latest technology for bloodglucose monitoring. It is easy to use and will give you fastand accurate results with a minimal sample of blood. It hasa large screen display for easy reading and is small andlightweight for portable convenience.The Prodigy AutoCode Meter: Requires no-coding, allowing you to save time and avoidhuman error due to improper coding. Allows You to Perform Alternative Site Testing (AST). Has memory and data management capabilities.Prodigy ’s free software, available atwww.prodigymeter.com, gives you and yourhealthcare professionals powerful graphic tools tomanage your diabetes.1.800.243.2636Diagnostic Devices, Inc.1
ProdigyOwner’s ManualTalking MeterProdigyTalking MeterOwner’s ManualTable of ContentsTable of ContentsImportant Safety Instructions. 4Blood Glucose Testing. 24Preparing the Lancing Device. 24Getting a Blood Sample. 26Performing a Blood Glucose Test. 28Important Health-Related Information. 5About Alternative Site Testing (AST). 6Introduction to the Prodigy AutoCode Meter. 8Intended Use. 8Test Principle. 8Contents of the Prodigy AutoCode Meter. 9Key Functions of the Meter. 10Using the Meter Memory. 30 Setting up the Prodigy AutoCode Meter. 11Meter Display . 11Speaking Function. 12Key Functions of the Test Strips. 13Important Test Strip Information. 14Set-Up Steps. 15Control Solution Testing. 19About Prodigy Control Solution. 19Important Control Solution Test Information. 20Performing a Control Solution Test . 21www.prodigymeter.comDiagnostic Devices, Inc.2Viewing Results on a Personal Computer. 32Caring for your Prodigy AutoCode Meter. 34Maintenance. 34Battery . 34Battery Replacement. 35System Troubleshooting. 36Special Messages. 36Error Messages. 37Troubleshooting Guide. 38Information about your Prodigy AutoCode Meter. 40Comparing Meter and Laboratory Results. 40Specifications. 42Performance Characteristics. 43Expected Test Results. 441.800.243.2636Diagnostic Devices, Inc.3
ProdigyTalking MeterOwner’s ManualProdigyTalking MeterOwner’s ManualImportant Safety InstructionsImportant Health-Related InformationRead this before using your Prodigy AutoCode Meter.The following basic safety precautions should always betaken.Severe dehydration and excessive water loss may causefalse low results. If you believe you are suffering fromsevere dehydration; consult a healthcare professionalimmediately. Close supervision is necessary when the device is usedby, on, or near children, handicapped persons or invalids.Elevated blood triglycerides, reducing substances suchas uric acid and ascorbic acid at normal bloodconcentration, or acetaminophen, dopa, methyldopa,L-dopa, and tolbutamide at normal blood concentrationsshould not significantly affect the results. Use the device only for the intended use described inthis manual. Do not use test strips and control solutions that are notsupplied by the manufacturer. Do not use the device if it is not working properly, or if ithas suffered any damage. Before using any product to test your blood glucose,read all instructions thoroughly and practice the test.Do all quality control checks as directed and consult witha diabetes healthcare professional.Warning: Keep the test strip vial away from children;the vial cap and the test strips can be a potential chokinghazard. Never chew or swallow a test strip. If this occurs,please seek medical assistance immediately.www.prodigymeter.comDiagnostic Devices, Inc.4Test results below 60 mg/dL (3.3 mmol/L) indicate lowblood glucose (hypoglycemia). Test results greater than240 mg/dL (13.3 mmol/L) indicate high blood glucose(hyperglycemia). If your results are below 60 mg/dL orabove 240 mg/dL, repeat the test, and if the testresults are still below 60 mg/dL (3.3 mmol/L) or above240 mg/dL (13.3 mmol/L), consult your healthcareprofessional immediately.Inaccurate results may occur in severely hypotensiveindividuals or patients in shock. Inaccurate lowresults may occur for individuals experiencing ahyperglycemic-hyperosmolar state, with or without ketosis.Critically ill patients should not be tested with blood glucosemeters.Please refer to your test strip package insert for additionalimportant information.1.800.243.2636Diagnostic Devices, Inc.5
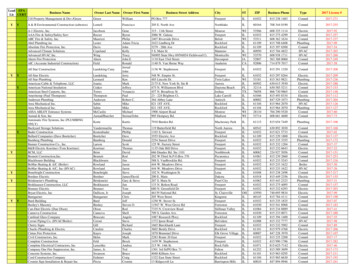
ProdigyOwner’s ManualTalking MeterProdigyTalking MeterOwner’s ManualAbout ting(AST)There are important limitations to AST. Please consult yourhealthcare professional before you perform AST.What is AST?Alternative Site Testing (AST) means you can use parts ofthe body other than your fingertips to check your bloodglucose levels. The Prodigy AutoCode Meter allows you totest on your palm, forearm, upper arm, calf or thigh.See Figure 1.What is the advantage?Fingertips feel pain more readilybecause they are full of nerveendings (receptors). At other bodysites, nerve endings are not sonumerous and you will not feel asmuch pain as you will experience atthe fingertip.Use AST only:v Two hours or more after your last meal.v Two hours or more after taking insulin.v Two hours or more after exercise.v During steady state blood glucose conditions.Do not use AST if:v You have reason to believe you have hypoglycemia orhyperglycemia.v Your routine glucose results are often fluctuating.v You are pregnant.*To increase the accuracy when using AST, rub the puncturesite before extracting blood.When to use AST?Food, medication, illness, stress,and exercise can affect bloodglucose levels. Capillary blood atFigure 1the fingertip reflects these changesfaster than capillary blood at other sites.Therefore, if you are testing your blood glucose levelduring or immediately after a meal, physical exerciseor stressful event, take the blood sample from yourfingertip only.www.prodigymeter.comDiagnostic Devices, Inc.61.800.243.2636Diagnostic Devices, Inc.7
ProdigyTalking MeterOwner’s ManualProdigyTalking MeterOwner’s ManualIntroduction to the Prodigy AutoCode MeterIntended UseThe system is intended for use outside the body (in vitrodiagnostic use only). It should be used only for testing bloodglucose (blood sugar) and only with fresh capillary wholeblood samples. The system is intended for use in the homeand in clinical settings. It should not be used for thediagnosis of diabetes or for the testing of newborns.Contents of the Prodigy AutoCode MeterThe Prodigy AutoCode Meter is available as a meter onlyor as a meter kit. Please check the “REF” number markedon the outside of the box to see if you have purchased a“Meter” or a “Meter Kit.” Please review the contents of yourpurchase to confirm that all the components are included aslisted below:Test PrincipleBlood glucose is measured by an electric current that isproduced when a blood sample mixes with the reagent(special chemicals) of the test strip. The electrical currentchanges with the amount of glucose in the blood sample.The Prodigy AutoCode Meter measures the strength of theelectrical current, calculates your blood glucose level andthen displays your result in either “mg/dL” or “mmol/L.”REF #51850 orREF #51885Your “Meter” includes: Prodigy AutoCode Talking Meter Two (2) AAA Batteries Carrying Case Complete Instructions:- Manual- Log Book- Quick Reference- Warranty CardThe Prodigy AutoCode Meter, Test Strips and ControlSolutions have been designed, tested and proven to worktogether as a system to produce accurate blood glucosetest results.Important: Use only Prodigy Control Solutions and TestStrips with your Prodigy AutoCode Meter. Using other teststrips and control solutions with this meter can produceinaccurate results.www.prodigymeter.comDiagnostic Devices, Inc.8REF #51880 orREF #51890Your “Meter Kit” includes: Prodigy AutoCode Talking Meter Two (2) AAA Batteries Prodigy ControlSolution (4ml) Prodigy Test Strips (10ct) Sterile Lancets (10ct) Lancing Device Complete Instructions:- Manual- Log Book- Quick Reference- Warranty Card*You can purchaseadditional suppliesfrom your providerImportant: Please review the contents of your purchase.If any items are missing, please return your meter to theplace of purchase.1.800.243.2636Diagnostic Devices, Inc.9
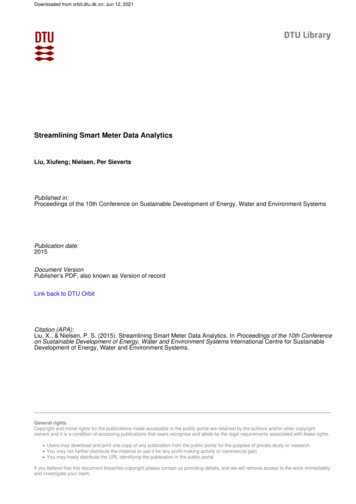
ProdigyOwner’s ManualTalking MeterProdigyOwner’s ManualTalking MeterSetting Up the Prodigy AutoCode MeterKey Functions of the MeterFigure 2FrontTest SlotInsert the test strip here.The meter will turn on automatically.LCD DisplayGuides you through the test usingsymbols and simple messages.Talking SymbolConfirms audio function.Main ButtonTurns the meter on or performs otherfunctions described in this manual.Set ButtonLocated in the battery compartment;used to set up the meter.Figure 3 - BackData PortPort for USB Cableconnection to your computer.10Day AverageIndicates that thedisplayed test resultis an average.DateTimeTestResult AreaDisplays testresults.Test StripSymbolAppearswhen themeter isturned on.Blood Drop SymbolFlashes when sampleshould be applied.Figure 5MemorySymbolAppears whenyou review ratureis outside ofoperatingrange.Low BatterySymbolAppearswhen thebatterypower is low.Voice SymbolShows if audiofunction is on.Control SolutionUnit of MeasureTest SymbolIndicates what unit of measure Shows that you are inthe test result is displayed in. Control Solution Mode.Figure 4 - Backwww.prodigymeter.comDiagnostic Devices, Inc.Meter Display1.800.243.2636Diagnostic Devices, Inc.11
ProdigyTalking MeterOwner’s ManualProdigyTalking MeterOwner’s ManualKey Functions of the Test StripSpeaking FunctionThe Prodigy AutoCode Meter talks you through each step ofyour testing procedure.When does themeter speak?When the meter is turnedon.When room temperature isoutside operating range;which is 50 F 104 F(10 C- 40 C).When the meter is ready totest.( appears on display)What does themeter say?When the test is completed.(The result appears ondisplay)Your blood glucose is(number) milligrams perdeciliter/millimoles per liter.When there is not enoughblood in the test strip.Your blood sample is notenough.When you turn off the meter.Goodbye.When a used test strip isinserted.Test strip has been used.Your Prodigy Meter is on.12The test strip consists of the following parts:Room temperature is out ofrange.Absorbent ChannelApply a drop of blood and it will be drawnin automatically.Please apply blood to thestrip.Confirmation WindowShows whether enough blood hasbeen drawn into the test strip’sabsorbent channel.www.prodigymeter.comDiagnostic Devices, Inc.The Prodigy AutoCode Meter measures the amount of bloodglucose (blood sugar) in whole blood. Blood is applied tothe opening of the absorbent channel of the test strip and isautomatically drawn.Test Strip HandleHold this part to insert the test strip intothe test strip port on the meter.Contact BarsInsert this end of the test strip into themeter. Push it in firmly until it will not goany further.Please refer to the “Performing a Blood Glucose Test”Section for complete instructions.1.800.243.2636Diagnostic Devices, Inc.13
ProdigyTalking MeterOwner’s ManualProdigyTalking MeterOwner’s ManualImportant Test Strip InformationSet-Up Steps Store test strip packages in a cool, dry place between39.2 F 104 F (4 C 40 C). Keep away from directsunlight and heat. Do not refrigerate. Store your test strips in their original vial only. Do nottransfer them to a new vial or any other container. With clean, dry hands, you may touch the test stripanywhere on its surface when removing it from thevial or inserting it into the meter. After removing a test strip from the vial, use itimmediately then replace the vial cap and close it tightly. Use each test strip immediately after remo
connection to your computer. Main Button Turns the meter on or performs other functions described in this manual. Figure 2 Front Figure 3 - Back Figure 4 - Back Key Functions of the Meter Setting Up the Prodigy AutoCode Meter