Transcription
Mike Elliott Eric M. LangIn Marvel Dice Masters: X-Men Forever, two players take on therole of masterminds directing the actions of a team of powerfulSuperheroes (represented by dice) to battle each other! Each turn, youroll your dice to see what resources you have available, acquire moredice, send your team members into the field, and then strike at theenemy mastermind. Reduce the opposing mastermind’s life to zeroand save the day!COMPONENTSAside from these rules, this set includes: 76 Custom DiceThere are multiple12 Basic Action Dice (3 in each ofcards available for each4 different colors)character die; you can48 Character Dicechoose which one you16 Sidekick Dice (white)want to use! 76 CardsThis lets you specialize62 Character Cards (24 differentyour dice to suit yourcharacters; Sidekicks have no cards) play style.10 Basic Action Cards4 Color Reminder Cards 2 Dice BagsAdditional cards and dice to expand your team can be found in teampacks—ask your retailer! High-quality playmats are also available forpurchase, or you can download one from dicemasters.com and printit out yourself.
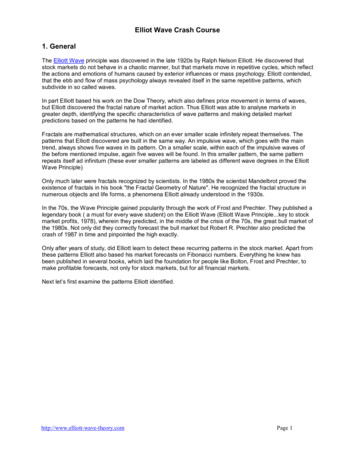
QUICK STARTReady for awesome comic book action? Hope so! It’s a smack-down ofcosmic proportions—and you’re in the middle of it!Getting Ready to Play0Set up both Players’ cards and theBasic Action Cards as shown below:34Player 2Player 1Only Player 1 canbuy these diceBoth players can buy dice fromthese Basic Action CardsFor card anatomy,see page 5.Only Player 2 canbuy these diceLIFE: 10 9 8 7 6 5 4 3 2 1 KOTIP: Use the playmat in the center of this rulebook to manage your dice!Each player takes a bag and puts 8 white Sidekick Dice ( ) in it. These areyour starting operatives/resources! You start the game with 10 Life. Youwin by reducing your opponent’s Life to zero!How to PlayBe aware, this Quick Start uses slightly simplified rules. The rest of theRulebook will explain each of the following 5 steps in more detail.Player 1 goes first and follows these 5 steps:1. Clear and Draw StepIf you have any dice in your Reserve Pool,CLEAR them and move them to your Used Pile.Then, DRAW 4 dice from your bag and put themin your Prep Area. If at any time you need todraw dice and your bag is empty, put ALL dicefrom your Used Pile into your bag, mix well, andcontinue drawing.2. Roll and Reroll StepTake all the dice from your Prep Area (the 4 you drew plus any thatwere there at the start of your turn) and ROLL them. If you don’t likethe results, you can choose any or all of them to REROLL, but you mustkeep the new results!2
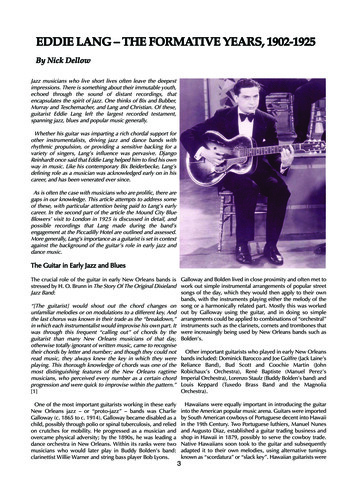
Your results will be one of three types of faces: Energy (/ / // / ), Characters (a special icon like the Sidekick ( ), with smallwith no numbers,numbers around it), or Actions (a special icon likebut possibly some number of ). Move all the dice you rolled into yourReserve Pool, keeping the faces showing.*3. Main StepNow you can “use” the dice you rolledearlier. There are several different actionsyou can take, depending on what you rolled,and you can do any or all of them in anyorder, as many times as you’d like (or at least,can afford to pay for!):Purchase Dice011202You can spend energy that you’ve rolled toacquire new dice. All cards on your team,as well as any of the Basic Action Cards inthe middle (regardless of who “brought”them), have a “Purchase Cost” in the upperleft corner of the card. You must “spend”exactly that much energy to purchase 1 die/ /from that card, and if there is an energy symbol on the card (/) then at least 1 energy spent must match that symbol. Whencan be spent as any symbol to match the energyspending energy, atype requirement.The Energy dice you spend, along with the die you purchased, all go toyour Used Pile.011011Field CharactersMost dice have three characterfaces denoted by small numbers inthe corners.If you rolled a Character face (), youmay pay its Fielding Cost (small number inFielding Cost 01 Attackthe upper left corner of the die) to move itBurst(s)Defensefrom your Reserve Pool to the Field Zone.(if any)Any type of energy may be spent, and theCustom IconFielding Cost may be 0. As with purchasingdice, energy “spent” goes to the Used Pile.Sometimes, a character will have a special ability that takes place whenyou field it: just follow what the corresponding card says.At the end of the Main Step, any Character Dice that you didn’t field aremoved to the Used Pile.010222122Play ActionsIf you rolled any Action faces ( * **), you may “use”the Action Die by moving it to your Used Pile andcarrying out the directions on the correspondingorsymbol, andcard. If the die is showing athe corresponding card has directions matching theburst(s), follow those directions. The Main Step isone of two windows when Action Dice can be played.* **Basic Action faces32
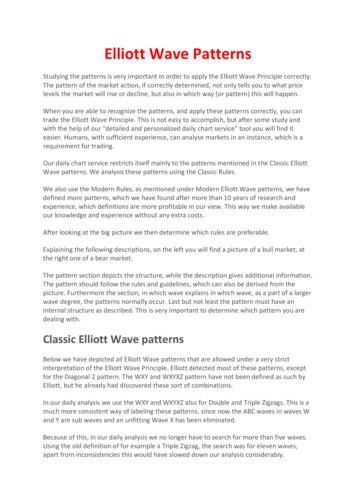
Use Global AbilitiesSome cards may have red text at the bottom starting with GLOBAL:These are game effects always available to both players, that can beused by paying the appropriate cost. As with purchasing characters,energy can be spent as any symbol to match the energy typerequirement, and Energy dice spent are moved to the Used Pile. TheMain Step is one of two windows when most Global Abilities can beplayed.PASS PRIORITYAfter you’ve done whatever you want to do during your Main Step, youmust allow your opponent to use any Energy they may have saved toactivate Global Abilities. Once you’ve both done everything you wantto do, unfielded Character dice are moved to the Used Pile, and you canchoose to attack your opponent or end your turn.4. Attack Step0 charactersNow it’s time to send yourto attack, and try and bring youropponent’s Life down! The AttackStep follows these four specific stepsin order:Declare AttackersPlayer 2 attackers1101301011UNBLOCKED!Unblockeddice will goto the UsedPile.Any Character Dice in your FieldZone can attack. You can use some,none, or all of them. Move attacking2dice to the Attack Zone to signifyPlayer 1 blockersto your opponent that they areattacking. Like when being fielded,some Characters may have a special ability that takes place when theyare assigned to attack: follow the directions on the corresponding card.Declare BlockersYour opponent decides which of the Character Dice in their Field Zonethey want to block with: some, none, or all of them. Each blocker canonly block 1 attacker, but multiple blockers can team up on a singleattacker! Move blocking dice to the Attack Zone across from the dicethey are blocking.ACTION/GLOBAL WINDOWJust like in the Main Step, you can use any Action Dice you haveremaining in your Reserve Pool, and/or use Energy on GlobalAbilities. You may not purchase or field character dice at this time,though. Once you’ve done what you want to, you pass priority to youropponent, giving them an opportunity to spend Energy for GlobalAbilities.42
Assign DamageAll attacking or blocking Character Dice deal damage (based on their Attackstat) simultaneously:Unblocked attackers deal their damage directly to the defending player’s Lifetotal, and then move to the Used Pile. If your opponent’s life reaches 0, theylose and you win!A blocked attacker deals all its damage to its blocker(s). If two or morecharacter dice blocked the same attacker, the attacker chooses how todistribute the damage.Blocking character dice deal all their damage to the attacker they areblocking.If a character die ever takes damage (cumulative over the turn) equal to orgreater than their Defense stat, that character die is KO’d and goes to itsowner’s Prep Area.For more information on the Attack Step, see page 9.5. Cleanup StepBlocked or blocking character dice that were not KO’d return to theirField Zone.All damage to all dice is cleared.Any remaining unused Action Dice in your Reserve Pool are movedto your Used Pile. The only diceremaining in your Reserve Poolat this time should be Energydice, that you can use during youropponent’s turn to pay for GlobalAbilities during the appropriatewindows (the Main Step and thecorrect part of the Attack Step).All card effects end.Now your opponent becomesthe active player, and follows thesame 5 steps for their turn!If you have any more questions about an ability or action, or wantmore detail, you can find the answers in this rulebook or on our RulesForum at http://win.wizkids.com/bb/0110110114PLAY AREASThere are several distinct areas where you place your dice to indicatewhat they can and can’t do for you.The Bag: One of the two dice bags provided (or your own bag).This is where your eight Sidekick dice start the game, and where diceare drawn from throughout the game. Dice should always be drawnrandomly, and while you are allowed to look into your bag at any time,you must shake it well afterwards to mix the dice. If you ever need to5
draw one or more dice and your bag is empty, move all dice currentlyin your Used Pile (NOT including Out of Play) to the bag and shake itwell, and continue drawing the appropriate number of dice.Prep Area: Dice that are here before your turn will be added to the 4dice you draw at the beginning of your turn, and all those dice will berolled during your Roll and Reroll Step. Character dice that are KO’dgo to the Prep Area, and certain game effects will direct you to “Prep adie”—meaning add the specified die to your Prep Area.Reserve Pool: After your Roll and Reroll Step, all the dice are placedin the Reserve Pool and used from here. Energy can be spent, ActionDice can be used, and Character Dice can be fielded from here. Duringyour opponent’s turn, only Energy dice can be in the Reserve Pool, andare cleared during your following Clear and Draw Step. If an effectever tells you to “draw a die” without specifying what to do with it,you should roll it a single time and place it in the Reserve Pool on theresulting face.Field Zone: Once rolled to a Character face, dice can be moved herefrom the Reserve Pool by paying their Fielding Cost. Sometimes othereffects can “field” dice from other areas. Characters will remain in theField Zone indefinitely until you attack with them or another effectsends them elsewhere. Some special Action Dice may also be used byplacing them in the Field Zone.Attack Zone: The Attack Zone is considered to be a special part ofthe Field Zone. Character dice assigned as attackers or blockers aremoved to the Attack Zone to distinguish this status, but are alwaysconsidered to be in the Field Zone.Out of Play: This is a special area that is not represented on theplaymat. When you spend Energy during your turn, or use an ActionOut of Play6
Die, it goes Out of Play until the end of the turn when it is moved tothe Used Pile. Dice that are Out of Play cannot be interacted with byany game mechanics, and will not be used to refill the bag if it runsout mid-turn. Unblocked attackers also go Out of Play, as well as anydice sent from the Field or Reserve Pool “to the Used Pile” during yourturn. The Out of Play area does not exist during your opponent’s turn,and any Energy spent or dice sent to the Used Pile will go directlythere.Used Pile: This is where dice you use end up. At the end of your turn,all dice that are Out of Play are moved to the Used Pile. Purchased diceare also placed directly in the Used Pile, along with unfielded characterdice after your Main Step. Any Energy spent on your opponent’s turngoes directly to the Used Pile, along with remaining energy clearedfrom your Reserve Pool during the Clear and Draw Step. When youneed to draw one or more dice, and your bag is empty, you refill itwill all dice in your Used Pile (not including any dice that are Out ofPlay) and continue drawing. This is how the dice you purchase willeventually cycle through your bag to be rolled and used.CARDSDice Masters is a unique game, in that it uses both cards and dice.Unlike most card games, you won’t actually be manipulating the cardsthemselves. They are always laid out for players to see, and they giveinformation about their corresponding dice: who they represent, whatit will cost you to use them, and what powers they have. There arethree types of dice, but only two of them have corresponding cards—Characters and Actions. The white Sidekick dice that you start thegame with don’t have corresponding cards. Characters are based onindividuals from the Marvel Universe, while Actions represent differentevents or objects. When something refers to a character, it will usuallymean the card, unless otherwise specified.At the top of the card is the name/title and subtitle. The name is whatCharacter or Action the corresponding die refers to; however, most dicewill have multiple cards available that you can choose between whencomposing your team. These are differentiated by the subtitle and thecollector number. You can choose which card you like best, and collectthem all!At the upper left of a card is that die’s purchase cost and energy type(s)/ / /).When you purchase a die from(any combination ofthat card, you must pay at least one of each matching energy type, andgenerally that die will produce that type of energy. Hope Summers:character thatMessiah Complex in the diagram on page 8 is acosts 2. Therefore, you must spend 2 energy, at least one of which must, in order to purchase it. Sidekick Dice and Basic Action Dicebe ahave no energy type.7
Below the cost and energy type(s), some characters have one ormore logos to identify their affiliation(s) (Action Dice generally haveno affiliation).Here are some affiliations found within this set:X-MenHellfire ClubBrotherhoodVillainCollectorNumberCost & TypeAffiliationCard Name &SubtitleCard ArtRarity Stripe(see page 31 for“Customizing YourTeam” )Text BoxDie FaceReferenceLevel Level Level123Die Limit(character faces of increasing level)EnergyFacesThe text box in the center of the card details the die’s abilities. Belowthat, the color of the rarity stripe provides information for collectors.Directly below the rarity stripe, “Max: #” shows the die limit; that’show many of these dice you are allowed to have on a team. Most cardsgenerally allow you to have 4 dice, but some of the more unique orpowerful ones may only allow 2 or even 1, while some others mayallow more than 4. Basic Action Cards have “Use: 3” instead becauseyou always use a fixed number of them in every game.At the bottom, the die face reference shows the various faces ofthe die. This will help you match up which dice correspond to whichcards, and see what is on the other faces of the die without having topick it up and spin it. The faces that provide energy are shown on theleft, and the character or action faces are on the right.8
DICEFieldingEach die consists of a unique1 AttackCost 1combination of colors and symbols.As mentioned before, there areBurst(s)5 Defensethree different types of dice: Action,(if any)Character, and Sidekick. All diceCustom Iconhave some sides that produceenergy, which we will discuss onpage 10.In addition to their energy sides, the other faces of Action Dice willhave a custom icon with or without some burst symbols in the corner.Action Dice will never have numbers around their icon, and any dicewithout numbers is by definition an Action Die. Basic Action Dice areused in every game, but there are other Action Dice found in boosterpacks that can be included in your team.Character Dice have a custom icon and may have burst symbols, butthey will always have several numbers that define the character’s basicstats.The number in the top left is the fielding cost of the die. This is howmuch energy you must spend to send it from the Reserve Pool into theField Zone to engage your opponent.The top right is the die’s attack, abbreviated in card text as A. Thisis how much damage the character die will deal to an opposing die oropponent in combat.The bottom right is the die’s defense, abbreviated in card text as D.This is how much damage the die can take before being knocked out.*The bottom left may have one or two burst symbols ( ). These may beused to provide additional abilities, if any are listed on the correspondingcard. If the card has no burst abilities listed, ignore the burst on the die.Characters have levels (normally three), shown on the card from left toright. Typically, the higher levels will have higher A and/or D values, andoften higher fielding costs to compensate.Sidekick Dice are special dice that each player begins the game with.You can never gain any more, or get rid of the ones you have. They canprovide any of the energy types, or even Wild ( ) energy. They alsohave one character face with the ( ) custom icon, and stats. When theyare rolled to this face (in the Reserve Pool or the Field Zone) they areconsidered to be Sidekick Character Dice (level 1), for game effects thatlook for character dice. However, when they are unrolled (in the PrepArea, Used Pile, or the bag) they are not considered to be character dice,but just Sidekick dice. For any game effects that care, they are consideredto have a Purchase Cost of 0.9
ENERGYEnergy is the main “resource” that most things in the game use. Allthe dice in the game, depending on which face they roll, will give youa Character, an Action, or provide Energy. You’ll need this energyto acquire more dice, field your characters, or pay for some specialabilities (we’ll describe all of these soon).There are four “types” of energy: Fist Bolt Mask ShieldAll characters and actions will fall into one (or sometimes more) ofthese “types” of energy, and generally produce that same energy. Inaddition, there are some other energy faces that certain dice mayproduce: Wild ( ) – when spending energy, you may consider this tostand in for any of the four energy types.or Generic Energy – represented most commonly with asymbol. The number in the circle is the amount of “generic”energy that can be spent on purchasing/fielding/abilities, but isnot considered to be any “type” of energy. In card text, a numberin a circle like this will mean that amount of “energy,” but is notrequired to be generic energy. Doubles – some die faces on the dice you purchase will providetwo Energy by showing two symbols: two Fists, or two Bolts, oreven one Mask and one Shield (for example).There are also some game effects that provide you with “virtualenergy” that isn’t represented on a die. In these cases, we recommendyou use something like a coin or a six-sided die to remind you about it.This energy is generally Generic energy, and must be spent before you“pass priority” (explained later) or it will be lost. Some abilities or effectswill “count” energy in your Reserve Pool or after you roll dice. Forthese effects, Wild ( ) energy doesn’t count as one of the four energytypes, and these effects will count the total amount of energy produced(symbols), not the number of dice that show those symbols. So a dieshowing ( ) counts as two ( ). Effects that look at what you’verolled during your Roll & Reroll Step only check at the end of that step(unless explicitly stated otherwise).PLAYING THE GAMEBefore starting the game, each player will need 8 Sidekick dice, andthey will choose up to 8 unique character/action cards for their “team.”Each card must have at least 1 corresponding die, and can have up to10
the die limit printed in the bottom right of the card. However, eachteam can only have a maximum of 20 dice, so you will have to choosehow you allocate your dice. You can’t have multiple cards that have thesame name/title, so choose which you want to use based on its cost/affiliation(s)/abilities, etc.Decide which player will go first. Using a random method, choose aplayer, who can choose to go first or second. One recommended ideais to have one player roll a Basic Action Die, while the other playercalls “Action” or “Energy.” The first player will have a chance to gettheir dice out earlier, but they start their first turn with one fewer die(see below).TURN ORDERPlayers alternate taking turns. During a player’s turn, they go throughthe following Steps, in order. Once a Step is completed, a player cannotgo back to it in the same turn. Some effects may take place “at the startof your turn” or “at the start of each player’s turn.” Do these before theClear and Draw Step.1. CLEAR AND DRAW STEPThe first thing you will do is CLEAR all the dice that are in yourReserve Pool. This is generally energy dice that you saved to useduring your opponent’s turn, but didn’t use for one reason or another.Since you never used these dice, they don’t go Out of Play, but movedirectly to your Used Pile.Then you will DRAW four dice from your bag. Remember that ifyou need to draw dice, and your bag is empty—refill it from yourUsed Pile, shake well to randomize, and continue drawing. Sometimescards or abilities will have you draw additional dice: draw these now.Any/all dice drawn during the Clear and Draw Step (even if physicallyseparated by a bag refill or additional abilities) are considered one“draw” for game purposes. Place all the dice drawn into your PrepArea.If you are unable to draw the requiredfour dice (even after refilling your bag), On the very first turn of thegame, the first player willyou lose one Life and gain one genericonly draw 3 dice and placeenergy for each die (below four) that them in their Prep Area.you were unable to draw. For example, if They will then draw and putyou were only able to draw one die, then their 4th die Out of Play foryou were unable to draw three dice; you the duration of the turn. Atwould lose three Life and gain three the end of the turn it willgeneric Energy. This “virtual” generic move to the Used Pile, andenergy, as mentioned previously, should all subsequent turns bothbe represented by something else, and players will draw the usual4 dice.spent before passing priority.11
2. ROLL AND REROLL STEPFrom the Prep Area, take all the dice that you drew, plus any that werepreviously there (from before your turn—dice that were KO’d, dicethat were Prepped from an ability, etc.), and ROLL all of them.After you have rolled your dice, if you are unhappy with any ofthe results, you may choose any (or all, or none) of your dice, andREROLL them. You only get one reroll, so select all the dice at once,and reroll them as a single group.Once you have rolled (and possibly rerolled) your dice, move allof them from the Prep Area to the Reserve Pool, keeping the sameface up. They are no longer considered “unrolled” dice, but “rolled”dice, and the displayed face determines if it is an Action, Character,or Energy die.3. MAIN STEPDuring this step, you have a “window” to do any of the following gameactions in any order, as many times as you would like (or have theability to do so).Spending EnergyFor any energy that you spend during your turn, move the appropriateEnergy Dice (die showing an energy face) from your Reserve Pool toOut of Play. It will move to the Used Pile during the Cleanup Step.While it is your opponent’s turn, you may still spend energy on certainthings, but it will go directly to the Used Pile. You can never choose tospend energy for no reason. If a die shows multiple energy, you may“partially” use the die by spinning it down to a single-energy face thatreflects the unspent portion. Once an energy die has been partiallyused like this, it is not eligible to be rerolled by any effects. If you havea die with a double generic energy face (such as a Basic Action Die), youmay use one of its energy and keep the other as a “virtual energy” untilyou pass priority (like the “virtual energy” gained from being unable todraw enough dice). Move the energy die Out of Play and keep track ofthe remaining “virtual energy.”Purchasing a DieOn your turn, you can purchase any combination of dice you’d like.You can purchase dice from the Basic Action Cards in the center ofthe table, as well as from the cards on your side of the table. You mayNOT purchase your dice from your opponent’s cards on their side ofthe table.To purchase a die, you must pay its purchase cost (the number in theupper left) in energy. This can be any type of energy, including generic,but if the card has one or more energy types then at least one of theenergy you spend must match the energy type(s). Some effects mayreduce the purchase cost of your dice, but this can never go below 1 (orthe number of different energy types, if more than one).12
Example: Jubilee: Wondra has a cost of 2 and isa character. Youcan buy a Jubilee die with aor. Basic Action Dice haveno energy type, so you can use any combination of any energy to payfor them.Purchased dice go directly to your Used Pile, not Out of Play. Theenergy dice spent go Out of Play.Fielding CharactersIt generally costs energy to send your rolled Character Dice fromyour Reserve Pool to the Field Zone, though in some cases, that costis zero.When you field a character die from the Reserve Pool, you must payenergy equal to the character die’s fielding cost (the small numberin the upper left corner of the die). This cost can be paid with anytype of energy, even generic. You cannot field a character die if youcannot pay the energy cost. As with any energy spent during yourturn, energy spent goes Out of Play.You are not required to field a die if you do not wish to. Any characterdice you don’t field (because you can’t pay for them or choose not to)by the end of the Main Step will be cleared to the Used Pile (like theClear and Draw Step, they do not go Out of Play since they were notused).Playing ActionsIf you have rolled an Action face on one of your Action Dice, you mayplay it in this window. For most Action Dice you will apply its effectand move it Out of Play (where it will go to the Used Pile at the endof your turn). Some Action Dice are instead “used” by moving themto the Field Zone, where they will remain and provide an effect, orallow you to gain an effect by removing them at a later time. Activatingan Action Die’s effect from the Field Zone is not considered “using”the Action Die for game effects. It does not cost any energy to use anAction Die.USE GLOBAL ABILITIESSome cards have Global Abilities printed in red text on them (seeProfessor X: To the Astral Plane on page 8). Global Abilities areavailable to both players, whether or not a die from that card is in theField Zone. You can use a Global Ability printed on an opponent’s cardeven though you cannot purchase a die from that card.The Main Step is one of the two “windows” when most GlobalAbilities may be used. To use a Global Ability, you must pay thespecified energy cost, moving the die or dice used to pay that costto Out of Play (on your turn) or directly to the Used Pile (on youropponent’s turn). Unless otherwise specified by the text of the Global,you may use the Global as many times as you can pay for it. As with13
purchasing dice, you may partially spend energy by spinning down adouble-energy face to a single-energy face. The active player (whoseturn it is) always has the option to use Global Abilities first.There are also some card abilities that may be used “whenever youcould use a Global Ability” (if that die is in the Field). This is one ofthose windows to use these abilities.PASSING PRIORITYOnce the active player has done as many of the above game actions asthey choose to do, they must pass priority to the inactive player. If theyhave any remaining “virtual” energy (from being unable to draw enoughdice, or from partially spending generic energy dice, for example) thatthey have not yet used, it is lost at this point. The inactive player may notpurchase or field dice, nor may they use Action Dice. However, they mayuse energy they have saved to pay for Global Abilities, or use abilitiesthat have the “whenever you could use a Global Ability” timing. Theymay activate one ability, then they must pass priority back to the activeplayer. The active player may then do more things if they would like to,before passing back to the inactive player. If they do anything, they mustpass priority afterwards, so the inactive player has a chance to react.Once the inactive player has passed priority without doing anything,and the active player does not choose to perform any more actions,the Main Step will end. Any unfielded character dice go directly to theUsed Pile (without going Out of Play, since they were never “Used”).The active player now chooses if they want to attack or not. If theactive player does not wish to attack, the turn will immediately end—there will not be an Attack Step, which means any unused Action Dicewill immediately go to the Used Pile, and neither player will be able touse any energy on Global Abilities. Go directly to Step 5—the CleanupStep. If the active player does want to attack, then move on to the nextsection.4. ATTACK STEPThe Attack Step happens in a stricter order than the Main Step does;follow these steps in order:Declare AttackersAny or all of your fielded character dice can attack. Move thesecharacter dice into the Attack Zone. It costs no energy to move a dieinto the Attack Zone; it is just a part of the Field Zone. You can sendall, some, or none of your character dice to attack (if you choose none,skip the Attack Step as described above).After you declare all attackers, you will apply any effects thathappen due to characters attacking. These “when attacks” abilitieswill trigger for each applicable die that attacks. If a character has theability “When this die attacks, deal 1 damage to target opponent” and14
you attack with two copies of this die, you will deal a total of 2 damageto your opponent. You choose the order to apply these effects. Youropponent may have abilities that trigger when they are attacked. Thesewill take place after all of your effects, and your opponent will choosethe order of their own abilities.Declare BlockersYour opponent declares which of their fielded character dice theywant to block with (if any). Each blocking character die must choosea specific attacker to block; however, they may assign multiple dice toblock the same attacker.After all blockers are declared, resolve any effects t
1. Clear and Draw Step If you have any dice in your Reserve Pool, CLEAR them and move them to your Used Pile. en, DRAW 4 dice from your bag and put them in your Prep Area. If at any time you need to draw dice and your bag is empty, put ALL dice from your Used Pile into your bag, mix well, and continue drawing. 2. Roll and Reroll Step