Transcription
Dashboard Skin TutorialFor ETS2 HTML5 Mobile Dashboardv3.0.2
Dashboard engine overview Dashboard menu Skin file structure config.json Available telemetry properties dashboard.html dashboard.css Telemetry data types Booleans Strings Numbers and Metersdashboard.js How to create a new skin from a template Testing your skin Publishing your skinIndex
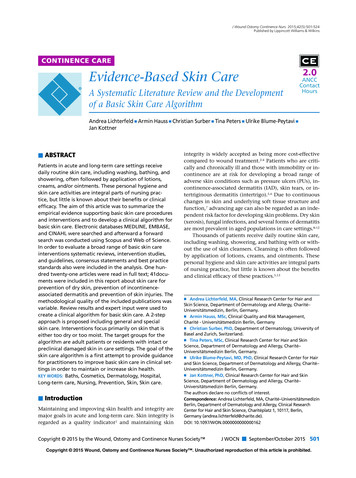
Dashboard engine overviewThe telemetry server consists of 3 different parts, connected in the following way:ETS2 Gameets2-telemetry-server.dllMemoryMappedFileETS2 Telemetry ServerHTTP WebSocketsHTML5 DashboardApplicationindex.html dashboard-host.html dashboard.html
Dashboard menuWhen you open the dashboard by clicking on the “HTML5 App URL”link displayed by the server, the first thing you see is the mainmenu handled by the index.html.When dashboard connects to the server, the server enumerates allskins inside "html/skins/*" path and loads their config.jsonconfigurations to display the list.When you select a skin to load, the browser navigates to thedashboard-host.html file that dynamically loads files for theselected skin (html, css, etc.).
Skin file structureEach skin must be located inside the "html/skins" directory with the name equal to the "name"property defined in the config.json file.For example, if you want to name your skin "volvo", you should create a directory "volvo" inside the"skins": "html/skins/volvo".All skins must have at least 5 files:config.json – defines skin configurationdashboard.html – defines all dashboard elements supported by the skindashboard.css – defines dashboard size and visual style for the dashboard elementsdashboard.jpg – defines dashboard splash screen for the menu (recommended size is 480x275px)dashboard.js – defines custom dashboard rendering and telemetry property filtering
config.json overviewEvery skin must have the following properties defined inside config.json: name: name of the skin. This value must be equal to the name of the sub-directory inside"html/skins". For example, if your skin is named "volvo", it must be placed inside "html/skins/volvo". title: human readable skin title that will be displayed in the top skin menu author: author name width: width of the skin in pixels height: height of the skin in pixels
Available telemetry propertiesThe game provides variety of telemetry data: truck speed, trailer name, jobincome and so on. All this information is available in real time and exposed asJSON by the telemetry server. You can see it by opening the following URL on thecomputer where server is ll properties are divided in several categories: game – overall game information: current time, pause state, etc. truck – truck information: name, speed, gear, light statuses, etc. trailer – trailer information: name, mass, attach status, etc. job – job information: source and destination cities, income, etc.You may see the full list of supported properties on the home page here.
dashboard.html overviewThe dashboard.html file defines HTML DOM for all dashboard elements.The minimal dashboard.html for a skin is a div with the "dashboard" class: div class "dashboard" /div The dashboard core will automatically fit this div tag into browser's viewport (keeping aspect ratio) using absolutepositioning. The width and height values are read from the skin's config.json file.You have full freedom to choose what HTML tags will be used inside that div for each dashboard element (img, div,span, etc.) and what hierarchy they will have.For example, you can create a skin that displays only current truck speed and nothing else.The DOM would look like this: div class "dashboard" div class "truck-speed" /div /div
dashboard.css: overviewThe dashboard.css file defines CSS styles for dashboard HTML elements.There are absolutely no restrictions on the dashboard.css file structure. It is totally up to you anddepends on the elements that you use in your skin.For example, if you have a truck-speed dashboard element defined in your HTML (i.e. a tag with"truck-speed" class), you probably want to have CSS style for that element as well. It could besomething like this:.truck-speed {color: #2491b9;font-weight: bold;font-size: 70px;position: absolute;left: 460px;top: 280px;width: 190px;height: 66px;}Coordinates for the absolutely positioned elementsare relative to the skin size defined in the config.json
dashboard.css: mapping conventionThe dashboard core uses a simple but powerful convention for mapping properties from JSON objectto CSS class names. There are two main rules: Period that splits objects is replaced with the hyphen character. For example:"game.connected" property is translated to the "game-connected" CSS class name"truck.speed" property is translated to the "truck-speed" CSS class name"trailer.placement.x" property is translated to the "trailer-placement-x" CSS class name Array indexes are inserted between object names. For example:"truck.wheels[0].steerable" property is translated to the "truck-wheels-0-steerable" CSS class name
Telemetry data typesThe dashboard core uses CSS class names to apply telemetry data to the HTML elements.Telemetry JSON has three different data types: boolean (for properties like truck.blinkerLeftOn, trailer.attached, game.connected, etc.) string (for properties like job.deadlineTime, job.sourceCity, trailer.name, etc.) number (for properties like truck.speed, truck.placement.x, truck.gear, etc.)Each data type is rendered in its own way. See next slides for more information.Hint: To see all available properties you may click onthe "Telemetry API URL" link displayed by the server.
Dashboard rendering: booleansboolean (for properties like truck.blinkerLeftOn, trailer.attached, game.connected, etc.)When value is true the dashboard core adds "yes" CSS class to the respective element found by itsclass name. When value is false the "yes" class is removed.For example, when "trailer.attached" property is true, the core searches for all HTML tags having"trailer-attached" class and adds additional "yes" class to them, so the DOM will look like this: div class "trailer-attached yes" /div And when the value is false the "yes" class disappears: div class "trailer-attached" /divBecause same class names may be attached to multiple HTML elements you can render sameinformation in different ways (controlled by the dashboard.css)
Dashboard rendering: stringsstring (for properties like job.deadlineTime, job.sourceCity, trailer.name, etc.)For all strings the dashboard core will update HTML content of the respective elements.For example, if you have a job-sourceCity element defined in your dashboard.html: div class "job-sourceCity" /div And the current source city value is "Graz" the dashboard core will set the element’scontent as follows: div class "job-sourceCity" Graz /div
Dashboard rendering: numbers (strings)number (for properties like truck.speed, truck.placement-x, truck.gear, etc.)There are two ways to display numbers: as a string value or as an analog meter.By default, all numbers are displayed just like strings, the dashboard core will update HTML content of the respectiveHTML elements. For example, if you have a trailer-mass element defined in your dashboard.html: div class "trailer-mass" /div And the current trailer mass value equals to 14000 the dashboard core will set the element’s content as follows: div class "trailer-mass" 14000 /div Hint: if you like to convert mass from kilograms to tons,or kmh to mph see dashboard.js section for more information.
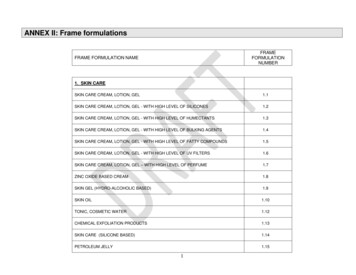
Dashboard rendering: numbers (meters)If you like to render a number as an analog meter instead of a string you should set data-type "meter" attribute to anHTML element. The core will use that HTML element as a meter arrow and will rotate it depending on the value.All meters must also have the following HTML data attributes defined: data-min: minimal possible value (as in JSON response),you can also put any telemetry property name here to use its current value data-max: maximum possible value (as in JSON response),you can also put any telemetry property name here to use its current value ("truck.fuelCapacity" for example) data-min-angle: angle in degrees for the arrow for data-min value (0 vertical, negative left, positive right) data-max-angle: angle in degrees for the arrow for data-max value (0 vertical, negative left, positive right)For example, in the default skin truck speed is displayed as a meter and it is defined in the HTML as follows: div class "truck-speed" data-type "meter"data-min "0" data-max "140" data-min-angle "-114" data-max-angle " 114" /div Here is how it looks in the browser:
When you define the styles for yourarrow in the CSS, keep in mind thatthe default position must alwaysbe vertical (i.e. 0 degree rotation).The arrow will rotate around itsorigin between min-angle and maxangle depending on the currentvalue. The origin must be definedin the CSS via transform-originproperty. In the default skin it isdefined as:transform-origin: 50% 440px;Which means that the origin is thepoint 50% to the right from thetop-left corner of the arrowelement (center of the small redtransparent rectangle on thescreenshot) and 440px down fromthe top. The origin is marked as abig solid green dot.To get the correct coordinates foryour own skin you should open yourskin background in a graphic editorand check pixel offsets which willbe relative to your skin size.
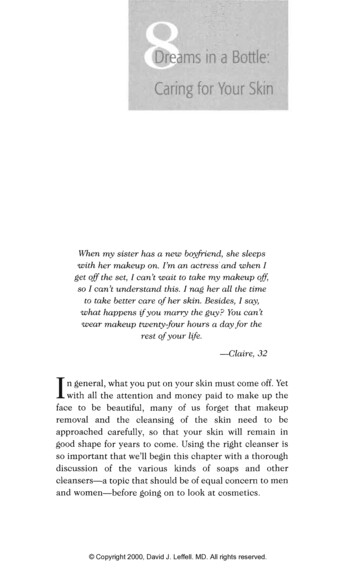
Dashboard rendering: numbers (meters)Here is another example from the default skin. The fuel is displayed as a meter defined in the HTML as follows: div class "fuel" data-type "meter"data-min "0" data-max "truck.fuelCapacity" data-min-angle "-96" data-max-angle "0" /div Here is how it looks in the browser ("min" & "max" are green, "min-angle" & "max-angle" are yellow):
Dashboard rendering: current valueWhen dashboard core renders an element (string, number or boolean) it always updates data-valueattribute, so if you check the DOM inside your browser you will see something like this: div class "trailer-mass" data-value "14000" 14000 /div div class "job-sourceCity" data-value "Graz" Graz /div div class "trailer-attached yes" data-value "true" /div This feature allows you to customize the element design depending on the current value.For example, the following CSS selector may be used to set a special style for the neutral gear value:.truck-gear[data-value "N"]{color: white;}
Dashboard rendering: special propertiesThere are only 2 special (i.e. always available and not related to the game telemetry data)properties available for now: game.connected – boolean property updated by the telemetry server that defines whethertelemetry server is connected to the simulator or not. You may use it to hide some dashboardindicators when server is not connected. statusMessage – human readable string property containing current dashboard core status("Connected, waiting for the drive.", etc.). You should use it to inform user about current status.See "html/scripts/config.js" for the full list of strings.
dashboard.js overviewThe dashboard.js file works like a small plugin for your skin.It contains 3 JavaScript functions used by the dashboard core:initialize function (skinConfig, utils) { }filter function (data, utils) { }render function (data, utils) { }
dashboard.js: initialize functioninitialize function (skinConfig, utils) { }This function is called only once when skin is loading.You may use it to initialize your custom JavaScript objects, setup DOM,or preload your CSS images to speed up skin loading process.The skinConfig argument will contain skin configuration properties from the config.json file.You may have your own properties there too (that may be used later inside dashboard.js).The utils argument represents utility object with some useful functions (see next slides).
dashboard.js: filter functionfilter function (data, utils) { }This function is called every time when dashboard core gets fresh telemetry data from the server, butbefore it is rendered on the screen. The data argument contains all telemetry data properties. Theutils argument represents utility object with some useful functions (see next slides).You may use this function to adjust the current properties or calculate your own ones.For example, you may convert trailer.mass property from a number of kilograms to a ton string:data.trailer.mass (data.trailer.mass / 1000.0) 't';Or, you can introduce a new property called myTruckSpeedMph like this:data.myTruckSpeedMph data.truck.speed * 0.621371;This new property will be treated and rendered just like any standard property (i.e. dashboard corewill find HTML elements having "myTruckSpeedMph" class and will apply the current value to it).
dashboard.js: render functionrender function (data, utils) { }This function is called after dashboard core has finished its own rendering process. This place may be used forcustom dashboard visual effect implementations, like animated bars, maps, animated odometers, etc. The dataargument contains all available telemetry data properties. The utils argument represents utility object withsome useful functions (see next slides). This function is called for each frame being rendered (about 60 timesper second) so you should be very careful, time consuming code may decrease your dashboard FPS.For example, you may implement a horizontal bar reflecting the current speed.The render implementation would look like er function (data, utils) { ('.truckSpeedBar').width(data.truck.speed * 10);}
dashboard.js: utilsAll functions mentioned above contain a special argument called utils.This object contains the following useful utility functions:utils.formatInteger function (num, digits)var hours utils.formatInteger(9, 2); // will return string "09"utils.formatFloat function (num, digits)var rounded utils.formatFloat(456.123, 1); // will return string "456.1"utils.preloadImages function g', 'images/bg-on.png']); // will preload 2 skin images
How to create a new skin from a templateIn order to create a new skin please do the following steps:1.Create a copy of the "html/skins/template" directory to something like "html/skins/myskin".2.Open config.json file and set skin name to "myskin", change its title, author, size, etc.3.Add dashboard element tags that you are going to support to the dashboard.html file4.Add styles for these tags to the dashboard.css file5.Edit dashboard.js if you like to implement custom data filtering or rendering (or leave it as is)6.Create a splash dashboard.jpg image for your skin7.Open "HTML5 App URL" and select your new skin from the menu to test it
Testing skin without ETS2It is possible to run the server in the "test" mode when server uses JSON data from theEts2TestTelemetry.json file instead of reading real game data. This may be very useful for skin testing,because it is very inconvenient to switch back and forth between the game and the dashboard just tocheck how new telemetry values are displayed on it.To enable test mode open Ets2Telemetry.exe.config file and set UseEts2TestTelemetryData option totrue and restart the server: add key "UseEts2TestTelemetryData" value "true" / Please note that you may edit Ets2TestTelemetry.json file in real time (just edit and save), thedashboard will update the values and render them right away without restaring the server.
Publishing your own skinIf you have created a cool skin you may send it to me and I will include it in the official "ETS2Dashboard Server" distribution published on GitHub.All you have to do is to pack your skin in a ZIP file and send it to email: funbit @ gmail.com (if youhaven't received any reply within a couple of days then most probably your email went to SPAM.You may contact me on the official SCS forum in this case).Before sending a skin, please make sure that it satisfies the following conditions: the size of the skin ZIP is less than 2MB (use JPG images for photos and PNG for flat pictures) the skin has all 5 files (config.json, dashboard.html, css, jpg and js) the skin has a fresh screenshot for the menu (dashboard.jpg must be around 480x275px)Happy driving!
dashboard.html -defines all dashboard elements supported by the skin dashboard.css -defines dashboard size and visual style for the dashboard elements dashboard.jpg -defines dashboard splash screen for the menu (recommended size is 480x275px) dashboard.js -defines custom dashboard rendering and telemetry property filtering