Transcription
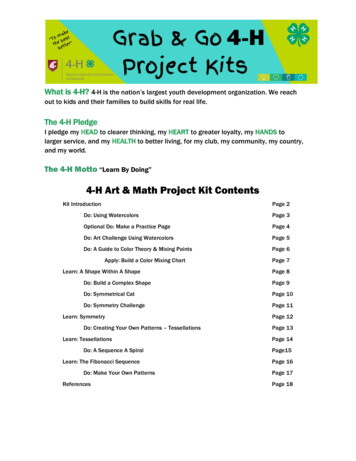
What is 4-H? 4-H is the nation’s largest youth development organization. We reachout to kids and their families to build skills for real life.The 4-H PledgeI pledge my HEAD to clearer thinking, my HEART to greater loyalty, my HANDS tolarger service, and my HEALTH to better living, for my club, my community, my country,and my world.The 4-H Motto “Learn By Doing”4-H Art & Math Project Kit ContentsKit IntroductionPage 2Do: Using WatercolorsPage 3Optional Do: Make a Practice PagePage 4Do: Art Challenge Using WatercolorsPage 5Do: A Guide to Color Theory & Mixing PaintsPage 6Apply: Build a Color Mixing ChartLearn: A Shape Within A ShapePage 7Page 8Do: Build a Complex ShapePage 9Do: Symmetrical CatPage 10Do: Symmetry ChallengePage 11Learn: SymmetryDo: Creating Your Own Patterns – TessellationsLearn: TessellationsDo: A Sequence A SpiralLearn: The Fibonacci SequenceDo: Make Your Own PatternsReferencesPage 12Page 13Page 14Page15Page 16Page 17Page 18
2About Your KitWhat Will You be Learning: Youth will mix concepts of math and art in this kit. The mathconcepts included are shapes, symmetry, and patterns. For art, youth will be learning basicwatercolor art techniques and color theory (mixing colors).Youth Ages: In 4-H, youth are divided into Age Groups based on common developmentalcharacteristics. Juniors are youth 8-10 years old, Intermediates are youth 11-13 years old,and Seniors are youth 14 and above. The activities in this kit are ideal for Juniors andIntermediates but Juniors may benefit from the help of an adult.Targeted Life Skills:Thinking: Learning to learn, Decision-making, Problem solving, Critical thinking.Managing: Planning/organizing, Wise use of resources.Working: Self-Motivating.Being: Self-Esteem, Self-Responsibility.Time: Estimated time the activity will take is marked above the activity. Allow additionaltime for drying and clean-up. Activities do not need to be completed all in one sitting.Break out this kit when you have time and put it away for fun later!Optional Supplies to Enrich Your Learning: CalculatorRulerCleaning supplies and instructions for cleaning are not included.Using 4-H’s “Do, Reflect, Apply” model, engage youth in learning:DO: “Doing” is an extension of the education step. It involves hands-on activities that allowthe youth to learn. Doing provides experience that supports the learning process. This iswhy you’ll see “Do” instructions with each Activity.REFLECT: “Reflecting” focuses on sharing and processing the activity. In this step youencourage and facilitate discussion. To maximize learning, grown-ups can ask questionsprovided in the Blue Reflection Boxes for great discussion. Older youth can participate inself-reflection by asking themselves the supplied question. Consider journaling youranswers and revisiting them after a short time for deeper insight.APPLY: “Applying” is the step where youth have the opportunity to think about how theycan apply what they have learned to their lives and the world around them. This step asksthem to think beyond their own growth.Based on the Art of Math Discover Club Kit byUtah State University Extension.
3For All AgesDo: Using WatercolorsGather These:From your house – Small dish of WaterRuler (if you want one)From your kit – Heavy PaperPencilWatercolor Pallet & BrushSquare of Parchment PaperNeed Help?Amy’s Art Table YouTubeWatercolor Tutorialhttps://bit.ly/3j2B3kXThen Do This:1. Get your brush wet and dip it into the water color you want to use.2. Mix your brush around in the paint. Pick up the color with your brush and put iton your parchment paper. Repeat until you have a small puddle of coloredwater.3. Use your brush to move the colored water onto your heavy paper. Now you’repainting!4. To change the color of your paint try these different ways of paintinga. mixing in more water to your small puddleb. picking up more paint from your paint palletc. wetting your brush with just water and gently wetting the paper beforeyou start mixing and using your watercolorsd. layering your art by allowing your paper to dry between drawing layersOther fun suggestions:Draw over your paper with crayons than paint over with watercolors.Paint with watercolors than sprinkle kosher salt over your wet paper.
4Ages 11 Optional Do: Make a Practice PageFold Your Paper Like This1. Hot Dog Fold (Long Edge to Long Edge) and color the edge of your fold with yourpencil2. Second Hot Dog Fold (Long Edge to Long Edge) and color the edge of your foldwith your pencil3. UNFOLD4. Hamburger Fold (Short Edge to Short Edge) and color the edge of your fold withyour pencil5. UNFOLDYour paper now has 8 squares.Try different amounts of paint and water in each square to experiment. When your paper driesreflect on what techniques you liked.124Learn More About WatercolorsWatercolors are different than other paints in that they are made of pigments andbinders. Water carries the pigment (what you and I would call color) onto the paper.When the water evaporates (dries) the paint pigments (colors) stay on the paper.
5For All AgesDo:ChallengeUsingyouWatercolorsApplyArtthe watercolortechniquespracticed earlier by completing an art challenge!Gather These:From your house – Small dish of WaterRuler (if you want one)Pen or PencilFrom your kit –Heavy PaperWatercolor Pallet & BrushSquare of Parchment PaperThen Do This:1. Make a list of the first 5 things you think of when you think of“Summer”. For example, maybe you think of green trees,flowers, sandcastles, watermelon, or popsicles.There are no wrong answers!1.2.3.4.5.2. Pick one of the items you wrote down and paint it withwatercolors.3. Share your painting using the hashtag #4HGrab&Go or bysending a photo to your local WSU Extension 4-H Office.Henri-Edmond Cross (ca. 1905-1908)Winslow Homer (1836-1910)Expand Your Learning!See examples of famous Watercolors from theMetropolitan Art Museum www.metmuseum.org
6Ages 11 DO: A Guide to Color Theory & Mixing PaintsApply the watercolor techniques you practiced earlier and learn aboutColor TheoryGather These:These are thePrimaryColors. Doyou see themin your paintpallet?From your house – Small dish of WaterFrom your kit – Heavy PaperWatercolor Pallet & BrushSquare of Parchment PaperColour are the smiles of nature.-James Henry Leigh HuntDo This:1) Get your brush wet and pick up a small amount of your firstPrimary color (Red, Yellow, or Blue). Create a small pile ofusable paint on your wax paper or a nonporous surface like anold plate.2) Clean your brush with water and pick up your second Primarycolor (Red, Yellow, or Blue). Make two separate piles of painton your wax paper.Color1Color23) Slowly mix the two colors.4)If the combination of your colors isn’t creating the secondarycolor (Orange, Green, or Purple) you desire you could try:a. Adding more of one or both Primary Colorsb. Adding a small amount of black paint to darkenc. Adding more water to lightenExpand your learning!Visit the Smithsonian website and learn about the Science ofColor. library.si.eduDo you know why you can see colors? askabiologist/asi.edu/explore/seeing-colorThese are Secondary Hues if youwant to try adding more of aprimary color to make makingmore shades of colors.
7Ages 11 Apply: Build a Color Mixing ChartNeed Help?Watch the Mr. Otter Art Studio Tutorialhttps://bit.ly/3kNK0ihApply Color Theory to Build a Color Mixing ChartGather These:From your house – Small dish of WaterRuler (optional)From your kit – Heavy PaperWatercolor Pallet & BrushSquare of Parchment PaperDo This: Build a Color Mixing ChartStep 1.A. Draw a large square on your paper.B. Divide it in half.C. Divide it in half the other way.12Step 2D. Divide the sections in half.Step 33E. Divide the sections in half again.F. You now have an 8 x 8 grid with 64 squares!G. Label each column (columns run top to bottom) with a color from your paint pallet from left toright Red, Green, Blue, Yellow, Orange, Violet, Black, Brown.H. Label each row (rows run left to right) with a color from your paint pallet from the top to thebottom Red, Green, Blue, Yellow, Orange, Violet, Black, Brown.CHECK YOUR WORK: The top right square on your grid should be labeled Red, Red.Do This: Begin Mixing PaintsEach square will be a combinate of the Column (running top to bottom) color and the Row (runningleft to right) color. The color you want the most of is the Row (running left to right) color.1. For the first row pick up a little red and a little more red (square 1). Pick Up Red and a littlegreen (square 2). Pick up red and a little blue (square 3). Continue down the row.2. In the second row pick up green and a little red (square 9). Pick up green and a little green(square 10). Pick up green and a little blue (square 11). Continue down the row.3. Repeat this process until each square is filled.This is a great reference tool for what color combinations you can create when you arepainting and want a specific color.You will also be practicing using your brush.
8Ages 11 Learn: A Shape Within a ShapeLet’s talk about shapes. Off the top of your head, what are some basic shapes?Today we are mainly looking at triangles and squares.A triangle has three sides and a square has four, but there are many other shapes out there withmany different numbers of sides. We call a shape that has many sides (more than four) apolygon. How many sides does a stop sign have? [Answer: 8] Is it a polygon? [Answer: Yes,because it has many sides]. These many-sided shapes are everywhere, but they aren’t asdifferent as they seem. In reality, they are simply just large shapes that have smaller shapesinside them.That means we can use basic shapes to create complex shapes. For example, a triangle is apretty simple shape, but when we put two triangles together, we can build a square.POLYGON2-DWhen you combine two triangles with a square,you can build a trapezoidPOLYHEDRON3-Dor if you flip one of the triangles upside down,you can build a parallelogram.If you combine basic shapes together, you can create more complex shapes of all kinds andsizes. In 2-D, we create polygons. In 3-D, we do the same but call them polyhedrons instead.Why combine shapes? We put different shapes together all the time to fit our daily needs. Lookaround you. These include tables, chairs, playgrounds, houses. Every 2-D and 3-D object is madeof a combination of shapes.How many shapesdo you see?
9Ages 11 Do: Build a Complex ShapeGather These:From your kit – Your choice of one of the Papers with patternColored PencilsScissorsGlue StickDo This:1. Find the shape patterns included in this kit that you wish tobuild.2. (Optional) Use colored pencils or your watercolors, or yourother coloring materials to give your soon-to-be polyhedronsome color.3. Cut along the outside of the shape.4. Fold at creases (you may need to fold it all the way into theshape to see what should be pasted to what).5. Put glue on the tabs and paste your shape together until itbecomes a full polyhedron.Reflect:Where do you see complex shapes around you?When you started folding your shape together did itmatter what order you folded in?Expand your learning!Borrow a book on origami from your localLibrary or find an online template andfold to your heart’s content! For addedfun count the different shapes that makeup each polyhedron you create. Try tobeat your personal best.This Photo by Unknown Author is licensed under CC
10For All AgesDo: Symmetrical CatGather These:From your kit – Cat ShapeColored PaperColored PencilsScissorsGlue StickNeed Help?Watch our Tutorialhttps://youtu.be/b8DzBbIHsyIDo This:1. Fold the cat shape in half along the dotted line, creating a line of symmetry.2. Cut along the outside of the cat (along the solid black line). Set the outer edges aside, do not throw itaway.3. Keep your cat folded in half. Cut out the triangle nose, again cutting along the solid black line. Set thenose aside.4. Fold the cat shape along the dotted line for the cat’s diamond eye (creating a line of symmetry) and cutout the eye by cutting along the solid black line. Set the eye aside.5. Follow the same steps (in step 4) for the triangle eyelashes. Folding along the dotted lines and cuttingthe solid black lines. Set the eyelashes aside.6. Unfold your shape and see the symmetry you’ve created. Is everything symmetrical? [If done correctly,then yes].7. Now cut the cat shape in half, down the line of symmetry (dotted line).8. Cut the outer edge you set aside in half along the line of symmetry (dotted line).9. Paste one of the halves of the outer edges to the left or right side of your colored paper.10. Take the left side of the outer edge and paste on the left side of your colored paper. Take the rightside of the cat face and match it up to the opposite side of your outer edges, pasting that to the rightside of your colored paper creating a full cat face again.11. Find the nose that you set aside. Cut the nose in half along the dotted line. Inside the outer edge half(the left side of your colored paper), match the half of nose to the cut out side of the nose on the catface.12. Find the diamond eye that you cut out and set aside. Paste on the leftside of your colored paper so it will be symmetrical to the cut out forthe eye on the cat face.13. For the eyelashes, you can choose whether to make them symmetricalor not. If you want them to be symmetrical, paste them like a mirrorobject to the ones on the other side. If not, paste them somewhereelse (like maybe below the eye instead of on top of the eye).Final Symmetrical Cat
11For All AgesDo: Symmetry ChallengeGather These from your Kit: Blank PaperColored PencilsScissorsGlue StickImage of ChoicePencilNeed Help?Watch the Mr. Otter Art Studio Tutorialhttps://bit.ly/3kNK0ihDo This:1. You will need to choose one of the provided images for thisactivity.2. Take your chosen image and fold it in half. Carefully cut along thefold.3. Paste the half sheet onto your piece of blank paper.4. On the blank side, try to draw in the other half of the face/objectto match the pre-drawn side.Try drawing the outline of the other side of this photo for practice.Expand Your Learning!On your next walk around your yard or neighborhood lookfor examples of symmetry and draw or write down whatyou see. Look at buildings, houses, stores, trees, flowers,animals, and people.An object that has symmetry can be divided into two pieces.Learn more on the next page.
12For All AgesLearn: SymmetryHere’s another way to think of symmetry: If you wereto draw a line from top to bottom through the verycenter point of a circle, would both sides look exactlythe same? If yes, then that’s symmetry. Can you dothe same thing with a square? That’s some moresymmetry. Many objects in nature have symmetry.Think of a butterfly. If you were to imagine a line straight down thecenter of a butterfly and fold it in half, you would find symmetry.That imaginary line is called the line of symmetry. We represent itby a dashed line. On either side of that dashed line, you shouldhave a mirror image. Mathematicians love discovering these sortsof natural symmetries of shapes because it helps to map out thepatterns of objects we see every day.What has more symmetry, a circle or a square? [The correctanswer is a circle, because a square only has 4 symmetries and acircle has an infinite number of symmetries]. No matter how manytimes you turn that circle, its position will not appear to change.However, you know that a square has been rotated when someoneturns it except for when it is turned 90, 180, 270, and 360degrees. It appears to change in all the other rotations in between.Need Help Understanding Symmetry?Watch this video from FreeSchoolhttps://bit.ly/30oyy51This Photo by Unknown Author islicensed under CC BY-SAReflect What kind of shapes can you create thathave symmetry?How did folding the object help to see thesymmetry?Can you find symmetry without folding?Apply Why might artists choose to use symmetry (e.g.drawing)?What other objects in your day-to-day life havesymmetry?When might it be a good idea to createsomething with symmetry
13Ages 11 Do: Creating Your Own Pattern – TessellationsWhat is a tessellation? A tessellation is a pattern that sort of looks like a puzzle. It iscreated by taking a shape and moving it (without rotating it) using translation symmetry.Gather These from your Kit: Need Help?Heavy PaperWatch a video walking youthroughthis activity step by step.Index red Pencils or Watercolor SuppliesDo This:1.Start with cutting your index card into a square. Draw a wavyline from the top of your index card to the bottom. Try not tomake the line too complicated and make sure you can cut alongthe line (no sharp corners).2.Cut along your line and then tape the index card backtogether with the flat sides touching.3.Draw another line that connects the two cut edges.4.Cut along the line you just drew and then swap the sides andtape your new pattern together.5.Take your heavy paper and trace your created pattern piece.Once you have your pattern started move your piece over untilan edge lines up with the previous tracing. Keep repeating untilyour entire paper is covered by the pattern. Now you have a fulltessellation!Now make your tessellation atrue work of art by adding color!
14Ages 11 Learn: TessellationsWhat is a tessellation? A tessellation is a pattern that sort of looks like a puzzle. It iscreated by taking a shape and moving it (without rotating it) using translationsymmetry. Translation Symmetry is when an object has done a movement, a shift,or a slide in a specific direction without the object rotating. It is important to notethat this shape touches all of the other translated versions of that shape. There areplenty of tessellations that exist all around us; the most common one that occurs innature is a beehive, which has a bunch of hexagons translated up, down, left andright. If you Google “tessellation,” you are bound to find a whole bunch of interestingpatterns created using this symmetry technique.Expand Your Learning: Learn more about TranslationSymmetry by watching this video bit.ly/3bsAKNeReflect How many shapes do you know how to make? What kind of shapes do you use every day? Why are basic shapes, polygons, and polyhedrons important?Apply What tessellations are in the world around you? How do artists use shapes? What shapes do you use or need every day?
15Ages 11 Do: A Sequence, A SpiralWhat is the Fibonacci sequence? Quite simply, the Fibonacci sequence is a list ofnumbers that form a naturally occurring pattern. How does it work? You start with the firsttwo numbers, 0 and 1. Then you add them together to get the next number. So, 0 1 1. Nowyour sequence is 0, 1, 1. Then you look at the last two numbers and add them together. So,1 1 2. Let’s do this together one more time. The last two numbers were 1 and 2 so now weadd 1 2 3. Now your sequence is 0, 1, 1, 2, 3. See the pattern? Now that you have the firstfour numbers in the Fibonacci sequence (0,1,1,2), find the next ten and add them to thesequence. The correct answer is at the bottom of the page.Need Help?Now Draw the Sequence!Gather These from your Kit: Graphing Paper Pencil (Optional) Colored PencilsWatch a video walkingyou through this activitystep by step.bit.ly/3hZY2wxDo This:1. In the center of your graphing paper, trace a one by one square. Next to that outlinedsquare, trace another one by one square (should be touching). This takes care of thefirst three numbers of Fibonacci’s sequence (0, 1, and 1).2. The next number in the Sequence is 2 (1 1 2). Next, trace a two by two square thatshares the bottom edge of the previous two squares.3. To the right of these, trace a three by three square (1 2 3).4. On the top of your previous squares, trace a five by five square (2 3 5).5. Continue creating squares in a counterclockwise direction according tothe Fibonacci sequence until your graphing paper can’t hold anymore squares.6. Finally, create your spiral byconnecting the points of yoursquares at a diagonal. Starting withthe one by one square in the middle,draw a half circle in the first onetoward the second. Then continue atthe point the last square ended,drawing another half circle from thatpoint to the two by two. Continueuntil the spiral is connected throughall of the traced squares.[Answer: 0, 1, 1, 2, 3, 5, 8, 13, 21, 34, 55, 89, 144, 233]
16Ages 11 Learn: The Fibonacci SequenceFibo-what? In the 13th century, Signore Leonardo Pisano Bogollo created aspecial sequence of numbers named after his nickname, “Fibonacci,” whichroughly translates to “son of Bonacci” (Knott 1996). Thus, we have a beautifulmathematical way to help make sense of the patterns in this world: theFibonacci sequence. The first 10 numbers are 0, 1, 1, 2, 3, 5, 8, 13, 21, 34.But what is the Fibonacci sequence? Quite simply, the Fibonacci sequence is alist of numbers that form a naturally occurring pattern. That’s right, this order ofnumbers exists in nature. For example, you can find them in pinecones, conchshells, and flowers, to name a few.In nature the Fibonacci sequence appears as a spiral,beginning quite small, and getting larger and larger as itturns. Look at the example photo of a shell on the right.This spiral is created by placing squares of equal base andheight (in order of Fibonacci’s sequence) close to oneanother.Where else can you find a spiral like this?Since this sequence is all about naturalpatterns, many artists use the sequence (andothers like it) to create art without evenknowing that they are using it. RememberLeonardo Da Vinci’s famous painting, the MonaLisa? Her body is aligned according to theFibonacci sequence, sitting quite comfortably ina spiral exactly like the one you just created.Expand Your Learning!To learn more about the FibonacciSequence look up “The Golden Ratio”.
17Do: Make Your Own PatternsAges 11 The Fibonacci sequence does not apply to everything, but it is a great example of howit is possible to find patterns in the world around you. Once you find a pattern, it is alsopossible to describe the “rule” of the pattern by describing how you get from one partto the next. The “rule” of a pattern is simply a description of how it works. Let’s useFibonacci’s sequence as an example. 0, 1, 1, 2, 3, 5, 8 The rule for this pattern waslooking back at the last two numbers and adding them together. Patterns of objects inour world have rules like this that mathematicians try to find in order to explain andrecreate those patterns. Thus, we can use addition, subtraction, multiplication, anddivision to describe what’s going on in the world around us.Let’s try a different example. 1, 5, 21, 85, 341, 1365 What rule will give us thissequence of numbers? [Answer: 4 times the number plus 1]. And just like that, wehave found the rule for a pattern.To Gather: Pencil PaperTo Do:Make up your own pattern. Remember, you can use one or moreoperations (don’t use division if you’re not ready for fractions). Whenyou’ve created one, share it with someone and see if they can guessyour pattern’s rule.Reflect1.2.3.4.ApplyWhat is a pattern?Who was Fibonacci and what was his connection to patterns?In what ways do you see patterns naturally occur in the world around you?What kind of man-made patterns can be found in the world around us?1. How are patterns related to art? How can artists use them to their advantage?2. What is it about a spiral that is visually appealing?3. Why do you think patterns (such as the Fibonacci sequence) are so important tomathematics?Expand Your Learning!M.C. Escher was a famous graphic artist. You canview an online gallery of his work at mcescher.com.Look for how he used patterns in his work.
18SHARE : Post on Social Media using the Hashtags #4HGrab&Goand #4HGrowsHere You can also tag your County 4-H Page.Want to purchase additional craftsupplies? You can save 15% every daywith every purchase as a 4-H RewardsMember with JOANNS www.joann.com/4-h/ReferencesThe 4-H Youth Development Program utilizes current best practices and research-based techniques for teachingyouth new skills. This page gives credit to the experts and agencies from whom we got materials or concepts forthis kit.A Simple Method For Creating Tessellations From Rectangles. (n.d.). Retrieved August 17, 2020, fromhttp://sofia.nmsu.edu/ pmorandi/math112f00/EscherRectangle.htmlBelmonte, C. & Pappas, C. (n.d.) Painting by Number, Scientia Review. Retrieved s, H. (1905). Landscape with Starts [Digital image]. Retrieved August 21, 2020, h/459189?&pkgids 613&ft *&offset 0&rpp 20&pos 3DeRosier, C. (2016, January 01). Tessellation Art. Retrieved August 17, 2020, tion-art.htmlShort, S. (2020). Susie Short: Working with a Split Primary Color Palette. Retrieved August 18, 2020, ng-with-a-split-primary-color-palette/Winslow Homer (American, 1836–1910). Flower Garden and Bungalow, Bermuda (detail), 1899. Watercolorand graphite on off-white wove paper, 13 15/16 x 20 15/16 in. (35.4 x 53.2 cm). The MetropolitanMuseum of Art, New York, Amelia B. Lazarus Fund, 1910 (10.228.10)For the full curriculum visit utah4h.org/discover/WSU Extension programs, employment, and volunteer service are available to all without discrimination. Concernsregarding potential discrimination may be reported through your local Extension office or directly to the WSU Officefor Equal Opportunity, web: oeo.wsu.edu, email: oeo@wsu.edu, phone: 509-335-8288
flowers, sandcastles, watermelon, or popsicles. There are no wrong answers! 2. Pick one of the items you wrote down and paint it with watercolors. 3. Share your painting using the hashtag #4HGrab&Go or by sending a photo to your local WSU Extension 4-H Office. Do: Art Challenge Using Watercolors Expand Your Learning!