Transcription
EnglishNovationA division of Focusrite Audio Engineering Ltd.Windsor House,Turnpike Road,Cressex Business Park,High Wycombe,Bucks,HP12 3FX.United KingdomTel: 44 1494 462246Fax: 44 1494 459920e-mail: sales@novationmusic.comWeb: http://www.novationmusic.comTrademarksThe Novation trademark is owned by Focusrite Audio Engineering Ltd. All other brand, productand company names and any other registered names or trade marks mentioned in this manualbelong to their respective owners.DisclaimerNovation has taken all possible steps to ensure that the information given here is both correctand complete. In no event can Novation accept any liability or responsibility for any loss ordamage to the owner of the equipment, any third party, or any equipment which may resultfrom use of this manual or the equipment which it describes. The information provided in thisdocument may be modified at any time without prior warning. Specifications and appearancemay differ from those listed and illustrated.COPYRIGHT AND LEGAL NOTICESNovation, Launchkey and InControl are registered trade marks of Focusrite Audio EngineeringLimited.2015 Focusrite Audio Engineering Limited. All rights reserved.2
EnglishCONTENTSINTRODUCTION . . . . . . . . . . . . . . . . . . . . . . . . . . . . . . . . . . . . . . . . . . . . . . . . . . . . . . . . . . .Key Features . . . . . . . . . . . . . . . . . . . . . . . . . . . . . . . . . . . . . . . . . . . . . . . . . . . . . . . . . . .About This Manual . . . . . . . . . . . . . . . . . . . . . . . . . . . . . . . . . . . . . . . . . . . . . . . . . . . . . . .What’s In The Box . . . . . . . . . . . . . . . . . . . . . . . . . . . . . . . . . . . . . . . . . . . . . . . . . . . . . . .Registering Your Launchkey . . . . . . . . . . . . . . . . . . . . . . . . . . . . . . . . . . . . . . . . . . . . . . .Power Requirements . . . . . . . . . . . . . . . . . . . . . . . . . . . . . . . . . . . . . . . . . . . . . . . . . . . . .Hardware Overview . . . . . . . . . . . . . . . . . . . . . . . . . . . . . . . . . . . . . . . . . . . . . . . . . . . . . .Top View – controls . . . . . . . . . . . . . . . . . . . . . . . . . . . . . . . . . . . . . . . . . . . . . . . . . . .Rear view – connections . . . . . . . . . . . . . . . . . . . . . . . . . . . . . . . . . . . . . . . . . . . . . . .444566779LAUNCHKEY SETUP EXAMPLES . . . . . . . . . . . . . . . . . . . . . . . . . . . . . . . . . . . . . . . . . . . . 10Interfacing Launchkey to a computer . . . . . . . . . . . . . . . . . . . . . . . . . . . . . . . . . . . . . . . . 10InControl mode . . . . . . . . . . . . . . . . . . . . . . . . . . . . . . . . . . . . . . . . . . . . . . . . . . . . . 10Basic mapping mode . . . . . . . . . . . . . . . . . . . . . . . . . . . . . . . . . . . . . . . . . . . . . . . . 11Interfacing Launchkey to an iPad . . . . . . . . . . . . . . . . . . . . . . . . . . . . . . . . . . . . . . . . . . . 11EXPLORING LAUNCHKEY . . . . . . . . . . . . . . . . . . . . . . . . . . . . . . . . . . . . . . . . . . . . . . . . . . 12MIDI Channel . . . . . . . . . . . . . . . . . . . . . . . . . . . . . . . . . . . . . . . . . . . . . . . . . . . . . . . . . . 12Transport controls . . . . . . . . . . . . . . . . . . . . . . . . . . . . . . . . . . . . . . . . . . . . . . . . . . . . . . 12Octave up/down . . . . . . . . . . . . . . . . . . . . . . . . . . . . . . . . . . . . . . . . . . . . . . . . . . . . . . . . 13Transpose . . . . . . . . . . . . . . . . . . . . . . . . . . . . . . . . . . . . . . . . . . . . . . . . . . . . . . . . . . . . . 13Pitch Wheel . . . . . . . . . . . . . . . . . . . . . . . . . . . . . . . . . . . . . . . . . . . . . . . . . . . . . . . . . . . 13Modulation Wheel . . . . . . . . . . . . . . . . . . . . . . . . . . . . . . . . . . . . . . . . . . . . . . . . . . . . . . 13Slider(s) . . . . . . . . . . . . . . . . . . . . . . . . . . . . . . . . . . . . . . . . . . . . . . . . . . . . . . . . . . . . . . 14Buttons . . . . . . . . . . . . . . . . . . . . . . . . . . . . . . . . . . . . . . . . . . . . . . . . . . . . . . . . . . . . . . . 14Rotary controls . . . . . . . . . . . . . . . . . . . . . . . . . . . . . . . . . . . . . . . . . . . . . . . . . . . . . . . . . 14Launch Pads . . . . . . . . . . . . . . . . . . . . . . . . . . . . . . . . . . . . . . . . . . . . . . . . . . . . . . . . . . 14Round buttons . . . . . . . . . . . . . . . . . . . . . . . . . . . . . . . . . . . . . . . . . . . . . . . . . . . . . . . . . 15Track I / H . . . . . . . . . . . . . . . . . . . . . . . . . . . . . . . . . . . . . . . . . . . . . . . . . . . . . . . . . . . . . 15Velocity Curves . . . . . . . . . . . . . . . . . . . . . . . . . . . . . . . . . . . . . . . . . . . . . . . . . . . . . . . . 15Using Launchkey with InControl . . . . . . . . . . . . . . . . . . . . . . . . . . . . . . . . . . . . . . . . . . . . 16Using Launchkey with Ableton Live Lite . . . . . . . . . . . . . . . . . . . . . . . . . . . . . . . . . . . . . . 16TECHNICAL INFORMATION . . . . . . . . . . . . . . . . . . . . . . . . . . . . . . . . . . . . . . . . . . . . . . . . 18Basic Troubleshooting Examples . . . . . . . . . . . . . . . . . . . . . . . . . . . . . . . . . . . . . . . . . . . 18MIDI messages table . . . . . . . . . . . . . . . . . . . . . . . . . . . . . . . . . . . . . . . . . . . . . . . . . . . . 193
EnglishINTRODUCTIONThank you for purchasing this Novation Launchkey MIDI controller keyboard. As well as themusic keyboard itself, Launchkey is equipped with a range of controllers to allow the modernmusician to create great music in the studio, in live performance or on the move. The keyboardallows you to control your existing Digital Audio Workstation (DAW) software, and also theincluded V-Station and Bass Station software plug-ins. Together, this unique software-hardwarecombination allows instant, real-time tweaking of synth parameters, loops and audio effects.This guide will introduce you to Launchkey and explain the various ways you can use it withyour music software in your recording set-up.Launchkey includes Novation’s InControl mode, which gives you a simple yet powerful way ofcontrolling all your favourite music software applications.With Launchkey you have two ways of working: InControl – automatically maps Launchkey’s sliders, rotary controls and buttons ontoyour essential DAW parameters, such as channel faders, pan, mute and solo.Basic Mapping mode – use Launchkey as a conventional MIDI controller, whereeach controller - sliders, rotary controls and buttons - transmits a dedicated MIDI CC(Continuous Controller) message.For additional information, up to date support articles and a form to contact our TechnicalSupport Team please visit the Novation Answerbase at: www.novationmusic.com/answerbaseKey Features Available with 25, 49 or 61-note synth-action keyboard8 rotary controls9 sliders (49 and 61-note versions)16 performance launch pads with multi-colour backlightingNumeric LED display showing parameter valuesStandard transport control setStandard synth modulation and pitch bend wheels, plus octave transpose buttonsDirect integration with Ableton Live recording softwareTrack control buttons – change DAW tracks remotelyIntegrated with InControl for seamless control of your DAWVery simple installation procedure – class compliant, no driver requiredAbout This ManualWe’ve tried to make this manual as helpful as possible for all types of user, both newcomers tocomputer music and those more experienced, and this inevitably means some users will wantto skip over certain parts of it, while relative novices will want to avoid certain parts of it untilthey’re confident they’ve mastered the basics.However, there are a few general points that are useful to know about before you continuereading this manual. We’ve adopted some graphical conventions within the text, which we hopeall types of user will find helpful in navigating through the information to find what they need toknow quickly:4
EnglishAbbreviations, conventions, etc.Where top panel controls or rear panel connectors are referred to, we’ve used a number thus:6 to cross-reference to the top panel diagram, and thus: 1 to cross-reference to the rearpanel diagram. (See pages page 7 and page 9).We’ve used CAPS to name physical things like top panel controls and rear panel connectors,and also on-screen buttons which you need to click, and bold Courier font to denote textwhich you see on the computer screen.TipsThese do what it says on the tin: we include bits of advice, relevant to thetopic being discussed that should simplify setting up Launchkey to do whatyou want. It’s not mandatory that you follow them, but generally they shouldmake life easier.What’s In The BoxLaunchkey has been carefully packed in the factory and the packaging was designed towithstand rough handling. Should the unit appear to have been damaged in transit, do notdiscard any of the packing material and notify your music dealer.Save all the packing materials for future use if you ever need to ship the unit again.Please check the list below against the contents of the packaging. If any items are missing ordamaged, contact the Novation dealer or distributor where you purchased the unit. Launchkey MIDI controller keyboardUSB Type A to Type B cable (1.5 m)Getting Started Guide, including Product/software Registration details, allowingdownload of: Setup instructions for popular DAWs Novation V-Station synth plug-in Novation Bass Station plug-in Loopmaster samplesLive Lite registration card, with download instructions for Ableton Live Lite music makingsoftware5
EnglishRegistering Your LaunchkeyIt is important to register your Launchkey on-line using the Product/software Registrationdetails on the back of the Getting Started Guide. Apart from validating your manufacturer’swarranty, you will also then be able to download the additional software that you are entitled toas a Launchkey purchaser. The registration details also contain codes you will need to enter inthe on-line forms on our website to download the software, but before you attempt to do this,warranty registration is required.Power RequirementsLaunchkey will normally be powered from your computer via its rear panel USB connector. DCpower will be supplied by the computer through the standard USB cable. We recommend thatyou connect Launchkey directly to a computer’s native USB port, and not via a USB hub.Launchkey cannot be powered from an iPad. When using Launchkey with an iPad, it must beseparately powered by an external, 9 V mains adaptor (AC-to-DC adaptor). When using thismethod, please ensure that your local AC supply is within the range of voltages required by theadaptor BEFORE you plug it into the mains. Please contact your Novation dealer for advice onsuitable mains adaptors if you are in any doubt.A word about laptops:When powering Launchkey from a computer you should be aware that althoughthe USB specification agreed by the IT industry states that a USB port shouldbe able to supply 0.5 A at 5 V, some computers - particularly laptops – are unable tosupply this current. Unreliable operation may result in such a case. When poweringLaunchkey from a laptop’s USB port, it is recommended that the laptop is powered fromAC mains rather than its internal battery.If this is a problem, Launchkey can be powered via an optional AC-to-DC 9 V mains adaptor,which you should connect to the Power In socket at the rear (see page 9). Pleasecontact your Novatin dealer for advice on suitable mains adaptors if you are in any doubt.6
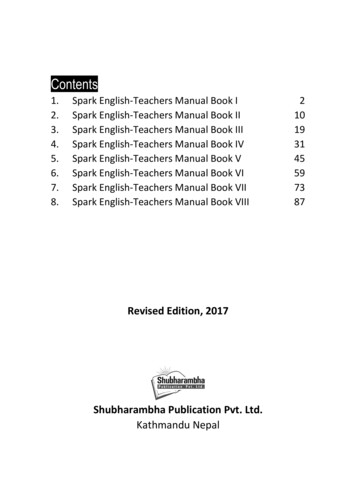
EnglishHardware OverviewTop View – controls11106131225-note version212 13 112331841597610897Applicable to 49 and 61-note versionsLaunchkey’s controls are non-assignable. This makes Launchkey very simple to configure and use.1Keyboard – Launchkey is available in 25-, 49- or 61-note versions.2Pitch wheel – standard pitchbend wheel, spring-loaded to return to centre position.3Modulation wheel.4 1 x 45 mm sliders, used to control levels and other parameters in your DAW and virtual9MIDI devices.592 x press-buttons, providing additional DAW/MIDI control functions.7
English68 x rotary controls, providing further DAW/MIDI control.7 Transport controls - these provide remote control facilities for your DAW, but also havespecific functions when Launchkey is used with Ableton Live Lite software.8 6 x velocity-sensitive launch pads. These can be used to trigger sounds (e.g., drums) in1your music software and provide other functions in some DAWs and iPad apps.9 2 x round buttons. These can be used for custom functions in the iOS software, or in yourDAW.10 3 x InControl buttons; these switch the operating mode of the sliders, rotary controls and3launch pads to be either DAW controllers or standard MIDI CC controllers.11 LED display. Shows the value of the MIDI parameter being transmitted by the control you’recurrently using.12 ctave / – buttons – shift the keyboard ‘up’ or ‘down’ in octave steps. Pressing the twoObuttons together lets you transpose the keyboard in semitone increments. The number ofoctaves over which the keyboard can be shifted varies with Launchkey model; the smallermodels have a greater shift range.13 Track I / H buttons – use these to change tracks in your music software. Pressing bothbuttons together lets you change the MIDI channel on which Launchkey will transmit MIDIdata.1 Launchkey 49 and 61 only. Launchkey 25 has one assignable slider.2 Launchkey 49 and 61 only. There are no buttons on Launchkey 25.3 Launchkey 49 and 61 only. Launchkey 25 has two InControl buttons.8
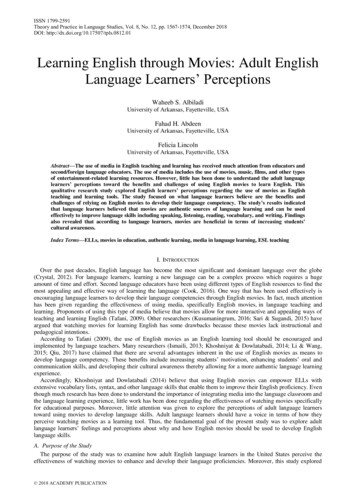
EnglishRear view – connections1324USB port – USB Type B connector compatible with USB 1.1, 2.0 or 3.0. Connect Launchkeyto a USB port on your computer or iPad using the USB cable supplied.12P ower In - you can also connect an AC-to-DC adaptor here to externally power Launchkey.3Sustain– a ¼” jack socket for the connection of a standard sustain pedal.4Kensington security lock – secure your Launchkey to a convenient structural point if desired.9
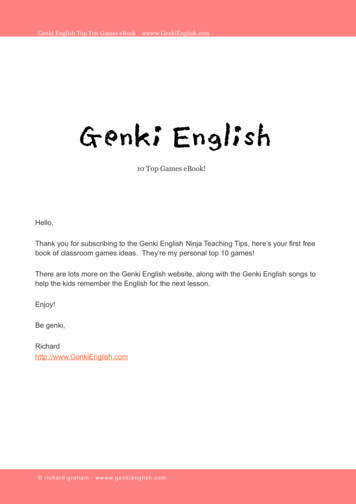
EnglishLAUNCHKEY SETUP EXAMPLESLaunchkey is designed to integrate automatically and seamlessly with your computer musicsoftware. Launchkey can be used with either a computer/laptop, or with an iPad; howeverthe features and operational possibilities do differ with the two platforms, so they have beencovered separately in the User Guide sections that follow.Interfacing Launchkey to a computerConnect Launchkey to your computer using the supplied USB cable between Launchkey’s rearpanel USB socket and a USB port on the computer.PowerControl informationUSBIf Launchkey cannot establish communications with the computer, all the pads will flash rapidlyin a multicoloured sequence. (We’ve called this Lightshow mode.) Once the USB data link isworking, Lightshow mode will stop and Launchkey will be ready for use.If you want to impress your friends with a dynamic and impressive lightshow,you can initiate this mode by pressing the Record button while Launchkeyboots up. Press the Track I and Track H buttons together to cancel it and returnto normal operation.InControl modeInControl has been integrated into your Launchkey to allow instant operability with certainDAWs. Consult the Setup Guide for your DAW which you downloaded when you registered yourLaunchkey*. This will explain how the various controls on Launchkey map onto each DAW’s keyfunctions.If your favourite DAW is not in this list, you can still use Launchkey with it effectively, but you willneed to use Basic Mapping Mode (see following page).*This can be downloaded at any time from www.novationmusic.com/downloads.10
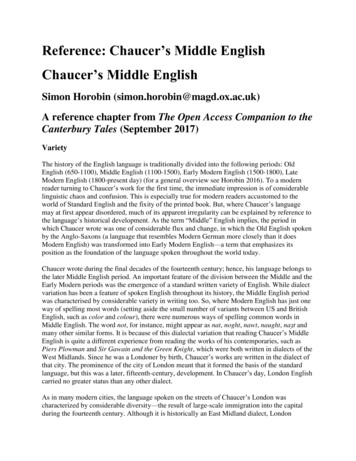
EnglishBasic mapping modeLaunchkey will act as a general-purpose MIDI controller for use with a wide range of musicsoftware applications. In addition to the keyboard’s Note On/Note Off messages, each of thevarious controls (sliders, buttons and rotary controls) will always transmit their own unique MIDIcontrol message, allowing you to configure your software to respond to the messages as youwish.Interfacing Launchkey to an iPadPowerControl informationApple iPad CameraConnection Kit, orApple Lightning toUSB Camera AdaptorUSBIf you have an iPad or iPad mini*, you can control many different music making apps with yourLaunchkey. Depending on the connector on your iPad, you will need either an Apple iPadCamera Connection Kit (earlier iPads), or an Apple Lightning to USB Camera Adapter (morerecent iPads) to interface Launchkey to an iPad, as shown above:1.2.3.plug the USB cable (in the box) into the USB port on Launchkey,plug the other end of the USB cable into to the USB port on the Camera Connection Kit orLightning to USB Camera Adapter,now connect the Camera Connection Kit or Lightning to USB Camera Adapter to the iPad.NOTE: Please note that neither an Apple iPad Camera Connection Kit nor an Apple Lightningto USB Camera Adapter is included with Launchkey, and must be sourced separately.IMPORTANTLaunchkey cannot be powered from an iPad. An external 9 V DC mains adaptor mustbe used.* OS version-dependant11
EnglishEXPLORING LAUNCHKEYMIDI ChannelMIDI data can be sent on any one of 16 channels, and will only be received and interpretedcorrectly if the receiving device is set to the same channel. In InControI mode, you don’tneed to worry too much about MIDI channels, as InControl will ensure that all messages aretransmitted on the correct channels in any case.To select a different channel: Press the two TRACK buttons 13 simultaneously; the LED displaywill flash, indicating the current MIDI channel Use the TRACK I / H buttons, select the desired channel number.11The exception to the above are the launch pads; these ALWAYS transmit onMIDI Channel 10, as this is the standard GM MIDI channel for percussioninstruments.When powering-on, Launchkey ALWAYS defaults to MIDI Channel 01; if youhave re-powered since changing the MIDI channel number, you will need toreset it.Transport controlsLaunchkey is provided with a standard set of six ‘transport’ controls, which can be used to start,stop, relocate, etc., within your DAW’s timeline. They act as a convenient remote control for thesoftware and duplicate the on-screen buttons.RewindFast Forward StopStartLoopRecordIn InControl mode, these will control the DAW’s standard transport functions. In Basic Mappingmode, each button will transmit its own unique MIDI CC message, and you may need toconfigure your DAW to respond correctly. See the MIDI tables from page 19 onwards.When Launchkey is used with Ableton Live, the D and C buttons act as Previous Scene andNext Scene respectively.12
EnglishOctave up/downThe Octave / Octave - buttons 12 shift the keyboard ‘up’ or ‘down’ in octave steps. Thenumber of octaves over which the keyboard can be shifted varies with Launchkey model: Launchkey 25: -4 to 5 octavesLaunchkey 49: -3 to 4 octavesLaunchkey 61: -3 to 3 octavesNote that the LED display will confirm the number of octaves shifted (as a positive or negativevalue).TransposePressing the Octave / Octave - buttons 12 together lets you transpose the keyboard insemitone increments, up to a maximum of /- 12 semitones. The LED display flashes, andconfirms the transposition.Pitch WheelLaunchkey’s Pitch Wheel 2 transmits standard MIDI Pitch bendmessages; use it with synth software to vary the pitch of the played note.Modulation WheelThe Modulation Wheel 3 transmits standard MIDI Modulation messages(CC 1); what effect these have on your synth sound will be determinedby how the synth has been configured.Typically, a Modulation Wheel is used to vary a synth parameter such asfilter cut-off frequency or vibrato.13
EnglishSlider(s)Launchkey 25 has one slider control, and Launchkeys 49 and 61 have nine.The single slider on the Launchkey 25 transmits a Master Volume message (CC 7). This slidercannot be used in InControl mode.On Launchkeys 49 and 61, the functions of sliders 1 to 8 will differ depending on whetherInControl mode is in use. In InControl mode, the sliders will act as faders in the DAW’s mixersection, controlling the track levels in a set of eight consecutively-numbered channels. In BasicMapping mode, each slider transmits a fixed MIDI CC message. See the MIDI tables frompage 19 onwards.ButtonsOnly Launchkeys 49 and 61 have control buttons. There are a total of nine, one under eachslider 5 . In InControl mode, buttons 1 to 8 will typically act as mute or solo buttons for theselected set of eight channels in the DAW’s mixer. In this case, the ninth button switches thefunction of buttons 1 to 8 between Mute and Solo. Note that Solo mode is indicated by theinternal LED. In Basic Mapping mode, each button transmits a fixed MIDI CC message.See the MIDI tables from page 19 onwards.Rotary controlsAll models have eight rotary controls 6 , which like the other Launchkey controllers, may beplaced in InControl mode, or used in Basic Mapping Mode. In InControl mode they wouldtypically act as pan controls for a set of eight channels in the DAW’s mixer section. In BasicMapping mode, each rotary control transmits a fixed MIDI CC message. See the MIDI tablesfrom page 19 onwards.Launch PadsAll models of Launchkey are equipped with a set of sixteen velocity-sensitive pads. Theirprimary purpose is to trigger percussive sounds, and to do so, the pads need to be set to BasicMapping mode. In this case, all data is transmitted on MIDI Channel 10. In this mode, the padsilluminate red when struck. If the pads are set to InControl mode, they can be used to triggerclips or loops with certain software (such as Ableton Live), but have no function with non-clipbased applications such as Logic Pro or Cubase (hence cannot be switched into InControlmode).14
EnglishRound buttonsThe two large, round buttons 9 transmit fixed MIDI CC messages (upper 104, lower 105) when Launchkey is in Basic Mapping mode. When InControl is active they have specificfunctions within the software being used.Track I / HThe two Track I / H buttons 13 are only operative in InControl mode. They allow you to ‘step’the slider(s) between tracks or instruments in your DAW, which will be assigned to consecutiveDAW tracks by successive presses of Track I / H.Note that the action of the Track buttons can differ slightly between DAWs; for example, LogicPro automatically selects the next bank of eight tracks when you step from the “last” track in abank of eight; e.g., stepping from track 8 to track 9 switches the controlled tracks from 1-8 to9-16.Velocity CurvesTo suit different keyboard playing styles, Launchkey lets you select the relationship betweenkey velocity (i.e., how hard you hit the keys) and volume. The relationship is called the velocitycurve, and the default curve is NORMAL, which will be satisfactory for a great number ofplayers. Three alternative velocity curves are available – Low, High and Fixed.To select an alternative curve, press and hold the top InControl button and press one of thetransport buttons as HioffNORWith the Fixed curve selected, velocity sensing is disabled, and all notes will be at maximumvolume regardless of how hard the key is struck. With the Low curve selected, the volume ofthe notes will be lower compared to the Normal curve for the same style of playing. The Highcurve has the opposite effect.Note: Velocity curves only affect the response of the keys, not the drum pads.15
EnglishUsing Launchkey with InControlIf you have one of the DAWs for which a DAW Setup Guide is available, you will first need tofollow the instructions on how to set it up to operate correctly with Launchkey. Once this hasbeen done, InControl will automatically assign each hardware controller to a key DAW functionin an intelligent manner. You should be able to discover very easily how each controller ismapped onto which DAW function by experimenting, but a full list of mappings is contained inthe DAW Setup Guide.InControl assignments are fixed and invisible to you, so its operation is seamless andtransparent.InControl mode may be selected independently for the various blocks of controllers –sliders/buttons, rotary controls and launch pads, using the three (Launchkey 49/61) or two(Launchkey 25) InControl buttons 10 . When enabled, the InControl buttons are illuminated.InControl ButtonsNote that the launch pads have no InControl functionality with some DAWs – these will beDAWs which are not clip-based, such as Logic Pro and Cubase. Ableton Live is clip-based, andyou will be able to trigger clips and loops directly with these DAWs, using the pads. When usedwith Reason, the pads can be used for many other purposes, such as to select and edit drumloops or modify sequencer steps.Using Launchkey with Ableton Live LiteAbleton Live Lite is available for download to Launchkey owners, and is an excellent DigitalAudio Workstation (DAW) if you don’t already have one that you’ve been working with for sometime. Using Ableton Live Lite gives you the advantage of a deeper level of integration betweenthe controls on your Launchkey and various DAW functions than is possible with other DAWs.It is possible to reassign the rotary controls as Device controls, panpots or Send level controls.16
EnglishA long press of the top InControl button for the rotary controls places Launchkey in PotSelection mode. The drum pads will now illuminate in various colours to indicate the currentfunction within Ableton Live Lite of the rotary controls (the bottom row of pads), and thecurrently selected Ableton Device Bank (the top row).Bottom row:One pad will be significantly brighter than the others; this indicates the function that the rotarycontrols will now perform. The first four pads’ functions are indicated by legends on the Launchkeypanel – Device, Pan, Send A or Send B respectively. If you want to control a different Abletonfunction from that currently selected, hold down the top InControl button while pressing a differentpad.The colour coding used is as follows: Pink:Orange:Purple:Blue:Device SelectPanSend ASend BNote that the remaining pads on the bottom row operate in a similar manner, and assign therotary controls to Sends C to F respectively, although this is not indicated on the Launchkeypanel. If these Sends have been enabled in Ableton Live Lite, the relevant pad(s) will illuminate infurther distinguishing colours. Only Sends A and B are enabled by default.Additionally, you can scroll through the Devices on a track by holding the top InControl buttondown while using the Track I and Track H buttons.Top row:If you touch any of the top row of drum pads while holding down the top InControl button down,you can select alternative Device Banks within Ableton Live Lite. The active Device Bank isindicated by one pad illuminating bright pink (the others will glow a dimmer pink).The first pad, which is always activated by default when you enter Pot Selection mode - selectsthe Default Bank (Ableton’s “best of” page of pre-selected controls), while the remaining sevenpads select Device Banks 1 to 7 (depending on the number of Banks available at the time – itwill often be only Banks 1 and 2).For many users, the Default Bank – Ableton’s “best of” set – will prove adequate most of thetime, so the top row of pads need not be altered.17
EnglishTECHNICAL INFORMATIONTROUBLESHOOTINGFor the latest information and assistance with your Launchkey please visit:www.novationmusic.com/answerbaseBasic Troubleshooting ExamplesQ. Where can I find my software?A. The software for Launchkey is available from our web site.Go to www.novationmusic.com/register and follow the instructions.Q. Do I need to install a USB driver when using Launchkey with a Mac or PC?A. No, Launchkey is a class-compliant device. This means your computer will detect thekeyboard when you connect it and, if necessary, install the correct drivers automatically.Q. What is the DC power socket for?A. You can power Launchkey with an external DC power supply of the recommended type.This way it won’t draw power from the your laptop battery. If you’re using Launchkey withan iPad, you must use an external power supply connected here – an iPad cannot powerLaunchkey via the USB cable.Q. Can I connect Launchkey to both a computer and an iPad at the same time?A. Launchkey is designed to connect via USB, and thus can only connect to one deviceat a time.Q. What is InControl?A. A Novation innovation that provides control of all major music software straightout of the box.Q. What do the arrow buttons do?A. These turn InControl mode on or off for Launchkey’s faders, knobs and pads individually.InControl mode is available when a control surface connection to your music software isestablished.18
EnglishMIDI messages table25-note Launchkey:ControlMsg TypeMsg No.RangeRotary control 1cc210 - 127Rotary control 3cc230 - 127Rotary control 2Rotary control 4Rotary control 5Rotary control 6Rotary control 7Rotary control 8Slider 9 (Master)Pad 1Pad 2Pad 3Pad 4Pad 5Pad 6Pad 7Pad 8Pad 9Pad 10Pad 11Pad 12Pad 13Pad 14Pad 15Pad 16Round button top rowRound button bottom rowArrow up buttonArrow down teNoteNoteNoteNoteNoteNoteNoteNoteccccccccTrack left (HUI Track Down) ccTrack right (HUI Track Up)ccOctave right (up)NoneOctave left (down)InControl (Basic mode)InControl (InControl mode)KeysNoneNoneNoteNote222425262728740 (E1)41 (F1)42 (F#1)43 (G1)48 (C2)49 (C#2)50 (D2)51 (Eb2)36 (C1)37 (C#1)38 (D1)39 (Eb1)44 (G#1)45 (A1)46 (Bb1)47 (B1)10410511211310310210 (A#2)0 - 1270 - 1270 - 1270 - 1270 - 1270 - 1270 - 1270 - 1270 - 1270 - 1270 - 1270 - 1270 - 1270 - 1270 - 1270 - 1270 - 1270 - 1270 - 1270 - 1270 - 1270 - 1270 - 1270 / 1270 / 1270 / 1270 / 1270 / 1270 / 1270 / 12719
English49 and 61-note Launchkeys:ControlMsg TypeMsg No.RangeRotary control 1cc210 - 127Rotary control 3cc230 - 127Rotary control 2Rotary control 4Rotary contr
8 English 6 8 x rotary controls, providing further DAW/MIDI control. 7 Transport controls - these provide remote control facilities for your DAW, but also have specific functions when Launchkey is used with Ableton Live Lite software. 8 16 x velocity-sensitive launch pads. These can be used to trigger sounds (e.g., drums) in your music software and provide other functions in some DAWs and iPad .