Transcription
Perkins Loan Assignment System (PLAS) User GuideVersion: 1.7Date: 03/14/2022
Table of ContentsVersionNumberDateUpdated ByChange Log1.09/18/2015ECSIFirst Version1.11/15/2016ECSIUpdated ECSI’s PO Box1.24/15/2016ECSIUpdated expiration date screen shots1.36/30/2016ECSIUpdated validation details1.44/12/2018ECSIRemoved reference to eCB per CR 4538.1.54/19/2020ECSIUpdated URL EFPLS.com to EFPLS.ed.gov1.67/10/2020ECSIUpdate Email Address from PLASAccess @efpls.comto PLASAccess@efpls.ed.gov.1.73/14/2022ECSIUpdate ECSI’s AddressPage 2 of 102Using the Federal Perkins Loan Assignment System
Table of ContentsTable of ContentsTable of Contents . 3About the Perkins Loan Assignment System (PLAS) . 5Overview for the User Guide . 5Two Factor Authentication . 6Administrative Procedures . 7Request User Access . 7Reset a Password .10Disable User Access.12Access PLAS .15Log in .15Log out of PLAS .16Retrieve a Password .17The Loan Assignment Data Entry Method Overview .19Loan Assignment Data Entry Method .21Create a New Batch.21Enter Loan Assignments .23Upload Supporting Documents .25Execute Batch Validation .28View and Correct Validation Errors.30Print the Manifest .33Mail Supporting Documents .34The Loan Assignment Upload Method Overview .36Prerequisite for Loan Assignment Upload Method .38Loan Assignment Upload Method .38Upload Assignments via a Data File .39Upload Supporting Documents .41Execute Batch Validation .44View and Correct Validation Errors.46Print the Manifest .49Using the Federal Perkins Loan Assignment SystemPage 3 of 102
Table of ContentsMail Supporting Documents .50Web Reports .52About the Accepted Report .53About the Rejected Report .53View, Edit and Delete a Batch .54View a Batch.54Edit a Batch .56Delete a Batch .57View, Edit, and Delete an Assignment .58View an Assignment .58Edit an Assignment .60Delete an Assignment .61Appendices .62Appendix A-About Data File Layouts .63Appendix B-About the Header Record.64Appendix C-Header Record Layout .65Appendix D-About Assignment Records .67Appendix E-Assignment Record Layout .68Appendix F-About the Trailer Record .93Appendix G-Trailer Record Layout .94Appendix H-How to Create a Pipe Delimited Text File .96Appendix I-How to Create a .zip File with PDFs .98Appendix J- About Automatic Assignment Validations .99Appendix K- About Automatic Batch Validations .101Appendix L-Assignment Status Definitions for PLAS.102Page 4 of 102Using the Federal Perkins Loan Assignment System
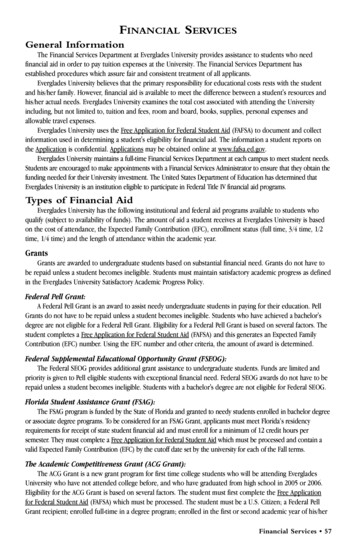
About the Perkins Loan Assignment System (PLAS)About the Perkins Loan Assignment System (PLAS)ECSI’s Perkins Loan Assignment System (PLAS) is used to electronically submit assignments under the FederalPerkins Loan (Perkins Loan) Program to the Department of Education (the Department). Perkins Loanassignments may also include National Direct Student (NDSL) and National Defense Student Loans (DefenseLoans). This user guide provides technical instructions for this automated assignment process. For additionalassistance with PLAS, contact ECSI Federal Perkins Loan Assignments Support at 844-301-2620 during thebusiness hours of 8:00 a.m. through 5:00 p.m. (EST), Monday through Friday.PLAS enables all users to:1. Enter loan assignment data electronically via PLAS.2. Upload or mail supporting documentation and hard copy original or certified copy promissory notesrequired for assignments. Please note that the Department still requires hard copy original or certified copypromissory note(s) be mailed to ECSI Federal Perkins Loan Servicer.3. Search, view, and edit loan assignment information.4. View a list of reports pertaining to accepted and rejected Perkins Loans listed in the ECSI Federal PerkinsLoan Servicer loan servicing system.Overview for the User GuideThis user guide provides a broad overview of the processes and steps needed to add a loan assignment toPLAS. Intentional blank pages divide this user guide into eight (8) sections, which are listed below:1.2.3.4.5.6.7.8.Administrative ProceduresAccess PLASThe Loan Assignment Data Entry MethodThe Loan Assignment Upload MethodWeb ReportsView, Edit and Delete a BatchView, Edit and Delete an AssignmentAppendicesUsing the Federal Perkins Loan Assignment SystemPage 5 of 102
Two Factor AuthenticationPrimary DestinationPoint Administrator(DPA):The institution’s PrimaryDPA for Federal StudentAid systems is notrequired to be the sameperson as theinstitutions designatedInstitutionAdministrator for PLAS.Similar to the security process used to access Federal Student Aidsystems, such as the National Student Loan Database System(NSLDS), authorized users of the Perkins Loan Assignment System(PLAS) are required to enter two forms of “authentication” toaccess the system.This security process is an established technology referred to asTwo Factor Authentication (TFA). TFA will require each authorizeduser to log in to PLAS with his or her Login ID and Password as wellas a Security Code generated by a registered TFA security token.If a user already has a TFA security token because he or she also hasaccess to one of Federal Student Aid’s systems, the user only needsto complete the PLAS User Access Form steps outlined below.If a user does not have a TFA security token, the user should contactthe institution’s Primary Destination Point Administrator (DPA) forFederal Student Aid systems to obtain one. Once the token isreceived, it will need to be registered. In addition, the user will needto complete the PLAS User Access Form steps outlined below.If an institution’s Primary DPA has questions related to TFA securitytokens, contact the TFA Support Center at 800-330-5947, option 2or by email at TFASupport@ed.gov. Representatives are available8:00 a.m. through 8:00 p.m. (EST), Monday through Friday.Page 6 of 102Using the Federal Perkins Loan Assignment System
Administrative ProceduresAdministrative ProceduresInstitutionAdministratorThe InstitutionAdministrator is aperson that isappointed by theinstitution.The responsibility of the Institution Administrator in PLAS is to request accessfor users, disable a user’s account, and to reset a user’s password. This personwill need to contact the institution’s Primary Destination Point Administrator(DPA) for Federal Student Aid systems to obtain a Two Factor Authentication(TFA) security token.Only the Institution Administrator is authorized to:1) Request access for him or herself; and2) Request access for other users.The Access Request Form needs to be completed and sent toPLASAccess@efpls.ed.gov, and the Institution Administrator will need tocomplete information to receive the TFA security token.Request User Access1. Navigate to https://efpls.ed.gov, which is the ECSI Federal Perkins Loan Servicer webpage.2. Click the PLAS tile.Using the Federal Perkins Loan Assignment SystemPage 7 of 102
Administrative Procedures3. On the Login screen, click the Access Request Form tile.4. Print and complete the form. Note: The instructions on the form must be followed.5. Email or mail the completed form to ECSI Federal Perkins Loan Servicer.Send via email:PLASAccess@efpls.ed.govMail printed forms:ECSI Federal Perkins Loan ServicerAttn: PLAS Access Requests1200 Cherrington Parkway, Suite 200Moon Township, PA 15108Page 8 of 102Using the Federal Perkins Loan Assignment System
Administrative Procedures6. Retain a copy of the completed and signed forms for the user’s records.Once ECSI Federal Perkins Loan Servicer receives the request for access, a staff member reviews therequest and grants or denies access. If access is denied, the Institution Administrator will receive an emailfromPLASAccess@efpls.ed.gov with the reason for denial.If access is approved, two emails are sent to the user. The first email contains the user’s OPEID and LoginID. The second email contains a temporary Password. At the first log in attempt, the user will beprompted to change the password.Using the Federal Perkins Loan Assignment SystemPage 9 of 102
Administrative ProceduresReset a PasswordTo reset a password for a user, the Institution Administrator will follow the procedures listed below. It isimportant to verify that the OPEID corresponds to the account of the user requesting a password change.1. Navigate to https://efpls.ed.gov, which is the ECSI Federal Perkins Loan Servicer webpage.2. Click on the PLAS tile.3. Enter the appropriate OPEID, the Login ID, Password, and Security Code that appears on the TFA securitytoken, and click the LOGIN button. Note: The system requires an eight digit OPEID. This ID represents thesix digits in use by the institution today followed by two zeros.Page 10 of 102Using the Federal Perkins Loan Assignment System
Administrative Procedures4. On the Menu screen, click Users List.5. On the Assignment User List screen, locate the Name of the User and click the radio button next to theUser #. Click [Reset User’s Password].6. On the Reset User Password screen, the Login ID field and the Name field are automatically populated.Click [Generate Random Password] to create a temporary password for the user. Click [Save Password],and contact the user with the temporary password. The system will direct the user to change thepassword the next time he or she logs in.Using the Federal Perkins Loan Assignment SystemPage 11 of 102
Administrative ProceduresDisable User AccessTo disable user access, the Institution Administrator will need to complete the proper sections on the PLASAccess Request Form, and follow the instructions below to disable the account in the system.IMPORTANT! To disable access for an Institution Administrator, all three sections of the PLAS Access Request Formmust be completed.To disable access for other users, complete and sign the first two sections of the PLAS Access RequestForm.The forms must be completed and returned to ECSI Federal Perkins Loan Servicer within one (1)business day (between the hours of 8:00 a.m. to 5:00 p.m. (EST), Monday through Friday) of disabling auser’s account.1. From the Welcome screen, access the PLAS Access Request Form, complete the necessary sections andsubmit the form.2. Once the PLAS Access Request Form is completed, log into the system, enter the appropriate OPEID, LoginID, Password, and Security Code that appears on the TFA security token. Click the LOGIN button.3. On the Menu screen, click Users List.Page 12 of 102Using the Federal Perkins Loan Assignment System
Administrative ProceduresOn the Assignment User List screen, locate the Name of the User, click the radio button next to the User #,and click [Disable User Account]. Once these steps are completed, the user will not have access to thesystem. However, the user’s name will remain on the Assignment User List screen.Using the Federal Perkins Loan Assignment SystemPage 13 of 102
Administrative ProceduresThis Page Intentionally Left BlankPage 14 of 102Using the Federal Perkins Loan Assignment System
Access PLASAccess PLASOnce the PLAS User Access Form is completed, and access is granted from ECSI Federal Perkins Loan AssignmentSupport, users receive two emails from PLASAccess@efpls.ed.gov that contain an eight digit OPEID, Login ID, andPassword credentials. With this information, users are able to log into PLAS from any computer with internetaccess. This section of the user guide contains instructions to log into the system, reset a password and log out ofPLAS.Log in1. Navigate to https://efpls.ed.gov, the ECSI Federal Perkins Loan Servicer homepage. Click the PLAS tile.2. On the Welcome screen, enter the institution’s OPEID, Login ID, Password, and the Security Code thatappears on the TFA security token. Note: The system requires an eight digit OPEID. This ID represents the sixdigits in use by the institution today followed by two zeros. If an invalid Password is keyed into the system, areset password page opens. If the user enters an invalid Login ID or OPEID, then the user should refer to theinitial account set up email from PLASAccess@efpls.ed.gov or contact the Institution Administrator toreceive access to this information. Once the user has completed the Welcome screen, click the LOGINbutton.Using the Federal Perkins Loan Assignment SystemPage 15 of 102
Access PLAS3. Review the Rules of Behavior screen; click the checkbox to acknowledge compliance with the Rules ofBehavior. Click [Continue] to move to the next screen.4. The Menu screen provides the user access to navigate to the main features of the system.Log out of PLASTo log out of PLAS, click the LOGOUT link located at the top of all pages within the system. Another way to logout is to close the browser window. After 15 minutes of inactivity in the system, the user is automaticallylogged out.Page 16 of 102Using the Federal Perkins Loan Assignment System
Access PLASRetrieve a PasswordFollow the instructions below to retrieve the user’s password. If additional help is needed, contact theInstitution Administrator.1. From the Welcome screen, leave the OPEID, Login ID, Password, and Security Code fields blank. ClickLOGIN to access the password assistance screen.2. On the Login screen, enter the institution’s OPEID, the user’s Login ID, and Security Code from the TFAsecurity token. Leave the Password field blank. Click [Email My Password]. The user’s password is sent tothe email address listed on the PLAS Access Request Form. For further assistance with password reset,contact the Institution Administrator.Using the Federal Perkins Loan Assignment SystemPage 17 of 102
This Page Intentionally Left BlankPage 18 of 102Using the Federal Perkins Loan Assignment System
The Loan Assignment Data Entry Method OverviewThe Loan Assignment Data Entry Method OverviewThe user will need to perform the following steps to submit loan assignments to ECSI Federal Perkins LoanServicer. These steps are a broad overview of the Loan Assignment Data Entry Method. Further instructions onhow to use PLAS follow this overview.1. Log In to PLASLog in to PLAS from any computer with internet access.2. Create a Batch and Enter Loan AssignmentsThe system is designed to reflect the exact layout of the paper Federal Perkins Loan Program AssignmentForm (OMB 1845-0048). Once the user has created a batch, he or she will enter the information into thesystem via the data entry screens. Multiple assignments can be entered and saved into the system, and willbe marked with a status of Entered.3. Upload Supporting DocumentsSupporting documentation must be provided with the loan assignment. The user has the ability to uploadsupporting documentation for each of the loan assignments, or mail supporting documents to ECSI FederalPerkins Loan Servicer. Note: Even if promissory notes are uploaded in the system, all hard copy original orcertified copy promissory notes must be mailed to ECSI Federal Perkins Loan Servicer.4. Execute Batch ValidationAll batches that are entered into the system must be validated to verify that all of the required informationis correct. View the manifest within the batch to determine if the assignment passes the system validation.If PLAS identifies errors in an assignment during the validation process, the assignment’s status will bemarked as School Pending. Correct any validation errors and validate the batch again. Once an assignmenthas successfully passed validation, the status will change to Submitted.5. Print the ManifestPrint one manifest per batch to accompany all hard copy original or certified copy promissory notes, andmail to ECSI Federal Perkins Loan Servicer. The user will need to mail supporting documentation that wasnot uploaded to the system. All documentation must be mailed within five (5) business days, once the statusof the assignment has changed to Submitted.6. ECSI Federal Perkins Loan Servicer ValidationA manual validation process occurs once ECSI Federal Perkins Loan Servicer receives hard copy original orcertified copy promissory notes and other supporting documents. If the assignments pass manual validation,the status will change to Accepted. If the assignments fail manual validation, then the status will change to ECSIPending. ECSI Federal Perkins Loan Servicer staff will contact the submitting institution promptly by phone toverify or correct the information. The ECSI Federal Perkins Loan Servicer staff member will contact the personlisted as the Authorized Institution Official in Section B on the Institutional Certification Form. Once theinstitution corrects the discrepancies, the status will change to Accepted. The Department officially acceptsassignments in Accepted status, and ECSI Federal Perkins Loan Servicer will begin servicing the loan.Using the Federal Perkins Loan Assignment SystemPage 19 of 102
Loan Assignments Data Entry Method - Process FlowLogin to PLASCreate a Batch and Enter loan assignment viadata entry screens.Status updated to Entered.Upload supporting documents in PDFformatUser to Execute Batch Validation insystemNo upload of supporting documents,user must mail supportingdocuments to ECSI.Validated?User must correctassignment data in PLAS.Assignments failing validation.Status updated to SchoolPending .FailPassStatus updated to Submitted.Print manifests and mail promissory notes and anyother supporting documents to ECSI Federal PerkinsLoan Servicer.ECSI Federal Perkins Loan Servicer validates thatsupporting documents match the information enteredinto PLAS.Validated?User must providecorrections to ECSI FederalPerkins Loan ServicerFailRecords fail validation. Statusupdated to ECSI Pending.PassStatus updated to Accepted.Assignment will be serviced by ECSI FederalPerkins Loan Servicer.Status updated to Exported.Page 20 of 102Using the Federal Perkins Loan Assignment System
Loan Assignment Data Entry MethodLoan Assignment Data Entry MethodBelow is the process for using the data entry screens to create a new batch and add assignments to PLAS.1. The user will log into PLAS, click Perkins Loan Assignment System.Create a New BatchThe user must create a new batch before he or she enters an assignment. The Institutional Certification Form isused to create the batch. The screen is formatted using the same information that is found on the FederalPerkins Loan Program Assignment Form. Note: The fields in Section A: Institutional Administration willautomatically populate with the institutional information. This section of the form contains the institution’sname, address, OPEID number, and the name and contact information for the authorized approver for thetransfer of debt through the assignment. If needed, the user can update the address field.1. Click [Create a New Batch] located on the Assignment Certification Form Administration page.Using the Federal Perkins Loan Assignment SystemPage 21 of 102
Loan Assignment Data Entry Method2. On the Institutional Certification Form screen, enter the following information into the fields in Section B- Certification: The Typed Name of Authorized Institution Official, Phone Number, Typed Title ofAuthorized Institution Official, Alternate Contact Person, Signature of Authorized Institution Official, andCertification Date. Note: Typing the name of the authorized official will meet the requirement for aSignature.3. Initially, the information in Section C-Manifest will be blank. The manifest section automatically populatesonce assignments are entered into the system.4. The system will automatically populate the number of loan assignments that are added to the batch in theAssignments Received field. Click [Save].Page 22 of 102Using the Federal Perkins Loan Assignment System
Loan Assignment Data Entry MethodEnter Loan AssignmentsLike the paper Assignment and Borrower Loan Form, this page in PLAS holds detailed information about a loanassignment. This includes contact information for the borrower, the cosigner (if applicable), historical anddetailed financial information about the loan, and any loan cancellation information. Follow the steps below toadd loan assignments to a batch.1. On the Assignment Certification Form Administration screen, click the drop down arrow next to the Batch# that will contain the new assignment. Click View Manifest, and click Select.2. On Assignment and Borrower Loan Form Manifest screen, click [Create a New Assignment]. Assignmentsthat are created in the system are given a Sequence # and will appear under the Batch Number: section ofthe screen.Using the Federal Perkins Loan Assignment SystemPage 23 of 102
Loan Assignment Data Entry Method3. On the Borrower and Loan Information Form screen, enter information for each loan assignment in thebatch. All fields marked with a red asterisk are required fields and must be completed.4. After all required fields are completed, click [Save] at the bottom of the form. To continue, attachsupporting documents for this assignment, or add more loan assignments to the batch by repeating steps2-4.Page 24 of 102Using the Federal Perkins Loan Assignment System
Loan Assignment Data Entry MethodUpload Supporting DocumentsSupporting documents for each of the loan assignments must be uploaded to the system or mailed to ECSIFederal Perkins Loan Servicer. All documentation must be mailed to ECSI Federal Perkins Loan Servicer withinfive (5) business days, once the status of the assignment has changed to Submitted.IMPORTANT! The user has two options for uploading supporting documentation to PLAS. 1) Enter all assignments in abatch before attaching the supporting documents or 2) upload supporting documents after entering eachloan assignment. Even if electronic copies of promissory notes are uploaded to PLAS, all hard copy original or certified copypromissory notes must be mailed to ECSI Federal Perkins Loan Servicer via registered mail. If the institution has a letter from the Department with permission to use an alternate supportingdocument, then the letter and alternate document can be uploaded (in PDF format) to PLAS in place of therequired document, or the user can mail the letter and alternate document to ECSI Federal Perkins LoanServicer via registered mail.1. On the Assignment Borrower and Loan Form Manifest screen, locate the loan assignment that requiressupporting documents, and click the drop down arrow located under the Actions column. Click AttachAssignment Documents, and click Select.Using the Federal Perkins Loan Assignment SystemPage 25 of 102
Loan Assignment Data Entry Method2. On the Attach Assignment Documents screen, click the Browse button next to the name of eachdocument associated with the loan.3. When the user’s operating system dialogue box (Windows Explorer or Mac) opens, navigate to the filecontaining the supporting document and double-click on the file name. The operating system dialogue box(Windows Explorer or Mac) closes and the path to the document appears in place of the Browse button.Repeat this process for each supporting document associated with the assignment. Note: Only one file canbe uploaded for each PDF file listed on this screen. When a file is uploaded, it replaces any previouslyuploaded file.4. Click Upload Documents button at the bottom of the page.When the upload is compl
Apr 12, 2018 · Support, users receive two emails from PLASAccess@efpls.ed.gov that contain an eight digit OPEID, Login ID, and Password credentials. With this information, users are able to log into PLAS from any computer with internet access. This section of the user guide contains instructions to log