Transcription
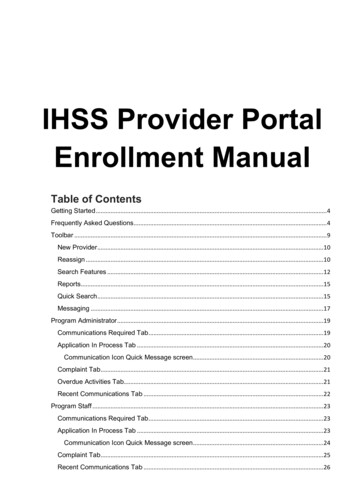
IHSS Provider PortalEnrollment ManualTable of ContentsGetting Started . 4Frequently Asked Questions. 4Toolbar . 9New Provider .10Reassign .10Search Features .12Reports .15Quick Search .15Messaging .17Program Administrator .19Communications Required Tab .19Application In Process Tab .20Communication Icon Quick Message screen .20Complaint Tab .21Overdue Activities Tab.21Recent Communications Tab .22Program Staff .23Communications Required Tab .23Application In Process Tab .23Communication Icon Quick Message screen .24Complaint Tab .25Recent Communications Tab .26
USER GUIDESystems Administrator .26Tools Tab .26Delete Provider .27Manage Videos .27Generate Annual Report.28Generate License Records .28Generate License Notices .28Correct Provider Complaint .29Correct Contact .29Correct Entity.29Archive Survey Results.30Archive Complaint Results .30Administer Letters.30Automate Letters .31Import CDSS Data .35Send Batch Communication .36Send Batch Document .38Communications Required Tab .39Applications in Process Tab.40Surveys in Process Tab.40Annual Reports Tab .41Overdue Activities Tab.41Appeals Tab .41Users Tab .42Lists Tab.43Lists Mapping .44Assessments Tab .83Modify Categories.85Modify Questions .86Creating an Application with an eSignature .88Application Activities Tab .90Regions/Cities .92Contact Types Tab .94Training Coordinator .95Training Event Set Up .972
USER GUIDECreate an Event .99Register and Update Registration for Event .102Manage Event .105Navigate A Provider .107Licenses Tab .111Services Tab .112Assessments Tab .113Application Assessments for eSignatures .114Notices Tab .116Complaints Tab .117Documents Tab.117Notes Tab .117Activities Tab .118Appeals tab.119Navigate A Recipient .119Workflow: Complete a Provider .122Workflow: Cancel a Provider .124Workflow: Reactivate a Provider .127Workflow: Communications Required .1283
USER GUIDEGetting StartedWelcome to BOUNDS! In this manual, we will introduce you to the BOUNDS system andthe different abilities within the system. The manual will show each role and the differentfunctions within that role. At the bottom of every page, there is a footer. The wordSupport is a link to the support page that has videos as well as another link to themanual.Frequently Asked QuestionsQ. What message does the provider receive when there are updates in their portal?A. An example message is might look like this:"On 12/07/2020, information was sent for your review and/or action.Please log into the portal at "their portal URL" to review the following.Messages"For these updates types below it will say the following where it says "Messages" in theexample to indicate the tab in their portal where they'll see the change.An activity will say, "Action Required"A follow-up item will say, "Messages"A document will say, "File Upload"A notice will say, "Notifications"Q. If I add a required activity, will it appear in the activities list for BOTH new and oldproviders?A. It will only appear for new providers4
USER GUIDEQ. Where do I find the webinars for BOUNDS university?A. At the bottom of the system windows you'll see the "Support" link. This link takes youto the Bounds support page. On the left you'll see the options under university. Theevents option shows upcoming webinars you can register for.Q. How do I change my password?A. You can use the forgot password link to reset your password. The 'Users' topic of theuser manual has a screenshot that instructs how to do so.Q. Since there are multiple languages, is it feasible to create an extra language columnand add the link so that the system can open up to the correct video?A. This is unnecessary. The system sends the provider to the correct video versionbased on the primary language you set for them when you entered them into thesystem.Q. In Bounds, I was able to locate the message that the test provider sent but where doI send the message back to the test provider?A. The 'Navigate a Provider' topic of the user manual shows the communications tab forthe provider, where you can add a new message.Q. Is the application accessible on a mobile device?A. Yes5
USER GUIDEQ. Is the Primary Language field for 'Spoken' or 'Written' language?A. Both, there is only one primary language field.Q. Hi, I am wondering if it is possible for us to customize the initial Invitation to Portalemail that provider applicants receive when we first enroll them in the Provider Portal?A. Yes, there are a few notification reasons that can be customized. See the 'Lists' topicof the manual.Q. How do I set up and configure training events.A. Use the Training Coordinator role. See more information in the manual starting withthe topic 'Training Coordinator'.Q. Can we resend the email registration in the event that they can’t locate it (forexample it may have gone to spam)?A. Yes, see the invite columns with the @ symbol on the contact page for the provider.You can also see this "invite" icon on the applications in process page in invite columnof the grid.Q. Is there a way that we can prevent the enrollment link from going to their SPAMfolder?A. If you believe the email is going to their spam folder you can ask them to addnoreply@jumpfaster.com to their addresses. Make sure they know that is anunmonitored mailbox. It's only used to send out messages from the system.6
USER GUIDEQ. Will the state docs that we are required to give to providers be available to themthrough the provider portalA. Yes you can add any documents they need to the provider forms. The links to thoseforms will show up in their portal under "forms and links"Q. Are they prompted by email if they are not going through the process?A. Yes, if you have application reminders turn on for your program. See the 'Lists'topic of the manual.Q. Do providers need to be logged in to use chat?A. Yes, the chat button appears in the upper right corner once they login to theirprovider portal.Q. How do I add an activity to a provider's activity list?A. See the Activities Tab sub-section under the Navigate a Provider section of themanual. Make sure you assign the activities to (Provider) in the "Assign To" selectionlist.Q. Is there a way we could regularly import provider information from our initial systeminto PEARS/BOUNDS?A. Yes, the system administrator role has an "Import CDSS Data" tool. Please see the'Import CDSS Data' topic of the user manual.Q. Does JUMP staff have access to the CDT file transfers?7
USER GUIDEA. No, transfers are done by the program using the system administrator tool "ImportCDSS Data" as seen on the 'Import CDSS Data' topic of the user manual. Automatedimports can be arranged if desired. Program administrators who have access to JUMP'sCustomer portal (https://jumpssc.com) may create a ticket to inquire about theautomated option.Q. How long after the provider completes their application process will they have accessto their account?A. Until they leave the program and you inactivate their account.Q. Do providers sign up for orientation through PA staff or through BOUNDS?A. Both options are available.Q. Is it possible to attach a Timesheet calculation function for providers to access?A. The system does not have a calculation feature. You may add an Excel sheet withthe calculation formula and instructions to provider forms for providers to download fromtheir forms and links page of their provider portal. See provider forms on the 'ListMapping' topic of the manual.Q. Once a provider or potential registry provider has been added to BOUNDS whosends them a registration email?A. An automatic invite is sent by the system. You may also manually send an invitationif needed by selecting the invite (@ symbol) button on the Applications in Processscreen, or the provider contact screen.8
USER GUIDEQ. Will automated emails go out to Registry Providers to remind them to check-in, usingthe portal, to verify their information?A. There is an option to turn on check-in reminders. Program administrators who haveaccess to JUMP's Customer portal (https://jumpssc.com) may create a ticket to inquireabout the turning on the option for your program.Q. Does cancelling the license cancelling the application?A. Yes, please see 'Navigate a Provider' topic of the manual or view the 'Workflow:Cancel a Provider' topic.Q. Are we able to send messages to the provider email account or does the providerand county staff have to log into Bounds in order to see that there has been a messagesent?A. You may send messages to their provider portal. The Bounds system has automationthat sends an email to providers overnight if they have new messages they should viewin their portal.ToolbarThe toolbar gives you several tools to help you find information and complete actions inthe system. My Inbox no matter what role you are on will return you to your"homepage"9
USER GUIDEAlso, always available next to the role drop-down is the blue question mark whichdownloads the user manual.New ProviderThe New Provider button allows you to create a new Individual or Agency. When youselect New Provider, choose either Individual or Agency, fill in the required fields, andsave. Note that you can select a staff member to assign the provider to using the"Assign To:" field.ReassignOn this tab you will select a staff member whose providers you need to reassign fromthe "Assign From" selection list. The system will load their providers into a grid. Selectsome or all of their providers for reassignment. Then select the a staff member from the"Assign To" selection list. Then execute the "Reassign" button.10
USER GUIDEThe system will verify the reassignment action. Click the OK button to verify you wish toreassign the selected providers.The providers will now show the under the staff member you assigned them too.11
USER GUIDESearch FeaturesWhen you select the search button from the toolbar you have several different searchoptions to choose from. Each option has different available fields to use to narrow yoursearch results. On most searches, you can export or view the results on the page.On the Search Provider tab, you can search for active or inactive providers. Added inversion 1.4 you have more search options.The Search Entity tab is not used by IHSS in Bounds.The Search Person tab is used to search for any person in the system.12
USER GUIDENote: if your program is using Bounds for Registry Provider / Client matching and theclient you are search for is not found the system will display the "Add New Contact"button. If you need to add a "recipient" fill in the "Title" (if applicable), the Email"address and "Phone". Make sure the First Name and Last Name fields in the top sectionappear as you want them to read on the new record. When you're ready select the "AddNew Contact" button. To find your contact reload the Search Person page by selecting"Search Person" again and search for the contact. They will now show in the results.13
USER GUIDEOn the Search Training tab you may search for training events if you're program is usingthe training events features in Bounds.14
USER GUIDEReportsWhen you select Reports from the toolbar here.You can select the report in the drop-downSee the reports manual for more information on reports.Quick SearchThere is a Provider and Contact quick search on the toolbar that makes it easy to get toprovider or contact information.Start typing in either box and the system will start searching for matches. Once you seewhat you're looking for, select it, and select the arrow to the right of the search.15
USER GUIDEWhen you load a contact from the quick search bar the result goes directly to theirsearch person result.To view the portal link for a provider click the close button at the top right of the searchresult next to the save button. This will take you to the page with the portal link for theprovider.16
USER GUIDEMessagingFrom the toolbar, you can easily send messages to providers. Type in the provider nameand select the message icon.You will then be taken to the provider's communications page. Select New to create thenew communication.17
USER GUIDEFill in the message details, selecting Portal sends it to the portal user so they can see iton their messages tab. If you enter a Completed date and time you can also select Nowto time stamp the communication. Select Save to send the communication to theprovider. You also have the option to Reply if you are responding to a message. New inversion 1.4 you can select the Subject from a selection list.This is how the messages show up in the portal.18
USER GUIDEProgram AdministratorThe program administrator inbox has several tabs for managing information in thesystem.Communications Required TabThe Communications Required tab has several sections, New Provider Contacts, ProviderUploads and a To Do items. See more about this area in the Workflow: CommunicationsRequired section of the manual.19
USER GUIDEApplication In Process TabAs the name suggests, the Applications in Process tab shows all the applications inprocess. When the page first loads you will only see the filters. Select the filters for theApplications In Process you would load to see then execute the "Load Applications inProcess" button. The system will load the grid with matching data. Use the linkedcolumn headers to sort the grid by any column.Clicking the provider name loads the provider details screen, Selecting the incompleteactivities number loads the provider's activities tab, The action column has several icons.The checkmark completes the application see the "complete a provider" work flow . Thex icon cancels the application; see the "cancel a provider" work flow. Selecting the pencilicon opens the assessment tab for the provider. The communication bubble opens aquick communication screen; see next screen shot.Note: If you do not mark the application complete using the check mark they will notshow on the provider completion report.Communication Icon Quick Message screenWhen you select the communication icon in the action tab it opens a sendcommunication screen to allow the program to quickly send a communication to theprovider in the portal. It will show when the last message was sent to this provider.When you "Save the Message" you will be taken back to the "Applications in Process"20
USER GUIDEscreen. Or you may return to "Applications In Process" by using the "Back to List"button.Complaint TabThere is a new tab called the Complaints tab. On this tab, you can view currentcomplaints. Select the date to open the complaint.Overdue Activities TabThe Overdue Activities tab was updated in version 1.4 to load filters instead of loadingthe overdue activities data. This speeds up the loading of the page and allows users tofilter the activities to only what they need to see. The user may filter by "Assigned To" or"Days Overdue" then click the "Load Overdue Activities" button. You may also use the"Load Overdue Activities" to load all overdue activities without filters if preferred. Oncethe grid is loaded, select the pencil icon to open the activity.21
USER GUIDERecent Communications TabOn the Recent Communications tab, the user can see communications both To andFrom providers. Select the pencil to open the message.Note: Messages here will appear if they were created in the last 14 days and have notbeen completed or cancelled.22
USER GUIDEProgram StaffCommunications Required TabThe Communications Required tab has several different sections. This tab shows theProviders that have New Contacts, Uploads, and new To Do items.Application In Process TabAs the name suggests, the Applications in Process tab shows all the applications inprocess. When the page first loads you will only see the filters. Select the filters for theApplications In Process you would load to see then execute the "Load Applications inProcess" button. The system will load the grid with matching data. Use the linkedcolumn headers to sort the grid by any column.Clicking the provider name loads the provider details screen, Selecting the incompleteactivities number loads the provider's activities tab, The action column has several icons.The checkmark completes the application see the "complete a provider" workflow . Thex icon cancels the application; see the "cancel a provider" workflow. Selecting the pencil23
USER GUIDEicon opens the assessment tab for the provider. The communication bubble opens aquick communication screen; see next screen shot.Note: If you do not mark the application complete using the check mark they will notshow on the provider completion report.Communication Icon Quick Message screenWhen you select the communication icon in the action tab it opens a sendcommunication screen to allow the program to quickly send a communication to theprovider in the portal. It will show when the last message was sent to this provider.When you "Save the Message" you will be taken back to the "Applications in Process"screen. Or you may return to "Applications In Process" by using the "Back to List"button.24
USER GUIDEComplaint TabThere is a new tab called the Complaints tab. On this tab, you can view currentcomplaints. Select the date to open the complaint.25
USER GUIDERecent Communications TabOn the Recent Communications tab, the user can see communications both To andFrom providers. Select the pencil to open the message.Note: Messages here will appear if they were created in the last 14 days and have notbeen completed or cancelled.Systems AdministratorThe System Administrator role is only held by a handful of users, as it has manycapabilities to add or change items/data in the system.Tools TabOn the Tools tab, the user has various tools at their disposal. Use the plus sign toexpand each of the different tools. Each tool has a different requirement to use it,normally either an ID or date range are necessary to use the tool.26
USER GUIDEDelete ProviderManage Videos27
USER GUIDEGenerate Annual ReportGenerate License RecordsGenerate License Notices28
USER GUIDECorrect Provider ComplaintCorrect ContactCorrect Entity29
USER GUIDEArchive Survey ResultsArchive Complaint ResultsAdminister LettersWith this tool, administrators can manage letters that appear inside the Documents tab of aprovider. Letters may be a word or pdf document that are used by the staff at any point duringthe course of investigation. A letter may be automated to populate certain key data elements,such as basic client and report information like name, dates and address.30
USER GUIDEIn the above area you will find a list of all current letters displayed in a grid along with theirdescription and date created. You can change the description of an existing letter by selectingthe pencil icon in the Edit column. You can also remove a letter form the list by clicking Delete.To add a new letter to list, select Choose File and locate the file from your local machine. Oncethe file is selected, enter the letter Description (this is how the letter will appear in thedropdown on the Documents tab of a provider). Next, you will choose the type of letter.Type Select "Client" or "Provider" if the Word document you are uploading contains mailmerges that are mapped to pre-defined data elements in Bounds. Select "Other" if the letter is not automated and will be downloaded as a plaindocument.Data ForThe final step is selecting the data type (in the event you are setting up a letter that is mappedto client data).Click Save to add the letter to the list.Automate LettersIn the previous section you saw how to save your document. Here you see how to upload ablank letter or form template into the letters list. For example, let’s say you had a PDF form thatyou wanted to give the workers easy access to or maybe there is a form that will fill outmanually. These types of forms are easy to upload and do not require any specific mappingsbeforehand.31
USER GUIDEHow to Map a Letter to Client DataIn order to automate a new letter to populate with client data, you will utilize the Merge Fieldfunction that is built into Microsoft Word. Open the Word document and make sure that editingis enabled for the document.Set the cursor to the section where the data will populate. In the menu at the top of thedocument, select Insert Quick Parts Field.A pop-up window will open. On the left side of the window, select Merge Field. It is veryimportant that in the “Field Name” section you enter the EXACT description of the data piecethat is pre-automated from Bounds (see descriptions list below). Click OK to finish adding themerge field.In this example, I am automating the letter to populate provider information when the letter isdownloaded.32
USER GUIDESave the for
Welcome to BOUNDS! In this manual, we will introduce you to the BOUNDS system and the different abilities within the system. The manual will show each role and the different functions within that role. At the bottom of every page, there is a footer. The word Support is a link to the suppor