Transcription
The Bug Out Bag GuideEssential SurvivalSkills & TacticsLearn how to survive & thrive - no matter whatmade with
Table of Contents1. 5 BasicSurvival SkillsYou Need WhenBugging Out2. Learn To BuildShelter For AnySurvival Situation3. Learn How ToHarvest WaterFrom NaturalSources4. 6 Ways ToMake FireWithout Matches5. What IsBushcraft:Survival Skills,Tools, & How ToLearn6. BushcraftSkills: Foragingfor food7. Learn TheseMap ReadingSkills To NeverGet Lost Again8. How ToPredict TheWeather In TheWilderness9. Want More?
5 Basic Survival Skills YouNeed When Bugging Outby Chris RuizAs we mentioned in our How to Make a Bug Out Plan post, the more skills youhave, the more self reliant you are and the higher your chances for survivalbecome. Here we are going to discuss some basic survival skills and teach you howto best utilize them to protect yourself and your loved ones when disaster strikes.Basic Survival SkillsWhen you are out on your own without the support net of a healthy society, theseare the traits and basic survival skills you need to master in order to succeed.1. Positive Mental AttitudeThis is actually more important than any of the other basic survival skills becausewhen you are relying on your ability to wring survival from your surroundings, onceyou give up hope you are done. There are many amazing stories of people whohave survived avalanches, fires, floods, and being isolated for extended periods andmaking it through thanks to an undying will to survive. They are ordinary people
who would simply not quit. Keeping a positive mental attitude will give you thestrength to never give up on yourself no matter the circumstances.Some ways to instill this mentality are:Set goals for yourself - These may be daily or even hourly goals such as makingit to the next hilltop or obtaining a meal from your surroundings. Make surethey are achievable and objective based. Every goal you accomplish will be apsychological boost for you and will build confidence in your basic survivalskills.Focus on what you can change - If a major disaster has struck, focusing on theunfairness of the resulting situation or the loss that has occurred will not helpyou. However, focusing on building a shelter or staying dry will help immensely.Concentrating your efforts to make your situation better will help you both inthe long and short term. Ignore the big picture and focus on improving yourimmediate situation.Keep hydrated and nourished - This will give you the energy to persevere in theface of adversity. A steady water and food supply are extremely important. Youwill not be looking to feast daily but meeting your basic calorie and hydrationneeds will be enough to keep you going. 2400-3600 Calories per day is a goodamount to aim for. Additionally, if this requirement is squared away it will allowyou to focus more on recovery efforts or finding help.Be outwardly positive - Positivity creates more positivity. Showing fellowsurvivors that you are with that you have a positive mental attitude will preventthe group being dragged down under the weight of the disaster. Be the seedthat grows into higher morale for your team.2. WaterBeyond your own internal fortitude, water is the most important resource yourequire. Finding it and knowing how to make it fit for consumption are two of ofthe most important basic survival skills you can learn.Know how to look for signs of water. This may be looking where plants aregrowing, where terrain slopes or contours into a natural water trap, or observinganimal movements to see where they are finding their water supply.If you are able to map a route as a part of your Bug Out Plan, identifying likelysources for water along the way will be a massive boon.Understand how to treat water to make it fit for consumption. Drinkingcontaminated water can be deadly.Filtration - this consists of passing water through very fine membranes to
remove particles and some pathogens. Some viruses may still make it througheven the finest filters available.Purification - treating water with either chemicals such as iodine or UV lightsources. This neutralizes all pathogens but does not eliminate particles.Boiling - This is a type of purification as it kills all pathogens but does notremove particles. Water should be kept at a rolling boil for at least 1 minute tosterilize it.Because of the separate benefits of both filtration and purification it isrecommended that you use both methods to be 100% sure of water safety. Themost basic way to do this is to pour water through a cloth and then boil it.However a more effective approach is to pass it through a filter device such asthe MSR MiniWorks EX Microfilter and then purify it using tablets or a SteriPen.These items should be considered mandatory requirements for any list of BugOut Bag Essentials.Be able to exploit rainfall if possible. This may include catching it in a poncho orcontainer if available.Utilize a Solar Still - This can be purchased here or fashioned out of yoursurvival gear. A Solar Still uses the sun's heat to evaporate liquid and thenrecapture it as clean water.Understand how much water you need - A person can survive 72 hours withoutwater. It is however recommended that someone who is active consumes 75%of their weight in ounces daily. So if you weigh 150 lbs then you should bedrinking about 113 ounces (3.31 liters) of water per day.A Home Made Solar Still3. FoodHiking with your Bug Out Bag loaded with essential survival gear will cause youto burn 400-500 calories in an hour. To keep your body working as an efficientmachine it is important to keep it fueled up.First off, ration what food you have with you. You are concentrating on survival,not feasting. Eat small portions when you are hungry but do not over do it.
Supplement your rations with foraged sustenance from your surroundings. Thismeans you will need to learn what edible plants are around and how to harvestthem. Also learn where these plants grow. Does a particular berry grow aroundwater holes? Does a high calorie plant prefer the shade? Learn these aspects tounderstand where to look for sustenance. Some plants are only edible aftercooking or boiling, learn what you need to do with your local flora to make itpalatable. Additionally, learn what is hazardous or poisonous to eat to avoidmaking yourself sick!Understand what types of animals inhabit your area. This includes possiblepredators to avoid and prey to seek out. Learn what environments theseanimals inhabit. Is there a particular fish that likes eddies and whirlpools? Targetthese spots to find them. Does an animal in your area like to eat a particularplant? Placing snares in the vicinity of these plants would be ideal. If you do notknow how to operate a firearm, a sling shot may be a good option for you.There are many options for sling shots, you can purchase one here or learn howto make one here. Also learn how to prepare these animals for cooking. Thisincludes skinning and butchering animals and filleting fish.4. ShelterA well prepared person will have a means of sheltering themselves from theelements as a part of their Bug Out Contents List. However, a TOTALLY preparedperson will also have learned survival shelter building as one of their basic survivalskills. A survival shelter does not need to be complicated or fancy but it shouldkeep rain/snow out, keep heat inside, and be easily cobbled together from localmaterials.A survival shelter can be built from most anything - debris from collapsedbuildings, trees and leaves, animal hides, or a tarp or ponchoConsider bringing paracord and a saw or hatchet when building your Bug OutBag Contents List as these can be your best friends when building a shelter.With these items you can make a survival shelter out of just about anything invery little time.If you do not have paracord, zip ties, duct tape, or another binding material,primitive rope can be improvised from strips of tree bark, small green saplings orbranches, and vines.A basic survival shelter could consist of building a frame from long rigidmaterials such as tree branches or 2x4's and laying a poncho or tarp over it.If you cannot use your poncho or tarp for this, layer brush on to the framesloping away towards the ground to insulate for warmth and keep moisture out.
See the picture below for a general idea of this.5. FireFire can provide many things when in a survival situation and both building andmaintaining one are essential basic survival skills. A fire will give a morale boost,provide heat and light, and enable you to purify water and cook foodThe basic requirements to build any fire are to give it air, fuel, and an ignitionsource.Air - A fire consumes air hungrily and it is important to build it in a way thatallows air to flow into the combustion. Do not smother a fire by putting toomuch fuel onto it.Fuel - This is what actually burns in a fire and can be sourced from many places.If a branch or stick snaps cleanly it is dry and will burn well. If it bends andsplinters it is still green and will smoke and smother a fire.Ignition Source - this can be a lighter, matches, or a fire starter that you bringwith you. You should however learn more primitive means of fire starting as oneof your basic survival skills in the event that these items cannot be sourced. Seethe video below for one simple method.A fire is build in successive layers of increasingly larger wood. You start withtinder, which is very small, dry, and catches easily. Examples of tinder are treebark, dryer lint, coconut husk, and pine needles. From tinder you go up tokindling which is generally twigs up to the diameter of your little finger. Next isfuel wood which is in sizes up to your thumb. Continue to add more woodgradually until you have a fire large enough to ignite logs. These logs are whatwill produce the majority of your coals in a fire pit.The opposite technique is to build what is known as an "Upside Down Fire" Thishas large logs at the bottom and tapers to fuel wood, kindling, and then tinderat the top. An upside down fire allows you to build your cooking fire and thenlet it burn down without having to babysit it and can be great in makky outdoorssituation. Check out my in-depth instructional guide to learn how to build anUpside Down Fire here.Learn how to use a fire to cook food. Coals are a far better method of cookingfood than a naked flame. Coals will produce a more even heat and allow you tocontrol the rate at which your food cooks, rather than having some parts searedwith the inside raw. A naked flame is however better at boiling water.The most commonly used types of fires are called a Teepee and a Log Cabin,which are pictured below.A Dakota Fire Pit is another type that is less widely used than these but more
efficient. See the image below for how a Dakota Fire Pit works.Basic Survival Skills: Dakota Fire PitConclusionThere is no doubt that learning basic survival skills will significantly increase yourchances of success. Putting in some time now to teach yourself these basic survivalskills will make you better prepared and help you provide for yourself and yourfamily when disaster strikes. As with your bug out bag contents or bug out plan,you should tailor your survival skill set to match your environment. To learn whatyou need to master in order to survive in a cold weather setting have a look at ourarticle on cold weather survival tips. We mentioned several survival tools in thisarticle that partnered with your skills will make your struggle far less dauntingincluding paracord, a hatchet, saw, and fire starter. To see how these items willaffect your overall survival kit and see what other items you can add to your BugOut Bag list, check out our Free Bug Out Bag Planning Tool . Remember, chancefavors the well prepared.
Learn To Build Shelter ForAny Survival Situationby Chris RuizSummer's rightaround the corner, and for many people that means getting back to the greatoutdoors, whether it be for a day hike or a weekend camping trip. This summer,take advantage of your time outdoors to practice the invaluable skill of buildingsurvival shelter. That's right, you need to step out of your comfort zone, leave yourfour-person tent and goose-down sleeping bag, and try to construct adequateshelter with only the items that would be available to you in a disaster scenario.It's the perfect time because if something does go wrong, you can always retreatback into your tent and try again the next night. The summer camping monthsprovide the perfect opportunity to hone your survival shelter skills; however, keepin mind that when the need arises to bug out, you won't have the luxury ofchoosing what time of year it is. Practice building survival shelters year-round,especially if you live in a four-season climate where summer and winter presentdrastically different survival scenarios.Why Learn to Build a Survival ShelterFood, water, shelter - the essential elements of survival. Shelter can protect you
from the elements and wildlife, as well as keep you warm or dry; findingappropriate shelter can literally mean the difference between living and dying in asurvival situation. No matter what your circumstances, you want to be sure you canprepare suitable survival shelter for you and your loved ones.Your shelterdoesn't have to be fancy - it just needs to keep you warm and dry.Possible situations that may require impromptu or planned shelter include buggingout, get-home scenarios, getting lost while hiking or exploring, tending to aninjured person while hiking or exploring, or getting caught in a storm. Dependingon your situation, your survival shelter needs may differ.For instance, in a get-home scenario you may only need short-term shelter for afew hours or a night, whereas when bugging out you may be indefinitely on yourown. The need for building a lean-to can arise when you least expect it, so learnhow to build a survival shelter in a number of different locales and with differentresources.Choosing the Best Location for Your SurvivalShelterChoosing the best location for building your survival shelter will be dependent onhow long you intend to be using it - needs for short-term shelter will differ fromthose required for long-term shelter.
Takeadvantage of the landscape when building a survival shelter.When searching for immediate, short-term shelter, look for trees (especially fallentrees), rocky overhangs, and caves. Trees are an obvious source of shelter and havemany useful parts for building shelter including the trunk - which can be used as asupport, the branches - which can be used as framework, and foliage - which canbe used as insulating material.Rocky overhangs and caves make excellent areas to take cover but depending onyour locale or the time of year, may not be an option. Don't panic, whether you'restranded in desert terrain or it's the middle of winter, you can still put together aneffective survival shelter.In desert terrain with little to no trees, consider using the slope of the land to seekprotection and the steep side of a dune for shelter - keep in mind that the gradualside indicates the direction the prevailing wind is coming from and therefore thesteep side will provide natural refuge.If it's the middle of winter and all available building supplies are frozen or buriedunder snow, remember that snow will have the same insulating effect as a stickbuilt shelter. For more cold weather survival tips, CLICK HERE. Additionally, alwaysseek out shelter where the ground is dry. If it is raining, waterways may overflowtheir banks and ravines, and washes may form.If you're in it for the long haul, you will need to consider substantially more factorsthan sheltering for the short-term. When searching for long-term shelter, look forareas in proximity to water and food sources as well as civilization (if applicable),
and for an area that provides adequate visibility for you to see what's happeningaround you and for others to see you. In some case, staying hidden may be morebeneficial to your survival.Types of Survival SheltersSimple Frame and Tarp MethodIf you happen to have the good fortune of having supplies with you (outbackpacking or have bug-out gear) you may be in possession of a tarp that can beused in conjunction with a simple frame to create shelter for the night. To create aframe, lean poles against a lower branch or tree trunk in a manner that will fitunder your tarp.Make sure to remove any sharp edges from the wood or wrap leaves at the cornersto ensure you don't puncture the tarp. If you happen to be lucky enough to havecordage with you, tie it at an angle between two trees and drape your tarp overtop, placing rocks on the sides to hold the tarp in place.In an emergency, you can forgo the frame and simply wrap yourself and your gearin a poncho and huddle amongst the crook of a tree or other sheltered spot untilmorning.A tarp makesan excellent short-term shelter but you may need to upgrade eventually.
Simple Body Heat ShelterThis shelter is fairly straight forward and easy to build - it is useful for short-term orunexpected situations and can comfortably accommodate one, possibly two,people.To build a simple body heat shelter, use debris from the ground such as dirt, leaves,and twigs, to create a mound and use larger sticks to frame it. Clear a hole just bigenough to crawl into and cover the opening to block air flow and limit the openspace. Your body heat will be trapped inside the shelter, keeping you warmthroughout the night.If you are seeking shelter in the winter and the ground is covered in snow, use thesnow to build your mound. Even though the snow is cold, it will still serve thepurpose of insulating you from the elements outside and trapping your body heat.Shelteringunder the snow will insulate you from the cold and preserve your body heat.Open Shelter or Lean-ToThe benefits of an open shelter or lean-to are that it offers extra protection againstthe elements such as wind and rain, and can accommodate up to four people (for atypical lean-to, however they can be constructed as large as resources allow).
We built this lean-to using two tripods instead of trees for support. Zip ties madequick work of building the grid.Depending on the supply of materials available, the construction can takeanywhere from two to five hours. Start by looking for downed trees that havebranches low enough to support the topmost point, known as the ridgepole. If youonly locate one tree, use it as the ridgepole - lashing in place if necessary - but ifyou locate two downed trees near one another, lay a sturdy branch between them.Gather approximately five to six poles to lean against the ridgepole at roughly a 4560 degree angle, enough to create a comfortable space to fit your team and gearunderneath. This will serve as your grid. To create the grid frame, attach 5 to 6poles across the frame. Weave flexible boughs between poles at right angles andthen use bark or leafy branches to thatch the roof, starting from the bottom andmoving upwards.
Use the grid to weave foliage to create a weather barrier.You can add additional walls for further protection using the same method. Shouldyou be lucky enough to have a tarp or mylar survival blanket, you can hang it fromthe opening to act as a curtain.A-Frame ShelterThe A-Frame shelter is constructed in much the same way as the lean-to, the onlydifference is that the ridgepole starts on the ground and extends up into tree,lashed at a height that allows enough space to sit underneath. In this way, twosides are constructed to create the A-frame shape, providing additional protectionfrom weather or cold temperatures. For added warmth, locate your fire pit near theopening.
Square lashings are used throughout the A-frame shelter.Side view of square lashing.Teepee VariationsA teepee can stand alone or be built around the slender trunk of a tree. In somecases, it may be easier to use a slim tree as your center support, lashing polesaround it to create a cone-shaped shelter, which will provide a sturdy frame, butalso limit your interior space.It's up to you whether you choose to completely enclose the exterior and create anopening in the top for ventilation or keep the top secure from rain and leave an
open doorway. Always make sure you account for ventilation, especially if youintend on building a small fire inside.For stand alone teepees, start with three long straight poles and use a tripodlashing to join them. Try to locate a long pole with a Y-shaped joint at one end. Thiswill provide the frame with stability as the next pole can rest within the Y-shape.To build the teepee, continually add pairs of similar sized poles and join themtogether at the top, leaving the base wide enough to curl up in and tall enough tosit comfortably.This technique can be the framework for a teepee or provide ridgepole support forbuilding a lean-to.Once the frame is constructed, fill in the gaps using whatever materials areavailable to you including leafy branches, vines, mud and grass. Work your way upfrom the bottom - as you would with roofing tiles - so that the rain will drip downthe overlapping layers instead of into your teepee.Subterranean Survival Shelter
Thisfallen tree can provide adequate shelter - just watch out for critters!For short-term shelter, a subterranean survival shelter can simply be hollowed outof a mound of earth, creating a warm place to sleep. An optimal location is the rootbase of fallen trees, as the roots provide structure and prevent caving in.For a longer-term shelter, substantial planning and effort will be required. A longterm subterranean survival shelter is something you would build in preparation forwhen SHTF, as opposed to building in the aftermath while bugging out. Those whochoose to build a long-term subterranean survival shelter either build one on theirproperty or an offsite location. Designs can range from simple cellar-style rooms tocomplex homes that are fully outfitted with a power supply, furnished withnecessities and comfort items, and have functioning defense systems.Long-Term Log CabinIf a crisis or disaster situation truly descends into chaos and it's TEOTWAWKI (theend of the world as we know it), you may find yourself in the position where youneed to build a solid and dependable home using only what the land provides.Obviously, this type of survival shelter requires a tremendous amount of time,resources and energy - therefore it'll save you time and aggravation to learn thebasics beforehand.
If you arepermanently relocating, a log cabin may be the way to go.A long-term log cabin is built using a similar method as Lincoln Logs you may haveplayed with as a child; the general idea is to lay a frame of logs that interlock at thecorners to form a rectangle. Before beginning, you will need to clear the ground ofgrass, level it, and top it with a layer of gravel for drainage. Locate large rocks thatcan serve as stilts to keep your cabin off the ground and place them at all fourcorners as well as every three to four feet.After the rocks are placed, locate the base layer of logs, the sill logs, which willneed to be larger than those used for the walls - about 12 inches in diameter. Oncethe sill logs are in place, you can add floorboards or skip ahead to building up thewalls.
This notching pattern will help shed water away from the joints.For the walls, look for trees that are seven to ten inches in diameter and cut themto fit the dimensions of your floor plan. To prepare the logs for the walls, flattenthe top and bottom so that they sit flush and notch the ends to interlock them andform a sturdy corner - additionally, cutting a notch in the top log only will avoidpooling water in the joints while in wetter climates.Once you reach your desired wall height, begin using logs in diminishing lengths oneither end to create the peak. Notch and lay two long logs perpendicular across thelength of the cabin to act as supports for the roof. Depending on the items youhave available in terms of tools and lumber, you can construct your roof with splitlogs, cut shingles, or sod.Survival Supplies Beneficial to Have on HandUndoubtedly, you've included tools and materials in both your bug-out and gethome bags that will lend themselves to building shelter; however, it's important toconsider what tools are must-haves if an unexpected need to shelter arises, such asduring a hiking or backpacking expedition.To ensure you have the proper tools, take inventory of the various tasks you willneed to perform when building shelter such as cutting, de-branching, notching,
lashing, digging, and weaving. Consider what tools could help with these tasks (andall the better if one tool can address several tasks) and make sure they are in yourLearn How To Harvest WaterFrom Natural Sourcesbug-out and get-home bags as well as on your person while you're out exploring.Here is our list of the top survival supplies that are crucial to have on-hand whenbuilding survival shelter:byChris RuizWildernessPrecautionsNo matter where you choose to set up shelter, always be cognizant of what wildlifemay be around. If you've found a great location, you are no doubt not the first tohave discovered it, so make sure to survey the land for wildlife such as snakes inleaf piles or under fallen trees.To stir up any creatures that may be hiding in brush or bushes, use a stick to prodthe area before proceeding with your hands. Additionally, store any food you havetied up high in a tree to avoid attracting unwanted critters to your dwelling.In terms of the wilderness itself, avoid any foliage that has a chalky whiteappearance as this is a mold that could spread through your shelter and impactyour health. Also, if a tree contains a lot of 'lacey' leaves, that indicates it isprobably infested with insects and best to be avoided. For more information onplants and foraging, CLICK HERE.ConclusionImagine, your mind a complete fog, your body unable to lift itself due to extremeNowthat andyou nauseahave thebasicskills necessaryto canplanbarelyand buildyourshelter,thedizziness,andcrampingso bad youmove.Thisis whatnextsteptois yourto getbodyoutsidegetpracticing!While techniquessuch asweavinghappensafterandonlythreedays withoutwater - it's calleddehydration.and lashingcan beandpracticedyourbackyard,when ofit comesbuildingWhilesymptomsseverityincanvary,the without waterareshelter,slim. there's no substitute for the real deal. As you'repracticing, make sure to take note of pertinent factors such how long it takes youIn civilizedsociety, droughtsare thoughtof moreas an inconvenienceatogather materialsand constructyour shelter- knowingthis timing canthanbe lifethreat;however,in a disasterscenario, the threat of a drought - especially in timessaving ina real disasterscenario.of extreme heat - becomes much more real when clean drinking water is a scarceBecreative, be resourceful, and most of all - have fun!resource.No matter how thorough your prepping, there is a limit to the amount of water youare able to store. In a long-term survival situation, sooner or later, you'll need tofind a natural water source suitable for drinking. The good news is, even in thedriest of times, there are always ways of harvesting water both above and belowthe ground.
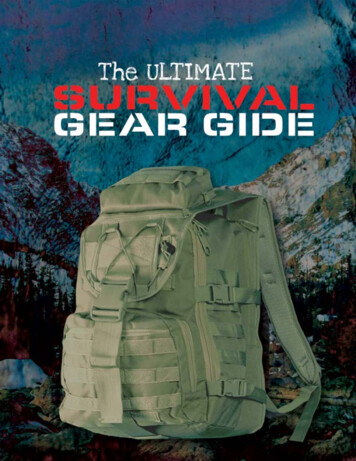
In this article, we're going to take you through the various methods you can use toharvest water in the wild, teach you to identify and find signs of water, and showyou ways to purify harvested water so it's suitable for drinking.3 Key Methods for Harvesting WaterWhen the pipes run dry, will you be able to harvest water from natural sources?Solar StillA great way to extract water straight from the ground is by using a solar still. Tobuild one, you will need the following:Collection bucket (this can be any type of wide-brimmed container to collect thewater; basically, anything water-tight. In a pinch, even a plastic bag will work, aslong as it can be secured so it will not tip and spill the water)Large sheet of plasticRocksLong straw (optional)Once you've collected your items, choose a sunny spot and dig a wide hole; at thebase of the hole, dig a fitted spot large enough for your collection bucket to rest in.If there is any leafy, green vegetation around, place it in the hole around theopening of the bucket; this will enhance your water collection rate by drawingmoisture from the plants as well as the air.Next, lay the sheet of plastic over the top of the hole and use your rocks to secureit firmly in place. Place a small stone in the center of the plastic to create a low-
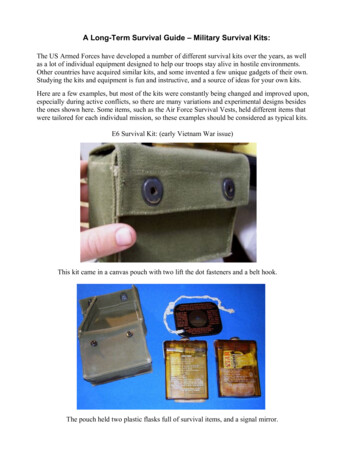
joint point, just above the top of the bucket to allow condensation to collect anddrip into the bucket. Even in the desert, a solar still can collect up to a quart ofwater per day. To access the water without disturbing your still, use a long straw orpiece of tubing.Solar Still Design. Make sure the plastic sheet overlaps the edge of the holeenough to lay the rocks.RainwaterAlthough water falling from the sky may seem like a lottery win to someonesuffering from dehydration, be aware that rainwater is not technically safe fordrinking due to pollutants in the air (such as arsenic) that make their way into therainwater. There are ways to purify this polluted water to make it safe for drinking;several strategies are discussed later in this article.If you are in the wilderness, collecting rainwater is as simple as setting up as manycontainers as you can. Be sure to place your containers in unobscured locations inorder to obtain rainwater directly from the sky, and not water that has dripped offplants.
Water dripping off plants can contain debris and pollutants, so collect rain awayfrom foliage.Harvesting rainwater from your home is accomplished by setting up rain barrelsbelow your roof gutters to catch the runoff. However, be aware that in addition topollutants, water from ro
Survival Situation 3.Learn How To Harvest Water From Natural Sources 4.6 Ways To Make Fire Without Matches 5.What Is Bushcraft: Survival Skills, Tools, & How To Learn 6.Bushcraft Skills: Foraging for food 7.Learn These Map Reading Skills To Never Get Lost Again 8.How To Predict The Weather In The