Transcription
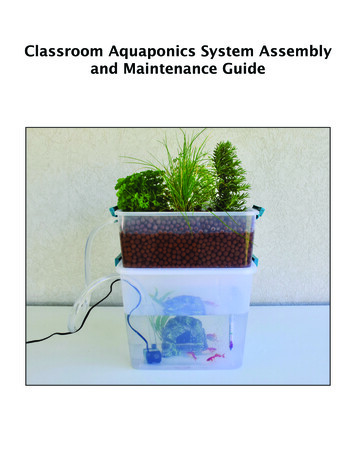
Classroom Aquaponics System Assemblyand Maintenance Guide
Table of ContentsMaterials.3-4Assembly Instructions.5-9De-chlorination Procedures.10Initial Cycle Instructions.11-12System Maintenance Instructions.13References.142
MaterialsAssembly Materials: 12-14 quart clear storage tub (approximately 17”L x 12”W x 6”D)* 20-24 quart clear storage tub with lid (approximately 17”L x 12”W x 10”D)* Measuring tape Drill or drill press 1” spade drill bit 3/4” spade drill bit 1/4” spade drill bit Swamp Cooler Overflow Drain Kit* (This is a seasonal/regional item. If it cannot be found at yourlocal hardware store, it can be purchased online.)a. 1/2” MPT threaded overflow pipe with hex headb. Rubber washerc. 3/4” nylon nutd. Nylon drain with 3/4” garden hose threads on outside and 1/2” FPT threads on inside 40-90 gal/hr submersible fountain pump* Flexible tubing *(to fit the submersible fountain pump discharge opening) De-chlorinated water, approximately 15 quarts (see De-chlorination Procedure on page 9) Plastic cup, jar, or bottle, approximately 3” wide and 5” tall* Expanded clay pellets, 10 quarts* 10-1/2” Brooder clamp light with porcelain ceramic socket* 42 watt twist CFL daylight high wattage light bulb with medium base* Timer (for the light)*3
De-chlorination Materials: Tap water conditionerInitial Cycle and Maintenance Materials: Ammonium chloride* Freshwater aquarium water test kit that measures pH, ammonia, nitrite, and nitrate* Aquarium thermometer* Goldfish, 5-7 adult fish Fish food (goldfish flakes) Aquarium fish net* Aquarium fish cave* 5 small seedling plants (basil or other small herbs, lettuces, or any other small plant that tolerateswet soil well)*These items are included in the Classroom Aquaponics Kit, which is available for purchase fromagclassroomstore.com.4
Assembly Instructions1. Assemble all materials and tools. The Classroom Aquaponics Instructional Video is available athttps://www.youtube.com/watch?v PF-HSttrLME&feature youtu.be2. Using the drill and 1” spade bit, drill a 1” hole in the bottom of the 12-quart storage tub, 3 inchesaway from the sides of the tub.3. Drill a matching 1” hole in the lid of the 20-quart storage tub, such that the holes line up exactlywhen the 12-quart tub is nested on top of the lid. These holes are for the drain tube that willallow water to drain from the grow bed to the fish tank.5
4. Drill a 3/4” hole approximately 1/2” from the edge of the lid or at the top of the front side of the20-quart tub. This hole is for adding fish food.5. Drill a 1” hole near the top of one side of the 20-quart storage tub. This hole is for thepump cord and the water tube.6. Drill a 3/4” hole near the top of one side of the 12-quart storage tub. This hole is for thewater tube and must be located above the level of the drain tube.6
7. Install the swamp cooler overflow drain tube:a. Set the 12-quart tub on top of the 20-quart tub lid so that the 1” holes line up.b. Slide the rubber washer onto the threads of the nylon drain from the Swamp CoolerOverflow Drain Kit.c. Thread the nylon drain through both 1” holes, and lightly hand tighten. The drainshould now extend through the bottom of the 12-quart tub and through the lid of the20-quart tub.d. Thread the nylon nut onto the end of the nylon drain and hand tighten securely. Do notovertighten, as the nylon nut will deform and break.e. Thread the 1/2” overflow pipe into the inside threads of the nylon drain and handtighten securely.f. You should now have a drain tube that sticks up inside the 12-quart tub and a drainthrough the bottom of the tub and the lid below into the 20-quart tub.8. Install the pump.a. Place the water pump inside the 20-quart tub, either on one side near the bottom oron the bottom. Use the suction cups to attach it to the tub.b. Thread the pump power cord through the 1” hole next to the water tube.c. Thread the flexible water tube through the hole in the side of the 20-quart tub next tothe pump power cord. Then thread the tube through the hole in the side of the12-quart tub. The tube should extend about 3-4” into the 12-quart tub and about 6-8”into the 20-quart tub when they are stacked on top of each other.d. Push the small plastic outlet sleeve into the outlet of the pump.e. Slide the water tube snugly over the outlet sleeve.f. Turn the pump flow adjustment all the way up.7
9.Fill the 20-quart tub about 3/4 of the way full of de-chlorinated water (approximately 15 quarts;see De-chlorination Procedure on page 9).10. Set the upper tub/lid assembly on top of the 20-quart tub.11. Plug in the pump, and verify that water is flowing from the bottom tub into the top tub with no leaksor spills. The upper tub should fill up to the top of the drain pipe, and then drain through the pipeback into the bottom tub.12. Construct the drain cover.a. In order to prevent the drain from becoming clogged with clay pellets, plant roots, orother items, construct a drain cover. The cover can consist of any plastic cup-shapedobject that is tall enough to leave at least a 1/2” space between the cover and thetop of the drain tube when it is inverted over the drain tube. Soda bottles with the topcut off, plastic mayonnaise jars, or plastic cups are all good candidates.b. To construct the drain cover, simply obtain a cup-shaped object that leaves at least1/2” of head room between the top of the drain and the cover. Drill several 1/4” holesaround the rim of the cover so that water can flow inside when it is inverted over thetop of the drain tube.c. Place the drain cover over the top of the drain.8
13. Rinse the clay pellets to remove any clay dust. With the drain cover in place, add clay pellets to the12-quart tub until it is nearly full (about 10 quarts of clay pellets).14. Plug the grow light into the timer. Set the timer so that the light is on for 16 hours during the dayand off for 8 hours at night. Place the system underneath the grow light so that the light reachesthe grow bed evenly. Keep the bottom tub (where the fish will be located) in the shade tolimit algae growth.15. Congratulations! You’ve constructed an aquaponics system! Now follow the instructions to run aninitial cycle before adding fish and plants.9
De-chlorination Procedures1. Determine whether your municipal water provider uses chloramine in the municipal water supply.Most small municipalities do not use chloramine, but many larger municipalities do.2. If your water provider does not use chloramine, simply allow the water to sit in a container for aminimum of 24 hours, allowing the chlorine gas to off-gas.3. If your water provider does use chloramine, purchase a tap water conditioner from any store thatsells aquarium supplies. Follow the directions on the package to de-chlorinate the water.4. If you are not able to determine whether your municipal water provider uses chloramine, err on theside of caution and follow Step 3 above.(Stewardson, 2016)10
Initial Cycle InstructionsThe initial cycle of an aquaponics system is very important. During this time, several importantbiochemical reactions (collectively known as “nitrification”) begin, which prime the environment for fish,bacteria, and plants to survive and thrive. Introducing contaminants or “bad” bacteria during this stagecan have potentially catastrophic effects.The initial cycle consists of three major phases. First, ammonia is introduced into the system byartificially adding ammonium chloride. During this phase, the nitrogen compounds in the system changeform between “free” ammonia and ammonium, and vice versa. Free ammonia is extremely toxic to fish,while ammonium is relatively harmless. The higher the pH in the system, the higher the concentration ofthe toxic ammonia. Thus, it is important to closely monitor pH as well as the ammonia levels.In the second phase, the ammonia (including both types) attracts nitrosomonas bacteria, which feed onthe ammonia and convert it into nitrite. Nitrite is also extremely toxic to fish, behaving like carbonmonoxide for humans. It is critical to watch for nitrite levels that are too high.During the third phrase, nitrite attracts nitrospira bacteria, which feed on the nitrite and convert it tonitrate. Nitrate is harmless to fish and very beneficial to plants. Plants can efficiently absorb the nitrogenfrom nitrates.1. Ensure that the water in the system is clean and has been de-chlorinated (see De-chlorinationProcedures on page 9).2. Ensure that the water is being cycled through the system by the pump.3. Add ammonia to the system a drop or two at a time, testing after each addition, until you get areading between 2 and 4 parts per million (ppm). If you exceed 6 ppm, just drain some of the waterfrom the system and replace it with fresh water. (Note: If you’ve added ammonia but are getting azero reading, you may have added too much ammonia and overwhelmed the test. Exchange someof the water for fresh water and repeat until you get a good reading.)4. Test and record ammonia, pH, nitrite, and nitrate levels DAILY until the system is fully cycled.a. Temperature: A temperature reading between 77 and 84 F will promote goodbacterial growth.b. pH: Try to keep the pH level in the range of 7.0–7.2. If you need to adjust the pH ofthe system, use a commercially available pH adjuster, which can be purchased at anystore which sells aquarium supplies.c. Ammonia: If ammonia drops below below 2–4 ppm (Good news! Bacteria areworking!), add more until you get back to that level.d. Nitrite: Once you see nitrites (you won’t initially), start checking for nitrates as well.e. Nitrate: At some point after the nitrite spike, you should see a nitrate spike. After thenitrate spike, look for ammonia and nitrite levels to drop.5. Once ammonia and nitrite levels have both dropped to 0.5 ppm or less, the system is ready toaccept fish and plants. At this point, you no longer need to add ammonia as the fish will produceenough.6. Add fish as you would for any aquarium:a. Add 5-7 adult fish to the system.11
b.c.d.7. Add plants:a.b.Place bag containing fish from the pet store in the water, and allow the temperature toequalize (approximately 15-30 minutes).Add approximately 1 cup of aquarium water to the bag, reseal, and allow to floatagain for 10 minutes.Repeat the previous step until the bag is full, then use a net to transfer the fish fromthe bag to the aquarium.Clean any soil from the root systems of the seedlings to prevent contaminants fromentering the aquaponics system.Gently nestle the roots of the seedlings in the clay pellets until the roots arecompletely covered in the moist pellets.12
System Maintenance Instructions1. Maintain the water temperature between 77 and 84 F. Depending on the preferences of your fishspecies, you may need to adjust up or down.2. Feed fish 2-3 times per day. At each feeding, give the fish no more food than they can consume in2 1/2 minutes. Fish should be fine without feedings over the weekend.3. Check water chemistry at least once per week. With fish and plants in the system, the chemicallevels should be maintained as follows:a. pH – between 7.0 and 7.2b. Ammonia – less than 0.25 ppm (if higher, do a 20% water exchange)c. Nitrite – less than 5 ppm (any higher and you should do a 20% water exchange)4. Monitor the water level. The bottom tub should be about 1/2 to 3/4 full.13
ReferencesBernstein, S. (2015). How to start an aquaponics system: Part 2. Retrieved from wardson, G. A. (2016). Standard operating procedure for Technology and Engineering Education’saquaponics system. Unpublished manuscript, Utah State University, Logan, UT.14
Jun 11, 2018 · The initial cycle of an aquaponics system is very important. During this time, several important biochemical reactions (collectively known as “nitrification”) begin, which prime the environment for fish, bacteria, and plants to survive and thrive. Int
