Transcription
Aquaponic SystemManual Copyright 1999-2005 by CropKing.com Inc., Lodi, OhioAll rights reserved. No part of this publication may be reproduced, stored in a retrievalsystem or transmitted in any form or by any means, electronic, mechanical, scanning,photocopying, recording or otherwise, without the prior written permission ofCropKing.com Inc.
Congratulations on your purchase of The Aquaponic System by CropKing!You’ll be pleased to know that every component in your system has been thoroughlytested and is made with the highest grade, professional quality materials. Your entireAquaponic System has been pre-assembled prior to shipment to ensure the quality andcompleteness of your order. If, however, for some reason there is anything missing whenit arrives, call our Aquaculture Department at the number listed at the end of this manualfor immediate replacement.IMPORTANT: YOU MUST INSPECT YOUR ORDER BEFORE ACCEPTINGDELIVERY FROM THE SHIPPER. NOTE ANY DAMAGE ON THE SHIPPINGRECEIPT. CLAIMS FOR DAMAGE WHILE IN TRANSIT MUST BE MADETHROUGH THE SHIPPING COMPANY.Aquaponic System Manual 2012 CropKing.com Inc.
200 Gallon Aquaponic SystemAquaponic System Manual 2012 CropKing.com Inc.
Section 1AssemblyAquaponic System Manual 2012 CropKing.com Inc.
ASSEMBLY1. Tools: To assemble your Aquaponic System you’ll need a flat head screwdriver, alevel and a pair of pliers.2. Location:a) Your Aquaponic System will occupy a space about 5’ wide and 14’ long. It’s bestto have walking and working space on at least two sides.b) Make sure that the place you select for the Aquaponic System has a floor sturdyenough to hold it. It will have close to 350 gallons of water—that’s about 2600lbs!c) Your plants will need light, so put the plant growing bed (the Aquaponic Tray)near a good source of sunlight, such as next to a broad window or inside agreenhouse. An Aquaponic System set up indoors may need supplementallighting which CropKing can provide. Please refer to the Accessories page at theend of this manual or to our CropKing catalogs for lighting fixtures.d) You’ll want to be within reach of a water source. Refer to the section on Water inOperations for considerations about sources. A nice optional item is the lowprofile automatic float valve (part number FLOV001); it uses a convenient gardenhose fitting to keep the water in your Tank always topped off at the right height.e) One 115V electrical outlet is needed for the high quality air pump included withyour system. You may need more outlets if you’ve purchased a water heater (partnumber AQUHEAT01), additional lighting, etc. as well. The outlet(s) must beproperly grounded; a ground-fault-interrupt (GFI) circuit is stronglyrecommended.Aquaponic System Manual 2012 CropKing.com Inc.
3. Components: Remove all the parts from your Aquaponic System packaging andfamiliarize yourself with the names of the components.Aquaponic TrayCompleted Airlift WaterPump AssemblyTank for rearing fish direction of water return to TankOutflow Assembly Part "A"Outflow Assembly Part "B"Valve Assembly (Gate andBall Valves)Inflow and Outflow HeadersAquaponic System Manual 2012 CropKing.com Inc.
Optional Aquaponic Tray Stand, PlywoodUnderlayment comes with each system.Flow Hood AssemblyInflowAir Pump and StandAir Hose Assembly and Air PumpAquaponic System Manual 2012 CropKing.com Inc.Bulkhead AssembliesOutflow
Air Ring AssemblyAquaponic System Manual 2012 CropKing.com Inc.
4. Assemble Drain and Stand for Fish Tank( Note: If tank will not fit thru your door follow the below directions,otherwise skip to step #5).a) Once you’ve decided where the Tank will be and which way the window will face,gently tip the Tank and Stand onto its side, being careful not to rest the window onthe floor.b) There is a black poly tube attached to a gray barbed elbow in the bottom of the Tank.Using your screwdriver, loosen the stainless steel band clamp that holds the blackpoly pipe on the barbed elbow.c) Observe that there is a gap between the Tank Stand’s supports that is larger than theothers, and that the black poly tubing presently rests in this gap. When the reassembly of this section is completed, the black poly tubing should again rest withinthis larger gap. Remove the tubing and set it and the Stand off to one side.d) Unscrew the retaining ring from the underside of the bulkhead fitting and remove theBarb/Bulkhead Assembly from the drain hole in the Tank. This bulkhead has reversethreads, so turn the retaining ring clockwise to loosen. Note that the rubber gasket islocated on the inside of the tank, not on the under side.e) Make sure that the surfaces on both sides of the Tank hole, the gasket and shouldersof the bulkhead fitting are completely free from all dirt, dust and debris. Anythingcaught on these surfaces will create a leak, requiring draining the tank and doing itover. A few moments invested here really pays off.f) Apply a bead of silicone sealant (included) around the Tank’s drain hole on bothsides. Apply another bead of sealant to the flat side of the rubber gasket, then slidethe gasket onto the Barb/Bulkhead Assembly with the gasket’s flat side against thebulkhead’s shoulder.g) Apply a thin bead of caulk onto the threads of the Barb/Bulkhead Assembly (this willprovide lubrication and help ensure a snug fit).h) Insert the Barb/Bulkhead Assembly down through the Tank’s drain hole and securewith the retaining ring. Make sure the elbow will be pointed towards to AquaponicTray when assembly is complete, and that when the Tank is set upright again that theWindow will be facing in the correct direction.i) Firmly hand tighten the retaining ring. Too much force will squeeze the gasket outfrom under the plastic parts and leave a gap; snug and firm should do it. Remember,it’s reverse threaded, so turn counter clockwise to tighten.Aquaponic System Manual 2012 CropKing.com Inc.
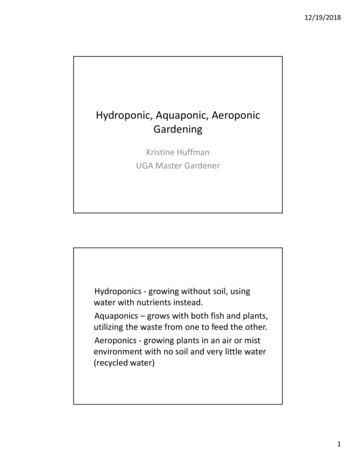
j) Return the Stand back against the bottom of the Tank, inserting the gray barb downthrough the Stand’s center hole and pointing the barb through the widest gap in theStand’s legs.k) Apply a light smear of silicone sealant to the barb and replace the black poly tubing,pushing as far up onto the barb as it will go.l) Secure by tightening the stainless clamp onto black poly tubing over the barb.m) Return the Tank and Stand to their upright position. Should the window seal becomedislodged during this procedure or at any time in the future it can be resealed whencompletely dry using the included silicone sealant.5. Position the Aquaponic Traya) Place the Aquaponic Tray on the assembled optional Aquaponic Tray Stand (partnumber AQUHSTAND), or on another support. If using the specially designedStand, check to ensure that the higher end is closest to the Tank. Regardless of thesupport you use for the Aquaponic Tray, it is important that the plywood supportingthe Tray be level from side to side.b) You can make a support for the Tray by dry assembling 6” hollow block in thepattern in Figure 1, and then putting a sheet of 4’ x 8’x 3/4” plywood on top of thestand. The plywood should have holes cut in both ends to accommodate the pipescoming out of the Aquaponic Tray.Figure 1: Suggested configuration for hollow block support of Aquaponic TrayThe final height of a stand should be about 24 1/2” when level; it should measure 48”wide and 96” long on the outside dimensions. However, ideally, the Aquaponic Trayshould rest about 2 inches higher (no more than three to four inches) at the end closest tothe fish Tank. This is to facilitate gravity-assisted water movement through the Tray, andwill optimize the overall function of the system. Should you decide to incorporate aAquaponic System Manual 2012 CropKing.com Inc.
slope to your Tray stand, the end closest to the fish Tank, including plywood, will need tobe no higher than 27”. It’s OK to carefully trim excess black poly tubing from the DrainAssembly if needed to help it fit under the lower end of the Tray.6. Install the Aquaponic Tray InflowThe Inflow takes the water from the bottom of the fish tank, past the drain and shut offvalves and up through the Aquaponic Tray. It delivers the nutrient-rich fish waterthrough a slotted header pipe.Figure 2: Water flow through Tray and return.a) The end of the Aquaponic Tray you place closest to the fish tank will be the Inflowend. Make sure that both sides of the Inflow hole are completely clean and free fromall dirt and debris. Experience shows that even a small particle under a gasket cancause a leak! Check that the other surfaces are clean as well: the area on both sides ofthe Inflow hole in the Aquaponic Tray and both shoulders of the Inflow BulkheadAssembly.b) Take the rubber gasket off the Inflow BulkheadAssembly. Note that one side of the gasket is flatand the other has a pair of ridges.c) Apply a bead of silicone sealant (included) to theflat shoulder or “lip” of the Inflow BulkheadAssembly.d) Apply a bead of sealant to the underside and thebottom inside of the tray around the drain hole.Figure 3: Apply sealantaround shoulder of Bulkheade) Apply one more bead of sealant to the flat side ofAssemblythe rubber gasket (this is the “up” side). Put theAquaponic System Manual 2012 CropKing.com Inc.
gasket with the ridges facing down over the drain hole (lining up the gasket hole overthe drain hole).f) Insert the Inflow Bulkhead Assembly up through the hole in the Tray and hold it therewhile threading on the retaining ring. The seal should be made snug by only handtightening the retaining ring—too tight will forcibly squish the gasket out of placeand allow water to leak through. If you’re not confident about the seal, we suggestrunning an additional bead of sealant around the edge of the bulkhead where itcontacts the Tray. This would be done at the end of this section.g) Move the fish Tank so that its rim is about 13” from the rim of the Aquaponic Tray.The bottom of the Tank drains through a black poly tube—this tube and the elbow itcomes from should point towards the Aquaponic Tray.h) Lubricate the gray barb of the Valve Assembly by putting a thin bead of siliconesealant around the tip of the barb.i) Slide the Tank’s black poly tubing over the barb as far as it will go.j) Set the Valve Assembly on thefloor—ensure that it will stand flaton the floor without any tendency totwist over to one side.k) Using a screwdriver (or a nutdriver), loosen the upper stainlesssteel band clamp on the ValveAssembly’s black poly tubing.l) Lubricate the tip of the gray barbFigure 4: Installing Valve Assemblycoming down from the InflowBulkhead Assembly with a smear of sealant.m) Push the black tubing up over the barb as far as it will go.n) Move the stainless band clamp over the barb, then tighten.7. Install Aquaponic Tray DrainAquaponic System Manual 2012 CropKing.com Inc.
The Drain allows water from theAquaponic Tray to return to the fish tank.a) Follow steps “a” through “f” inSection 6 for the Drain BulkheadAssembly.b) Place the Drain Header onto the stemof the Drain Bulkhead Assembly andpush gently but firmly down to secureFigure 5: Pressing Drain Header intoin place. (No sealant or glue isDrain Bulkhead Assemblyneeded for this joint.)8. Assemble the Return LineThe Return Line joins the Drain to the Air Lift. It consists of two parts (“Return Line‘A’” and Return Line ‘B’,” which are joined by a rubber Fernco union or “boot.” Theunion is secured in place by tightening 2 stainless band clamps.a) Lay the pieces flat on the floor (so that there will be no twisting in the finalassembly).b) Loosen the stainless steel band clamp on the open end of the rubber boot.c) Connect the two pipes by inserting the end ofthe open pipe into the open end of the rubberboot. Push the pipe in as far as it will go andre-tighten the loose band clamp onto theboot’s indentation.d) Put the completed Return Line under theAquaponic Tray. The end with the blackpoly tubing will go under the Tray’s drainageFigure 6: Assemble Return Lineend.parts on the floor for flatnesse) Lubricate the gray barb of the Drain Bulkhead Assembly with a light bead of siliconesealant going around the barb. Push the black poly tubing over the gray barb until it’sseated as far up as it will go.f) Loosen the stainless band clamp and slide it onto the poly tubing over the barb.Tighten band clamp with the screwdriver until the clamp is securely in place.9. Air Pump StandAquaponic System Manual 2012 CropKing.com Inc.
The Air Pump Stand holds your professional-quality Air Pump and Air Hose Assemblyabove the water level, helps keep the air adjustment valves within easy reach and servesto stabilize the pipes for the returning water flow.a) Your Aquaponic System’s Air Pump Stand comes pre-assembled. One side has analuminum band—this band slides over the top of the Airlift Pipe (the vertical portionof the Return Line). Place the Stand in the gap between the Tank and Tray. Thealuminum band should be about in the middle of this gap.b) Lift the Stand slightly and slide the band down around the Airlift Pipe. This willsecure the Airlift pipe in place.c) Place the legs of the Stand behind the Valve Assembly and Return Line to give easyaccess to the drain and cutoff valves.10. Air SupplyYour Aquaponic System needs air for more than just the fish! The Air Ring for theAquaponic Tray delivers oxygen to the plant roots and to the beneficial bacteria that livein your System’s media.Air is used to move water up through the Airlift Pipe and back into the fish Tank. Airbubbles rising in the fish tank are also used to help direct water flow in a circular pattern,which assists with solids removal. Your Pump is the only moving part in your Systemand it does a lot of work!Figure 7: Layout of the air supply linesAquaponic System Manual 2012 CropKing.com Inc.
a) The Air Ring arrives pre-assembled: just place it in theAquaponic Tray with the vertical section of pipe locatedbetween the wall of the Tray and the Inflow BulkheadAssembly.b) Insert the Inflow Header pipe snugly into the top of theInflow Bulkhead Assembly.c) Place the Air Pump on top of the Air Pump Stand.d) Take the Air Hose Assembly and slip the small stainlesssteel band clamp over the rubber hose. Push the open endof the rubber hose over the barb on the Air Pump.Figure 8: The Air Ring andInflow Header go into the Traye) Orient the Assembly so that the shortest hose points towards the Tank. Tighten thesmall stainless band clamp over hose on the barb of the Air Pump.f) Take the end of the vinyl hose that runs off the tip of the Air Hose Assembly andgently insert it over the black barb near the bottom of the Air Lift pipe. Take care tosupport the bottom of the elbow as you push down; a little smear of silicone sealanton the barb helps to lubricate this. Clamp with a plastic “snap clamp;” use pliers totighten clamp securely in place.g) Insert vinyl tube nearest to the Air Ring onto its barb. Secure with “snap clamp” aswell.h) It may be worth noting here that the vinyl tubing, like each and every component inyour Aquaponic System, has been selected with particular care. In the case of thevinyl tubing, it has extra thick walls to increase durability and reduce kinking. Whatmakes this tubing especially well suited for this application, though, is that it wasmade without lead plasticizers—and that makes it far safer for use in your foodproduction.11. Protein Skimmer and Return FlowExcess protein can be a source of potentially detrimental nitrogen for the fish. If theprotein was not captured while passing through the Aquaponic Tray, it can be induced toform extra-large bubbles in the Airlift pipe. The bubbles formed by the stretchingproteins tend to cling to the walls of the pipes and can be pushed out of the skimmer bythe rising water and other bubbles forming underneath them. The removal of excessnitrogen in the form of protein helps in maintaining good water quality for the fish.Encouraging the formation and removal of these protein “bubbles” is a process known as“protein skimming.”a) The last few pieces simply press into place. The Flow Hood is already bolted ontothe rim of the tank. It should be located near the water return line ("Return FlowAquaponic System Manual 2012 CropKing.com Inc.
Pipe") that comes off the top of the Air Lift. This is also another form of an airliftwater pump. Again, rising air bubbles drive water from the bottom of the Tank upthrough the water column until everything hits the “ceiling” of the Flow Hood.Because of the Hood’s slope, the movement of the air bubbles and rising water isdirected laterally to help create the circular motion of water in your fish Tank. Notewhich way the Flow Hood is sloping: this is the direction you’ll want to aim the flowof water returning from the Tray.b) Next, assemble the water return and skimmer piping: run a light bead of siliconesealant around the short end of the “U” shaped tube that facilitates protein skimming.c) Push the open end of the “U” tube onto the top of the “tee” that will, in a moment, goonto the top of the Airlift Pipe. When the installation is finished, the discharge end ofthe protein skimmer should be aimed into the 5-gallon bucket (included).d) Water re-enters the Tank via the Return Flow Pipe. Put a light smear of siliconesealant on the end of this horizontal pipe. That will aid in smoothing out the actionof adjustment to the “S” that delivers the water back into the Tank.e) There are two elbows that form an “S” shape on the end of the Return Flow Pipe. Putthese two elbows together and place them onto the end of the Return Flow Pipe. This“S” allows the returning water to flow back onto thesurface of the fish tank with a minimum of splashing.Importantly, it also enables you to direct the waterflow to assist in gently spinning the water in yourround Tank. The circular motion of the water movesthe dirt in the tank in towards the center, therebyfacilitating removal of debris through the centerdrain.f)Figure 9: Push Return Flow andSkimmer pipes down onto top ofAirlift pipeFigure 10: Aim water outlet toThe “tee” thatencourage circular flowjoins the “U”shaped tube and the Return Flow Pipe should havea light bead of silicone sealant placed on theinside of the bottom rim.g) Insert the bottom of the “tee” onto the Airlift Pipe;aim the Return Flow Pipe into the fish Tank,keeping the end of the pipe about 5” from theinside edge of the Tank. The “S” should direct thewater along but slightly away from the wall of thetank, as shown above.12. Aquaponic Growing MediaAquaponic System Manual 2012 CropKing.com Inc.
Please read this section through before starting! Your Aquaponic System comes withsubstrate that will hold the roots of your plants in place while they grow. The seedlingswill actually grow their roots right into this media to absorb the nutrients that the fish putinto the water. There are fourteen bags of an inert, expanded clay media calledLecastone. There will be a little dust from emptying these bags into the Aquaponic Tray:we recommend wearing at least a dust mask to prevent inhalation. Four dust masks areincluded in your Aquaponic System kit for this purpose. Bear in mind that once theLecastone has been wetted down it’s no longer awkward to be around.a) Open each bag of Lecastone and pour it into the Tray. Make sure that the Air Ringremains on the bottom of the Tray during this process.b) When all the Lecastone is in, wet down the media by spraying water over the top.This will help eliminate any more dust from spreading. Drag the edge of a flat boardalong the surface to even out the media in the Tray.13. Tank Prepa) Take the blue, cone-shaped drain strainer and thread into drain inside Tank. It isdesigned for preventing the smallest fish from getting caught in the Tank’s drainpipes. When your fish have grown beyond the point at which they could escapethrough the blue strainer, or if you stock with more mature fish, you may wish toremove the strainer or remove some of the bars to make the gaps wider. This willreduce clogging with the larger fecal material and improve flow characteristics.b) Read the notes on “Water Sources” in the Operations chapter, and you may then wishto start filling your system with water. As it fills, check carefully for leaks in each ofthe three bulkhead fittings.c) Fill your Aquaponic System so that water just comes up the edge of the inside shelf inthe Tank, It may require more water to keep good lift and circulation. Even just aquarter inch more may do it, the key is to give the system time to circulate beforeadding more water. ( if the grow tray is not at the right height, this is usually thecause for bad circulation) Refer to the Operations section of this manual aboutadjusting air flow through the valves and let water circulate overnight. You’re donewith Assembly!Aquaponic System Manual 2012 CropKing.com Inc.
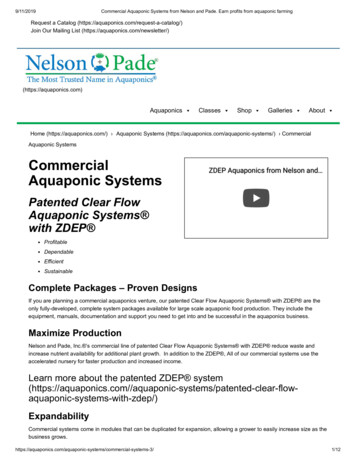
Figure 11: The completed Aquaponic SystemAquaponic System Manual 2012 CropKing.com Inc.
Section 2System OperationAquaponic System Manual 2012 CropKing.com Inc.
OPERATIONSThis part of the manual provides an orientation to the nature of aquaponics and presentsguidelines on how to maintain your system. As you read through this section, just bear inmind that it really boils down just to feeding the fish, replacing fish and plants as neededand monitoring water quality. While no manual could ever hope to cover everycontingency for every individual’s unique situation, details from many years ofexperience are distilled into these next pages to try to give you a feel for the techniquesand particulars of growing aquaponically.I. System BasicsYour Aquaponic System is a complete ecosystem. That’s because you’re setting up anatural balance of animals and plants and the microbial community that links the two.Each one has it’s own role and thrives because it is an integral part of a larger whole.All animals make waste nitrogen in the form of ammonia. It is a metabolic byproductthat comes from the fish eating the food that you give them. The ammonia comes as aliquid and leaches from the solid waste as well. In the case of a closed system, wherethere is no new water constantly flushing the wastes downstream, ammonia can reach ahigh enough concentration to be toxic to the fish if it is not dealt with.Plants need nitrogen for growth of green leaves—in the natural cycle of things animalwaste and decomposing organic matter form the basis which plants can grow on. Thewhole process is mitigated by bacteria, which break down the waste and organics. Inessence, the bacteria change the nutrients into a form that’s better for the plants to utilize.In the Aquaponic System, we combine fish, plants and naturally occurring, beneficialbacteria to complete the circle of Life.The following is a discussion of the main components in your Aquaponic System.1. Bacteria, the keystone to it all:a) How they work for you. There are two naturally occurring kinds of aerobic(oxygen consuming) bacteria that work to help you raise fish. The first kind,Nitrosamonas, takes oxygen and the harmful ammonia and changes the ammoniainto nitrite. Nitrite can also hurt the fish, but another bacteria co-exist with thefirst. Nitrobacter bacteria also use oxygen, changing nitrite into nitrate. (Nitrateis harmful to fish only in concentrations so high that they are rarely seen.) So thebacteria have detoxified the nitrogen in the system. They’ve also performedanother function, which is to make nitrate, a far more “friendly” form of nitrogento the plant roots than ammonia. This natural biological process can be roughlydescribed as follows:Aquaponic System Manual 2012 CropKing.com Inc.
NitrosamonasNitrobacterNH3 O2 NO2 O2 NO3ammonia oxygennitrite oxygennitrateThis process is called “nitrification,” and it is facilitated by a “biofilter.” “Bio-”meaning “living,” and “-filter” meaning “purify” or “separate.” By providingsurface for your bacteria to live on, you have made a biofilter. The beneficial,autotrophic bacteria, Nitrosamonas and Nitrobacter, will colonize on all surfaces,e.g., the growing media in the Aquaponic tray, the tank walls, etc. After the firstmonth or so you should be able to feel that the walls inside the tank and tray areslippery. That’s your beneficial bacteria! The vast majority of your beneficialbacteria will live on the Lecastone in the Aquaponic Tray. Without the surfacearea and bacteria to live on it, the Tank would normally sustain 5-10 lbs of fish.With the enormous surface area on the Lecastone, the Aquaponic System cangrow up to 100 lbs of fish, and that’s the benefit of using a biofilter.b) How to treat them right. It’s important to provide the bacteria with anappropriate living environment:1) don’t expose them to harsh chemicals like bleach or pesticides;2) try to keep the pH between 7 and 8; and3) maintain the temperature between 60o and 90o.4) Depending on the hardness of your water, the pH may have a tendency togo down. A pH corrector that uses potassium hydroxide can be added alittle at a time to correct this. CropKing also has available food gradepotassium carbonate, which has the added benefit of adding alkalinity tothe system as well.5) If you have a window on your Tank, keep it clean with soft cloth but youneedn’t worry about scrubbing the rest of the inside of the Tank. Thewalls harbor a lot of hard working microbes and scrubbing will removethem.6) Keep your system topped off with water so the bacteria living on theLecastone media can do their job. Remember that if the beneficialbacteria are exposed to the air and allowed to dry they’ll die, and withthem, the system’s ability to handle waste nitrogen.Take care of your beneficial bacteria and they’ll take care of you by helping you to growterrific crops the year round.Aquaponic System Manual 2012 CropKing.com Inc.
2. Air: Oxygen from the air is consumed at each point in the Aquaponic System. Air isadded to the Aquaponic Tray for the plant roots and bacteria, to the Tank for the fishto breathe and at the bottom of the Airlift to return the water from the Tray to theTank. Each of these air lines has it’s own valve. You will develop a feel for the bestadjustment of the valves, but to start off with:a) turn each valve completely open, thenb) adjust the Tray valve by closing it off about 1/16th of a turn. Putting your earclose to the Lecastone bed, you should be able to hear the air in the bedbubbling away. If not, open the valve a hair more, making sure that the wateris still moving back into the tank. Taking the “S” off the end of the ReturnPipe helps with this observation.Valve positions on airlinesc) With a little practice and observation you may end up adjusting the Tray orairlift valves away from these initial settings. One of the valves, preferablythe one leading to the fish tank, should always be fully open in order to get themost out of your air pump. Oxygen at the outflow end of the Tray should beat least 2-3 ppm to ensure adequate aeration of the beneficial bacteria.3. Circulation: Water in the fish Tank is driven in a circular motion to take advantageof the tank’s round shape. The water spinning in the tank moves the settled solids intowards the center, where the dirt is then removed down through the drain and awayfrom the fish. The circular pattern is induced in two ways: 1) the Flow Hood isplaced over the rising column of bubbles coming from the air stone or diffuser. Thepitch of the Flow Hood drives the bubbles and the water they bring up with them in asingle direction. 2) Water returning from the Tray via the Airlift can be directeddown into the tank using the pair of PVC “elbows” on the end of the delivery pipe.The elbows insert into each other to form an “S” shape, and one end of the “S” insertsonto the end of the delivery pipe. To operate efficiently, the open end of the “S”should be submerged no more than half way into the tank’s water (adjust be rotatingthe upper elbow) and it should be aimed along the wall, somewhat towards the centerof the tank (adjust with the lower elbow). The actions of the Flow Hood andAquaponic System Manual 2012 CropKing.com Inc.
returning water complement each other and help to provide for maximum efficiencyin inducing the circular flow pattern.II. Ready, Set, Grow!1. Water Source: Water used in your Aquaponic System can be from the tap (from amunicipal source), from a well or spring or rain or even reverse osmosis. Each onehas advantages.a) Well and spring water may be best because they can contain natural sources oftrace elements like calcium, chloride, sodium and iron. Circulate and aerate thewater in the system for at least a day before adding fish or bacteria to make surethat oxygen is adequate and any commonly found gases that are harmful to yoursystem, e.g., hydrogen sulfide and carbon dioxide, are released.b) Municipal water can have chlorine in it, which is not only harmful to the fish butcan also kill off your biofilter. If you know or even suspect chlorine in yourwater, it must be removed prior to adding bacteria and/or fish. This can be donechemically with Tap Water Conditioner, available from CropKing, whichremoves other potentially harmful components as well. Chlorine can also beremoved with plenty of aeration: just let the system run for a couple of days ormore to get all the chlorine out. Using a chlorine test kit can help you to findwhen the water is ready, when there is less than 1 part per million (ppm) ofchlorine. Municipal water sources may also contain chloramine, which is alsoharmful to your fish and bacteria. Chloramine can be removed using the TapWater Conditioner.c) Reverse osmosis water is recommended last due to it’s lack of anything beneficialto your plants, but at least it shouldn’t have anything harmful, either. You’ll justneed to be more careful about ensuring the availability all the essential elementswhen using r.o. water.1. Aquaponic System start up: Your plant crops
Tools: To assemble your Aquaponic System you’ll need a flat head screwdriver, a level and a pair of pliers. 2. Location: a) Your Aquaponic System will occupy a space about 5’ wide and 14’ long. It’s best to have walking and working space on at least two sides. b) Make sure that the