Transcription
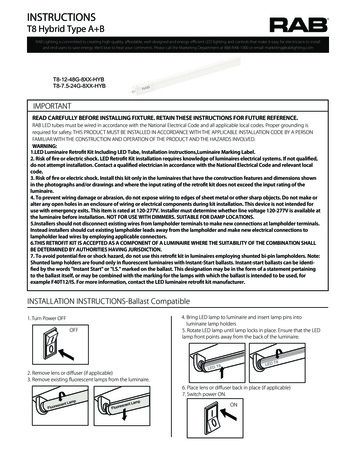
INSTRUCTIONS5 )ZCSJE 5ZQF " #RAB Lighting is committed to creating high-quality, affordable, well-designed and energy-efficient LED lighting and controls that make it easy for electricians to installand end users to save energy. We’d love to hear your comments. Please call the Marketing Department at 888-RAB-1000 or email: marketing@rablighting.com7 * ;; %7 * ;; %IMPORTANTREAD CAREFULLY BEFORE INSTALLING FIXTURE. RETAIN THESE INSTRUCTIONS FOR FUTURE REFERENCE.RAB LED tubes must be wired in accordance with the National Electrical Code and all applicable local codes. Proper grounding isrequired for safety. THIS PRODUCT MUST BE INSTALLED IN ACCORDANCE WITH THE APPLICABLE INSTALLATION CODE BY A PERSONFAMILIAR WITH THE CONSTRUCTION AND OPERATION OF THE PRODUCT AND THE HAZARDS INVOLVED.WARNING:1.LED Luminaire Retrofit Kit Including LED Tube, Installation instructions,Luminaire Marking Label.2. Risk of fire or electric shock. LED Retrofit Kit installation requires knowledge of luminaires electrical systems. If not qualified,do not attempt installation. Contact a qualified electrician in accordance with the National Electrical Code and relevant localcode.3. Risk of fire or electric shock. Install this kit only in the luminaires that have the construction features and dimensions shownin the photographs and/or drawings and where the input rating of the retrofit kit does not exceed the input rating of theluminaire.4. To prevent wiring damage or abrasion, do not expose wiring to edges of sheet metal or other sharp objects. Do not make oralter any open holes in an enclosure of wiring or electrical components during kit installation. This device is not intended foruse with emergency exits. This item is rated at 120-277V. Installer must determine whether line voltage 120-277V is available atthe luminaire before installation. NOT FOR USE WITH DIMMERS. SUITABLE FOR DAMP LOCATIONS.5.Installers should not disconnect existing wires from lampholder terminals to make new connections at lampholder terminals.Instead installers should cut existing lampholder leads away from the lampholder and make new electrical connections tolampholder lead wires by employing applicable connectors.6.THIS RETROFIT KIT IS ACCEPTED AS A COMPONENT OF A LUMINAIRE WHERE THE SUITABILITY OF THE COMBINATION SHALLBE DETERMINED BY AUTHORITIES HAVING JURISDICTION.7. To avoid potential fire or shock hazard, do not use this retrofit kit in luminaires employing shunted bi-pin lampholders. Note:Shunted lamp holders are found only in fluorescent luminaires with Instant-Start ballasts. Instant-start ballasts can be identified by the words "Instant Start" or "I.S." marked on the ballast. This designation may be in the form of a statement pertainingto the ballast itself, or may be combined with the marking for the lamps with which the ballast is intended to be used, forexample F40T12/IS. For more information, contact the LED luminaire retrofit kit manufacturer.INSTALLATION INSTRUCTIONS-Ballast Compatible1. Turn Power OFFOFF4. Bring LED lamp to luminaire and insert lamp pins intoluminaire lamp holders5. Rotate LED lamp until lamp locks in place. Ensure that the LEDlamp front points away from the back of the luminaire.2. Remove lens or diffuser (if applicable)3. Remove existing fluorescent lamps from the luminaire.6. Place lens or diffuser back in place (if applicable)7. Switch power ON.ON
INSTRUCTIONS5 )ZCSJE 5ZQF " #RAB Lighting is committed to creating high-quality, affordable, well-designed and energy-efficient LED lighting and controls that make it easy for electricians to installand end users to save energy. We’d love to hear your comments. Please call the Marketing Department at 888-RAB-1000 or email: marketing@rablighting.comPRODUCT NOTESThe products are intended to retrofit TypeIC or Non-IC recessed mount Listed Fluorescent luminaires withinstructions to remove the existing trim. They use maximum fourstraight tubular lamps with or without a diffuser.The minimum lamp compartment dimensions are tabulated on the right:Replace LED lamp only with model: T8-7.5-24G-8XX-HYB;T8-12-48G-8XX-HYB Manufactured by RAB Lighting Inc.Part NumberMINIMUM LAMP COMPARTMENTDIMENSIONS 2 x 56 x 5T10070/T10071/T10072/T10073T8-12-48G-8XX-HYB122 x 56 x 5Maximum Lampquantity in Luminaire4INSTALLATION INSTRUCTIONS-Ballast Bypass DOUBLE-ENDED POWER1. Make sure the circuit breaker that supplies the power to thefixture is turned off.2. Remove lens or diffuser cover (if applicable) and existingfluorescent lamps.3. Open/Remove ballast wiring compartment cover.Instant Start4. Identify the line and neutral wires running from thebreaker box to the ballast and confirm the power is offusing a voltmeter.5. Cut all wires connected to ballast,Dispose of removed ballast and fluorescentlamps in accordance with government regulations in your area.Program Start or Rapid StartFig: 3 - Retrofit luminaire with Two Lamps6. Ensure that the fixture contains shunted G13 bi-pin lampholders. If soket lamp holders are non-shunted, replace withnew shunted socket lamp holders, or shunted with a jumperwire to convert into shunted sockets.7. LED T8 lamps are designed for double sided connectionsonly (Fig. 1). To install, please wire non-shunted socketsby connecting one wire from the lamp holder to branchcircuit L (LIVE) and the other wire at the opposite end to thebranch circuit N (NEUTRAL). Do not connect opposite side topower. Use appropriate wires for connection.Instant StartProgram Start or Rapid StartFig: 4 - Retrofit luminaire with Three LampsLNFig: 1 - Double sided connections8. Make sure all sockets are replaced and wired according tothe appropriate wiring diagram. (Fig. 2, 3, 4, 5) .Instant StartInstant StartProgram Start or Rapid StartProgram Start or Rapid StartFig: 2 - Retrofit luminaire with One LampFig: 5 - Retrofit luminaire with Four Lamps9. Reinstall the ballast cover to hide all wires.10. Install your new LED T8 replacement lamps.11. Apply Relamping Label on a visible location inside the fixture.12. Reinstall lens or diffusion cover on the light fixture.13. Turn power on at the breaker box.14. Turn on the lights.Note: These instructions do not cover all details or variations in equipment nor do they provide for every possible situation during installation, operation or maintenance.
INSTRUCTIONS5 )ZCSJE 5ZQF " #RAB Lighting is committed to creating high-quality, affordable, well-designed and energy-efficient LED lighting and controls that make it easy for electricians to installand end users to save energy. We’d love to hear your comments. Please call the Marketing Department at 888-RAB-1000 or email: marketing@rablighting.comINSTALLATION INSTRUCTIONS-Ballast Bypass SINGLE-ENDED POWER1. Turn Power OFF.2. If applicable, replace lamp holders at power end with non-shunted lamp holders (Fig.6).Non-ShuntedShuntedFig: 63. Install lamp with the L and N markings into the wired lamp holder end (Fig.7).Fig: 74. If installing a single tube refer to Fig. 8. If connecting multiple lamps, connect separate neutral wire into “Neutral out” from primary sourcelamp holder and connect that wire into “Neutral in” on the adjacent tube. See Fig. 9 lampFig: 9Fig: 8Easy AnswersNorthvale, New Jersey 07647 USArablighting.comVisit our website for product infoBallast Compatible& Ballast Bypass T8RAB WARRANTY: RAB’s warranty is subject to all terms and conditions found at rablighting.com/warranty. 2019 RAB LIGHTING Inc.Tech Help LineCall our experts: 888 722-1000e-mailAnswered promptly - sales@rablighting.comFree Lighting LayoutsAnswered online or by request
5 )ZCSJE 5ZQF " #T8-13-U6G-8XX-SD-HYBT8-13-U1G-8XX-SD-HYBSUITABLE FOR DAMP LOCATIONS.DO NOT USE WITH DIMMERS.THIS DEVICE IS NOT INTENDED FOR USE WITH EMERGENCY EXITS.THE RETROFIT KIT IS ACCEPTED AS A COMPONENT OF A LUMINAIRE WHERE THE SUITABILITY OF THE COMBINATION SHALLBE DETERMINED BY AUTHORITIES HAVING JURISDICTION. PRODUCT MUST BE INSTALLED BY A QUALIFIED ELECTRICIAN INACCORDANCE WITH THE APPLICABLE AND APPROPRIATE ELECTRICAL CODES. THE INSTALLATION GUIDE DOES NOTSUPERSEDE LOCAL OR NATIONAL REGULATIONS FOR ELECTRICAL INSTALLATIONS.CAUTION - RISK OF FIRE. IF THE LAMP OR LUMINAIRE EXHIBITS UNDESIRABLE OPERATION (BUZZING, FLICKERING, ETC.),IMMEDIATELY TURN OFF POWER, REMOVE LAMP FROM LUMINAIRE AND CONTACT MANUFACTURER.DO NOT INSTALL THIS LAMP IN A PRE-HEAT LUMINAIRE.FOR TYPE A, THIS LAMP ONLY OPERATES ON ELECTRONIC BALLASTS. IF LAMP DOES NOT LIGHT WHEN THE LUMINAIRE ISENERGIZED, REMOVE LAMP FROM LUMINAIRE AND CONTACT LAMP MANUFACTURER OR QUALIFIEDELECTRICIAN.FOR TYPE B,INPUT VOLTAGE IS 120-277V.RISK OF FIRE OR ELECTRIC SHOCK.LED RETROFIT KIT INSTALLATION REQUIRES KNOWLEDGE OF LUMINAIRES ELECTRICALSYSTEMS.IF NOT QUALIFIED,DO NOT ATTEMPT INSTALLATION AND CONTACT A QUALIFIED ELECTRICIAN.RISK OF FIRE OR ELECTRIC SHOCK.PRODUCT MUST BE INSTALLED IN ACCORDANCE WITH THE NATIONAL ELECTRICALCODE OR YOUR LOCAL ELECTRICAL CODE.IF YOU ARE NOT FAMILIAR WITH THESE CODES AND REQUIREMENTS,CONTACT A QUALIFIED ELECTRICIAN.RISK OF FIRE OR ELECTRIC SHOCK.INSTALL THIS KIT ONLY IN THE LUMINAIRES THAT HAVE THE CONSTRUCTION FEATURESAND DIMENSIONS SHOWN IN THE PHOTOGRAPHS AND/OR DRAWINGS AND WHERE THE INPUT RATING OF THE RETROFITKIT DOES NOT EXCEED THE INPUT RATING OF THE LUMINAIRE.TO PREVENT WIRING DAMAGE OR ABRASION, DO NOT EXPOSE WIRING TO EDGES OF SHEET METAL OR OTHER SHARPOBJECTS.DO NOT MAKE OR ALTER ANY OPEN HOLES IN AN ENCLOSURE OF WIRING OR ELECTRICAL COMPONENTSDURING KIT INSTALLATION.TO AVOID POTENTIAL FIRE OR SHOCK HAZARD, DO NOT USE THIS RETROFIT KIT IN LUMINAIRES EMPLOYING SHUNTEDBI-PIN LAMPHOLDERS. NOTE: SHUNTED LAMPHOLDERS ARE FOUND ONLY IN FLUORESCENT LUMINAIRES WITHINSTANT-START BALLASTS. INSTANT-START BALLASTS CAN BE IDENTIFIED BY THE WORDS “INSTANT START” OR “I.S.” MARKEDON THE BALLAST. THIS DESIGNATION MAY BE IN THE FORM OF A STATEMENT PERTAINING TO THE BALLAST ITSELF, OR MAYBE COMBINED WITH THE MARKING FOR THE LAMPS WITH WHICH THE BALLAST IS INTENDED TO BE USED, FOR EXAMPLEF40T12/IS. FOR MORE INFORMATION, CONTACT THE LED LUMINAIRE RETROFIT KIT MANUFACTURER.INSTALLERS SHOULD NOT DISCONNECT EXISTING WIRES FROM LAMPHOLDER TERMINALS TO MAKE NEW CONNECTIONSAT LAMPHOLDER TERMINALS.INSTEAD INSTALLERS SHOULD CUT EXISTING LAMPHOLDER LEADS AWAY FROM THELAMPHOLDER AND MAKE NEW ELECTRICAL CONNECTIONS TO LAMPHOLDER LEAD WIRES BY EMPLOYING APPLICABLECONNECTORS.
5 )ZCSJE 5ZQF " #- BALLAST BYPASSINSTALLATION - BALLAST COMPATIBLE1) Switch-off power to the luminaire(Fig.6).1) Turn-off power before installation(Fig.1).162) Remove the existing ballast and existing starter (if present) from the fixture(Fig.2).2) Remove fixture diffuser if present(Fig.7).3) Remove the existing fluorescent lampsfrom your fixture(Fig.7).723) Rewire the fixture to be on certain single end/double end power(Fig.3).4) Install the LED T8 U-Bend replacement lamp(Fig.8).85) Attach the diffuser and turn on the power switch to the fixture(Fig.9).3CAUTION: Use only non-shunted lampholders for single-endedwiring installations.Do not perform single-ended wiring installationof product in a fixture wth shunted lampholders(found in all fixturesusing instant start ballasts).If the existing lampholders are shunted,and single-ended wiring is desired,remove and replace them withnon-shunted lampholders (or remove the external shunt if applicable).Make new connections directly to lampholer terminals as shown inFigure 4 below.94After wiring modification is completed,attach the warning label onto avisibl place on the fixture that is kept visible after installation of U-Bend.4) Install the LED U-Bend(Fig.5).55) Turn-on the power and light the LED U-Bend.Easy Answers 2020 RAB LIGHTING Inc.Northvale, New Jersey 07647 USArablighting.comVisit our website for product infoTech Help LineCall our experts: 888 722-1000e-mailAnswered promptly - sales@rablighting.comUBHYB-IN-0820RAB WARRANTY: RAB’s warranty is subject to all terms and conditions found at rablighting.com/warranty.Free Lighting LayoutsAnswered online or by request
lamps in accordance with government regulations in your area. 6. Ensure that the xture contains shunted G13 bi-pin lamp holders. If soket lamp holders are non-shunted, replace with new shunted socket lamp holders, or shunted with a jumper wire to convert into shunted sockets. 7. LED T8 lamps