Transcription
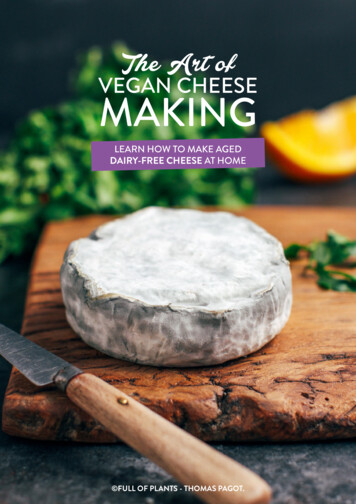
The Art ofVEGAN CHEESEMAKINGLEARN HOW TO MAKE AGEDDAIRY-FREE CHEESE AT HOME FULL OF PLANTS - THOMAS PAGOT.
‘A cashew grew, it took a little bath for you,without a scream, it was turned into a cream.After ripening for a few weeks, it wasready for you to eat.’
- CONTENT Introduction 6Cheese History 9Tools / Equipment10Ingredients 13Do You Need a Cheese Cave?171. AGED CHEESES Camembert 20 Blue Cheese 23 Hickory Smoked27 Garlic Tomato Camembert31 Pouligny35 Ashed White38 Ricotta 42 Shropshire Blue 45 Farmstead Camembert48 Smoked Ricotta 51 Mont d’Or 54 Cambozola 59 Saint-Albus 632. CREAMERY Cultured Cream Cheese Cultured Butter Easy Almond Milk Yogurt6870733. RECIPES Swiss Fondue78 Cream Cheese Stuffed Peppers80 Maple Baked Camembert withCaramelized Onions 83 Smoked Ricotta Buffalo Noodles85 Potato & Camembert Gratin86 Crispy Sesame Cheese Balls89 Mac & Blue Cheese92 Pulled Jackfruit Blue CheeseBánh mì95 Blue Cheese Ravioli with WhiteWine Sauce 97 Ricotta Pancakes994. FAQ
- INTRODUCTION Hey! I’m so glad to find you here, thanks for downloading this ebook! You are now goingto enter the wonderful world of vegan cheese making! Where cashews are blended withcultures and aged for long weeks before turning into wheels of deliciousness.In this ebook, I’m going to teach you the techniques I learned over the past 3 years to makethe best vegan cheeses you will ever eat, but before diving into the recipes, we will take aquick look at the history of cheese, and what kind of equipment and ingredients you willneed.HOW IT ALL STARTEDAs a French guy who grew up eating cheese at every meal it was obviously the food that Imissed the most when I went vegan. Being dairy-intolerant and caring about animals I justcouldn’t go back to eating cheese, so in 2015 I started to experiment with vegan cheesemaking. My first cheeses were very simple: soaked cashews mixed with lemon juice, salt,and nutritional yeast.While these were good I was not fully satified with the flavor, something was missing. Iquickly realised that the fact they were not fermented was the problem. A few days later Imade my first cultured cheese by using rejuvelac. If you have never heard of rejuvelac, it’s afermented drink made from sprouted grains, quinoa in my case. The fresh cultured cheeseflavor was here! As I started to experiment more I learned that temperature, humidity, andmolds used are all affecting the end results.After a few days of searching how camemberts were made, I got my hands on PenicilliumCandidum, the mold responsible for the white rind and mushroom flavor and started myfirst batch. I can’t say my first camemberts were a success, the rind just never grew. Mysecond attempt went even worse as mice ate my cheeses after a few days, I assumed theywere pretty good at the time. For information, I was aging my cheeses uncovered in a smallcellar.I went back to the drawing board, tweaked the ingredients ratio a bit and aged the cheesescovered this time as I realized that white mold needed moisture to grow.Boom! It worked! I was amazed to see my cheeses covered with a white and fluffy rind!I made many more batches of camembert, trying to make them better each time until I washappy with it.Later I experimented with more molds, techniques, and ingredients, and eventually came upwith a blue cheese. The blue cheese was a bit tricky as I couldn’t get veins inside at first,6
that’s when I thought about crumbling it after a few weeks and reforming it to create smallholes inside.Then came the Hickory Smoked (still one of my favorite) and some other amazing cheeses Iwill let you discover as you browse through this ebook.WHAT TO EXPECTFirst we will take a look at the history of cheese making, going back 7,000 years ago wherethe first cheese was invented to today where making cheese doesn’t require cow or goatmilk anymore thanks to the developement of veganism.Next, you will learn about the tools and ingredients required to make vegan cheese. Most ofthem can be find easily online, or by asking artisan cheese makers. I will explain you the roleof each ingredient and how to make sure it is vegan.You will also discover new techniques to make vegan cheese (see the Ricotta andCambozola recipes) where we start from cashew milk, curdle it with a specific enzyme andthen let it drain until it forms a cheese wheel. This technique is very similar to traditionaldairy cheese techniques and yields creamier cheeses.Finally, in chapter 3 you will find recipes that make use of the cheeses you just made. Yes,vegan cheese is not only for crackers, it can be used in many recipes! Mac & Blue Cheese,Camembert Potato Gratin, Ricotta Pancakes, and more are waiting for you!7
Hickory Smoked Cheese, p27.
- CHEESE HISTORY We don’t know exactly who made the first cheese, but we are aware that cheese has beenaround for several thousand years. It first appeared in the prehistoric age, around 7000years B.C.The process to make cheese was discovered accidentally by merchants who were storingmilk in pouches made from the stomach of animals, usually sheeps or calves. An enzymepresent in the animals’ stomachs called rennet caused the milk to curdle, creating curdsthat will be later called cheese, and whey, the liquid remaining. It is said that merchants andtravellers really liked the result and kept the technique secret for many years.By the time of the Roman empire, cheese making spread across Europe and became aluxury food only accessible to the wealthy. The legend says that even Julius Caesar was afan of cheese, especially one that he discovered in France that will later be very famous:Roquefort.Cheese making continued to flourish in Europe and the Middle-East for over a thousandyears. As people kept experimenting with it, different type of cheeses appeared. First Blue,Cheddar, washed-rind cheeeses, and a bit later, Camembert.In the Middle Ages, monks in Europe started to make their own cheese for a couple reasons:to nourish themselves, and feed the poor. Monks played an important role in cheese makingby developing and improving the aging process. Munster and Époisses, for example, werecreated by monks.By the XIXth century, cheeses started to be massively produced by industrial cheesemakers.Today, we are seeing a revolution in cheese making, it no longer requires animal milk tocreate cheese! I believe we are still at the beginning of vegan cheese making, but theprogress is already huge. More complex and flavorful vegan cheeses are being createdevery year.As you will see in this book, many cheese recipes share a similar process but some of themuse different techniques, temperatures, and aging time that affect the flavor and final lookof each cheese, just like real dairy cheese making.9
- TOOLS / EQUIPMENT While cheese making can be done with little to no extra tools or equipment, you will stillneed some basic tools to make the process easier.BLENDER / FOOD PROCESSORA high speed blender is essential to blend the cashew and turn them into a smooth cream. Ifyou don’t have a blender, you can use a food procesor, just be aware the cheese won’t be assmooth.LATEX GLOVESAs you will learn in the following pages, hygiene is key in cheese making. By using gloveseach time you handle the cheeses, you reduce your chances to see bad mold growing. Latexgloves are pretty cheap and come in large boxes so do not hesitate to get yourself a box.SPRINGFORM PANS / MOLDSWhile these are not essential, they are very practical. You will use springform pans to shapethe cashew cream into the final cheese. Large cookie cutters work great too!RICOTTA CHEESE MOLDThese molds, usually made of plastic look like little baskets, they are essential to drain the‘whey’ from the curds. We will only use these to make ricotta.GRID / PLASTIC MATFor a better mold development, especially for camembert-style cheeses, aging the cheeseson a grid is recommended. It will allow the white mold to grow more uniformly and youwon’t have to flip them everyday.CHEESE PAPEROnce your cheeses have gone through the ripening stage, you need to wrap them in paperto slow down the mold growth and allow the flavors to develop even more. Parchmentpaper may be used but is not perfect as it tends to dry the cheeses too much. I recommendbuying special camembert paper if you plan on making it regularly.10
AGING CONTAINERMold requires humidity to grow. If you don’t keep your cheeses in a container they will drytoo quickly and the mold will never have a chance to grow. I recommend using a tupperwarecontainer, or placing your cheeses on a plate and covering them with a large bowl. Note:Your container doesn’t have to be airtight.REFRIGERATOR / AGING ROOMA basic refrigerator will work well for most of the recipes in this ebook.QUICK NOTE ABOUT HYGIENECheese making requires to be patient, meticulous, and more importantly you need to takecare of the hygiene.Make sure all the equipement and tools you use are as clean as possible. I’m talking aboutthe blender, mixing bowls, spatulas, cheeseclothes, and obviously, your hands. The cleaneryou are, the better your chances to get no bad mold. I want you to understand good hygienewill be crucial to your success in vegan cheese making.To prevent bad mold from happening, I highly recommend pouring boiling water ontothe soaked cashews and letting it sit for 1 minute before draining. This step will kill somebacterias and is recommended for all the recipes in this book.I have been making vegan cheese for over 3 years and I can count on one hand, moreprecisely three fingers, the number of times I saw bad mold growing. Don’t get me wrong,bad mold doesn’t mean your cheese is going to the trash, you will just have to take additionalcare and monitor it more regularly. You can learn more about how to handle bad mold in theFAQ.WANT TO GET A LIST OF THE TOOLS I USE?12CHECK OUT THIS PAGE
- INGREDIENTS There are not that many ingredients required to make vegan cheese. The base alwaysremains the same: cashews. Then come molds, cultures, and sometimes additionalingredients used for extra flavor and/or texture.CASHEWSThe main ingredient we are going to use here! From my experience, cashews yield thecreamiest vegan cheeses. Most molds grow very well on them and it’s almost impossible totaste the cashew flavor once the mold has appeared.MESOPHILIC CULTURES / PROBIOTICSThis ingredient usually comes in a powder form. It’s what will give the cheeses theirtanginess. Important note: If you don’t have mesophilic culture, you can replace it with 4capsules of acidophilus probiotic. I had the best results with Acidophilus Advanced fromSolgar. I cannot recommend other brands as it’s the only one I had success with yet.PENICILLIUM CANDIDUMP. Candidum is the mold responsible for the white blommy rind present on camemberts.There are different types of Penicillium Candidum, some yielding a thicker rind, some astronger mushroom-y flavor, etc. It is an essential ingredient in camembert making.PENICILLIUM ROQUEFORTIP. Roqueforti is the mold that creates the blue/green veins in blue cheese. Just like P.Candidum, there are many different types of P. Roqueforti, some give the cheese a more orless piquant flavor while others will give it a green or blue color.GEOTRICHUM CANDIDUMGeotrichum candidum is a yeast that is often used in conjonction with Penicillium Candidumor Roqueforti. When used in camembert, it gives the cheese a stronger, more complex flavorand makes it creamier. When combined with B.linens, it creates a thin, slightly sticky orangerind.B. LINENS13
Have you ever seen or tasted a washed-rind cheese? Well, Brevibacterium Linens is themold responsible for that stinky smell and light orange rind. It produces a yeasty flavor anda slightly sticky orange mold. It also prevents the cheeses from drying too much, makingthem creamier.PAPAINPapain is often used as a digestive enzyme, you may actually use it if you have digestionproblems. It comes from the papaya fruit. This ingredients is optional but slightly improvesthe flavor of the cheeses, especially on the camembert. Be aware it is not essential though.ANNATOAnnatto is a natural food coloring derived from the seeds of a tree. It adds a bright orangecolor to cheeses, perfect to bring more color to your vegan cheese platters! We will use it tomake Shropshire Blue and Mont d’Or.ADDITIONAL RIPENING CULTURESIf you want to go even further and make a «high-end» cheese, I would recommend gettingto learn more about aromatic cultures. These cultures are used in addition to the basic onesand are completely optional.MD88: I know, this sounds like the model of a futuristic smartphone but it’s not. Thisaromatic culture gives the cheeses a subtle buttery taste.Flora Danica: This culture not only improves the flavor, it also produces some gas, creatingsmall holes in camembert-style cheeses.MISOMiso adds umami, giving the cheeses a more complex, slightly sweeter flavor. Make sure youuse a *sweet* white miso as red or white miso would add too much saltiness.NUTRITIONAL YEASTWhile this is not an ingredient I use a lot as I prefer to get the cheesy flavor from culturesand fermentation, it can be useful in some types of cheese to add a deeper and sweeterflavor. It is used in the Hickory Smoked and the Swiss Fondue to add more flavor.SALTA key ingredient! Not only it makes the cheeses taste better, it also prevents bad mold fromgrowing on the cheese.14
TRANSGLUTAMINASETransglutaminase is an enzyme that helps bind the protein with the fat. It acts the same wayrennet acts in dairy cheese making, it curdles the plant milk.KOJIWhile I am not sharing any recipe featuring koji in this book, it is an ingredient you mightwant to experiment with. Koji is basically fermented rice that contains active cultures.LOOKING FOR THESE INGREDIENTS?15GET INGREDIENTS HERE
- DO YOU NEED A CHEESE CAVE? Do you absolutely need a cheese cave? No. For over two years, I used a regular refrigeratorand a cellar to age cheeses and it worked great, but it you plan on making cheese regularlyand don’t want to bother checking constantly if your refrigerator is at the correcttemperature, I would definitely recommend buying or making one.WHY A CHEESE CAVEMost refrigerators can’t go above 52 F (11 C), while this temperature can be good for mostcheeses recipes in this book, it’s too cold for some of them.Another problem when using your main refrigerator to age cheese is that it must be at thesame temperature the whole time, meaning you will have to eat/drink food at a slightlywarmer temperature than usual. This might also decrease the conservation time of the foodin your refrigerator.With just a few tweaks, it is possible to transform an old refrigerator into a cheese cavewhere you will be able to set the exact temperature needed to age cheese. This is a greatalternative if you have a low budget and/or don’t want to invest in a real cheese cave.To make a custom cheese cave, you will need an old refrigerator (I recommend using a smallone), a mechanical thermostat, and some wires. You should be able to find a mechanicalthermostat for around 10 on Amazon.The goal is to replace the actual thermostat with a new one that will have a higher range oftemperature. I’m not going to go into the details here but you can find tutorials on how to dothis on the Internet.17
- AGED CHEESES -
AGED CAMEMBERTAging time: 3 weeks - Makes: 3 cheesesSharp and creamy vegan camembert with a white and fluffy rind. It’s soft on the inside and has atender, slightly firmer rind with a subtle mushroomy flavor. With over 80 five-star reviews, this is amust-try!INGREDIENTSFORMING THE CHEESES 4 cups raw cashews, soakedovernight 8-10 tbsp filtered water 1/8 tsp mesophilic (or 8capsules vegan Acidophilusprobiotic) 4 drops (1/8 tsp) ofpenicillium candidum sea salt for rubbing Place the cashews in the bowl of a blender or foodprocessor. Add 8 tablespoons of filtered water. Blendon high speed, scraping down the sides from time totime, until you get a very smooth and thick mixture.This step might take about 10 minutes depending onyour blender.Optional: 1/16 tsp MD88 1/16 tsp Flora Danica 2 tbsp refined coconut oil,melted Add the mesophilic cultures to the blender. Add thepenicillium candidum. At this step you can add theoptional ingredients. Blend on high speed for another 10-15 seconds.The cashew cream should be smooth but thick. Ifneeded, add 1 tablespoon of water at a time untilsmooth. Transfer the mixture to a clean mixing bowl andcover with plastic film to touch. This will prevent thetop from drying. Let sit at room temperature for atleast 12 hours. This step is important to let the cheeseferment. The next day, line 3 small springform pans (I used4-inches pans) with plastic film, making sure to coverthe bottom and sides. The goal is to prevent thecheese from touching the metal and sticking to it.If you don’t have springform pans, then use cookiecutters or ramequins. Fill each pan with the mixture and press it downusing plastic film so it doesn’t stick to your hands.Place the springform pans at a temperature of 50-56degrees Fahrenheit (10-13 C).20
The next day, carefully remove the cheeses from the springform pans and sprinkle about1/4 tsp of salt over the top of each cheese, rub with your finger to evenly distribute the salt.Carefully flip the cheeses and sprinkle the bottom and sides with more salt. The cheeses willbe very soft, this is normal, they will firm up as they age.AGING Place the cheeses in a container with the bottom lined with parchment paper. You canalso place them on a plate lined with parchment paper and cover with a bowl or box. It isessential to keep the cheeses covered all the time to keep enough humidity. You will age thecheeses for the next two weeks in the box. Place the box in your refrigerator or in your aging room. Be aware that if you age thecheeses at a temperature lower than 50-56 F, the mold will take longer to grow. You willage the cheeses at this temperature for the next two weeks. Do not store the cheeses at atemperature higher than 59 F (15 C), this is important. Every day, carefully flip the cheeses. The cheeses will be very soft at the beginning, likecream cheese. Don’t worry they will firm up after a few days. After 7-10 days, the cheesesshould be a little bit firmer and you should be able to place them on a clean grid (keep themcovered). If you don’t have a grid, place the cheeses on skewers or chopsticks. This will allowthe mold to grow uniformly. Continue flipping the cheeses everyday for the next week. The mold will appear after5-7 days and continue to grow until they are fully covered with a white rind. After about 2weeks, wrap the cheeses in parchment or cheese paper and place them in the refrigeratorfor at least 2 days. The longer you let them age, the sharper they become. Camemberts willkeep for at least 1 month in the refrigerator.ABOUT THIS CHEESEThis camembert is the first vegan cheese recipe I released on Full of Plants, hundreds ofpeople have tried it and loved it. This is a great recipe to try if you are just getting started invegan cheese making.WINE PAIRINGMany people think Camembert goes well with red wine, it’s not true as red wine tends toovercome the flavor of this cheese. You better go with a white wine like Chardonnay,Champagne, Gewürztraminer, or even cider! The apple undertones of the cider contrastvery well with the slight bitterness of the camembert.22
BLUEAging time: 5-8 weeks - Makes: 4 small cheesesThis vegan blue cheese tastes like the real one and has blue veins! Made using traditionalcheese making techniques and only 4 ingredients. The longer you let it age the firmer andsharper it becomes.INGREDIENTS 3 cups raw cashews, soakedovernight 5 tbsp filtered water 2 tbsp refined coconut oil,melted but not hot 1/16 tsp mesophilic (or 6capsules vegan Acidophilusprobiotic) 1/8 tsp liquid penicilliumroqueforti (or 1/16 tsppowdered) sea salt for rubbingOptional: 1/16 tsp MD88 1 capsule papain powderFORMING THE CHEESES Place the cashews in the bowl of a blender or foodprocessor. Add the 5 tablespoons of filtered waterand the coconut oil. Blend on high speed, scrapingdown the sides from time to time, until you get a verysmooth and thick mixture. This step might take about10 minutes depending on your blender. Add the mesophilic cultures and penicilliumroqueforti to the blender. At this step you can add theMD88 and papain powder. Blend on high speed for another 10-15 seconds.The cashew cream should be smooth but thick. Ifneeded, add 1 tablespoon of water at a time untilsmooth. Transfer the mixture to a clean mixing bowl andcover with plastic film to touch. This will prevent thetop from drying. Let sit at room temperature for atleast 12 hours. This step is important to let the cheeseferment. The next day, place the bowl in the refrigerator forabout 4 hours. The cashew cream will slighty firm up,making it easier to work with. Cut strips of parchment paper and lay them in 4small springform pans (I used 3-inches pans).You want to cover the sides and bottom of thespringform pans, you can also use plastic film ifyou prefer. The goal is to prevent the cheese fromtouching the metal.23
Fill each pan with the mixture and press it down using plastic film so it doesn’t stick toyour hands. Place the springform pans in the refrigerator, or at a temperature of 47-52degrees Fahrenheit (8-11 C). You do not want to age them at a temperature colder than47 F (8 C). The next day, carefully remove the cheeses from the springform pans and sprinkle about1/4 tsp of salt over the top of each cheese, rub with your finger to evenly distribute the salt.Flip the cheeses and sprinkle the bottom and sides with more salt.AGING Place the cheeses on a plate lined with parchment paper and cover with a bowl or box.You can also place them directly in a container with parchment paper in the bottom. It isessential to keep the cheeses covered all the time to keep enough humidity. Place the box in your refrigerator or in your aging room. Be aware that if you age thecheeses at a temperature lower than 47 F, the mold will take longer to grow. You will agethe cheeses at a 47-52 F (8-11 C) temperature for the next four weeks. Do not store thecheeses at a temperature higher than 55 F (12 C), this is important. Every day, carefully flip the cheeses. The cheeses will be very soft at the beginning, likecream cheese. After about one week, you will see some blue mold starting to grow on thesurface of the cheese. Continue flipping the cheeses for one more week. After 2 weeks, scramble the cheeses into little pieces (just like when you scrambletofu) into a clean bowl. Lay strips of parchment paper in the same springform pans youused at the beginning and fill each pan with the scrambled cheese, without pressing toomuch, leaving holes inside. This step is important to create blue veins inside the cheese asmold needs to be in contact with the air to grow. Carefully remove the cheeses from thespringform pans right after shaping them. At this step, you can slightly smooth the exteriorof the cheese to hide the holes. Place the cheeses back on the baking sheet, cover with plastic box and return to therefrigerator or aging room. Continue to flip the cheeses every day for the next 3 weeks. Don’t worry this step onlytakes a few seconds every day. After a total of 5 weeks, the outside of your cheeses should be covered with blue mold.They will be ready to eat very soon! Wrap the cheeses in aluminum foil or special cheese paper and let them age in therefrigerator for at least another 7 days. The longer you let them age in the refrigerator, thesharper they become.24
Blue cheese will keep for at least 1 month in the refrigerator and will become firmer andsharper as it ages.ABOUT THIS CHEESEIf you used to like dairy blue cheese, you are going to love this one. It is so close to the ‘real’thing that many people thought it was made from milk when they tasted it!The crumbling process is the best way I found to create beautiful veins inside the cheese, soit is an essential step.WINE PAIRINGWhich wine to choose will depend on how strong your blue cheese is. The longer you letit age, the stronger it becomes. For a young blue cheese aged for less than 8 weeks, youcan go with a red wine. For a strong blue cheese aged for over 2 months, go with a sweetwhite wine that will balance with the saltiness, a Sauternes or Monbazillac would be goodchoices.26
HICKORY SMOKEDAging time: 4 weeks - Makes: 4 small cheesesThis cheese is smoked over hickory wood chips for a rustic look and real smoky flavor. It’snutty and buttery with bacon undertones. One of my favorite!INGREDIENTS 4 cups raw cashews, soakedovernight 4 tbsp filtered water 3 tbsp sweet white miso 3 tbsp nutritional yeast 1/18 tsp mesophilic (or 8capsules vegan Acidophilusprobiotic) sea salt for rubbingMATERIAL/TOOLS Stovetop smoker 1 tbsp hickory wood chipsFORMING THE CHEESES Place the cashews in the bowl of a blender or foodprocessor. Add the 4 tablespoons of filtered water,sweet white miso, and nutritional yeast. Blend on highspeed, scraping down the sides from time to time,until you get a very smooth and thick mixture. Thisstep might take about 10 minutes depending on yourblender. Add the mesophilic cultures to the blender andblend on high speed for another 10-15 seconds.The cashew cream should be smooth but thick. Ifneeded, add 1 tablespoon of water at a time untilsmooth. Transfer the mixture to a clean mixing bowl andcover with plastic film to touch. This will prevent thetop from drying. Let sit at room temperature for atleast 12 hours. This step is important to let the cheeseferment. The next day, place the bowl in the refrigerator forabout 4 hours. The cashew cream will slighty firm up,making it easier to work with. Cut strips of parchment paper and lay them in 4small springform pans (I used 3-inches pans). You canmake larger cheeses if you want. You want to cover the sides and bottom of thespringform pans, you can also use plastic film ifyou prefer. The goal is to prevent the cheese fromtouching the metal.27
Fill each pan with the mixture and press it down using plastic film so it doesn’t stick toyour hands. Place the springform pans in the refrigerator, or at a temperature of 47-52degrees Fahrenheit (8-11 C). The next day, carefully remove the cheeses from the springform pans and sprinkle about1/4 tsp of salt over the top of each cheese, rub with your finger to evenly distribute the salt.Flip the cheeses and sprinkle the bottom and sides with more salt. Place the cheeses on a plate lined with parchment paper. You don’t have to cover them.If you have other cheeses aging in your refrigerator or aging room I would recommendcovering them or placing them in a container to avoid cross contamination. Place the cheeses in your refrigerator or in your aging room. The next day, your cheeseswill have lost some water thanks to the salt. Pat them dry with a paper towel if they are toowet, and replace the parchment paper with a new one.AGING Age the cheeses at a 47-52 F (8-11 C) temperature for the next two weeks and flip themevery 2-3 days. Do not store the cheeses at a temperature higher than 55 F (12 C) or theycould turn bad. During the first week, the cheeses will be very soft but as they age they willbecome firmer. If you see some mold appearing, just scrape it off and re-salt the area.SMOKING After two weeks, your cheeses should be firm enough to handle, if they are not I recommend you let them age for another week. To smoke: place one tablespoon of hickory wood chips in the bottom of the stovetopsmoker. Place the drip and cooking trays on top of the wood chips. You can now place twocheeses on the cooking rack. Heat the smoker over low-medium heat on a stovetop burner. Once smoke starts to appear, close the lid of the smoker completely and smoke the cheese for about 12 minutes.Some smoke will escape from the smoker, that’s normal. I usually carefully flip the cheeseshalfway through smoking but it’s not essential. After 12 minutes, the cheeses should be golden brown. Remove the smoker from heatand let cool for at least 30 minutes. The cheeses will be very soft because of the heat, so becareful when handling them. Transfer to a bamboo mat or clean grid and place in the refrigerator. Let it age for onemore week, flipping every 2-3 days. If you are patient enough, I recommend you let thecheeses age for 2-3 weeks after the smoking process, the flavors will merge and the cheesewill become even firmer.29
Note: You can see a photo of this hickory smoked cheese aged for over 2 months on page 8,it becomes grateable like parmesan.ABOUT THIS CHEESELooking for a cheese to enjoy on a cold night near the fireplace in a barn? This is it! Thischeese has a rustic look, an incredible smoky scent and a delicate sweetness. To me this isthe most comforting cheese in this book!WINE PAIRINGPersonally, I love to pair this hickory smoked cheese with a sweet or semi-sweet white winelike a Riesling, Gewürztraminer, or Roussette. For red wine lovers, go with a Pinot Noir, orMerlot. These bold red wines will balance very well with the nutiness of the cheese.30
GARLIC TOMATO CAMEMBERTAging time: 4 weeks - Makes: 3 cheesesGarlicky, savory, and so creamy, this camembert is packed with a sun-dried tomato flavor! Youhave never tried anything like this! Can I suggest pairing it with pesto and toasted bread?INGREDIENTSDRIED TOMATOES 10 fresh large tomatoes 1 tbsp olive oil 1/4 tsp thyme 1/4 tsp oregano 1/8 tsp saltCHEESE 4 cups raw cashews, soakedovernight 3/4 cup packed driedtomatoes, drained 1 tbsp nutritional yeast 1 and 1/2 tsp garlic powder 1 tsp onion powder 5 tbsp water 1/8 tsp mesophilic (or 8capsules vegan Acidophilusprobiotic) 4 drops (1/8 tsp) ofpenicilliu
Then came the Hickory Smoked (still one of my favorite) and some other amazing cheeses I will let you discover as you browse through this ebook. WHAT TO EXPECT First we will take a look at the history of cheese making, going back 7,000 years ago where the first cheese was invented to today where m