Transcription
3How to GenerateElectricityhapter 1 described why you need a closedloop to get current flowing through acircuit, and Chapter 2 showed you howto build your own electromagnet and motor. Theprojects in those chapters used electricity from abattery, but in this chapter, you’ll make your ownelectricity sources!
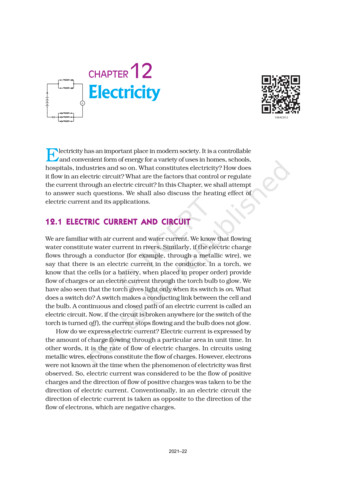
Specifically, you’ll learn how to build your own generator, which creates electricity from movement, and your ownbattery, which creates electricity through chemical reactions.These are two of the most common ways to obtain electricity.Generating Electricitywith MagnetsWhen you run current through a wire, it creates a magneticfield around the wire, but there’s another connection betweenelectricity and magnetism. You can also create electricityusing a wire and a magnet!A Changing Magnetic Field Creates ElectricityIf you move a magnet back and forth over a wire connected ina closed loop, you’ll create a current in the wire. Moving themagnet changes the magnetic field around the wire, and thechanging magnetic field pushes the electrons through the wire.currentmagnet movingacross wireIf you stop moving the magnet, the current also stops—even if the wire is still within the magnetic field—because themagnetic field is no longer changing.44Chapter 3
If you connect the two ends of the wire to a light bulb andcreate a closed loop, then the current can flow. Unfortunately,however, the current created by moving a magnet over a singlewire doesn’t provide enough energy quickly enough to actually light the bulb. To light a bulb, or to power anything else,you need to find a way to generate more power, which is theamount of energy produced in a certain time.How Does a Generator Work?A generator is a device that turns movement—such as themovement of a magnet over a wire—into electricity. To createmore power with a wire and a magnet, you can wind thatwire into a coil. The coiled wire acts like a group of wires,and when the magnetic field passes through it, a currentflows through each coil, creating more power than you couldwith a straight wire.Light bulbturns on!morecurrentmagnet movingthrough coil of wireHow to Generate Electricity45
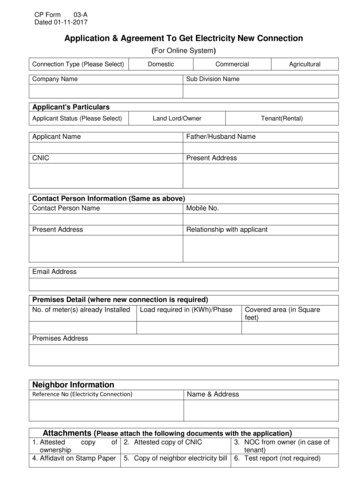
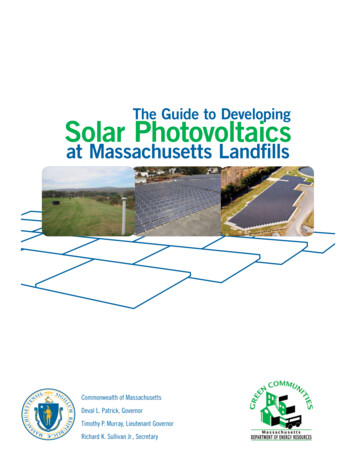
Creating Electricity fromWater or WindIf you place a coil in a magnetic field and rotate the coilwith a handle, you’re converting your own movementinto electricity. If you replaced the handle with a waterwheel and placed it into a stream of water, the waterwould push the wheel so that the coil would rotate in themagnetic field and create a current. This is how somepower plants generate electricity! The power plant justlets water run through a wheel that’s connected to agenerator. Then this electricity is transferred, throughpower lines, to the power outlets in people’s houses.high-pressurewatersluice gateswaterdampower plantgeneratorwater wheelYou can make electricity out of other natural forcesin the same way. For example, to create electricity outof wind, you can connect the coil to a windmill so thatwhen the wind blows, it rotates the coil.46Chapter 3
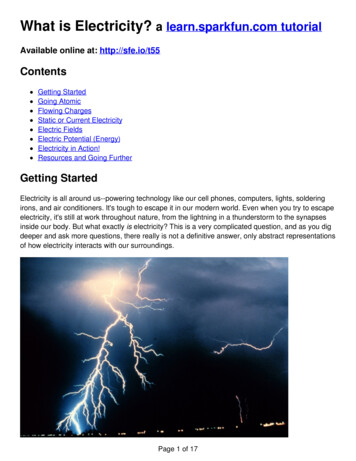
Meet the MultimeterYou can measure exactly how much energy a simple generatorcreates with a basic multimeter. Multimeters are handy whenbuilding any circuit because they can measure a lot of different values, including resistance, current, and voltage.The red lead is the positive lead, the black lead is thenegative lead, and the big dial in the middle lets you tell themultimeter what to measure. If you’re having problems with acircuit, measuring the voltage at key points in your circuit isone practical way to figure out what’s wrong.How to Measure VoltageTo measure voltage with a multimeter, first turn the dial toone of the V options. (In this book, I’ll tell you which settingto choose, but in your own projects, pick one that has a number higher than the highest voltage you expect to see in yourcircuit.) Then, at the bottom of the multimeter, connect theblack lead to the COM socket and the red lead to the V socket.Finally, place one lead on each side of the part you want tomeasure the voltage across.How to Generate Electricity47
In this example, the meter is measuring the voltagebetween the positive and negative terminals of a 9 V battery.Notice that my dial is turned to 20 V, in the range showinga V with a straight-line symbol. But there’s another V on themultimeter with a wavy line next to it. Let’s look at what thesesymbols mean.What Are AC and DC?How you set your multimeter depends on whether you want tomeasure the voltage from a battery or a generator. A batteryhas a positive and a negative side, but a generator doesn’t!A generator has two wires that alternate between beingpositive and negative. This is because when one side of themagnet moves past the coil, current in the coil flows in onedirection, and when the other side of the magnet moves pastthe coil, current flows in the other direction.When the current direction switches like that, we call italternating current (AC); when the direction of the currentstays the same all the time, we call it direct current (DC).48Chapter 3
Usually, you’ll find these symbols on your multimeter to indicate the AC and DC ranges of measurement:ACDCYou need to set the multimeter to measure either ACor DC to get the correct reading. For example, batteries havea DC voltage.Project #5: Make a ShakeGeneratorGrab your multimeter—this project will show you how to makea generator and measure its voltage. One quick way to create asimple generator is to manually move a magnet back and forthinside a coil. In this project, you’ll put a magnet inside a tubeand wind a coil around the tube. When you shake the tube, themagnet should move back and forth inside the coil and create avoltage.How to Generate Electricity49
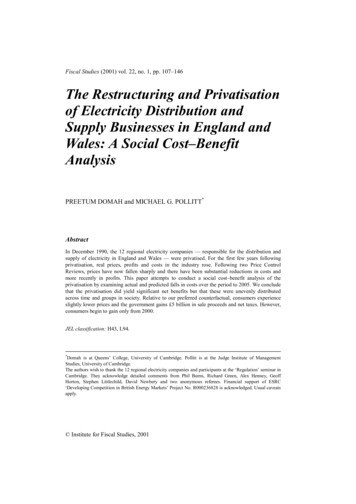
Shopping Listinsulated wireplastic tubemagnetsalligator clipsXXInsulated solid-core wire (Jameco #36792, Bitsbox#W106BK), about 9 feet. Standard hookup wire works fine.XXA small plastic tube, such as an old pen.XXFive disc magnets (Jameco #2181319, Bitsbox #HW145)stacked to form a magnet rod.XXTwo alligator clips (Jameco #256525, Bitsbox #CN262)to connect the multimeter to the coil.ToolsXX50Chapter 3A multimeter to measure the voltage of your generator.The multimeter should be able to measure very low ACvoltages, down to 0.01 V or less. Suitable mul timeters areJameco #2206061, Bitsbox #TL057, or Rapid Electronics#55-6662. These multimeters are a bit more expensivethan the cheapest ones, but they will serve you for manyyears to come.
multimeterStep 1: Prepare Your TubeFind a tube that’s big enough to let the magnets slide easilyback and forth. If you’re using a pen, disassemble the pen andmake sure your magnets fit inside the tube.How to Generate Electricity51
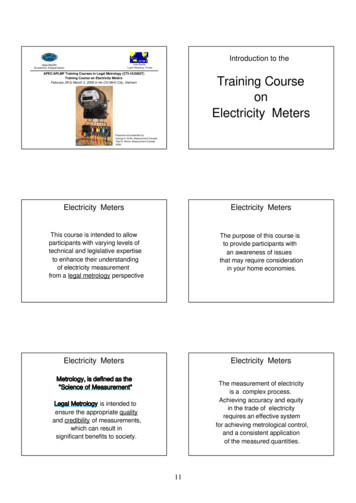
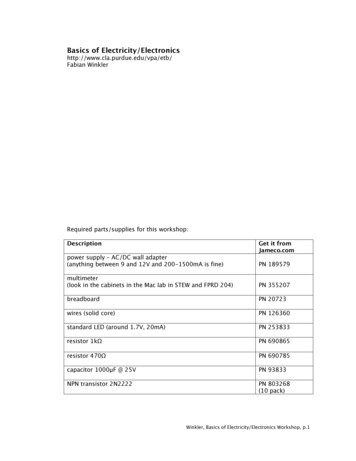
Step 2: Wind Your CoilWind about 50 turns of wire around the middle of your tube.After winding, make a simple knot with the two ends to keepyour coil together. Then, strip the insulation from the two wireends, as shown.Step 3: Connect the MultimeterConnect the multimeter to both ends of the coil using alligatorclips and set the multimeter to measure AC. Choose the lowestAC voltage setting available.52Chapter 3
Step 4: Shake That Thing!Next, put the magnets inside the tube. They should fit insidewithout coming apart.Holding the tube and multimeter leads in your hand, placeone finger on each side of the tube so that the magnets don’tfall out. Then, shake it like you mean it!How to Generate Electricity53
Observe the voltage value on the multimeter. How muchvoltage do you get? I was able to get only 0.02 V from my generator, so it’s not very powerful.Step 5: What If There’s No Voltage?If you can’t measure any voltage from your generator, firstcheck that your multimeter leads are connected well to theexposed coil wires. If you still don’t see a voltage higher than0 V, make sure your multimeter is set to measure really lowvoltages; my dial was turned to 2 V AC. You won’t get a highvoltage from this simple generator, so if the multimeter isn’t onthe lowest setting possible, it will keep reading 0 V. Note thatnot all multimeters are able to measure such low voltages.This generator isn’t very powerful right now. How can youmake it more powerful? Try to increase the voltage from thegenerator by shaking it faster, adding more loops of wire to thecoil, or using a more powerful magnet.N o t e Standard hookup wire is a bit bulky; even 50 turnstake up a lot of space! If you want to get a lot more turns, tryusing magnet wire instead. It’s really thin wire with a thinlayer of insulating coating.54Chapter 3
Try It Out:Using a Motor as a GeneratorA motor already has a magnet and a coil of wire that canrotate in the magnet’s magnetic field. If you rotate therotor with your hand, you can generate a voltage on themotor’s wires.You could create a generator by reversing the motoryou built in Chapter 2, but the power you’d get from itwould be too small to measure. Instead, try to find anold motor from a computer fan or a radio-controlled toycar that you don’t want to play with anymore. Then,set your multimeter to a low-voltage DC range, such as2 V DC. Attach the multimeter leads to the motor wires,just as you did with the shake generator, and turn therotor with your fingers. Some motors have internalcircuits that control the motor, and those circuits canprevent the electricity generated inside the motor fromgoing out to the wires. But if you’re lucky and find amotor that doesn’t have such circuits, you should see areading on the multimeter. Try a low-voltage AC rangeon your multimeter if you see nothing with DC.How Do Batteries Work?I’ve shown you how to generate electricity manually, but thatdoesn’t explain how you’ve powered circuits up to this point inthe book. You’ve been using batteries, and in this section, we’lllook at what lets those batteries create electricity.What’s Inside a Battery?To create a battery, you need three things:XXA positive electrodeXXA negative electrodeXXAn electrolyteHow to Generate Electricity55
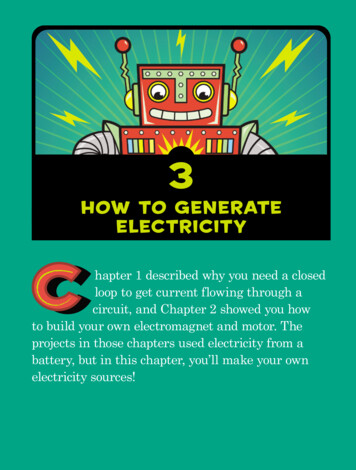
An electrode is a wire that is used to make contactwith something nonmetallic, like the inside of a battery. Anelectrolyte is a substance that can release or gain electrons.Here’s how these three pieces fit inside a typical battery:positive electrodeelectrolytenegative electrodeYou can actually make your own battery by using a simplenail for one electrode and a copper wire for the other. Stickboth into a lemon, and the lemon juice is your electrolyte.positive electrode(copper wire)negative electrode(nail)lack of electronslots of electronslemonThe copper wire becomes the positive terminal of thebattery, and the nail becomes the negative terminal.The Chemistry Behind BatteriesWhen you combine the lemon, the copper wire, and the nail,two chemical reactions happen: one between the lemon juiceand the nail, and another between the lemon juice and thecopper wire. In the first reaction, electrons build up on the56Chapter 3
nail; in the second, electrons leave the copper wire. The nailgets too crowded with electrons, and the copper wire ends upwith too few. Electrons don’t like to be in crowded places, sothe electrons on the nail want to go over to the copper wireto even things out. But the chemical reactions with the lemonjuice are pushing the electrons the other way.Now, what do you think will happen if you connect a lightbulb between the nail and the copper wire? The electrons on thenail really want to get to the copper wire, so they’ll take theeasiest path they can find, and when you create this closedloop circuit, they flow from the nail to the copper wire throughthe light bulb. Recall that current is just electrons flowing ina wire; if you have enough current flowing through the lightbulb, it lights up!After a while, the chemical reactions in the battery stop.When this happens, the battery is dead. Some batteries can berecharged when they die, while others must be thrown away.The materials chosen for the electrodes and electrolyte determine whether the battery can be recharged or not.The batteries you buy in the store are not made oflemons, of course! Modern batteries are made from differentmaterials, and scientists are always looking for new ways tocreate batteries that have more energy, while being smalland lightweight.What Determines a Battery’s Voltage?The materials used for the electrodes and electrolyte determine the voltage you get from a battery, but the size of theelectrodes and the amount of electrolyte don’t matter when itcomes to voltage.To create higher battery voltages, several battery cells areconnected in series. Connecting two battery cells in seriesmeans that you connect the positive side of one battery to thenegative side of the other. The two unconnected terminalsbecome the bigger battery’s new positive and negative terminals, and the resulting voltage is the sum of the voltages fromthe two batteries. For example, in a standard 9 V battery, youHow to Generate Electricity57
have six 1.5 V battery cells, as shown. Notice that the connectors on the outside are attached to just two terminals.9VProject #6: Turn On a Lightwith Lemon PowerYou can make a battery out of many different things; forexample, in “What’s Inside a Battery?” on page 55, I showedyou how a lemon battery might work. In this project, you’lllearn how to build a lemon battery of your own and power alight with it.Wa r n i n g When you’re finished with this project,throw the lemons away. The chemical reactions that happenwith the nail and copper wire will leave the lemons unsuitablefor eating.Meet the LEDA lemon battery can’t create a lot of electricity, so you need toconnect the battery to something that needs very little powerto see the effect. Most light bulbs need more power than you’llgenerate in this project, so let me introduce a component calleda light-emitting diode, or LED.58Chapter 3
This little electronic component gives off, or emits, lightwhen you apply a little bit of power to it. LEDs come in manycolors: red, green, yellow, blue, and more. You’ll learn moreabout this component in Chapter 4, and you’ll use LEDs a lotin this book. For now, you’re just going to use an LED to seethe power generated by your lemon battery.Shopping Listlemonscopper wirealligator clipsLEDnailsXXFour lemons or one lemon cut into four pieces.XX24 inches of copper wire (any copper wire will do, butit’s important that the wire be copper).XXFour galvanized nails (most common nails for outdoorprojects are galvanized).XXTwo alligator clips (Jameco #256525, Bitsbox #CN262)for connecting the LED.XXA standard LED (Jameco #333973, Bitsbox #OP002 forjust this one, or Jameco #18041, Bitsbox #K033 for a variety pack). You’ll need several LEDs for the projects in thisbook, so order at least 10 or a variety pack.How to Generate Electricity59
Toolsmultimeterand leadswire cutterXXA wire cutter (Jameco #35482, Bitsbox #TL008) to prepare the copper wire.XXA multimeter (Jameco #2206061, Bitsbox #TL057, RapidElectronics #55-6662) to see whether your battery is working correctly.Step 1: Prepare Your WiresFirst, cut your copper wire into four 6-inch lengths. Stripabout 1 inch of insulation from both ends of each wire. Thesewill become the electrodes.60Chapter 3
Step 2: Insert Electrodes into a LemonRoll and squeeze a lemon so that you break up the small juicepackets inside it, but not enough to break the skin. Then, usea nail to make one hole in one end, push a copper wire intothat hole, and push the nail into the other end, as shown. Thisis the first lemon battery!Get your multimeter, set it for DC voltage measurement,and test your lemon battery now. Place the positive test leadon the copper wire and the negative test lead on the nail. Ifeverything works correctly, you should see a voltage of around1 V on your multimeter.How to Generate Electricity61
Step 3: Create Four Lemon BatteriesEven if you get 1 V out of your lemon, that’s not enough tolight an LED. Let’s create several lemon batteries so we canget more electricity!Just repeat the process described in Step 2 for the otherlemons; each will become a battery. (If you don’t have fourlemons to spare, you can cut one lemon into four pieces.) Nowyou should have four lemon batteries.1234Step 4: Connect the Lemons in SeriesTo get a higher voltage with your lemon batteries, you’ll needto connect them in series. To connect two lemons in series, youjust connect the positive side of one lemon to the negative sideof another. Remember, the copper wire is positive, and the nailis negative.negative ( )negative ( )positive ( )62Chapter 3positive ( )
To wire four lemons in series, just repeat that processa couple more times. Line your lemons up in a row with thecopper wires pointing to the right and number the lemonsfrom 1 to 4, beginning from the left. Connect the copperwire from lemon 1 to the nail in lemon 2. Twist the wireonto the nail so that the metals connect without comingapart.Connect the copper wire of lemon 2 to the nail inlemon 3, and connect the copper wire from lemon 3 to thenail in lemon 4. This should give you a row of four lemons,with an unconnected nail on lemon 1 and an unconnectedcopper wire on lemon 4. These are the positive and negativeterminals for your big lemon battery, respectively.2341When you connect batteries in series, you can add theirvoltages to find your total. Four 1 V lemon batteries shouldgive you 4 V. If you have a multimeter, measure the voltagebetween the two ends to see whether everything is connected.You should get a voltage of around 3.5 to 4 V.How to Generate Electricity63
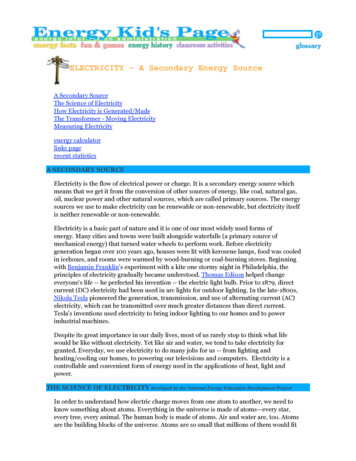
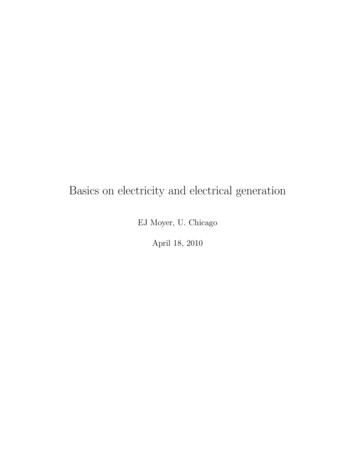
Step 5: Test Your Lemon BatteryLet’s connect the LED to the lemons! Connect the long legfrom the LED to the copper wire, and connect the short legto the nail, as shown. The LED should now light up.64Chapter 3
Lemons aren’t super powerful batteries (you’d neversee anyone with a lemon connected to their computer, forexample), so your LED will probably be very dim. After youfinish building your lemon-powered circuit, turn off the lightin your room, and you should see the LED glow.Remember, when you’re finished with your lemon battery,throw the lemons away—don’t eat them!Try It Out:More Food Batteries!When you’re done making lemon batteries, test to seewhether you can make batteries out of other fruits orvegetables. For example, what about a potato battery?Are you able to get more voltage, or is it the same as thevoltage from the lemon?Step 6: What If Your Lemon Light Doesn’t Work?If you can’t see light from your LED, even in a dark room,check to see whether your LED is connected the right way.The long leg should be connected to the positive side of thebattery, which is the copper wire.Make sure the lemons are connected to each other onlythrough the wires and nails. For example, if your lemons aresitting in a puddle of lemon juice, they could be connectedthrough that. Just dry them off and move them somewhereelse. Next, check that the copper wires are properly connected to the nails and that the nails and copper wires areactually touching the juice inside the lemons. Also, checkthat the nails and copper wires are not touching each otherinside any of the lemons.If the circuit still doesn’t work, disconnect all the lemonbatteries from each other. Then, use a multimeter to checkthat each lemon battery has some voltage. Connect two lemonsin series, and check that you see a higher voltage. Connect thethird lemon, and check that the voltage has increased again.Then, connect the fourth lemon and check that you have evenmore voltage.How to Generate Electricity65
If you see a voltage but the LED doesn’t light, then youprobably just need some more power. Get another lemon ortwo, create some more batteries, and connect them in serieswith the rest.What’s Next?In this chapter, you learned how to create your own electricity from magnetism and chemical reactions. You made yourown shake generator, and you built a lemon battery to poweran LED.If you want to explore generators even more, I suggesttrying to find a dynamo from an old bike. Unlike the generator you built in this chapter, a dynamo is a generator thatgives you a DC voltage, like a battery, and dynamos are commonly used to power headlights on bikes. Cut some windmillblades out of some stiff cardboard or plastic, connect themto the dynamo, and see whether you can harvest energy fromthe wind.You’ve now met a few electronic components, includingswitches, LEDs, and motors. In the following chapters, you’lllearn about even more components and graduate to building some real electronic circuits, like lights that blink, atouch-sensitive switch, and even your own electronic musicalinstrument!66Chapter 3
electricity hapter 1 described why you need a closed loop to get current flowing through a circuit, and Chapter 2 showed you how . Jameco #2206061, Bitsbox #Tl057, or rapid electronics #55-6662. These multimeters are a bit more expensive than the cheapest ones, but they will serv