Transcription
Vendor Processing -- Vendor Management
COPYRIGHT & TRADEMARKSCopyright 1998, 2009, Oracle and/or its affiliates. All rights reserved.Oracle is a registered trademark of Oracle Corporation and/or its affiliates. Other namesmay be trademarks of their respective owners.This software and related documentation are provided under a license agreementcontaining restrictions on use and disclosure and are protected by intellectual propertylaws. Except as expressly permitted in your license agreement or allowed by law, youmay not use, copy, reproduce, translate, broadcast, modify, license, transmit, distribute,exhibit, perform, publish or display any part, in any form, or by any means. Reverseengineering, disassembly, or decompilation of this software, unless required by law forinteroperability, is prohibited.The information contained herein is subject to change without notice and is not warrantedto be error-free. If you find any errors, please report them to us in writing.If this software or related documentation is delivered to the U.S. Government or anyonelicensing it on behalf of the U.S. Government, the following notice is applicable:U.S. GOVERNMENT RIGHTSPrograms, software, databases, and related documentation and technical data delivered toU.S. Government customers are “commercial computer software” or “commercialtechnical data” pursuant to the applicable Federal Acquisition Regulation and agencyspecific supplemental regulations. As such, the use, duplication, disclosure, modification,and adaptation shall be subject to the restrictions and license terms set forth in theapplicable Government contract, and, to the extent applicable by the terms of theGovernment contract, the additional rights set forth in FAR 52.227-19, CommercialComputer Software License (December 2007). Oracle USA, Inc., 500 Oracle Parkway,Redwood City, CA 94065.This software is developed for general use in a variety of information managementapplications. It is not developed or intended for use in any inherently dangerousapplications, including applications which may create a risk of personal injury. If you usethis software in dangerous applications, then you shall be responsible to take allappropriate fail-safe, backup, redundancy and other measures to ensure the safe use ofthis software. Oracle Corporation and its affiliates disclaim any liability for any damagescaused by use of this software in dangerous applications.This software and documentation may provide access to or information on content,products and services from third parties. Oracle Corporation and its affiliates are notresponsible for and expressly disclaim all warranties of any kind with respect to thirdparty content, products and services. Oracle Corporation and its affiliates will not beresponsible for any loss, costs, or damages incurred due to your access to or use of thirdparty content, products or services.
Training GuideVendor Processing -- Vendor ManagementTable of ContentsVendor Processing -- Vendor Management . 2Vendor Processing -- Vendor Management. 3Vendor Processing Overview .4Vendor Processing Roles and Responsibilities . 5Vendor Management Process . 6What's Changing? . 7Request and Create Vendors .8Vendor Creation Process . 9Nature of Transaction . 11Documentation Requirements for Vendors . 12Requesting a New Supplier. 13Requesting a New Payee . 14Vendor Request Status . 15Validating Vendor Information in OnBase . 16Resetting Temporary Vendor Passwords . 29Vendor Records in ARC . 33Vendor Record Overview . 34Vendor Identifying Information . 35Vendor Addresses . 36Vendor Contacts . 37Vendor Location . 38Identifying Vendors for a Transaction . 39Searching For Vendors . 40Approving Vendors in ARC . 58Request Updates to Existing Vendors. 76Requesting Vendor Modifications . 77Modifying Supplier Information . 78Modifying Employee Information . 79Modifying Vendor Information in ARC . 80Create and Maintain Vendor Conversations . 140Create and Maintain Vendor Conversations . 141Key Terms . 157Course References . 158Knowledge Assessment . 159Page iii
Training GuideVendor Processing -- Vendor ManagementPage 1
Training GuideVendor Processing -- Vendor ManagementVendor Processing -- Vendor ManagementPage 2
Training GuideVendor Processing -- Vendor ManagementVendor Processing -- Vendor ManagementThis is the Vendor Processing -- Vendor Management course within the Vendor Processingcurriculum.If you need a reminder on how to navigate through this course using ARC's web-based trainingtool (WBT), click here /files/gateway/content/training/job aids/Job Aid Getting Started With the Web Based Tool.pdf) for a quick reference guide.Page 3
Training GuideVendor Processing -- Vendor ManagementVendor Processing OverviewThis is the Vendor Processing Overview lesson of the Vendor Processing -- Vendor Managementcourse. Upon completion of this lesson, you will be able to: Describe the benefits of the changes to the new vendor management request processDescribe the new vendor request form as well as the business reasons for thestandardizationUnderstand the data flow for vendor records into ARC through OnBaseReview vendor information in ARCEstimated time needed to complete lesson: 10 minutesPage 4
Training GuideVendor Processing -- Vendor ManagementVendor Processing Roles and ResponsibilitiesVendor processing involves both departmental users, vendors, and the Vendor ManagementTeam. While the departmental users and vendors will be responsible for requesting new vendorsand vendor modifications, the Vendor Management Team is responsible for validating allinformation and ensuring that all documentation/vendor records are compliant. The VendorManagement Team will adhere to the Vendor Validation Policy (click ylib/imce shared/Vendor Management Vendor Validation Policy.pdf) to see the policy) to ensure that all vendors are legitimate andare tax compliant by adhering to all documentation requirements. Throughout this course, thefollowing characters with different security rights and roles will help demonstrate the vendorprocessing business flow:Page 5
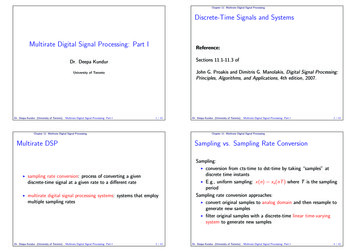
Training GuideVendor Processing -- Vendor ManagementVendor Management ProcessThe vendor management process involves an interface between ARC and OnBase. The process isas follows: Page 6School/Admin users and/or Vendors will initiate new vendor requests and modificationsthrough submitting a vendor request form, which will be submitted into OnBaseVendor Management Team will validate the vendor information in OnBaseOnce vendor information is validated, OnBase will send the vendor information to ARC,and the vendor record will be createdVendor Management Team will identify unapproved vendors to review/updateVendor Management Team will make applicable updates to the vendor record, i.e.withholding information, Location, etc. while referencing the vendor informationuploaded in OnBaseOnce completed, the Vendor Management Team will approve the vendor in ARC, andthe vendor is available for processing on procurement transactions
Training GuideVendor Processing -- Vendor ManagementWhat's Changing?ARC will maintain a single vendor master list. The new vendor request web form will helpstreamline and standardize vendor data. In addition, the new system will be able to capturemultiple vendor addresses and contacts for a single vendor.Page 7
Training GuideVendor Processing -- Vendor ManagementRequest and Create VendorsThis is the Request and Create Vendors lesson of the Vendor Processing -- Vendor Managementcourse. Upon completion of this lesson, you will be able to: Describe the new vendor request formReview vendor master file structureValidate vendor information in OnBaseEstimated time needed to complete lesson: 25 minutesPage 8
Training GuideVendor Processing -- Vendor ManagementVendor Creation ProcessIn order to initiate a request for a new vendor, a Requestor (Department user) should first verifythat the vendor does not currently exist in ARC. If the vendor does not exist, a request formshould be submitted to have the vendor created in ARC. The web form can be accessed on theProcurement web page. The vendor request form has different components depending on thenature of the transaction:1. The School/Admin User Portion -- This part of the form will require Department usersto complete basic vendor information and select the nature of the transaction. The natureof the transaction dictates the rest of the fields on the form and vary based on whether theuser wants to add a supplier to the system or are trying to do an employee reimbursement.2. The Vendor Portion -- Once the School/Admin user has initiated the vendor request, itwill automatically be sent to the vendor for them to complete additional disbursementinformation and submit required documentation.Please click here /files/gateway/content/training/job aids/Job Aid InitiatingVendor Requests.pdf) to access the new vendor request step-by-step guide to see step-by-stepinstructions on how to complete the vendor request form. Then, you can access the vendorstep-by-step guide here /files/gateway/content/training/job aids/Job Aid Vendor Components of Vendor Form.pdf) to help provide guidance should vendors have questions.Please note that the look and feel of the form will vary from the step-by-step guides, but thegeneral process/fields will remain the same. The vendor request form looks like this:Page 9
Training GuideVendor Processing -- Vendor ManagementPage 10
Training GuideVendor Processing -- Vendor ManagementNature of TransactionThe term vendor is an umbrella term for anyone that Columbia University pays. Vendor refers toboth suppliers (good and services, etc), employees, and all other payees to which Columbiadisburses payments. The vendor creation process will vary based on the type of vendor beingrequested. The vendor type is indicated by the Nature of the Transaction. The Nature ofTransaction' is the first field selected on the online vendor request form. The Nature of theTransaction determines requirements such as necessary tax forms and what transaction types avendor can be associated with. Guidance on what to select is seen below. If you would like toprint this table, you can access this job aid /files/gateway/content/training/job aids/Job Aid Nature ofTransactions.pdf). For each new vendor request, you will need to validate that the Nature ofTransaction is appropriate given the vendor.Please note that there is only one Nature of Transaction (transaction type) allowed per vendorprofile. If the same vendor experiences multiple transaction types, department users will need torequest multiple vendor profiles for this vendor.Page 11
Training GuideVendor Processing -- Vendor ManagementDocumentation Requirements for VendorsA vendor record is not considered complete until all required documentation is submitted.Required documentation will vary based on the Nature of the Transaction. The following tableprovides guidance on what documentation must be submitted for each type of transaction. A printfriendly version of this table can be found in this job aid /files/gateway/content/training/job aids/Job Aid Vendor Documentation Requirements.pdf). For additional questions on documentation requirements, youcan access the documentation policy ylib/imce shared/W9 policy 030209 1236890612902.pdf). In addition, the foreign vendor icylib/imce shared/Foreign Payment Policy foreignnationals.pdf) can help dictate actions regarding foreign vendors. You will be responsible forvalidating that all required documentation is complete and submitted given the Nature of theTransaction.Page 12
Training GuideVendor Processing -- Vendor ManagementRequesting a New SupplierVendors should be created in ARC prior to requesting goods and/or services from the vendor.Before deciding to transact with a new vendor, verify that there is not a vendor with a UniversityWide Purchasing Agreement (UwPA) that will meet your need. When a new vendor request isnecessary, School/Amin Users will access the online vendor request form and select theappropriate 'Nature of Transaction'. Two of the most common transaction types are with suppliersand payees. The vendor request process will vary based on whether you are processing a requestfor a new supplier or a new payee. When requesting that a new supplier be added to ARC, theprocess is as follows: School/Admin User will access the web form and complete basic identifying informationfor the supplier and submit this informationThe information will then be sent to OnBase, which will trigger OnBase to automaticallygenerate an e-mail to the supplier providing them with temporary login information. (Asthe temporary login information expires after a week, the vendor must create a permanentuser ID and password soon after receiving the initial e-mail)The vendor will login to the online web form using their temporary ID and complete therest of the required vendor informationAfter the vendor submits the completed form, the information will be sent to OnBase forreview by the Vendor Management team before the vendor record can be created in ARCPage 13
Training GuideVendor Processing -- Vendor ManagementRequesting a New PayeeAnother common transaction is an employee reimbursement which requires a new employeepayee be created. In this case, the Department user will be able to complete the entire form withthe exception of the W8/W9 information (if applicable). If a W8/W9 is necessary, an e-mail willbe automatically generated and sent to the payee, indicating that they need to submit the requiredinformation (similar to the supplier process). The payee process is as follows:Page 14
Training GuideVendor Processing -- Vendor ManagementVendor Request StatusOnce department users have submitted a vendor request form, there are multiple ways in whichthey can find out the status of the request. They can check the status of a vendor request onlinevia the Procurement web Website. They will also receive emails at certain parts of the vendorcreation lifecycle, which will provide notification when certain actions take place.Emails will be sent to department users at the following stages in the request process: Once a request has been submitted, department users will receive a confirmation e-mailwith the Request ID (which can be used to track the status of the request online)When a request has been approvedWhen a request has been deniedWhen a request has been on holdWhen a request that was previously on hold has been approvedPlease note that vendors will not be able to view status on the Procurement website. If a vendorwould like the know the status of a request, they will need to inquire with the Service Desk.Page 15
Training GuideVendor Processing -- Vendor ManagementValidating Vendor Information in OnBaseOnce a vendor request has been submitted by a School/Admin User, the information will beuploaded to OnBase for your review. You will need to review and validate the information inOnBase to ensure the information is complete and accurate. Once you have reviewed thisinformation, you will validate, deny, or put a hold on the request. If you validate the request, thevendor information will be uploaded to ARC. Please note that all validated requests in OnBasewill be sent to ARC with an Unapproved Status. Vendor Management will then need to approvethe request in ARC. If you deny or put the request on hold, a notification will be sent to theRequestor with the status of their request as well as your comments indicating the reason behindthe decision.Throughout the following topic, imagine a time you've faced a similar scenario: Sean, aDepartment User, has submitted a request for a new vendor. You need to validate the informationand decide whether or not to validate, deny, or hold the request.ProcedureWelcome to the Validating Vendor Information in OnBase topic where you will learn how tovalidate vendor requests once they are sent to OnBase.Step1.Page 16ActionOnce you have logged into OnBase, you will select the file containing the pendingvendor requests for review. Click the VRP Pending Vendor Review [149] treeitem.
Training GuideVendor Processing -- Vendor ManagementStep2.ActionClick the button of the scrollbar.Page 17
Training GuideVendor Processing -- Vendor ManagementStep3.Step4.Page 18ActionClick the date for which you want to view the requests.ActionClick the Vendor Status list.
Training GuideVendor Processing -- Vendor ManagementStep5.ActionClick the Unapproved list item.Page 19
Training GuideVendor Processing -- Vendor ManagementStep6.Step7.Page 20ActionClick the Persistance list.ActionClick the Regular list item.
Training GuideVendor Processing -- Vendor ManagementStep8.ActionClick the Classification list.Page 21
Training GuideVendor Processing -- Vendor ManagementStep9.Step10.Page 22ActionClick the Supplier list item.ActionIf you want to validate the request, double-click the Approve VM Request button.
Training GuideVendor Processing -- Vendor ManagementStep11.ActionClick the Yes button.Page 23
Training GuideVendor Processing -- Vendor ManagementStep12.Step13.Page 24ActionClick the VRP PeopleSoft Notification [1] tree item to see when the file has beenreceived by ARC.ActionWhen the vendor has been sent to ARC successfully and is pending a Vendor ID, thenumber next to the VPR Pending Vendor ID from PS will increase by 1 (notice thenumber went from 5 to 6). When the Click the VPR Pending Vendor ID from PS[6] tree item.
Training GuideVendor Processing -- Vendor ManagementStep14.ActionWhen the vendor request is ready for final approval, the number next to "VRPPending Final PS Approval" will increase. When this occurs, click the VRPPending Final PS Approval [10] tree item.Page 25
Training GuideVendor Processing -- Vendor ManagementStep15.Page 26ActionValidate that the correct date is selected.
Training GuideVendor Processing -- Vendor ManagementStep16.Step17.ActionClick the button of the scrollbar.ActionSee that the Vendor ID has been created for the vendor. This will be the ID used inARC to identify the vendor.Page 27
Training GuideVendor Processing -- Vendor ManagementStep18.Page 28ActionYou have successfully validated vendor information in OnBase. You can now selectthe next lesson.End of Procedure.
Training GuideVendor Processing -- Vendor ManagementResetting Temporary Vendor PasswordsEach time a new vendor is requested, an email is sent to the vendor containing a temporary loginID and password. This temporary information will expire after a week. In the event the vendorhasn't updated their information in that time period, their login ID and password will need to bereset by the Vendor Management Team. This hands-on scenario will teach you how to resettemporary login information.ProcedureWelcome to the Resetting Temopary Vendor Passwords topic where you will learn how to resetvendor login information.Step1.ActionAfter you have logged into the Vendor Management Request form on theProcurement Web Page, you will select the Password Management link from theFIN ERP Administration menu.Page 29
Training GuideVendor Processing -- Vendor ManagementStep2.Page 30ActionClick the button of the scrollbar to find the request ID you are looking for.
Training GuideVendor Processing -- Vendor ManagementStep3.Step4.ActionThe dates in red will indicate that the information has expired. Click the Renew &Send object.ActionClick the Send new password button.Page 31
Training GuideVendor Processing -- Vendor ManagementStep5.Page 32ActionYou can now select the next topic.End of Procedure.
Training GuideVendor Processing -- Vendor ManagementVendor Records in ARCThis is the Vendor Records in ARC lesson of the Vendor Processing -- Vendor Managementcourse. Upon completion of this lesson, you will be able to: Review the different components of a Vendor Record in ARCSearch for vendors and review vendor information in ARCApprove Vendors in ARCEstimated time needed to complete lesson: 20 minutesPage 33
Training GuideVendor Processing -- Vendor ManagementVendor Record OverviewOnce vendor information has been validated in OnBase, a vendor record is created in ARC.Vendor Records in ARC are robust and contain six different tabs of information. The four tabsthat contain most of the vendor information you will use are: Identifying Information, Address,Contacts, and Location. You can use these tabs to review vendor information and makemodifications to certain fields.The organization of the information on the vendor profile is as follows: There is one tax identification number per vendor profile (there can be no duplicate taxID numbers in the system)Each vendor then can have multiple addresses (one remit to address, one orderingaddress, and one tax address)Each one of these addresses can be associated with a specific contact person at thisvendor address as well as a location for this address.Locations are payment methods (check, wire, automated clearing house). Each locationfor a vendor must be linked to one of the three addressesPage 34
Training GuideVendor Processing -- Vendor ManagementVendor Identifying InformationThe Identifying Information Tab contains key labeling information for the vendor such as,Vendor Name, Vendor ID, and Vendor Short Name. You will use the fields on the IdentifyingInformation tab to search for vendors when processing a transaction, such as a voucher orrequisition.In addition, this is where you will change the Vendor Status to Approved and make the vendorOpen for Ordering, meaning that Departmental Users can use this vendor when processingrequisitions.Page 35
Training GuideVendor Processing -- Vendor ManagementVendor AddressesThe Address Tab is where you can find the vendor's address(es). ARC allows you to entermultiple addresses for a vendor. This information will also be used when dispatching paymentsand purchase orders to vendors. There is also a description field on the page to indicate what typeof address is entered (remit to, ordering, tax, etc.)Page 36
Training GuideVendor Processing -- Vendor ManagementVendor ContactsThe Contacts Tab contains information about the primary contacts for a vendor. The informationentered on this page is informational only. It will not be copied to a transaction when the vendoris selected.Page 37
Training GuideVendor Processing -- Vendor ManagementVendor LocationThe Locations Tab contains key disbursement information for the vendor. You will find paymentmethod and associated payment details on this tab. The Vendor Management Team will need toupdate this tab with Location Information for the vendor once it has been submitted. New vendorscreated from ARC will be entered with the default Check Location (CHK-01). If a request issubmitted for the vendor to be paid via ACH, the Vendor Management Team will need to insert anew row to define the ACH Location.Page 38
Training GuideVendor Processing -- Vendor ManagementIdentifying Vendors for a TransactionVendor Records can be used to review vendor information and verify whether or not a vendorexists in ARC. When processing transactions involving vendors, such as vouchers andrequisitions, you can search for vendors using identifying information. When creating a newvoucher or requisition, you can use the Look Up Function (symbolized by a magnifying glass) toidentify and select the appropriate vendor. The Look Up function allows you to search by thefollowing fields:Page 39
Training GuideVendor Processing -- Vendor ManagementSearching For VendorsOnce a vendor exists in ARC, users can review the vendor information via the vendor searchpages.Note: This page can also be used to determine whether a vendor already exists in ARC prior toinitiating the creation process.Throughout the following topic, imagine a time you have faced a similar scenario: Mark needs toverify that a vendor does not already exist in ARC before he initiates the vendor request process.Estimated time needed to complete topic: 5 minutesProcedureWelcome to the Searching for Vendors topic where you will learn how to search for vendorrecords. You can reference the Vendor Validation icylib/imce shared/Vendor Management Vendor Validation Policy.pdf) for additional information about validating vendors.Page 40
Training GuideVendor Processing -- Vendor ManagementStep1.ActionThere are two ways to access menu options in ARC. The first is by clicking on theappropriate option in the blue box, or you can find the same selections by clickingthe Main Menu button at the top of your screen. In this course, we will use the MainMenu button at the top of the screen.Page 41
Training GuideVendor Processing -- Vendor ManagementStep2.Page 42ActionClick the Main Menu button.
Training GuideVendor Processing -- Vendor ManagementStep3.Step4.ActionClick the Vendors menu.ActionClick the Vendor Information menu to see the different options available forviewing/modifying vendor information.Page 43
Training GuideVendor Processing -- Vendor ManagementStep5.Page 44ActionClick the Add/Update menu to find an existing vendor.
Training GuideVendor Processing -- Vendor ManagementStep6.Step7.ActionClick the Vendor menu. You will always select this option when searching forexisting vendors.ActionClick the Name 1 list to select the appropriate search options.Page 45
Training GuideVendor Processing -- Vendor ManagementStep8.Page 46ActionSelect Contains. This is a common search tool. If you don
Vendor Management Process The vendor management process involves an interface between ARC and OnBase. The process is as follows: School/Admin users and/or Vendors will initiate new vendor requests and modifications through submitting a vendor request form, which will be submitted into OnBase Vendor