Transcription
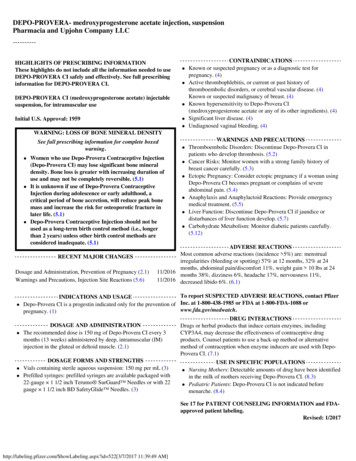
Giving a subcutaneous injectionWhat is a subcutaneous injection?A subcutaneous injection is given in the fattylayer of tissue just under the skin.A subcutaneous injection into the fatty layer of tissue(pinched up to give the injection) under the skin.Why are subcutaneous injectionsgiven?These injections are given because there islittle blood flow to fatty tissue, and the injectedmedication is generally absorbed more slowly,sometimes over 24 hours. Some medicationsthat can be injected subcutaneously aregrowth hormone, insulin, epinephrine, andother substances.Preparing to give medicationSubcutaneous injections are not given if theskin is burned, hardened,inflamed, swollen,or damaged by a previous injection.Patient Education1l. Wash your hands thoroughly. This is thebest way to prevent infection.2. Assemble your equipment:Medication May be a multidose vial of liquid ormay be a vial with powder thatrequires “reconstitution.” Follow themanufacturer’s instructions as to whatand how much diluent to use. Thediluent is usually saline (a mixture ofsalt water) or sterile water.Syringe or pen and needleDepending on the amount of medicationto be given and the size of the childor adult: 0.5 cc,1.0 cc, or 2 cc with 27 gaugeneedle (5/8 of an inch long) 3 cc luer lock syringe—used whensolution is more than 1 cc 25 gauge needle (5/8 of an inch longor 27 gauge needle (5/8 of an inchlong) 0.3 mL insulin syringes with 31 gaugeneedles (3/16 to 5/16 inches long ) areavailablefor those who are visually impaired orfor those who need very small dosesof medication. medication log container for syringe disposal sterile 2 x 2 inch gauze pad alcohol padsDrawing up medication1. Check the label for correct medication.2. Remove the soft metal or plastic capprotecting the rubber stopper of the vial.3. If the medication vial or pen can be used formore than one dose, record the date andtime on the label.Giving a subcutaneous injection
4. Clean the exposed rubber stopperusing an alcohol swab.5. Remove the syringe from the plasticor paper cover. If necessary, attachthe needle securely.6. Pull back and forth on the plunger bygrasping the plunger handle. Graspingthe handle end will prevent contami nation of the plunger shaft (which issterile).7. With the needle capped, pull back theplunger, filling the syringe with airequal to the amount of medication tobe administered.8. Remove the cap covering the needleand set it on its side to prevent con tamination. Be careful not to touch theneedle. The inside of the cap andneedle is sterile, and the needle willbe covered again with this cap.9. With the vial in an up right position,push the needle through the cleansedrubber stopper on the vial. Push theneedle in at a 90 degree angle, beingcareful not to bend the needle.10.Inject the air in the syringe intothe vial. Air is injected into a multi dose vial to prevent a vacuumfrom forming. If too little or no air isinjected, withdrawing the medicationmay be difficult. If too much airis injected, the plunger may beforced out of the barrel causing themedication to spill.11.Turn the vial upside down, with theneedle remaining in the vial. Theneedle will be pointing upward.12.Make sure that the tip of the needleis completely covered by themedication. This will make it easier towithdraw the solution (and not air).13.Pull back on the plunger to fill thePatient Education2syringe with the correct dose ofmedication.14.Keep the vial upside down, with theneedle in the vial pointed upward.Tap the syringe, or “flick” it with yourfingertips. This helps move bubbles tothe top of the syringe.15.Once the bubbles are at the top of thesyringe, gently push on the plunger toforce the bubbles out of the syringeand back into the vial.Or, you may push all the medicationsolution back into the vial, withdrawagain slowly, and repeat steps 14 and15.Note: It is important to eliminate large airbubbles because they take up space neededfor the medication, and they may cause painor discomfort when injected.16.After removing the bubbles, check thedose of medication in the syringe tobe sure you have drawn up the cor rect amount.If using a pen, skip steps 5 to 16.Do the following:a. Attach needle to pen by cleaningthe top with alcohol and screwingon the needle.b. Dial in your prime volume (usually0.02 mL) using the manufacturer’sdirections.c. With pen needle pointed up, pushthe injection button completely.You should see a drop or streamof liquid. If you do not, repeatpriming steps until this occurs.d. Dial in prescribed dose ofmedication.17. After the medication is correctlydrawn up, carefully replace theneedle cap to prevent contamination.Giving a subcutaneous injection
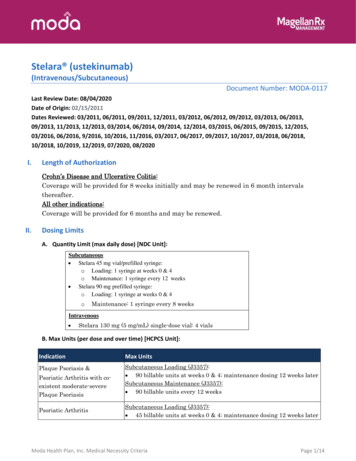
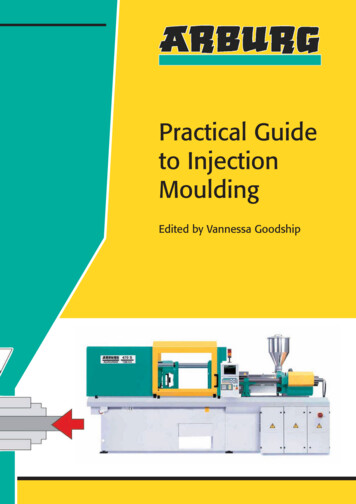
Locating injection sitesSubcutaneous injections can be given in the arms, legs, or abdomen. Your nurse ordoctor will help you select the best sites to administer your medication.1. To locate injection siteson the arms, fold one armacross the chest. Placeyour hand on the shoulderand draw an imaginaryline below your hand.Place another hand on theelbow.Draw an imaginaryline down the outer side of tthe arm and down thecenter front of the arm,starting at the elbow.The area inside theseimaginary lines is whereinjections are given.(If you are injectingimagine the handplacement.)yourself,Injection sites on the side of thearm.Injection sites on the back of the arm.2. To locate injection sites on the thighs, sit down,place your hand above the knee, and draw animaginary line above it. Place your hand at theuppermost part of the thigh and draw an imaginaryline below your hand. Draw an imaginary line downthe outer side of the leg and down the center frontof the leg. The area within these imaginary linesis where injections may be given.3.To locate injection sites on the abdomen, place yourhands on the lower ribs and draw an imaginary linethem. Use this area below your hands for injections,as far around as you can pinch up fatty tissue.use a 1 inch area around the navel.Patient Education3belowDo notInjection sites on the front of the thigh.Giving a subcutaneous injection
Rotating injection sitesIt is extremely important to rotate sites to keepthe skin healthy. Repeated injections in thesame spot can cause scarring and hardeningof fatty tissue that will interfere with absorp tion of medication. Each injection should beabout 1 inch apart. Each injection site can bemeasured with a small dot Band Aid, providingthe patient is not sensitive to the adhesive.Start injections at the highest point of the areaand continue down toward the point farthestaway from the body (for example, upper armdown toward elbow). It is preferable to use allsites available on one body part (arm or leg)before moving on to another. However, someparents find that children are more acceptingInjection sites on the abdomenof injections if they are rotated from one bodypart to another (arm, leg, arm, leg). Avoid giving injections in areas that are burned,reddened, inflamed, swollen, or damaged by prior injections.Preparing the skinGiving the injectionCleanse the skin with a back and forthmotion using an alcohol swab. Thismotion moves bacteria away from theinjection site. Allow the alcohol to drycompletely by air.2. Hold the syringe in one hand likepencil or a dart.3. Grasp the skin between the thumb andindex finger with your other hand andpinch up.Since the skin is the body’s first defenseagainst infection, it must be cleansedthoroughly before a needle is inserted.Patient Education1. Take the cover off the needle. Becareful not to contaminate the needle.Place the cover on its side.4. Quickly thrust the needle all the wayinto the skin. Do not “push” the needleinto the skin slowly or thrust the needleinto the skin with great force.4Giving a subcutaneous injection
Do not press down on the top of theplunger while piercing the skin.5. Insert the needle at a 90 degree (right)angle. This angle is important toensure that the medications will beinjected into the fatty tissue. However,for small children, and persons with lit tle subcutaneous fat on thin skin, youmay be taught to use a 45 degreeangle.If using a pen, insert the pen needleat a 90 degree angle.6. After the needle is completely insertedinto the skin, release the skin that youare grasping.Press down on the plunger to releasemedication into the subcutaneouslayer in a slow, steady pace.If using a pen, press the injectionbutton completely (or until it clicks).Count 10 seconds before removingthe needle from the skin.7. As the needle is pulled out of the skin,gently press a 2 x 2 gauze onto the nee dle insertion site. Pressure over the sitewhile removing the needle prevents skinfrom pulling back, which may be uncom fortable. The gauze also helps seal thepunctured tissue and prevents leakage.gauze pad. Also, a small amount ofclear fluid may appear at the site. Thismay be medication that is following theneedle track to the surface. Again,apply pressure using a 2 x 2 gauzepad.If using a pen:Untwist needle on the pen and safelydispose the needle. Replace pen capand store as instructed.Safe needle disposalPlease refer to the Clinical Center pam phlet “Handling Sharp Objects Safely atHome.”o Place the syringe or needle in a hardplastic or metal container with a tightlysecured lid.o Do not re cap needles after use.Keep the container out of the reach ofchildren or pets.o When the container is three quartersfull, take it to a health care facility(hospital or doctor’s office) for properdisposal. If you live within drivingdistance of NIH, you can bring yourcontainer to NIH for proper disposal.8. If instructed to do so, press or rub thesite for a few seconds.9. It is not serious if you notice blood atthe site after the needle is removed.You may have nicked a surface bloodvessel when you injected, and blood isfollowing the needle track out to the sur face. Simply press the site with a 2 x 2Patient Education5Giving a subcutaneous injection
MedicationDoseSchedulePrimary NursePhonePhysicianPhoneThis information is prepared specifically for personstaking part in clinical research at the NationalInstitutes of Health Clinical Center and may not applyto patients elsewhere. If you have questions about theinformation presented here, talk to a member of yourhealth care team.Products/resources named serve as examples and donot imply endorsement by NIH. The fact that a certainproduct/resource is not named does not imply thatsuch product/resource is unsatisfactory.National Institutes of Health Clinical CenterBethesda, MD 20892Questions about the Clinical IH.Turning Discovery Into HealthPatient Education6Giving a subcutaneous injection
injected into the fatty tissue. However, for small children, and persons with lit tle subcutaneous fat on thin skin, you may be taught to use a 45 degree angle. If using a pen, insert the pen needle at a 90 degree angle. 6. After the needle is completely inserted into