Transcription
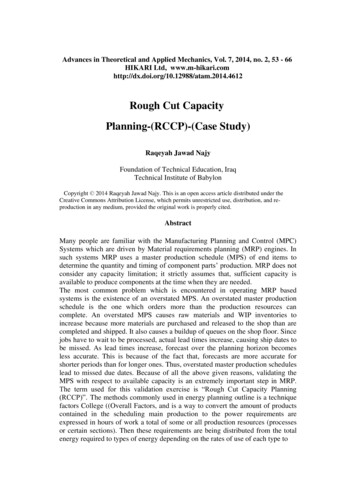
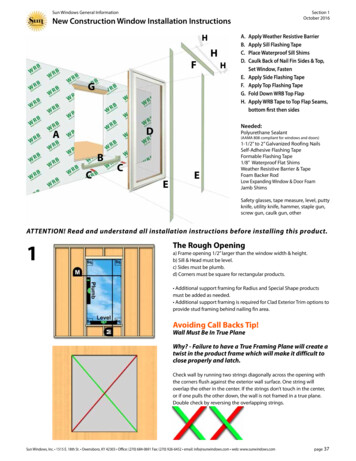
Sun Windows General InformationSection 1October 2016New Construction Window Installation InstructionsHFHE.F.G.H.GABApply Weather Resistive BarrierApply Sill Flashing TapePlace Waterproof Sill ShimsCaulk Back of Nail Fin Sides & Top,Set Window, FastenApply Side Flashing TapeApply Top Flashing TapeFold Down WRB Top FlapApply WRB Tape to Top Flap Seams,bottom first then sidesNeeded:DCHA.B.C.D.Polyurethane Sealant(AAMA 808 compliant for windows and doors)CEE1-1/2” to 2” Galvanized Roofing NailsSelf-Adhesive Flashing TapeFormable Flashing Tape1/8” Waterproof Flat ShimsWeather Resistive Barrier & TapeFoam Backer RodLow Expanding Window & Door FoamJamb ShimsSafety glasses, tape measure, level, puttyknife, utility knife, hammer, staple gun,screw gun, caulk gun, otherATTENTION! Read and understand all installation instructions before installing this product.1The Rough Openinga) Frame opening 1/2” larger than the window width & height.b) Sill & Head must be level.c) Sides must be plumb.d) Corners must be square for rectangular products. Additional support framing for Radius and Special Shape productsmust be added as needed. Additional support framing is required for Clad Exterior Trim options toprovide stud framing behind nailing fin area.Avoiding Call Backs Tip!Wall Must Be In True PlaneWhy? - Failure to have a True Framing Plane will create atwist in the product frame which will make it difficult toclose properly and latch.Check wall by running two strings diagonally across the opening withthe corners flush against the exterior wall surface. One string willoverlap the other in the center. If the strings don’t touch in the center,or if one pulls the other down, the wall is not framed in a true plane.Double check by reversing the overlapping strings.Sun Windows, Inc. 1515 E. 18th St. Owensboro, KY 42303 Office: (270) 684-0691 Fax: (270) 926-6452 email: info@sunwindows.com web: www.sunwindows.compage 37
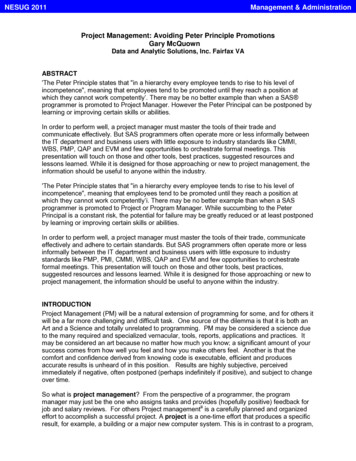
Sun Windows General InformationNew Construction Window Installation Instructions23aSection 1October 2016Test fit window in the openinga) Remove all packaging from the window. This includes the clear wrap,cardboard protectors and wood transportation support from bottomnailing fins (on mulled units). Make sure to keep the sashes closed andlocked while installing the window.b) Place the window in the opening and check all clearances. You shouldhave approximately 1/4” on the sides and 1/2” at the top. The extra spaceat the top allows for shims to be applied at the sill. See Step 5.c) Remove the window and make any necessary adjustments to theframing now.Integrating The Weather Resistive Barriera) Apply Weather Resistive Barrier (WRB) to the exterior wall surface permanufacturers instructions.3b3c-db) Cut WRB over window opening as indicated in illustration.Cut 1” above the top of the opening to allow for taping of this flap tothe top flashing. See step 16. Cut bottom even with sill framing.c) Wrap sides into opening. Fasten. Trim excess.d) Temporarily fold up top flap and tape out of the way in preparationfor setting the window.Sun Windows, Inc. 1515 E. 18th St. Owensboro, KY 42303 Office: (270) 684-0691 Fax: (270) 926-6452 email: info@sunwindows.com web: www.sunwindows.compage 38
Sun Windows General InformationNew Construction Window Installation Instructions4Section 1October 2016Note: All Flashing is to be applied in Weatherboardfashion.Apply Sill FlashingUsing Flexible Flashing Tape, run up the sides about 3”. Apply flush withthe interior edge of the window opening. Overlap the face of the WRBon the exterior about 2” to 3”.5Shim at the SillPlace 1/8”, flat, waterproof shims on the sill. They should be placed neareach side of the window. If the window is a mulled unit, add shimsunder each mull point. The shims must be level across the opening sothat the window unit will sit level when it is placed in the opening.6Apply Sealant to Back of Nail Fins or to theWRB - Top and Sides OnlyUsing AAMA 808 compliant polyurethane sealant, apply a continuousbead, 1/4” to 3/8” in width, to the back-side of the top and side nail finsor to the corresponding surface of the WRB. Do Not apply sealant to thebottom nail fin or below the window opening. Leave that area bare toallow for drainage.Set the Window in the Opening7a) With the sealant applied, set the window in the opening.b) Center the unit so that there is equal space on both sides. Makesure that it is resting on the Sill Shims and that they are at the supportpoints specified in Step 5.c) Temporarily fasten the unit in the opening using a wood blockand screw. The wood block should overlap the nail fin on one sidethe unit, near the top. Apply the screwapproximately 1/2” from edge of nailingfin. Loosely fasten the block just enoughto hold the unit in place but allow forshifting of the frame for adjustments. Seethe following step. Keep the hole closeenough to the nail fin so that it will becovered by the flashing tape when it isapplied.Sun Windows, Inc. 1515 E. 18th St. Owensboro, KY 42303 Office: (270) 684-0691 Fax: (270) 926-6452 email: info@sunwindows.com web: www.sunwindows.compage 39
Sun Windows General InformationNew Construction Window Installation Instructions8Section 1October 2016Level the SillVerify that the sill is level. If not, shim with additional waterproof shimsto level.Avoiding Call Backs Tip!Leveling is the first step in making sure the windowis installed square. A level sill ensures that water willdrain properly and is the foundation for sash-to-framealignment.9Square the Window Framea) Check that the window is square. To do this, measure diagonallyfrom one top corner to the opposite side bottom corner and thenmeasure the other two corners. These measurements should be thesame (within 1/16th of an inch). If they are not, the window is set in theopening out-of-square.b) Adjust if necessary - shift either the top or bottom of the windowsideways until both diagonal measurements equal each other.c) When the window is square, permanently fasten the four cornersof the unit through the exterior nail fins.Avoiding Call Backs Tip!Squaring the window frame ensures that the alignmentrelationship between the sash and frame is correct.Casement Window: Failing to do so will cause misalignment betweenthe latches and keepers, preventing proper closure. Out of square willalso cause the top hinge pin to interfere with sash closure. It is alsopossible that the adjustable hinges will not have enough adjustment toallow the square sash to fit in the out of square frame.Double Hung Window: If the window frame is not installed square,the alignment of the sashes in relationship to each other and the jambliners will be off. This will create gaps between the sashes and the jambliners, as well as the head and sill. This will cause air leakage, possiblewater leakage and sash drift.10Plumb & Shim Sidesa) Check the side jambs to verify that they are plumb. Use a straightedge to check that the sides are not bowed. Also measure across thewidth of the window frame near the top, middle and bottom and verifythat the frame width is the same. If not, correct with shims.b) Shim at multiple points along the sides of the window. Do not shimthe top of the window.Sun Windows, Inc. 1515 E. 18th St. Owensboro, KY 42303 Office: (270) 684-0691 Fax: (270) 926-6452 email: info@sunwindows.com web: www.sunwindows.compage 40
Sun Windows General InformationNew Construction Window Installation Instructions10continuedSection 1October 2016Avoiding Call Backs Tip!Plumbing and Shimming the sides ensure there is nobow to the sides of the window frame.Casement Window: Failure to shim the sides may allow them to bowout slightly. This can cause the frame height to shrink slightly. Thisheight shrinkage can cause the top rail of the sash to rub on the headrail hinge pin, making it hard to open or close the sash.Double Hung Window: Failure to shim the jambs at the meetingrails and making the jambs plumb will cause operational issues withthe balance system (sash drift) which may not be correctable withthe adjustable balance shoes. It will also reduce the weatheringeffectiveness of the window by allowing the sash to not have a uniformseal with the jamb liners.11Finish Fastening Through The Nail FinNote: if your window has Sun Exterior Trim, as in Brick Mold orCasing, the nailing fin is actually on the extruded trim. It is to betreated the same as instructed below. The fasteners must penetrateactual stud framing.a) Finish fastening the window through the nail fin, applying fastenersevery 8 to 10 inches all around the window. Use 1-1/2” to 2” galvanizedroofing nails.b) Seal the heads of the fasteners with a dab of sealant.12Apply Side FlashingUsing Self-Adhesive Flashing Tape, apply flashing so that it covers thenailing fin and overlaps the adjacent Weather Resistive Barrier. Be sureto cover the fastener heads on the nailing fin. Flashing should extendon each side just above the top nail fin and below the bottom nail fin.Do Not flash the bottom nail fin. Leave unflashed to allow for drainage.Sun Windows, Inc. 1515 E. 18th St. Owensboro, KY 42303 Office: (270) 684-0691 Fax: (270) 926-6452 email: info@sunwindows.com web: www.sunwindows.compage 41
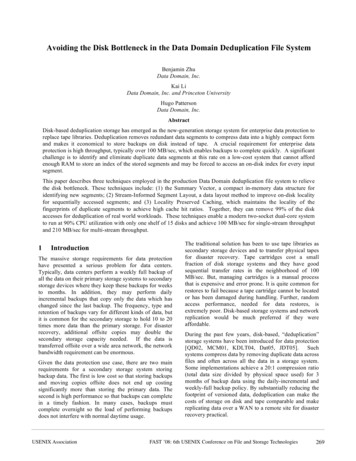
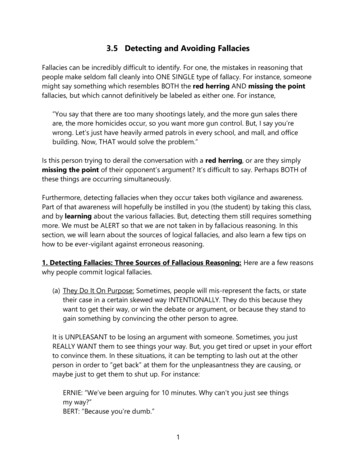
Sun Windows General InformationNew Construction Window Installation Instructions13Section 1October 2016Drip Cap (for Field-Mulled Units)Sun single window units, with their integrated nailing fin, do notrequire an additional drip cap. Mulled units do. In most cases, units thatare mulled at the Sun Factory will already have the drip cap installed.Units that are mulled in the field require a drip cap to be installedacross the top full width of the unit. Sun’s Extruded Drip Cap snaps intothe accessory groove on the window frame. Other drip caps must befastened and sealed by other methods.14Apply Top FlashingWith the top WRB flap still folded out of the way (see step 3), applySelf-Adhesive Flashing Tape across the top of the window. It shouldcover the nailing fin, including fastener heads, and overlap the adjacentwall sheathing surface above the nailing fin. The flashing shouldextend approximately 1” beyond the side flashing on both sides ofthe opening. It should also cover the tops of the side flashing. Seeillustration.15Fold Down the Top WRB Flap & Tapea) Remove the tape that is temporarily holding the top WRB flap out ofthe way.b) Fold the WRB flap down so that it covers the top flashing.12c) Using WRB tape, first tape along the top of the unit. Then tapedown the angled side seams of the WRB, making sure that the side tapeoverlaps the horizontal tape. See illustration.Sun Windows, Inc. 1515 E. 18th St. Owensboro, KY 42303 Office: (270) 684-0691 Fax: (270) 926-6452 email: info@sunwindows.com web: www.sunwindows.compage 42
Sun Windows General InformationNew Construction Window Installation Instructions16Section 1October 2016Seal Interior Seamswith Low Expansion Foama) Using Low Expanding Foam made for windows and doors, apply acontinuous fill around the perimeter of the window, between the edgesof the window and the wall framing.b) At the bottom, fill the back (interior) edge, but do not fill the wholecavity under the sill of the window. It is important to leave an open voidunder the sill to allow for drainage to the exterior should water everenter the frame cavity.17Exterior Wall Treatments:Information for the Masonry InstallerAvoiding Call Backs Tip!Provide Clearance Between Product and Masonry &other exterior treatmentsBe sure to allow the following: Minimum 1/8” on sides, head and sill for all non-masonry treatments. Minimum 1/4” on sides and head of masonry treatments Minimum 3/8” to 1/2” at the sill of masonry treatmentsWhy? - The main wall structure will expand, contractand move independently and at a different rate thanthe masonry wall, often resulting in some shifting andsettling of the main wall. This causes the bottom ofexterior frame of the window to contact the masonrywall which in turn exerts upward pressure against thewindow sill, deforming it and forcing it to contact andbind against the bottom of the sash. This damages thewindow and prevents it from operating correctly.Apply Backer Rod and Sealant to ExteriorPerimeter18After the Exterior Wall Treatment is installed . . .a) Apply approved sealant to all 1/8” seams.b) Apply backer rod and top with sealant all 1/4” and greater seams.Interior Finishing - Wood SurfacesWood surfaces must be painted or stained and sealed within 90days of installation. Follow your finish manufacturers instructions forapplication of the finish.Sun Windows, Inc. 1515 E. 18th St. Owensboro, KY 42303 Office: (270) 684-0691 Fax: (270) 926-6452 email: info@sunwindows.com web: www.sunwindows.compage 43
Sun Windows General InformationNew Construction Window Installation InstructionsSection 1October 2016Additional Instructions:Cleaning - Product Surfaces:Removal of Sun Label - The Sun label can be easily removed by simply peeling it from the glass.Glass - Use typical household glass cleaner and a soft cloth to clean the glass.Metal Surfaces - The SunClad exterior aluminum should be washed occasionally with a mild soap and water solution and rinsedwith a gentle spray of water. Metal hardware surfaces can be cleaned with a cloth dampened with a mild household cleaner, thenpolished dry with a clean soft cloth.Vinyl Surfaces - Clean with a mild soap and water solution and a soft cloth.Wood Surfaces - Painted and stained wood surfaces should be cleaned according to the finish manufacturer’s instructions.Screens - Remove from the window and wash with a mild soap and water solution. Rinse with a gentle spray of water.Warnings, Notes, Etc. Read All Instructions and Notes. Do not proceed if you are unable to understand and follow these instructions. These Instructions are for Typical Wood Frame Construction. Local building codes and other construction concerns may requireadditional installation instructions per Architect or Building Professional. Proper Application of Product: This product is design for typical vertical wall construction. Do not use in roof, sloped walls oraquatic applications. To prevent damage to the product and its components, keep product closed and locked throughout all phases of the constructionproject. Failure to follow these installation instructions or the specialized instructions designed by an Architect or Building Professional willvoid the Product Warranty. Read the Sun Product Warranty, available online at www.sunwindows.com/Support/Warranty.html and follow all productapplication, care and maintenance guidelines. Failure to do so will void the Product Warranty. Window and Door products can be heavy. Use caution when handling. Assistance may be needed. Failure to do so may result ininjury or damage to the product. Prior to installing, do not store the product in direct sunlight. Store in a temperature controlled environment to keep the productfrom freezing or over heating. Do not stack horizontally. The product may be stacked vertically with additional units, providing noglass surface is load bearing. Failure to do so may result in product damage and will void the Product Warranty. Elevated Working Heights - use caution working around unit openings. Follow manufacturers’ instructions. Failure to do so mayresult in injury or death. Use of hand and power tools - follow manufacturers’ instructions. Failure to do so may result in injury or death. Use only Low Expansion Foam designed for windows and doors and follow manufacturers Instructions for application. All Product Surfaces must be protected throughout all phases of construction and finishing. Failure to do so will void the ProductWarranty. Protecting the product from work site conditions and debris is the responsibility of builder, installer, subcontractors Raw Wood Surfaces must be protected, properly prepared and finished within 90 days of installation according to the instructionsin this document. Failure to do so will void the Product Warranty. Chemicals and Cleaning - follow the instructions included in this document for cleaning the product. Do not allow harsh chemicalsto contact any of the product surfaces. Failure to protect the product throughout all phases of construction and finishing will voidthe Product Warranty. Follow Glass Cleaning Practices contained in this document. Failure to do so will void the Product Warranty Water Management - Proper management of water and moisture is an essential part of any structure. All structures must havea functional, engineered drainage system as part of its exterior finished wall system. Sun Windows, Inc. cannot control or beresponsible for water/moisture management beyond the product itself. All products manufactured by Sun Windows must beproperly installed as described per these installation instructions. All products manufactured by Sun Windows must be properlyflashed and a complete vapor barrier applied to seal the product opening. Proper installation of drainage systems, flashing, waterand vapor barriers are the sole responsibility of the owner or their agents. Failure to properly install these systems will void theProduct WarrantyFor questions or more information call 1-800-328-1151, Monday to Friday, 8 AM to 4:30 PM Central Time.For more information visit our website - www.sunwindows.comSun Windows, Inc. 1515 E. 18th St. Owensboro, KY 42303 Office: (270) 684-0691 Fax: (270) 926-6452 email: info@sunwindows.com web: www.sunwindows.compage 44
Sun Windows, Inc. 1515 E. 18th St. Owensboro, KY 42303 Office: (270) 684-0691 Fax: (270) 926-6452 email: info@sunwindows.com web: www.sunwindows.com page 40 Sun Windows General Information New Construction Window Installation Instructions Level the Sill Verify that the sill is level. If not, shim with additional waterproof shims