Transcription
The PracTEX Journal, 2008, No. 3Article revision 2008/11/16Writing posters in LATEXT. Morales de LunaEmail morales@anamat.cie.uma.esAddress Dpto. Análisis MatemáticoFacultad de CienciasUniversidad de MálagaMálaga 29071SpainAbstractLATEX is an excellent editor for the creation of poster presentations. Whenwriting a poster with LATEX, several options are available. Here we wouldlike to present some of these options and in particular the a0poster classand Brian Amberg’s poster template. We shall introduce the basics aswell as some useful packages and techniques to make your poster looknice. You can even choose to write your poster sequentially or up fromdifferent text blocks positioned absolutely or relatively within the pageContents1 The a0poster class1.1 Learning the basics . . . . . . . . . . . . .1.2 Adding some eye candy to your poster .1.2.1 Dividing the poster into columns1.2.2 Adding some color . . . . . . . . .1.3 Obtaining smaller size posters . . . . . .2233572 Using text blocks with absolute positioning103 Brian Amberg’s poster template124 Making big posters from smaller pages155 Conclusion18
1 The a0poster class1.1 Learning the basicsThe a0poster package [1] has been developed by Gerlinde Kettl and MatthiasWeiser and allows to write posters in different sizes in an easy way. The packageis composed of the following files:a0poster.cls Defines the class filea0size.styDefines the font sizesa0 eng.texManual in Englisha0.texManual in GermanIn theory it allows you to define posters of size A4 to A0b, but it practice thereis some problem with scaling when we define posters of size A4 to A1. To myknowledge, this problem still exists so we are going to use just the A0 size and aworkaround will be shown in section 1.3 to obtain smaller sizes.a0poster is a class like article, book and many others in LATEX and is used in asimilar way. Therefore, the beginning of a TEX file would be something gin{document}Write poster here\end{document}Now, you can write the content of your poster as you would write any otherdocument in LATEX. If you prefer your poster to be in landscape mode, just replacethe option portrait with landscape.All that remains to be done is to compile your document in the usual wayusing LATEX and dvips.latex your doc.texdvips your docAlthough pdfLATEX can also be used, we prefer LATEX here in order to usesome nice effects of the package PStricks described in next section.The only disadvantage of the a0poster class is that you have to think carefullythe position of text and graphics because the poster is written sequentially. Wewill learn how to make posters from different text blocks that are absolutely orrelatively positioned on the main page in sections 2 and 3.2
1.2 Adding some eye candy to your posterNow that we know how to write a poster, we would like to add some colors andother effects so that the final poster looks nice.1.2.1 Dividing the poster into columnsFirst, let us divide the page in several columns. This could be done using thepackage multicol but we prefer here to use the minipage environment instead, asthis will be more versatile and really useful in many situations. The environmentminipage allows to virtually include a small page inside your document. You canthink of it as a small text box placed in your document. The syntax of the minipageenvironment is as follows\begin{minipage}{length}Write here\end{minipage}where length is a given length. One suitable way to define the length of theminipage is to use a fraction of the text width. Thus, suppose that you want todefine a minipage of size equal to the half of the available line width, just write\begin{minipage}{0.5\linewidth}Write text here\end{minipage}So, to make a two-column poster (which makes each column of size 1/2 0.5the available text width), we write\begin{minipage}{0.49\linewidth}First h}Second column\end{minipage}Take care not to add extra blank lines between the end of one minipage andthe beginning of the following or you will not obtain the desired effect. Usually3
it is better not to use all the line space available otherwise we obtain one minipageunder the other one. That’s the reason we use 0.49 times the line width.You can include a minipage environment within another minipage environmentso that the possibilities are endless. For instance, the following hrule*****************Writing two idth}This is the first minipage}{0.6\linewidth}This is the second column and it is subdivided into three roduces*****************WritingThis is the first columntwocolumns*****************This is the second column and it is subdivided into three columnsOneTwoThree4
1.2.2 Adding some colorPrevious sections should allow you to already obtain a suitable poster for yourneeds, but we would like our poster to have some nice colors and other effects.We are going to include two new packages by writing\usepackage{pstricks,pst-grad} before the \begin{document} line.PStricks is a set of macros that allows the inclusion of PostScript drawingsdirectly and pst-grad is used to fill with colour gradients, using PStricks.With the aid of this package, we can now define any color we want using theRGB scale, just use in the preamble the folowing syntax\newrgbcolor{colorname}{r g b}where r,g,b are numbers between 0 and 1 that express the quantity of red,green and blue we add to create our color. For example\newrgbcolor{lightviolet}{0.8 0.3 0.7}We can now obtain any word by writing {\lightviolet any word}. Thegray-scales black, darkgray, gray, lightgray, and white, and the colors red, green, blue,cyan, magenta, and yellow are predefined in PStricks.You may also want to have a look to the package xcolor which provides easydriver-independent access to several kinds of colors, tints, shades, tones, andmixes of arbitrary colors already predefined in the package. The add-on packagedvips with the option dvipscolor defines also some extra colors and may be usefulas well.Once we have defined our favourite colors, let as introduce a fancy way toinclude titles. For this purpose we may define in the preamble the new n{center}\psshadowbox[linewidth 2mm,framearc 0.1,linecolor blue,fillstyle gradient,gradangle 0,gradbegin white,gradend lightviolet,gradmidpoint 1.0,framesep 1em]{#1}\end{center}\vspace{0.015\textheight}}5
This will allow to use the command \fancytitle{My title}within the body of the document, which will giveanywhereMy titleYou can try changing the options passed to psshadowbox in the command definition in order to obtain different results. In particular,linewidthGives the width of the line that surrounds the boxframearcIncrease in order to have the edges more roundedlinecolorThis is the color of the edges of the boxgradbegin, gradend These are the colors used to fill the boxThe command psshadowbox can also be used to write some text inside a box.For example,\psshadowbox[linewidth 1mm,framearc 0.1,linecolor red,framesep 1em]{\begin{minipage}[h]{0.5\linewidth}{\bf Fermat’s last theorem}If an integer n is greater than 2 , then the equation a n b n c n has no solutions in non-zero integers a , b , and c .\end{minipage}}will giveFermat’s last theoremIf an integer n is greater than 2, then theequationan bn cnhas no solutions in non-zero integers a,b, and c.6
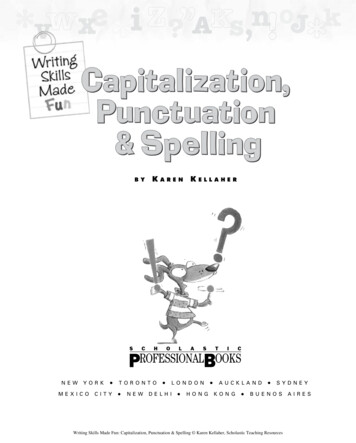
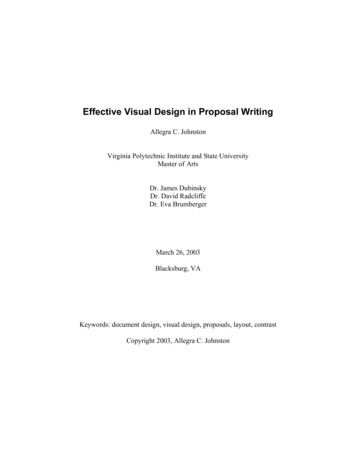
You can even define a background color for the poster. Just write the followingafter \begin{document}\psframe[fillstyle gradient,framearc 0.05,linewidth 1mm,gradmidpoint 0,gradbegin cgradbegin,gradend cgradend](0,0)(1.\textwidth,-1.\textheight)where the colors cgradbegin, cgradend are colors already defined.Combining all these techniques, we can obtain posters like the one shown inFigure 1PStricks allows many other possibilities. We refer to [2] for more information.1.3 Obtaining smaller size postersAs we have said, the option for making posters from A4 to A1 does not seemto work properly. Nevertheless, we can always rescale the poster to smaller sizewhen printing.There is also a workaround to exactly obtain the desired size.First you have to know that when you generate your poster.dvi with thecommand latex poster, you also generate a file called a0header.ps with thecontent:%%BeginFeature *PageSize ISOA0/ISO A02 dict dup /PageSize [2380 3368] put dup /ImagingBBox null putsetpagedevice%%EndFeatureThis file (a0header.ps) is linked to poster.dvi and contains information related to the size of the poster. Now, suppose we want a A1 size poster. Beforerescaling our poster, modify the a0header.ps file into:%%BeginFeature *PageSize ISOA1/ISO A12 dict dup /PageSize [1684 2380] put dup /ImagingBBox null putsetpagedevice%%EndFeatureWhere we have changed the size of the page in bp (big points). See Table 1.Then, we can proceed with the scaling step:7
Semi-discrete entropy satisfying approximate Riemann solversand application to the Suliciu relaxation approximationT. Morales de Luna1. The Saint Venant systemConsider the Saint Venant system( tρ x(ρu) 0, t(ρu) x(ρu2 p(ρ)) 0,We have an entropy η(U ) ρu2/2 ρe(ρ) with entropy flux G(U ) (ρu2/2 ρe(ρ) p(ρ))u.From the Suliciu system, we have the decompositionG(Ur ) G(Ul ) 2Xσi 1(Ei 1 Ei),E0 η(Ul ),whereE1 ρ l (u l )2/2 ρ l e l ,E2 ρ r (u r )2/2 ρ r e r and E3 η(Ur ).(1)i 0We may apply the preceding theorems.3. Semi-discrete entropy satisfying Suliciuapproximate Riemann solverTheorem.Suppose2. Discrete entropy satisfying Suliciuapproximate Riemann solver(pr pl )2 c2r , 2 er el pl ρ1r ρ1l(pr pl )2 c2l , 2 el er pr ρ1l ρ1r(3)Then the Suliciu solver is semi-discrete entropy satisfying.We may define cl , cr so that (3) is satisfied and the shocks for the Saint Venant system are solved exactly.Theorem. LetTheorem.Suppose ρ [ρl , ρ l ], ρ [ρr , ρ r ],ρ2p0(ρ) c2l ,ρ2p0(ρ) c2r .c2l (2)ThenEi η(Ui), i 1, 2,(p pl )2 h r i , (pr pl ) ρ1l ρ1r 2(el er ) (pr pl ) ρ1l ρ1r c2r and the Suliciu solver is discrete entropy satisfying.We may define cl , cr so that (2) is satisfied. This is for example the approach used in [2]. We obtain a schemethat is discrete entropy satisfying but the shocks for the Saint Venant system are not solved exactly.Then, for(p pl )2 h r i . (pr pl ) ρ1l ρ1r 2(el er ) (pr pl ) ρ1l ρ1r pecl max cl , ρl (ul ur ) , ρl (pr pl ) ) , pecr max cr , ρr (ul ur ) , ρr (pl pr ) ,the Suliciu approximate Riemann solver for the isentropic gas dynamics system has the properties:(i) it preserves the non negativity of ρ,(ii) it satisfies a semi-discrete entropy inequality,(iii) it preserves the entropic shocks for the isentropic gas dynamics system.The technique can be adapted for full gas dynamics4. Numerical testsInitial data:ρ0(x) (1,2,if x 0.5,if x 0.5,u0(x) (3.2125,0.5,if x 0.5,if x 0.5.Initial data:(1ρ0(x) 1.2242Density profile for t 0.1u0(x) (11.666if x 0.5,if x 0.5. .ρ0 0.33,u0 0.18/0.33,(0.2 0.05(x 10)2 if 8 x 12,0otherwise.z(x) Density profile for t 0.05Density profile for t 100t 0.05t 0.11.3t 200Semi discrete entropy satisfyingSemi discrete entropy satisfying2Initial data:if x 0.5,if x 0.5,Discrete entropy satisfyingDiscrete entropy satisfying1.25Exact solutionSemi discrete entropy satisfyingExact solutionDiscrete entropy satisfyingExact 150.30.16789References[1] F. Bouchut. Entropy satisfying flux vector splittings and kinetic BGK models. Numer. Math., 94(4):623–672, 2003.[2] F. Bouchut. Nonlinear stability of finite volume methods for hyperbolic conservation laws and well-balanced schemes for sources. Frontiers in Mathematics. Birkhäuser Verlag, Basel, 2004.[3] P. Colella and H. M. Glaz. Efficient solution algorithms for the Riemann problem for real gases. J. Comput. Phys., 59(2):264–289, 1985.[4] E. F. Toro. Riemann solvers and numerical methods for fluid dynamics. Springer-Verlag, Berlin, second edition, 1999. A practical introduction.Figure 1: A poster Example8101112131415
dvips -O ’-6bp,-6bp’ -T595mm,841mm -x694 poster.dvi -o poster.a1.psWhere:-T595mm,841mm : the new poster dimension in mm. Here the poster is inportrait mode. To rescale a landscape poster, use: -T841mm,595mm.-x694 : the scaling factor.p1000 is a scaling factor of 1 (no change). From A0 toA1, the scaling factor is 1/ (2) 0.707 (See Table 2). To avoid to create new setof fonts (and to save space), it is recommended to use the closest standard LaTeXmagnification factor (694 here). Note that from A1 to A0, use 1440. Have a lookat Table 3. Read also [3] for more information.-O ’-6bp,-6bp’ : the ps file obtained with dvips includes a margin of 1in 72bp by default. In order to center the poster, we change the paper offset withthe corresponding value given by Table 4.poster.dvi : the input file (in A0 size)-o poster.a1.ps : the output fileTo obtain the PDF file, just run ps2pdf:ps2pdf poster.a1.ps poster.a1.pdfA0bA0A1A2A3A4A5A6A7A8A9A10w bp259423801684119084259542129821114910675Table 1: Paper Sizeh bp w in h in w mm3370 36,03 46,819153368 33,06 46,788402380 23,39 33,065941684 16,53 23,394201190 11,69 16,532978428,26 112,072,93531491,472,07371061,041,47269h mm11891188840594420297210149105745337
HHTable 2: Scaling factorstoHHfrom 350,50,7111,410,110,130,180,250,350,50,711Table 3: LATEX magnification factorHHHHtofrom 5536748269410002 Using text blocks with absolute positioningWhen writing a poster with the a0poster class, one has to have in mind the finaldistribution of the different parts we have written and sometimes it may be difficult to obtain the text exactly where we want. In this section we would like tointroduce another philosophy for composing the poster. Instead of composing theposter sequentially, we are going to write a poster by composing small pieces oftext boxes that are pasted over the big poster sheet exactly where we want. Thiswill be possible by using the textpos package.Just write in the preamble of the document10
Table 4: Offset correctionHHHtoHfrom kage[absolute,overlay]{textpos}The textpos package will allow to place text boxes at a given absolute postitionby creating a virtual grid over the page. The absolute option makes the origin ofthe grid on which text blocks are positioned the upper left hand corner.overlay gives the text blocks opaque backgrounds. Without the overlay option,the background of the text blocks are transparent. You can change the background color of a given textblock by writing \textblockcolour{color name}.It is also useful to add the option showboxes when you are writing the poster.This will draw a rectangle around your text block making much easier to correctlyplace the block.The package defines the environment textblock which is used as follows\begin{textblock}{hsize}(hpos, vpos)Some text\end{textblock}The hsize and hpos arguments are given in units of a module \TPHorizModuleand vpos is given in units of a module \TPVertModule. For example,\begin{textblock}{20.5}(1.5, 2.5)Some text\end{textblock}11
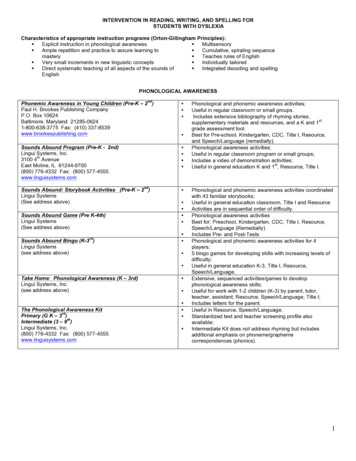
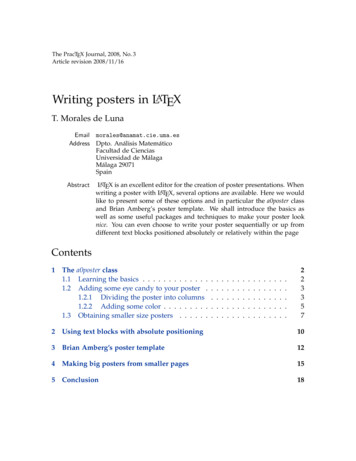
will place a text box of width 20.5 TPHorizModule so that its left uppercorner is placed 1.5 TPHorizModule to the right and 2.5 TPVertModule tothe bottom from the left upper corner of the poster.We are going to set these units to 1cm by placing the following code in th{\TPVertModule}{1cm}A little trick that helps placing the text blocks is to define a grid over the page.You can do so by loading the package eso-pic [5]\usepackage[colorgrid,texcoord]{eso-pic}This will produce something similar to Figure 2.mm406080100120140160180200220240260280Fermat’s last theoremIf an integer n is greater than 2, then the equation4060an bn cnhasno solutions in non-zero integers a, b, and c.80100120140Figure 2: Zoom of poster page with a grid1601803 Brian Amberg’s poster template200Brian Amberg has created another class for posters in LATEX. This class presents220the advantage of creating the poster directly from small blocks with relative positioning. Whileit presents an easy way of creating posters, it leaves you less24026028030032012300320340
choice to customise what your poster looks like, and sometimes you will have toedit the class file directly (always remembering to save it under a different name!)in order to make changes. This class has to be used with pdfLATEX.You can use it as n{document}\background{}\begin{poster}{ poster options }Boxes definitions\ldots\end{poster}\end{document}The command \background{} has to be defined just after the \begin{document}and it lets you define a background for the poster. You can have a look at someof the templates provided by Brian Amberg to see some examples.Then you have to write down the poster environment where you select theoptions for your poster. A typical example would be\begin{poster}{grid no,colspacing 0.7em,color orange,colortwo white,textborder roundedleft,eyecatcher no,headerborder none,headershape roundedright,}The possible options you can select are given in Table 5.Once we have set the options for the poster, we begin writing the poster bycomposing different text blocks that are introduce with the command headerbox13
orderheadershapeValuesyes nonumericcolor valueMeaningShows a grid to help you place text boxesDefines the spacing between columnsColor definition used as the main colorof the postercolor valueThe other color for gradient based layoutsnone, rectangle, The style of the box around the text arearounded, .none,closed, No extra border, full border around oropenborder that is open below for box headerrectangle,Shape of the box-header regionrounded,roundedleft,roundedrightTable 5: Options for poster command.\headerbox{title}{name and position}{content}This command takes three arguments. The first and the third are respectivelythe title and the content of the text block. In order to specify where the box willbe placed, we shall use the second argument.Each box has a name and can be placed absolutely or relatively. To specify thename we just write name custom name inside the second argument. This namehas to be unique.Then, if you want to place the box in an absolute position, you will have givethe row and column number. By default, your poster will be divided into threecolumns (this option can be changed by editing the class file). Thus,\headerbox{Contribution}{name contribution,column 0,row 0}{content.}will place the text box named contribution in first column and first row. Remarkthat first row and first column correspond to 0.14
But, you can also define a relati
umn This is the second column and it is sub-divided into three columns One Two Three 4. . Nevertheless, we can always rescale the poster to smaller size when printing. There is also a workaround to exactly obtain the desired size. First you have to know that when you generate your poster.dvi with the comma