Transcription
Deploying the Hitachi NAS Platform inVMware vSphere Environments Using theHitachi Adaptable Modular Storage 2000FamilyImplementation GuideBy Bob Ingram and Ken EwersDecember 2009
SummaryExplosive growth in NAS filers that is required to meet user demand results in administrative headaches andincreasing equipment costs. Deploying VMware vSphere 4 on the Hitachi NAS Platform 3080 and 3090,powered by BlueArc , can reduce those costs. Managing virtual disks is easier than managing logical units(LUs) in a SAN environment, and deploying a Hitachi NAS Platform 3080 or 3090 system instead of deployingmultiple smaller NAS systems reduces overall management complexity, improves performance, and lowersenergy consumption.This paper describes how to deploy the Hitachi NAS Platform 3080 and 3090 with the Hitachi AdaptableModular Storage 2000 family of storage systems in vSphere 4 environments. This solution enables you tocentralize management and consolidate the storage used in vSphere 4 environments.This paper describes how to implement this solution and provides some of the best practices for designing asolution for medium to large enterprise environments. It is written for IT administrators responsible for storageand virtualized environments. It assumes familiarity with managing NAS devices, general storage managementpractices and familiarity with vSphere.For best results use Acrobat Reader 8.0.
ContributorsThe information included in this document represents the expertise, feedback and suggestions of a number ofskilled practitioners. The authors recognize and sincerely thank the following contributors and reviewers of thisdocument: Steve Burns Ron-An Lee Lisa Pampuch Gokula Rangarajan
Table of ContentsSolution Overview . 1Tested Deployment . 2Deploying the Solution . 4Launching the 2000 Family Management Interface . 4Launching the Hitachi NAS Platform Management Interface . 5Configuring the SAN . 5Configuring the Hitachi Adaptable Modular Storage 2000 Family . 6Hitachi NAS Platform Storage Management Stack . 8Configuring the Hitachi NAS Platform . 9Using the Hitachi NAS Platform on vSphere . 16Best Practices . 24Best Practices for the Hitachi Adaptable Modular Storage 2000 family . 24Best Practices for the Hitachi NAS Platform. 25
Deploying the Hitachi NAS Platform inVMware vSphere Environments Usingthe Hitachi Adaptable Modular Storage2000 FamilyImplementation GuideIT administrators often deploy file systems on NAS because managing file systems on NAS generally requiresless administration than managing file systems on SAN devices. While deploying and managing a few NASfilers might be relatively painless, as storage demands grow, the explosive growth in NAS filers that is requiredto meet user demand results in administrative headaches and increasing equipment costs.Deploying VMware vSphere 4 on the Hitachi NAS Platform 3080 and 3090, powered by BlueArc , can reducethose costs. Managing virtual disks is easier than managing logical units (LUs) in a SAN environment, anddeploying a Hitachi NAS Platform 3080 or 3090 system instead of deploying multiple smaller NAS systemsreduces overall management complexity, improves performance, and lowers energy consumption.This paper describes how to deploy the Hitachi NAS Platform 3080 and 3090 with the Hitachi AdaptableModular Storage 2000 family of storage systems in vSphere 4 environments. This solution enables you tocentralize management and consolidate the storage used in vSphere 4 environments.This paper describes how to implement this solution and provides some of the best practices for designing asolution for medium to large enterprise environments. It is written for IT administrators responsible for storageand virtualized environments. It assumes familiarity with managing NAS devices, general storage managementpractices and familiarity with vSphere.Solution OverviewThe solution was tested in Hitachi Data Systems labs using a Hitachi NAS Platform 3090, a Hitachi AdaptableModular Storage 2300 and a Dell R905 host running vSphere 4. This white paper provides a step-by-stepinstructions demonstrating deploying two guest virtual machines (VMs) running Windows 2003 R2 and Red HatLinux 5.4.While Hitachi Data Systems testing used a Hitachi NAS Platform 3090, the Hitachi NAS Platform 3080 can alsobe used to deploy this solution, using the same procedures provided in this white paper. In addition, whileHitachi Data Systems testing used an Adaptable Modular Storage 2300, any member of the Hitachi AdaptableModular Storage 2000 family can be used to deploy this solution.The 2300 presents storage to the Hitachi NAS Platform 3090 and is used to create two file systems, exportedas NFS shares to the ESX host, for VMware file systems (VMFS). The first VMFS is populated with .isoimages of operating systems for the purpose of deploying guest VMs on the ESX host. The second VMFS isused for vDisks for both operating system boot drives and additional storage on the guest OS. All NFSmapping is done to the ESX host, not to the guest OS.1
vSphere 4 can access an NFS volume for a number of storage uses. These can include, but are not limited to,the following: Shared unstructured data on VMFS file systems. The solution described in this white paper uses the VMFSfile systems to store .iso images for deployment of operating systems. Booting of virtual machines from vDisks on NFS datastores.The midrange Hitachi NAS Platform 3080 and 3090 deliver best-in-class performance and scalability. They canprovide a centrally managed storage pool, increasing utilization, simplifying management and increasingproductivity. Managing NFS in a vSphere environment can be simpler than managing many Fibre Channellogical units (LUs). Applications or file system types can be grouped into a single file system and distributed inthe vSphere environment. Environments that use a few ESX hosts to run a few dozen virtual machines offerlittle administrative advantage for using the Hitachi NAS Platform instead of Fiber Channel LUs, but as vSphereenvironments grow into hundreds of virtual machines distributed across multiple ESX hosts, managing LUs canbe complex and labor intensive.Tested DeploymentThis section describes the hardware and software used in Hitachi Data Systems laboratory testing of thissolution. Table 1 describes the hardware used in testing this solution.Table 1. Tested Deployment HardwareHardwareDetailsHitachi Adaptable Modular Storage2300 storage systemDual controllers4 4GB Fibre Channel ports, 2 per controller8GB cache memory, 4GB per controller20 146GB, 15K RPM, SAS disksMicrocode version 0870/C-MBrocade 48000 switchDirector-class SAN switch with 4Gb FibreChannel portsFOS 5.3.1aHitachi NAS Platform 3090 storagesystemNetwork attached storage (NAS) platform using1 10GbE port, 4 4Gbit/s Fibre Channel ports and32GB distributed memoryFirmware 6.5.1847.16Dell PowerEdge R905 server64GB memory, 4 quad-core AMD processorsBIOS 3.0.22
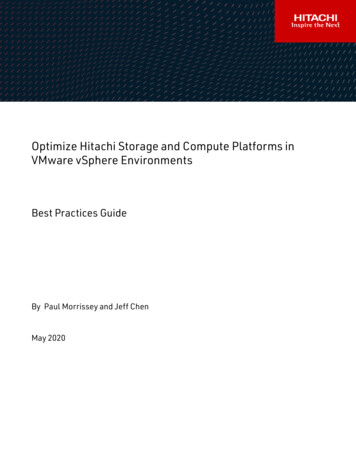
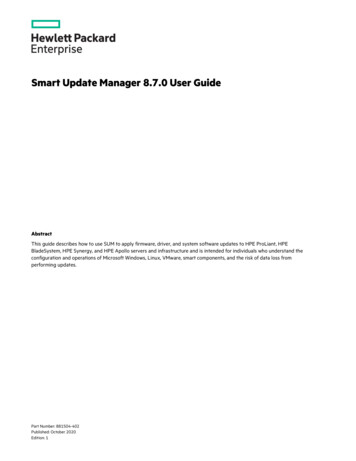
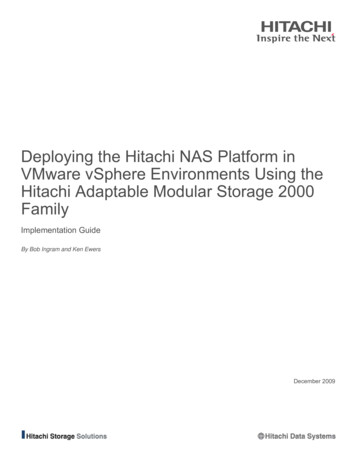
Table 2 lists the software used in deploying this solution.Table 2. Tested Deployment SoftwareSoftwareDetailsVersionHitachi Storage Navigator Modular 2Storage management GUI and CLI7.01Included with the Hitachi BasicOperating System PackageVMware vCenter servervSphere management4.0.0 build 140742VMware Virtual Infrastructure ClientvSphere management4.0.0VMware ESXHost operating system that provides avirtualization layer to support sharing ofmultiple virtual machines4.0.0 build 164009Microsoft Windows 2003Operating system for virtual machine2003 SP2 - 32 bitRed Hat LinuxOperating system for virtual machine5.1 - 64 bitFigure 1 illustrates the tested deployment.Figure 1. Tested Deployment3
Deploying the SolutionTo deploy this solution, follow these high-level steps:1. Connect the Hitachi Adaptable Modular Storage 2000 family storage system to the SAN switch ordirectly to the Hitachi NAS Platform 3090.2. Install and launch the 2000 family and Hitachi NAS 3090 management interfaces.3. Connect the Hitachi NAS Platform 3090 to the SAN switch or directly to the 2000 family storagesystem.4. Configure the Fibre Channel ports on the 2000 family storage system.5. Configure the Fibre Channel ports on the Hitachi NAS Platform 3090.6. Zone the SAN switch if applicable.Because of the many type of SAN switches available, this configuration is not described in thisdocument. For more information, see your SAN switch documentation.Hitachi Data System recommends that each initiator (Hitachi NAS Platform Fibre Channel port) beplaced in a separate zone. This zone contains the Fibre Channel port on the 2000 family storagewhere LUs will be presented.7. Configure the 2000 family storage LUs.8. Configure the Hitachi NAS Platform 3090 storage pools, file systems and NFS exports.9. Map the NFS exports to the ESX hosts.Launching the 2000 Family Management InterfaceUse Hitachi Storage Navigator Modular 2 software to connect to and manage the 2000 family storage systemused in this solution. To connect to the 2000 family storage system, follow these steps:1. Install Storage Navigator Modular 2 software.For installation instructions, see the installation guide that accompanies the software.2. Using a Java-enabled browser, connect to the following URL:http:// IP address of Storage Navigator Modular 2host :23015/StorageNavigatorModular/Login3. Log in using the user name and password.The default user name is system and the default password is manager.4. Click the Add Array button at the bottom of the window.5. Follow the wizard’s prompts to add the 2000 family storage system to Storage Navigator Modular 2software.6. Click the 2000 family storage system name to connect to and manage the storage.4
Launching the Hitachi NAS Platform Management InterfaceTo connect and manage the Hitachi NAS Platform, use the internal or the external Server Management UnitWeb Manager interface (SMU). For more information, see the installation guide that accompanies the HitachiNAS system. Server/cluster management is performed through Web Manager (a browser‐based graphical userinterface)1. Open a Web browser and enter the public IP address of the SMU GUI in the address field.2. Log in using the user name and password.The default user name is admin and the default password is nasadmin.3. Select the Hitachi NAS platform to be managed from the Server Status Console drop-down menu.Note that some of the Fibre Channel port configuration must be done using the command-line interface(CLI).The CLI can be accessed in the following ways:– Preferred method, using Secure Shell (SSH) to connect to the Hitachi NAS Platform server through theSMU–Using the SSC utility, available for Windows and Linux–Using the Perl SSC utility (PSSC), available for all other UNIX operating systemsWhen logging in to the SMU via the CLI, the default username is manager and the default passwordis nasadmin.Configuring the SANTo begin this deployment, connect all Fibre Channel ports from the Hitachi NAS Platform and 2000 familystorage system to the SAN switch. If you do not use the optional SAN switch, the Fibre Channel ports can bedirectly connected from the Hitachi NAS Platform Fibre Channel ports to the 2000 family storage system’sFibre Channel ports. After the physical connections are complete, configure a point-to-point connect to theswitches from the 2000 family storage system’s Fibre Channel ports and Hitachi NAS Platform’s storage ports.Configuring the Storage System Fibre Channel PortsTo configure the storage system’s Fibre Channel ports, follow these steps:1. Log on to Storage Navigator Modular 2 software.2. Click the 2000 family storage system to be configured.3. Click the Settings link and the FC Settings link and choose a connection type as follows:– SAN switch connection — Set the Fibre Channel port to point-to-point and the transfer rate to matchthe SAN switch.–Direct connection — Set the Fibre Channel port to loop and the transfer rate to 4Gbps.5
Configuring the Hitachi NAS Platform Fibre Channel PortsTo configure the Hitachi NAS Platform Fibre Channel ports, follow these steps:1. Connect to the SMU CLI.The default user name is manager and the default password is bluearc.2. Select the Hitachi NAS Platform system to be configured from the list presented.3. Configure the Fibre Channel ports for connectivity, as follows:To configure for SAN switch connection, configure the Fibre Channel ports as N-Ports, as follows:fc-link-type -t NTo configure for direct connection, configure the Fibre Channel ports as Node-Loop ports, as follows:fc-link-type -t NLThis command sets all the Fibre Channel ports to the type N-port. The Fibre Channel ports arenumbered 1, 2, 3 and 4.To configure a single Fibre Channel port, specify –i port number on the command line, asfollows:fc-link-type –i 1 -t NConfiguring the Hitachi Adaptable Modular Storage 2000 FamilyTo configure the 2000 family storage system, follow these high-level steps:1. Log in to Storage Navigator Modular 2 software and connect to the 2000 family.2. Create the RAID groups to be utilized by the Hitachi NAS Platform.3. Create the LU to be utilized by the Hitachi NAS Platform.4. Create the host groups on the Fibre Channel ports.5. Add the LUs to the host groups.Creating RAID GroupsBefore creating RAID groups, examine your expected workload. For example, if you plan to use these RAIDgroups for storage of .iso images, read performance is more important than write performance, meaning thatRAID-5 or RAID-6 is the best choice.For more information about RAID levels, see the ”Best Practices” section in this document.1. Using the Storage Navigator Modular 2 software GUI, connect to the 2000 family storage system byclicking the Array Name link.2. Choose Groups Logical Units and click the RAID Groups tab.3. Click the Create RG button.6
4. Select a RAID level and combination.Leave the Number of Parity Groups and Automatic Selection at the default settings.For more information, see the “Best Practices” section of this document.5. Select the drive type and drive capacity needed.NOTE: The 2000 family selects the next available disks of the size and type requested.6. Click OK.7. Repeat until the needed number of RAID groups exists.Creating LUs on RAID GroupsTo create LUs on RAID groups, follow these steps:1. Log in to Storage Navigator Modular 2 software and connect to the 2000 family.2. Navigate to Logical Units.3. Click the Create LU button.4. Select a RAID group in which to place the LU.5. Note the value in the LUN field.You can choose to keep this LU number for or change it to any LU number from 0000 to 4096 that isnot already used by another LU.Document the LU number used for future reference.6. Use one LU per RAID group and click OK.NOTE: The new LU begins formatting. However, it is available for immediate use.Creating Host GroupsHost groups (host storage domains) are a feature of 2000 family storage that allows your storage systems tobe more easily managed. You can assign world wide names (WWNs) to a host group and the desired LUs canbe associated with each host group. By default, each port contains one host group that can be used.For solutions where the Hitachi NAS is directly connected to the 2000 family system or where the FibreChannel ports on the 2000 family are not shared with other hosts or devices, host groups are not needed. Sethost group security to disabled and use the default host group.The host LUN (H-LUN) is the LU number presented to the host.1. Using the Storage Navigator Modular 2 software GUI, connect to the 2000 family storage system byclicking the Array Name link.2. Choose Groups Host Groups.3. Click the Host Group Security tab and verify that host group security is enabled on the Fibre Channelports to be used.If host group security is not enabled, select the port’s radio button and click the Change Host GroupSecurity button to enable it.7
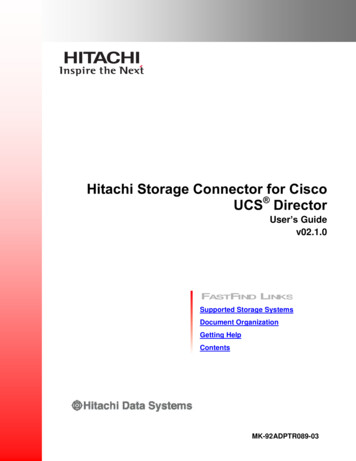
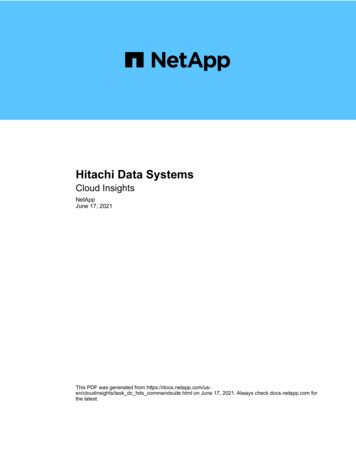
4. Click the Create Host Group button.5. Select all of the Fibre Channel ports that will be used for the Hitachi NAS Platform.6. Enter a name for the host group in the Name field.7. Select all of the WWNs associated with the Hitachi NAS Platform and click the Add button.For more information about how to obtain the WWNs for the Hitachi NAS Platform, see the“Configuring the Hitachi NAS Platform” section of this white paper.8. Click the Logical Units tab.9. Select the beginning H-LUN number radio button.10. Select all the check boxes for LUs to be presented to the Hitachi NAS Platform and click the Add button.No changes are required in the Options tab for Hitachi NAS Platform configuration.11. Click OK.Configuration of the 2000 family storage system is complete. No changes in options are required, standardmode is used. If you need to make changes to the host groups at a later time, for example, to add additionalLUs to the host group, use the Edit Host Group button.Hitachi NAS Platform Storage Management StackThe Hitachi NAS Platform storage management stack consists of a system drive (SD), a system drive group(SDG), a storage pool (SP) and a file system. An LU presented from the 2000 family storage system to theHitachi NAS Platform is called a system drive.A system drive group is a mechanism for telling the Hitachi NAS Platform which SDs are in which RAID groupin the 2000 family so that it can avoid writing to several members of the same RAID group at once, thusdecreasing the head movement. Before a system drive can be active and belong to a storage pool, it mustbelong to an SDG. When a RAID group has one LU, one SD per SDG is used.A storage pool is a logical container for one or more system drives. An SP can be expanded by adding SDs tothe pool. An SP can grow up to 256TB and contain up to 128 file systems.A file system is the primary storage component in the Hitachi NAS Platform. All other features either directly orindirectly support file systems. A standalone Hitachi NAS Platform can support up to 128 file systems and aclustered Hitachi NAS Platform can support up to 125 file systems.8
Figure 7 illustrates the Hitachi NAS Platform storage management components; it does not include the VMwarefile system.Figure 7. Hitachi NAS Platform Storage Management ComponentsFor more information about Hitachi NAS Platform storage management, see the “Best Practices” section in thisdocument.Configuring the Hitachi NAS PlatformIn this deployment guide assumes that your Hitachi NAS Platform and SMU hardware are installed and theinitial configuration is c
The default user name is manager and the default password is bluearc. 2. Select the Hitachi NAS Platform system to be configured from the list presented. 3. Config