Transcription
Adapted by Ed Archuleta andArlando Gilbert with thepermission of theGeorgia Department of TransportationCopyright 2000Updated March 2007
TABLE OF CONTENTSTABLE OF CONTENTS.2LIST OF FIGURES .4INTRODUCTION .5CHAPTER 1: CONSTRUCTION SURVEYS.5PREPARATION .5RESPONSIBILITIES .5CHAPTER 2: CONSTRUCTION STAKING .6TYPICAL SURVEY STAKES .6MINIMUM STAKING REQUIREMENTS .6FLAGGING COLOR CODE .7CHAPTER 3: MEASUREMENT OF DISTANCES .8PACING .8TAPING.8TAPING PROCEDURES .9EDM (Electronic Distance Measuring) .10ACCURACY AND PRECISION.11CHAPTER 4: COMMON MISTAKES IN READING AND RECORDING LINEARMEASUREMENTS .12READING THE WRONG FOOTMARK .12TRANSPOSING FIGURES .12READING THE TAPE UPSIDE-DOWN .12TAPE NOT STRETCHED STRAIGHT .12INCORRECT ALIGNMENT.13CARELESS PLUMBING .13TENSION AND SAG .13CHAPTER 5: DIFFERENTIAL LEVELING.14THE ENGINEER’S LEVEL.14THE SELF LEVELING LEVEL (Auto Level) .15THE HAND LEVEL.15LEVELING RODS .16READING THE ROD.16HOLDING THE ROD.16DETERMINING ELEVATIONS - LEVELING.17PROCEDURE .17NOTE KEEPING .19CHAPTER 6: COMMON SOURCES OF ERRORS AND MISTAKES IN DIFFERENTIALLEVELING .20INSTRUMENT OUT OF ADJUSTMENT .20BUBBLE NOT CENTERED WHEN TAKING ROD READING .20ROD NOT HELD PLUMB.20TURNING POINTS .20ERRONEOUS ROD LENGTH .20OTHER MISTAKES AND ERRORS.20CARE OF EQUIPMENT.20CHAPTER 7: SLOPE MEASUREMENTS .22METHOD 1 .22Basic Surveying - Student WorkbookPage 2 of 523/15/2007
METHOD 2 .23CONVERTING FROM DEGREES MINUTES SECONDS (DMS) TO DECIMAL DEGREES(DD) .24CONVERTING FROM DECIMAL DEGREES (DD) TO DEGREES MINUTES SECONDS(DMS).24EXERCISES .24CHAPTER 8: SLOPE STAKING .25EQUIPMENT.25SLOPE STAKING PROCEDURES .25SLOPE STAKES .29STAKING SUBGRADE .30CHAPTER 9: GRADE STAKING .34BLUE AND RED TOPS.34CHECKING FINISH GRADE.34CHAPTER 10: PIPE LAYOUT .36SAMPLE PIPE PROBLEM #1.37SAMPLE PIPE PROBLEM #2.38SAMPLE PIPE PROBLEM #3.40SAMPLE PIPE PROBLEM #4.42CHAPTER 11: AREA AND VOLUME CALCULATIONS.43PRACTICE EXERCISES .44EARTHWORK VOLUMES .44PROCEDURE .45SAMPLE EARTHWORK PROBLEM #1.46SAMPLE EARTHWORK PROBLEM #2.47SAMPLE EARTHWORK PROBLEM #3.48SAMPLE PROBLEM #4 (USE CHAPTER 10 & 11) .49CHAPTER 12: MODERN SURVEY TECHNIQUES.50TOTAL STATION .50GPS (GLOBAL POSITIONING SYSTEM).50SUMMARY .51CREDITS.51ANSWER KEY.52Basic Surveying - Student WorkbookPage 3 of 523/15/2007
LIST OF FIGURESFigure 2-1 Typical construction stakes .6Figure 2-2 CDOT Standard flagging color .7Figure 3-1 Gradations on typical tape.8Figure 3-2 Survey chain and modern survey tape .9Figure 3-3 Direct distance measurement.9Figure 3-4 Breaking tape .10Figure 3-5 Error in measuring when tape is not horizontal .10Figure 3-6 Accuracy and Precision .11Figure 4-1 Effect of not stretching the chain .12Figure 4-2 Error in measurement from improper alignment of the chain.13Figure 4-3 Example of sag in taping .13Figure 5-1 Example of engineering Levels .14Figure 5-2 Example of self leveling level .15Figure 5-3 Examples of hand levels.15Figure 5-4 Example of Philadelphia rod.16Figure 5-5 Error in reading the rod from being tilted .17Figure 5-6 Differential leveling .18Figure 5-7 Typical notes .18Figure 5-8 Typical surveying level notes.19Figure 7-1 Determining horizontal distance from slope distance and elevation difference .22Figure 7-2 Determining horizontal distance from slope distance and slope angle .23Figure 8-1 Catch points .25Figure 8-2 Roadway Typical Section .25Figure 8-3 Determine an H.I. .26Figure 8-4 Calculate the Grade Rod .27Figure 8-5 First attempt, try 35’.27Figure 8-6 Reference Offset right side.28Figure 8-7 Reference Offset left side .28Figure 8-8 Second attempt, try 40’.29Figure 8-9 Third attempt, try 38’ .29Figure 8-10 Slope stake set at catch point.30Figure 8-11 10’ Offset stake for catch point set 1.3’ higher than catch point .30Figure 8-12 Point of Slope Selection (P.O.S.S.) .31Figure 8-13 Calculating difference in slopes.31Figure 8-14 Calculating difference in elevation.32Figure 8-15 Slope stake at subgrade.33Figure 9-1 Example of checking grade using a string line .35Figure 10-1 sample pipe problem #1 .37Figure 10-2 Sample pipe problem #2.38Figure 10-3 Sample pipe problem #3.40Figure 10-4 Sample pipe problem #3 field notes .41Figure 10-5 Pipe deflection.42Figure 11-1 Cross sections.44Figure 11-2 Cross section equation and calculations .45Figure 11-3 Sample problem #4 .49Basic Surveying - Student WorkbookPage 4 of 523/15/2007
INTRODUCTIONThis manual is intended only as a guide for training purposes and is not meant to replace theCDOT Survey Manual and in all cases, the CDOT Survey Manual has precedence over thismanual when matters of policy and procedure are of concern. The CDOT survey manual canbe found at http://www.dot.state.co.us/Survey Manual/CHAPTER 1: CONSTRUCTION SURVEYSConstruction surveying is the translation of construction plans into physical points on the groundthat can be used as a basis for the actual construction. The results of construction surveyingare seen in almost any urban, suburban, and rural setting. Almost any roadway, building, orother man-made improvement probably had some amount of construction surveying involved.Construction surveying provides not only the horizontal location of new improvements, but alsothe vertical information required to ensure that surfaces drain or pipes flow as required.PREPARATIONTo successfully perform construction staking and layout, preparation is a major part of theoperation.Study: Contract plans Special Provisions Standard Specifications Plan Quantities Construction Manual CDOT Surveying Manual Contractor’s ProposalTake appropriate measures to protect existing monuments.RESPONSIBILITIESContractor Surveying - When the bid schedule contains pay item 625, Construction Surveying,the Department will provide control points and bench marks as described in the Contract. TheContractor shall furnish and set construction stakes establishing lines and grades in accordancewith the provisions of Section 625. Per Section 105.12(a) the Engineer may order additionalsurveying which will be paid for at the rate established by the contract.Department Surveying - When the bid schedule does not contain pay item 625, ConstructionSurveying, the Engineer will furnish one set of construction stakes and marks establishing linesand grades as described below for proper prosecution of the work.Basic Surveying - Student WorkbookPage 5 of 523/15/2007
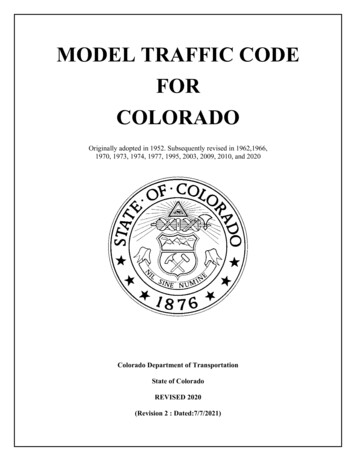
CHAPTER 2: CONSTRUCTION STAKINGSurvey stakes are the survey party's primary means of communication. Survey stakes arenormally set to establish and designate a work point or reference point on the ground.Appropriate information is written on the stake instructing construction personnel as to the workto be performed. Because these stakes are the actual physical basis for construction, it isessential that they be set at the correct location with the data written on them in a legible andunderstandable manner.TYPICAL SURVEY STAKESAlthough other sizes are available, the survey stakes most frequently used in construction arethe wooden 1" x 2" x 18" stakes, 1” x 1” x 12” oak hubs, and 1 ½” x 48” lathe.1" x 1" wooden stakes (called Hubs) in 6” to 12” lengths or 60d nails (6” long) are often used tomark important survey points, work points, or reference points, which are to remain in place forfuture use. Hubs are normally driven flush with the ground after which a survey tack is set in thetop of the hub to mark the exact survey point. The 60d nails are also driven flush with theground but with flagging tied on them. Both hubs and nails are driven flush to make them lesssusceptible to damage and a “guard” or “witness” stake may be used to mark its location. Theguard stake will usually have sufficient information written on it to identify the point.Figure 2-1 Typical construction stakesMINIMUM STAKING REQUIREMENTSThe surveyor is required to perform all staking indicated on the survey tabulation sheet inaccordance with the Standard Specifications for Road and Bridge Construction and inaccordance with the CDOT Survey Manual. Minimum staking requirements for the variousconstruction items are described in detail in the CDOT Survey Manual. An example of minimumstaking requirements for typical survey items is listed below.Basic Surveying - Student WorkbookPage 6 of 523/15/2007
Centerline Staking - The maximum staking interval for the project centerline shall be 100 ft ontangents and 50 ft on curves or as specified on the survey tabulation sheet.Clearing and Grubbing - Stakes should be set at 50 ft intervals and meet the MinimumConstruction Horizontal and Vertical Accuracy Tolerance. The vertical tolerance may be waivedby the engineer.Removal of Structures and Obstructions - Staking should meet the tolerance and intervalspecified on the plans or specifications. The appropriate tolerance and interval variesdepending on the item.Reset Items - Staking is usually not required for the removal of a reset item but may be requiredto place items that are to be reset such as light poles, signs and minor structures as the itemmay not be put in the same place it occupied prior to construction.Excavation and Embankment - Slope stakes shall be set at a maximum 50 ft spacing interval.Grade stakes for the subgrade shall be set at a maximum 50 ft interval or at the interval shownon the survey tabulation sheet.FLAGGING COLOR CODEIt is desirable to have a uniform color code system throughout the state so the Contractor’spersonnel will be able to readily recognize the work item referenced. Whenever flagging isnecessary on the project, the following flagging color code should be used.Type of Stake and/orColor Flagging, Paint, Etc.MonumentPrimary Control, Right of Way (ROW), Boundary, Public LandSurvey System (PLSS)OrangeSecondary Control, Structure ControlYellowBenchmarks (Primary and Secondary)BlueEasements (Permanent and Temporary)Florescent Lime or GreenAlignment Centerline (Permanent and Temporary)RedAlignment ReferenceRed and WhiteSlope StakesWhiteStructure Reference (Major and Minor)Yellow and WhiteTest Holes (Geotechnical)PinkUtility LocatesWhiteSelective Thinning(To be tied around tree at eye level)Trees to be RemovedOrangeTrees to RemainBlueClearing and GrubbingWhiteFigure 2-2 CDOT Standard flagging colorBasic Surveying - Student WorkbookPage 7 of 523/15/2007
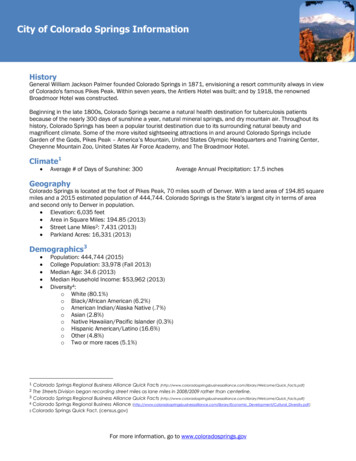
CHAPTER 3: MEASUREMENT OF DISTANCESIn surveying, the distance between two points typically refers to the horizontal, or level, distancebetween those two points. Construction plans are prepared showing distances as horizontaldistances. Horizontal distances are ordinarily determined in the following ways: Pacing, Tapingor Electronic Distance Measuring (EDM).PACINGPacing is one of the most valuable things learned in surveying because it has practicalapplications for everybody and requires no equipment. Pacing is very useful when a roughapproximation is needed.The length of a person’s pace must first be determined. This is best done by walking withnatural steps back and forth over a measured level course a minimum of 100 ft long, and thenaveraging the number of steps taken. An accuracy of 1 ft. per 100 ft. is suitable for pacing.TAPINGTaping consists of measuring between two points with a tape calibrated in feet to the nearestone-hundredth of a foot.Figure 3-1 Gradations on typical tapeSteel or fiberglass tapes are typically used, although cloth tapes can be used where highaccuracy is not important. The tape is often incorrectly referred to as a "chain" and is usually100 feet in length.The term “chain” derives from a device commonly used for land measurement in the past. The“Gunter's Chain” being the most common was 66 ft. long and had 100 links. Each link wasabout eight inches (0.66’) long, made of heavy gauge wire with a loop at each end. The linkswere joined end to end to create the chain by rings between the links. Another type of chain,the “Engineer’s Chain” was 100 ft. long and had 100 links each 12 inches long. The term"taping" is gradually being used more exclusively and is used in place of “chaining” in this text.See figure 3-2.Basic Surveying - Student WorkbookPage 8 of 523/15/2007
Figure 3-2 Survey chain and modern survey tapeTAPING PROCEDURESTwo methods are commonly used to measure the horizontal distance between two points usinga tape. See figure 3-3.The first method is to measure the distance by holding the ends of the tape on the samehorizontal line between the two points. This method requires the use of plumb bobs to transferthe distance to the ground.Figure 3-3 Direct distance measurementThe second method called breaking tape is used when it is not possible to pull a full 100 ft.because of the slope of the ground. A point is set at a convenient number of whole feet from theback point. This method also requires the use of a plumb bob to transfer the distance to theground. See figure 3-4.Basic Surveying - Student WorkbookPage 9 of 523/15/2007
Figure 3-4 Breaking tapeTape measurements are not usually made with the tape held directly on each point. Normally,each end is held above the point and is located vertically over the point by means of a plumbbob and string. The proper way to hold the plumb bob is to have the thumb and forefinger pinchthe string against the top of the tape. Normally one should not use the hand controlling theplumb bob to apply tension to the tape.The importance of having both ends of the tape at the same elevation when measuring ahorizontal distance cannot be overemphasized. One of the most common errors in taping isfailure to hold both ends of the tape at the same level.Figure 3-5 below shows how errors in determining horizontal distances can occur as a result offailure to keep both ends of the tape level.Figure 3-5 Error in measuring when tape is not horizontalHorizontal measurement with a tape and plumb bob is a process which requires skill and care.It takes considerable practice and experience to tape accurately and efficiently.EDM (Electronic Distance Measuring)When a distance is measured using an EDM instrument, an electromagnetic wave is transmittedfrom the instrument towards a reflector where part of the transmitted wave is returned to theinstrument. Electronic comparison of the transmitted and received signals allows forBasic Surveying - Student WorkbookPage 10 of 523/15/2007
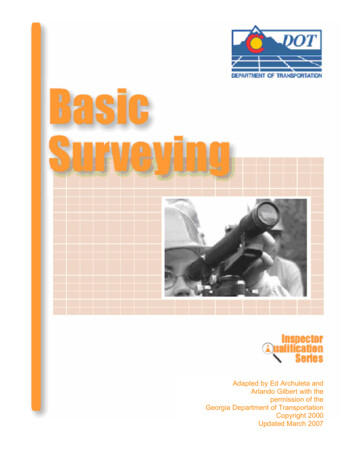
computation of the distance. Today most EDMs will be found as an integral part of a TotalStation. A Total Station is a combination of an EDM, electronic transit and a microcomputer.ACCURACY AND PRECISIONTo many people, accuracy and precision mean the same thing: to someone involved inmeasurement, the two terms should have very different meanings.Accuracy -- How close to the real value a measurement is.Precision - The ability of a measurement to be consistently reproduced.Figure 3-6 Accuracy and PrecisionAll measurements should be performed with a precision that ensures that the desired accuracyis attained.Basic Surveying - Student WorkbookPage 11 of 523/15/2007
CHAPTER 4: COMMON MISTAKES IN READING AND RECORDINGLINEAR MEASUREMENTSAn error may be defined as the difference between an observed value and the true value or asthe variation in observations, measurements, or calculations of a quantity. This section willdiscuss some of the principal errors and their effect on the measurements. In general, theseerrors tend to result in the recorded, or measured, distance being greater than the actualdistance.READING THE WRONG FOOTMARKThis is a careless mistake, which can usually be avoided by alertness and concentration.TRANSPOSING FIGURESSometimes a person may mentally transpose figures before calling them out, or the note keepermay transpose them when recording them. For example, he may call out, or record 42.63 whenhe should have called out 42.36. Alertness and concentration will usually eliminate this type ofmistake.READING THE TAPE UPSIDE-DOWNWhen reading a tape upside down, certain numbers can easily be misread for others. Forexample, a 6 may be misread as a 9; 86 may be misread for 98, etc. One way to avoid thismistake is to note the adjacent footmarks on both sides of the footmark being used to see thatthe number is in sequence. However, the best solution is to avoid reading the tape in an upsidedown position.TAPE NOT STRETCHED STRAIGHTAlways be sure that the tape is free to be stretched directly between the two points. The tapeshould not be allowed to bend around trees, bushes, boulders, etc., since this would result in themeasured distance being greater than the actual straight line value.Figure 4-1 Effect of not stretching the chainOne can readily see in figure 4-1 above the effect of this error on the measured distance ascompared to the actual distance.The wind can blow the tape off line, particularly when plumbing, resulting in the same type erroras an obstacle, which prevents the tape from being stretched straight between two points.Supporting the tape on line at one or more intermediate points can reduce the magnitude of thistype of error.Basic Surveying - Student WorkbookPage 12 of 523/15/2007
INCORRECT ALIGNMENTWhen measuring distances greater than the length of the tape, or when breaking the tape, theintermediate points must be placed on line by eye or by instrument. Usually, the back personcan stand on line and line the front person to within 0.2 feet to 0.3 feet of true line.Figure 4-2 Error in measurement from improper alignment of the chainOne can see that if the tape is lined within 0.5 ft. of the true line, the error is insignificant whenmeasuring a full tape length. One can also see that for shorter distances, the alignmentbecomes more critical. Since this type error is cumulative, it becomes more significant whenmultiple points are used in measuring a distance. This type of error results in the measureddistance being greater than the actual distance.CARELESS PLUMBINGThis error relates to failure to hold the plumb bob tip directly over the chaining point. This typeof error is a compensating error in that the measured distance may be greater, or it may be lessthan the actual distance. Proficient use of the plumb bob requires practice and care. Careshould be exercised to ensure that the plumb bob is positioned directly over the point whenmaking a measurement.TENSION AND SAGA tape stretches when pulled. Its length changes if the tension changes. For this reason, itshould be pulled with the tension for which it is designed. Only at this tension can its actuallength be expected to be the same as its calibrated length. The proper tension is normally 20 lb.for a 100-ft. steel tape suspended at the two ends. If the tape is supported throughout its length,as when it is laying on a level sidewalk, the tension should be one-half as much.Figure 4-3 Example of sag in tapingBasic Surveying - Student WorkbookPage 13 of 523/15/2007
CHAPTER 5: DI
This manual is intended only as a guide for training purposes and is not meant to replace the CDOT Survey Manual and in all cases, the CDOT Survey Manual has precedence over this manual when matters of policy and procedure are of concern. The CDOT survey manual can