Transcription
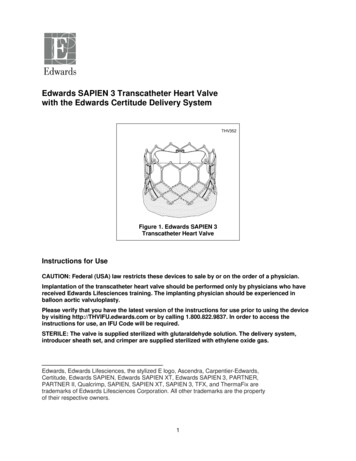
Edwards SAPIEN 3 Transcatheter Heart Valvewith the Edwards Certitude Delivery SystemTHV352Figure 1. Edwards SAPIEN 3Transcatheter Heart ValveInstructions for UseCAUTION: Federal (USA) law restricts these devices to sale by or on the order of a physician.Implantation of the transcatheter heart valve should be performed only by physicians who havereceived Edwards Lifesciences training. The implanting physician should be experienced inballoon aortic valvuloplasty.Please verify that you have the latest version of the instructions for use prior to using the deviceby visiting http://THVIFU.edwards.com or by calling 1.800.822.9837. In order to access theinstructions for use, an IFU Code will be required.STERILE: The valve is supplied sterilized with glutaraldehyde solution. The delivery system,introducer sheath set, and crimper are supplied sterilized with ethylene oxide gas.Edwards, Edwards Lifesciences, the stylized E logo, Ascendra, Carpentier-Edwards,Certitude, Edwards SAPIEN, Edwards SAPIEN XT, Edwards SAPIEN 3, PARTNER,PARTNER II, Qualcrimp, SAPIEN, SAPIEN XT, SAPIEN 3, TFX, and ThermaFix aretrademarks of Edwards Lifesciences Corporation. All other trademarks are the propertyof their respective owners.1
1.0 Device Description Edwards SAPIEN 3 Transcatheter Heart Valve - Model 9600TFX (Figure 1)The Edwards SAPIEN 3 transcatheter heart valve is comprised of a balloon-expandable, radiopaque,cobalt-chromium frame, trileaflet bovine pericardial tissue valve, and polyethylene terephthalate (PET)fabric skirt. The leaflets are treated according to the Carpentier-Edwards ThermaFix process.Table 1Valve SizeHeight20 mm15.5 mm23 mm18 mm26 mm20 mm29 mm22.5 mmSizing recommendations for implanting the Edwards SAPIEN 3 transcatheter heart valve in a nativeannulus are provided in the table below:Table 2Native Valve Annulus Size(CT)Area DerivedAreaDiameterNative Valve Annulus Size(TEE)Valve Size16 – 19 mm273 – 345 mm218.6 – 21 mm20 mm18 – 22 mm338 – 430 mm220.7 – 23.4 mm23 mm21 – 25 mm430 – 546 mm223.4 – 26.4 mm26 mm24 – 28 mm540 – 683 mm226.2 – 29.5 mm29 mmValve size recommendations are based on native valve annulus size, as measured bytransesophageal echocardiography (TEE) or computed tomography (CT). Patient anatomicalfactors and multiple imaging modalities should be considered during valve size selection.NOTE: Risks associated with undersizing and oversizing should be considered.Sizing recommendations for implanting the Edwards SAPIEN 3 transcatheter heart valve in a failingsurgical bioprosthesis are provided in the table below:Table 3Surgical Valve TrueInner Diameter (ID)[1]SAPIEN 3 Valve Size16.5 – 19.0 mm20 mm18.5 – 22.0 mm23 mm22.0 – 25.0 mm26 mm25.0 – 28.5 mm29 mmNOTE: Surgical valve ‘True ID’ may be smaller than the labeled valve size. For a failing stentlessbioprosthesis, consider sizing recommendations for a native annulus. The dimensions of thefailed bioprosthesis should be determined so that the appropriate THV size can be implanted; andis best determined by using computed tomography, magnetic resonance imaging, and/ortransesophageal echocardiography.NOTE: Exact volume required to deploy the THV may vary depending on the bioprosthesis innerdiameter. Factors such as calcification and pannus tissue growth may not be accuratelyvisualized in imaging and may reduce the effective inner diameter of the failing bioprosthesis to asize smaller than the ‘True ID’. These factors should be considered and assessed in order todetermine the most appropriate THV size to achieve nominal THV deployment and sufficientanchoring. Do not exceed the rated burst pressure. See Table 4 for inflation parameters.2
Edwards Certitude Delivery System (Figure 2a-e)The Certitude delivery system is used for delivery of the Edwards SAPIEN 3 transcatheter heart valve.The delivery system includes a handle with a flex wheel for articulation of the balloon catheter, a loaderand extension tubing. The loader allows for the delivery of the crimped valve through the hemostasisvalves of the sheath. The valve is crimped between the two radiopaque shoulders on the distal andproximal ends of the balloon. A radiopaque center marker in the balloon is provided to help with valvepositioning. An inflation and guidewire hub is housed in the handle assembly. A 2-piece crimp stopperand the Qualcrimp crimping accessory are packaged with the delivery system for use during crimping ofthe valve. The inflation parameters for valve deployment are:Table 4Nominal InflationVolumeModelNominal BalloonDiameterRated Burst Pressure(RBP)9600SDS2020 mm12 mL7 atm9600SDS2323 mm17 mL7 atm9600SDS2626 mm23 mL7 atm9600SDS2929 mm30 mL7 atm Edwards Certitude Introducer Sheath Set (Figure 2f)The Edwards Certitude introducer sheath set is intended for use with the Edwards Certitude deliverysystem. The sheath has a radiopaque marker for visualization of the sheath tip and non-radiopaque depthmarkings on the distal end of the body of the sheath. The proximal end of the sheath includes a flush tubeand three hemostasis valves. An introducer is supplied with the sheath. The entire introducer isradiopaque.Figure 2a. Edwards Certitude Delivery System3
Figure 2d. LoaderFigure 2b. QualcrimpCrimping AccessoryFigure 2c. CrimpStopperFigure 2e. Extension Tubing1. Housing2. Flush Tube withStopcock3. Sheath4. Radiopaque Marker5. Non-RadiopaqueDepth Markers6.IntroducerFigure 2f. Edwards Certitude Introducer Sheath Set Edwards CrimperRefer to the Edwards Crimper instructions for use for device description. Ascendra Balloon Aortic Valvuloplasty CatheterRefer to the Ascendra Balloon Aortic Valvuloplasty Catheter instructions for use for device description. Inflation devicesRefer to the inflation device instructions for use for device description.2.0Indications1) The Edwards SAPIEN 3 transcatheter heart valve, Model 9600TFX, and accessories areindicated for relief of aortic stenosis in patients with symptomatic heart disease due to severenative calcific aortic stenosis who are judged by a Heart Team, including a cardiac surgeon, to be4
at intermediate or greater risk for open surgical therapy (i.e., predicted risk of surgical mortality 3% at 30 days, based on the Society of Thoracic Surgeons (STS) risk score and other clinicalco-morbidities unmeasured by the STS risk calculator).2) The Edwards SAPIEN 3 transcatheter heart valve, Model 9600TFX, and accessories areindicated for patients with symptomatic heart disease due to failure (stenosed, insufficient, orcombined) of a surgical bioprosthetic aortic or mitral valve who are judged by a heart team,including a cardiac surgeon, to be at high or greater risk for open surgical therapy (i.e., predictedrisk of surgical mortality 8% at 30 days, based on the STS risk score and other clinical comorbidities unmeasured by the STS risk calculator).3.0ContraindicationsThe valve and delivery systems are contraindicated in patients who cannot tolerate ananticoagulation/antiplatelet regimen or who have active bacterial endocarditis or other active infections.4.0Warnings Observation of the pacing lead throughout the procedure is essential to avoid the potential risk ofpacing lead perforation. There may be an increased risk of stroke in transcatheter aortic valve replacement procedures, ascompared to balloon aortic valvuloplasty or other standard treatments in high or greater risk patients. The devices are designed, intended, and distributed for single use only. Do not resterilize or reusethe devices. There are no data to support the sterility, nonpyrogenicity, and functionality of thedevices after reprocessing. Incorrect sizing of the valve may lead to paravalvular leak, migration, embolization, residual gradient(patient-prosthesis mismatch) and/or annular rupture. Accelerated deterioration of the valve may occur in patients with an altered calcium metabolism. Prior to delivery, the valve must remain hydrated at all times and cannot be exposed to solutionsother than its shipping storage solution and sterile physiologic rinsing solution. Valve leafletsmishandled or damaged during any part of the procedure will require replacement of the valve. Caution should be exercised in implanting a valve in patients with clinically significant coronary arterydisease. Patients with pre-existing prostheses should be carefully assessed prior to implantation of the valveto ensure proper valve positioning and deployment. Do not use the valve if the tamper evident seal is broken, the storage solution does not completelycover the valve, the temperature indicator has been activated, the valve is damaged, or the expirationdate has elapsed. Do not mishandle the delivery system or use it if the packaging or any components are not sterile,have been opened or are damaged (e.g. kinked or stretched), or the expiration date has elapsed. Use of excessive contrast media may lead to renal failure. Measure the patient’s creatinine level priorto the procedure. Contrast media usage should be monitored. Care should be exercised in patients with hypersensitivities to cobalt, nickel, chromium, molybdenum,titanium, manganese, silicon, and/or polymeric materials. The procedure should be conducted under fluoroscopic guidance. Some fluoroscopically guidedprocedures are associated with a risk of radiation injury to the skin. These injuries may be painful,disfiguring, and long-lasting. Valve recipients should be maintained on anticoagulant/antiplatelet therapy, except whencontraindicated, as determined by their physician. This device has not been tested for use withoutanticoagulation. Do not add or apply antibiotics to the storage solution, rinse solutions, or to the valve. Balloon valvuloplasty should be avoided in the treatment of failing bioprostheses as this may result in5
embolization of bioprosthesis material and mechanical disruption of the valve leaflets.5.0 Precautions Safety, effectiveness, and durability have not been established for THV-in-THV procedures. Long-term durability has not been established for the valve. Regular medical follow-up is advised toevaluate valve performance. Glutaraldehyde may cause irritation of the skin, eyes, nose and throat. Avoid prolonged or repeatedexposure to, or breathing of, the solution. Use only with adequate ventilation. If skin contact occurs,immediately flush the affected area with water; in the event of contact with eyes, seek immediatemedical attention. For more information about glutaraldehyde exposure, refer to the Material SafetyData Sheet available from Edwards Lifesciences. To maintain proper valve leaflet coaptation, do not overinflate the deployment balloon. Appropriate antibiotic prophylaxis is recommended post-procedure in patients at risk for prostheticvalve infection and endocarditis. Special care must be exercised in mitral valve replacement if chordal preservation techniques wereused in the primary implantation to avoid entrapment of the subvalvular apparatus.Safety andeffectiveness have not been established for patients with the following characteristics/comorbidities: Non-calcified aortic annulus Severe ventricular dysfunction with ejection fraction 20% Congenital unicuspid or congenital bicuspid aortic valve Pre-existing prosthetic ring in any position Severe mitral annular calcification (MAC), severe ( 3 ) mitral insufficiency, or Gorlinsyndrome Blood dyscrasias defined as: leukopenia (WBC 3000 cells/mL), acute anemia(Hb 9 g/dL), thrombocytopenia (platelet count 50,000 cells/mL), or history ofbleeding diathesis or coagulopathy Hypertrophic cardiomyopathy with or without obstruction (HOCM) Echocardiographic evidence of intracardiac mass, thrombus, or vegetation A known hypersensitivity or contraindication to aspirin, heparin, ticlopidine (Ticlid ), orclopidogrel (Plavix ), or sensitivity to contrast media, which cannot be adequately premedicated Excessive calcification at access site Bulky calcified aortic valve leaflets in close proximity to coronary ostia A concomitant paravalvular leak where the failing bioprosthesis is not securely fixed in the nativeannulus or is not structurally intact (e.g. wireform frame fracture) A partially detached leaflet of the failing bioprosthesis that in the aortic position may obstruct acoronary ostium Residual mean gradient may be higher in a “THV-in-failing bioprosthesis” configuration than thatobserved following implantation of the valve inside a native aortic annulus using the same sizedevice. Patients with elevated mean gradient post procedure should be carefully followed. It isimportant that the manufacturer, model and size of the preexisting bioprosthetic valve bedetermined, so that the appropriate valve can be implanted and a prosthesis-patient mismatch beavoided. Additionally, pre-procedure imaging modalities must be employed to make as accurate adetermination of the inner diameter as possible.6
6.0 Potential Adverse EventsPotential risks associated with the overall procedure including potential access complications associatedwith standard cardiac catheterization, balloon valvuloplasty, the potential risks of conscious sedationand/or general anesthesia, and the use of angiography: Death Stroke/transient ischemic attack, clusters or neurological deficit Paralysis Permanent disability Respiratory insufficiency or respiratory failure Hemorrhage requiring transfusion or intervention Cardiovascular injury including perforation or dissection of vessels, ventricle, atrium, myocardium orvalvular structures that may require intervention Pericardial effusion or cardiac tamponade Embolization including air, calcific valve material or thrombus Infection including septicemia and endocarditis Heart failure Myocardial infarction Renal insufficiency or renal failure Conduction system defect which may require a permanent pacemaker Arrhythmia Retroperitoneal bleed Arteriovenous (AV) fistula or pseudoaneurysm Reoperation Ischemia or nerve injury Restenosis Pulmonary edema Pleural effusion Bleeding Anemia Abnormal lab values (including electrolyte imbalance) Hypertension or hypotension Allergic reaction to anesthesia, contrast media, or device materials Hematoma Syncope Pain or changes at the access site Exercise intolerance or weakness Inflammation Angina Heart murmur FeverAdditional potential risks associated with the use of the valve, delivery system, and/or accessoriesinclude: Cardiac arrest7
Cardiogenic shock Emergency cardiac surgery Cardiac failure or low cardiac output Coronary flow obstruction/transvalvular flow disturbance Device thrombosis requiring intervention Valve thrombosis Device embolization Device migration or malposition requiring intervention Left ventricular outflow tract obstruction Valve deployment in unintended location Valve stenosis Structural valve deterioration (wear, fracture, calcification, leaflet tear/tearing from the stent posts,leaflet retraction, suture line disruption of components of a prosthetic valve, thickening, stenosis) Device degeneration Paravalvular or transvalvular leak Valve regurgitation Hemolysis Injury to the mitral valve Device explants Mediastinitis Mediastinal bleeding Nonstructural dysfunction Mechanical failure of delivery system, and/or accessories Non-emergent reoperation7.0 Directions for Use7.1 Required EquipmentTable 5Product NameEdwards SAPIEN 3Transcatheter Heart ValveEdwards CertitudeDelivery System*Edwards CertitudeIntroducer Sheath SetAscendra Balloon AorticValvuloplasty Catheter20 mm System(9600CT20)23 mm System(9600CT23)9600TFX (20 mm)9600TFX (23 mm)9600TFX (26 mm)9600TFX (29 0IS189600IS189600IS21Not included**26 mm System(9600CT26)Model29 mm System(9600CT29)9100BAVC***Inflation devices provided by Edwards LifesciencesEdwards Crimper9600CR* Includes the Qualcrimp crimping accessory, 2-piece crimp stopper, loader and extension tubing** Use 16 mm commercially available balloon valvuloplasty catheter*** Includes extension tubing8
Additional Equipment: 20 cc syringe or larger (x2) 50 cc syringe or larger Standard cardiac catheterization lab equipment Fluoroscopy (fixed, mobile or semi-mobile fluoroscopy systems appropriate for use in percutaneouscoronary interventions) Transesophageal or transthoracic echocardiography capabilities 18 gauge Seldinger needle (for transaortic) 145 cm x 0.035 inch (0.89 mm) soft guidewire 180 cm or 260 cm x 0.035 inch (0.89 mm) & Exchange length 0.035 inch (0.89 mm) extra-stiffguidewire Temporary pacemaker (PM) and pacing lead Sterile rinsing basins, physiological saline, heparinized saline, 15% diluted radiopaque contrastmedium Sterile table for valve and device preparation7.2 Valve Handling and PreparationFollow sterile technique during device preparation and implantation.7.2.1 Valve Rinsing ProcedureBefore opening the valve jar, carefully examine for evidence of damage (e.g. a cracked jar or lid, leakage,or broken or missing seals).CAUTION: Valves from containers found to be damaged, leaking, without adequate sterilant, ormissing intact seals must not be used for implantation.StepProcedure1Set up two (2) sterile bowls with at least 500 mL of sterile physiological saline to thoroughlyrinse the glutaraldehyde sterilant from the valve.2Carefully remove the valve/holder assembly from the jar without touching the tissue. Verifythe valve serial identification number with the number on the jar lid and record in the patientinformation documents. Inspect the valve for any signs of damage to the frame or tissue.3Rinse the valve as follows: Place the valve in the first bowl of sterile, physiological saline. Besure the saline solution completely covers the valve and holder. With the valve and holdersubmerged, slowly agitate (to gently swirl the valve and holder) back and forth for a minimumof 1 minute. Transfer the valve and holder to the second rinsing bowl of sterile, physiologicalsaline and gently agitate for at least one more minute. Ensure the rinse solution in the firstbowl is not used. The valve should be left in the final rinse solution until needed to preventthe tissue from drying.CAUTION: Do not allow the valve to come into contact with the bottom or sides of therinse bowl during agitation or swirling in the rinse solution. Direct contact between theidentification tag and valve is also to be avoided during the rinse procedure. No otherobjects should be placed in the rinse bowls. The valve should be kept hydrated to preventthe tissue from drying.9
7.2.2 Prepare the ComponentsRefer to the Edwards Crimper and Ascendra Balloon Aortic Valvuloplasty Catheter instructions for use fordevice preparation.StepProcedure1Visually inspect all components for damage. Ensure the Edwards Certitude delivery system isfully unflexed.2Prime and flush the introducer and sheath with heparinized saline. Hydrate the length of theintroducer and sheath.3Advance the introducer fully into the sheath housing.4Unscrew the loader cap from the loader and flush the loader cap with heparinized saline.5Place the loader cap onto the delivery system with the inside of the cap oriented towards thetapered tip.6Flush the extension tubing and connect to the delivery system.7Partially fill a 50 mL or larger syringe with diluted contrast medium, and connect to theextension tubing.8Fill the inflation device with 20 mL of diluted contrast medium, lock the inflation device, andconnect to the extension tubing. Close 3-way stopcock to inflation device.9De-air the delivery system using the luer lock syringe. Leave zero-pressure in the system.Close the 3-way stopcock to the luer lock syringe.10Remove 3 mL fluid from the delivery system by turning the knob of the locked inflation device.Keep the inflation device locked for valve crimping steps.7.2.3 Mount and Crimp the Valve on the Delivery SystemStepProcedure1Set up two (2) additional sterile bowls with at least 100 mL of sterile, physiological saline tothoroughly rinse the Qualcrimp crimping accessory.2Completely submerge the Qualcrimp crimping accessory in the first bowl and gentlycompress it to ensure complete saline absorption. Slowly swirl the Qualcrimp crimpingaccessory for a minimum of 1 minute. Repeat this process in the second bowl.3Remove the valve from the holder and remove the ID tag.4Attach the 2-piece crimp stopper to the base of the crimper and click into place.5With the crimper in the open position, gently place the valve into the crimper aperture.Gradually crimp the valve (if necessary) until it fits into the Qualcrimp crimping accessory.6Place the Qualcrimp crimping accessory over the valve making sure the valve is parallel tothe edge of the Qualcrimp crimping accessory.7Place the valve and Qualcrimp crimping accessory in the crimper aperture. Insert thedelivery system coaxially within the valve. The orientation of the valve on the delivery systemis described below:Antegrade approach: Inflow (outer skirt end) of the valve towards the proximal end of thedelivery system.Retrograde approach: Inflow (outer skirt end) of the valve towards the distal end of thedelivery system.8Crimp the valve between the two internal shoulders of the delivery system until it reaches theQualcrimp Stop located on the 2-piece Crimp Stopper.9Gently remove the Qualcrimp crimping accessory from the valve. Remove the QualcrimpStop from the Final Stop, leaving the Final Stop in place.10
StepProcedure10Fully crimp the valve until it reaches the Final Stop.NOTE: Ensure that the delivery system remains coaxial within the valve.11Repeat the full crimp of the valve two more times for a total of three full crimps.12Flush the loader with heparinized saline. Immediately advance the valve into the loader untilthe tapered tip of the delivery system is exposed and the valve is within the distal end of theloader tube.CAUTION: To prevent possible leaflet damage, the valve should not remain fullycrimped and/or in the loader for over 15 minutes.13Attach the loader cap to the loader and flush through the port on the loader.CAUTION: Keep the valve hydrated until ready for implantation.CAUTION: The physician must verify correct orientation of the valve prior to itsimplantation.14With 3-way stopcock still closed to the luer lock syringe, unlock the inflation device. Allow thedelivery system to reach zero-pressure.15Close the 3-way stopcock to the delivery system. Use the luer lock syringe to de-air theinflation device if necessary16Adjust the inflation device to the inflation volume required to deploy the valve, per thefollowing:Delivery SystemValveInflation VolumeModel 9600SDS2020 mm12 mLModel 9600SDS2323 mm17 mLModel 9600SDS2626 mm23 mLModel 9600SDS2929 mm30 mLRe-lock the inflation device. Close the 3-way stopcock to the luer lock syringe and removesyringe.CAUTION: Maintain the inflation device in a locked position until valve deployment.17Remove the stylet and flush the guidewire lumen of the delivery system.7.3 Valvuloplasty and Valve DeliveryValvuloplasty and valve delivery should be performed under conscious sedation and/or generalanesthesia with hemodynamic monitoring in a catheterization lab/hybrid operating room with fluoroscopicand echocardiographic imaging capabilities.The following table shows the minimum required distances from the valvular plane to the distal tip of thesheath to allow the Edwards Certitude delivery system balloon to inflate properly during valvedeployment. These distances do not include sheath insertion depth, which should be considered duringthe transaortic approach when selecting the access site on the ascending aorta.Delivery SystemValveMinimum Required Distance FromSheath Tip to Valvular PlaneModel 9600SDS2020 mm3.5 cmModel 9600SDS2323 mm3.5 cmModel 9600SDS2626 mm3.5 cmModel 9600SDS2929 mm4.0 cmAdminister heparin to maintain the ACT at 250 sec during the procedure.Balloon valvuloplasty should be avoided in the treatment of failing bioprostheses as this may11
result in embolization of bioprosthesis material and mechanical disruption of the valve leaflets.CAUTION: Use of excessive contrast media may lead to renal failure. Measure the patient’screatinine level prior to the procedure. Contrast media usage should be monitored.CAUTION: Care should be taken to avoid damage to soft tissue, chordae, aorta, native leaflet orventricular wall during insertion, positioning and removal of devices.7.3.1 Baseline ParametersStepProcedure1Perform an angiogram with fluoroscopic view perpendicular to the valve.2Evaluate the distance of the left and right coronary ostia from the aortic annulus in relation tothe valve frame height.3Introduce a pacemaker (PM) lead and position appropriately.4Set the stimulation parameters to obtain 1:1 capture, and test pacing.7.3.2 AccessStepProcedure1Gain access using standard catheterization techniques.2Using the sheath depth markers, advance the introducer and sheath over the guidewire to thedesired depth while following its progression on fluoroscopy.3Withdraw the introducer slowly, keeping the sheath in place. Maintain guidewire positionacross the valve.7.3.3 ValvuloplastyRefer to Ascendra Balloon Aortic Valvuloplasty Catheter Instructions for Use (IFU) for informationon device handling.NOTE: Rapid ventricular pacing should be performed when using the Edwards Ascendra BalloonAortic Valvuloplasty Catheter for valvuloplasty prior to aortic transcatheter valve implantation.After placement of the balloon at the intended site, begin rapid ventricular pacing. Once the systolic bloodpressure has decreased to 50 mmHg or below, balloon inflation can commence.CAUTION: Valve implantation should not be carried out if the balloon cannot be fully inflatedduring valvuloplasty.7.3.4 Valve DeliveryStepProcedure1Confirm that the valve is oriented properly and the volume in the inflation device matchesthe indicated volume.2Advance the valve/balloon assembly with the loader over the guidewire.3Engage loader into sheath housing while maintaining a firm grip.4Advance the valve out of the loader into the large section of the sheath. Tap on the sheathhousing to release air bubbles to the proximal end of the loader. Depress button valve onloader to de-air.5Advance the valve/balloon assembly through the sheath and position within the targetvalve.If needed, rotate the flex wheel on the handle to articulate the valve/balloon assembly intoposition.CAUTION: To prevent possible leaflet damage, the valve should not remain in thesheath for over 5 minutes.12
StepProcedure6Ensure that the valve is correctly positioned between the two internal shoulders of thedelivery system.7Begin valve deployment: Unlock the Inflation device provided by Edwards Lifesciences. Begin rapid pacing; once systolic blood pressure has decreased to 50 mmHg or below,balloon inflation can commence. Deploy the valve by inflating the balloon with the entire volume in the Inflation deviceprovided by Edwards Lifesciences, hold for 3 seconds and confirm that the barrel of theinflation device is empty to ensure complete inflation of the balloon. Deflate the balloon. When the balloon has been completely deflated, turn off thepacemaker.7.3.5 System RemovalStepProcedure1If articulation was used, completely unflex the delivery system.Retract the delivery system and guidewire into the sheath. Remove the loader and deliverysystem from the sheath.CAUTION: Properly deflate the balloon and unflex the delivery system prior toremoval.2Remove all devices when the ACT level is appropriate.3Remove the sheath from the access site, close the access site and confirm hemostasis.8.0 How SuppliedSTERILE: The valve is supplied sterilized with glutaraldehyde solution. The delivery system is suppliedsterilized with ethylene oxide gas.8.1 StorageThe valve must be stored at 10 C to 25 C (50 F to 77 F). Each jar is shipped in an enclosurecontaining a temperature indicator to detect exposure of the valve to extreme temperature.The delivery system should be stored in a cool, dry place.9.0MR SafetyMR ConditionalNon-clinical testing has demonstrated that the Edwards SAPIEN 3 transcatheter heart valve is MRConditional. A patient with this device can be scanned safely, immediately after placement of this deviceunder the following conditions: Static magnetic field of 1.5 tesla or 3 tesla. Maximum spatial gradient field of 2500 gauss/cm (25 T/m) or less. Maximum MR system reported, whole body averaged specific absorption rate (SAR) of2 W/kg (Normal Operating Mode)Under the scan conditions defined above, the SAPIEN 3 transcatheter heart valve is expected to producea maximum temperature rise of 3.0 C after 15 minutes of continuous scanning.13
In non-clinical testing, the image artifact caused by the device extends as far as 14.5 mm from the implantfor spin echo images and 30 mm for gradient echo images when scanned in a 3.0T MRI system. Theartifact obscures the device lumen in gradient echo images.The implant has not been evaluated in MR systems other than 1.5 or 3.0T.For valve-in-valve implantation or in the presence of other implants, please refer to the MRI safetyinformation for the surgical valve or other devices prior to MR imaging.10.0 Patient InformationPatient education brochures are provided to each site and should be given to the patient to inform them ofthe risks and benefits of the procedure and alternatives in adequate time before the procedure to be readand discussed with their physician. A copy of this brochure may also be obtained from EdwardsLifesciences by calling 1.800.822.9837. A patient implant card request form is provided with eachtranscatheter heart valve. After implantation, all requested information should be completed on this form.The serial number may be found on the package and on the identification tag attached to the transcatheterheart valve. The original form should be returned to the Edwards Lifesciences address indicated on the formand upon receipt, Edwards Lifescien
Edwards Certitude Introducer Sheath Set (Figure 2f) The Edwards Certitude introducer sheath set is intended for use with the Edwards Certitude delivery system. The sheath has a radiopaque marker for visualization of the sheath tip and non-radiopaque depth markings on the distal end of the body of the sheath.