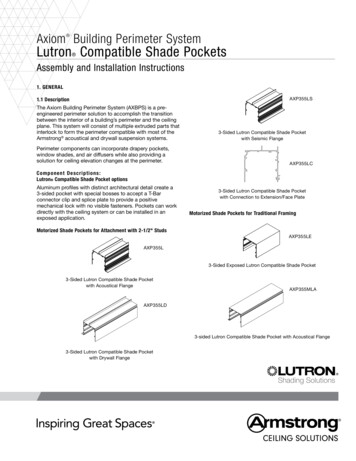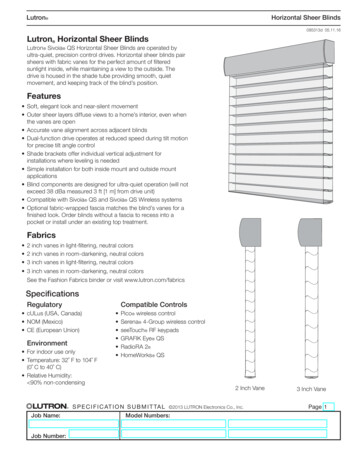
Transcription
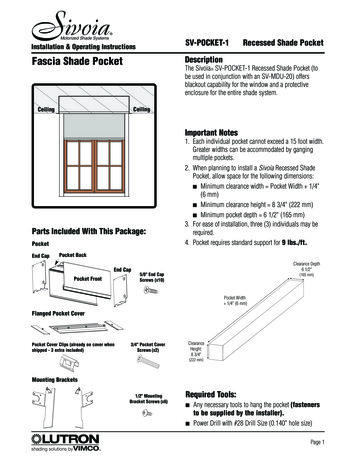
Motorized Shade SystemsInstallation & Operating InstructionsSV-POCKET-1Fascia Shade PocketDescriptionRecessed Shade PocketThe Sivoia SV-POCKET-1 Recessed Shade Pocket (tobe used in conjunction with an SV-MDU-20) offersblackout capability for the window and a protectiveenclosure for the entire shade system.CeilingCeilingImportant NotesParts Included With This Package:PocketEnd Cap1. Each individual pocket cannot exceed a 15 foot width.Greater widths can be accommodated by gangingmultiple pockets.2. When planning to install a Sivoia Recessed ShadePocket, allow space for the following dimensions: Minimum clearance width Pocket Width 1/4"(6 mm) Minimum clearance height 8 3/4" (222 mm) Minimum pocket depth 6 1/2" (165 mm)3. For ease of installation, three (3) individuals may berequired.4. Pocket requires standard support for 9 lbs./ft.Pocket BackClearance Depth6 1/2"End CapPocket Front5/8" End CapScrews (x10)(165 mm)Pocket Width 1/4" (6 mm)Flanged Pocket CoverPocket Cover Clips (already on cover whenshipped - 3 extra included)3/4" Pocket CoverScrews (x2)ClearanceHeight:8 3/4"(222 mm)Mounting Brackets1/2" MountingBracket Screws (x6)Required Tools: Any necessary tools to hang the pocket (fastenersto be supplied by the installer).Power Drill with #28 Drill Size (0.140" hole size)Page 1shading solutions by VIMCOTM
I. Pre-Installation/Pocket Assembly1Assemble PocketInsert the top flange of the pocket front into the receiving cavity of the pocket back. Angle the pocket front (Figure A),slide the flange into place, and lower the pocket front. The two pieces should fit snugly (Figure B), forming a level surface on top of the pocket.Figure APocket BackPocket FrontFigure B2Attach End CapsMount the end caps as shown using five (5) screws per cap.Page 2shading solutions by VIMCOTM
II. Installation1Attach PocketNote: Only mount system where ambient temperature will be 0 C–50 C (32 F–122 F).Choosing which fasteners to use when attaching the pocket is left to the discretion of the installer.1. The weight of the pocket is 9 lbs./ft.2. Keep all fasteners at least 3” from any fabric edge if the fastener is attached to the pocket back (Figure A). Thisdoes not apply if the fasteners are located on the top or front walls of the pocket (Figure B).3. Do not fasten any drop ceiling supports to the cavity area on the pocket front (as shown in Figure B: “NoScrews!”). See Figure C for an alternative solution for fastening drop ceiling supports.Front View(with Pocket Front removed)Figure AGray Area:Back Wall of PocketNo Fasteners6"(3" x 2)FabricEdgeNo Fasteners6"(3" x 2)AreaAllowedforFastenersFigure BFabricEdgeFigure CSide ViewPocketTopLumber(1/2-3/4”)Fasten Lumber toPocket Here (abovecavity)Fasten Support toLumber ONLY. Do notfasten to the pocket.BackFastenersAllowed inThese AreasFrontDrop CeilingBottom CoverDrop CeilingDrop CeilingSupportsImportant! Noscrews in thisarea.No Screws!Page 3shading solutions by VIMCOTM
II. Installation (continued)2Bring Wiring into the PocketRemove one of the 7/8" (22 mm) knockouts (located onthe side covers) to allow the MDU wiring to enter thepocket.Notes:1. It is recommended that the installer provide a strainrelief device to prevent damage to the wiring.2. If necessary, it is possible to drill a hole through thetop of the pocket as an alternative wire entry. ContactVIMCO for details.3Add Side Channels (Optional)A. Mount the pocket to the wall stud (Figure A), allowing the drywall to bring the side channels flush.Note: To mount directly to the wall (Figure B), add1/2" (13 mm) furring strips to where the side channels are to be mounted. This will bring the sidechannels flush with the pocket.Figure AFigure BPocketPocketSTUD1/2" Drywall1/2" Furring StripWALLSide ChannelSide ChannelB. Mount the top of the side channels 3/8" (10 mm)inside the bottom of the pocket.Note: This diagram shows the pocket without a frontcover for instruction purposes.3/8"Caution! 3/8" (10 mm) engagement into thepocket is necessary to ensure complete blackoutonce the shade is in place.Bottom of PocketC. Mount the 2-1/2" (64 mm) side channels (other sizesavailable)1" (25 mm) from each side of the pocket(measure towards the center of the pocket).Note: For inside pocket mount applications, the3-1/2" (89 mm) side channel is recommended.Mount the channels flush with the sides of the pocketto ensure complete blackout.1"Page 4shading solutions by VIMCOTM
III. Installing Brackets1Attach the MDU to the BracketAttach the MDU to the mounting bracket using three (3)truss head screws.2Attach the Idler Support to the BracketAttach the idler support to the mounting bracket usingthree (3) truss head screws.3Slide the Brackets into PlaceSIDE VIEWA. Slide the top flange of the bracket into the upper sloton the back wall of the pocket.Further bracket placement instructions areincluded on the next page .Page 5shading solutions by VIMCOTM
III. Installing Brackets (continued)3Slide the Brackets into Place (cont’d)B. While pushing the top flange as high as it will gointo the upper slot, drop the bottom flange of thebracket into the lower slotFront ViewC. Position the brackets using the Fabric Width measurement as a guide.Note: Use the indentation on the outer edge of eachbracket as a fabric edge indicator.Fabric WidthBracketsD. Tighten the locking screw against the pocket ceilingto secure the brackets in place.Once the brackets are in place, proceed withinstalling the shade(s) as instructed in the SVMDU-20, SV-CP, or SV-MMDP Installation Guide(depending on the application).LockingScrewPage 6shading solutions by VIMCOTM
IV. Attach Pocket Cover1Prepare Pocket CoverIf the pocket cover does not require the side flanges (inside-mount application) included with this kit, proceed toStep 2 below.For outside-mount applications, it is necessary to attach the side flanges to the pocket cover. Follow these steps:A. Trim the pocket cover at each end 11/16" (18 mm) using a chop saw and debur the edges.Caution! Make sure to trim the cover at each end. Do not add the measurements and trim from one side, orone of the pre-drilled holes for fastening the cover to the pocket will be eliminated.11/16"(18 mm)Top FlangeTrim CoverHere11/16"(18 mm)Trim CoverHerePocket CoverFront ViewPre-drilled HolePre-drilled HoleB. Fasten the side flanges to the pocket cover using the screws provided.Pocket CoverSide FlangeSide Flange2Attach Pocket CoverNote: These steps show an outside-mountapplication for attaching the pocket cover.Inside-mount applications follow this same procedure.A. Push the pocket cover into place by inserting theclips on the cover’s top flange into the pocket’sreceiving cavity.Note: These clips should be placed 8" (203 mm) to12" (305 mm) apart and snap firmly into the cavity.Top FlangeReceivingCavityClipsPage 7shading solutions by VIMCOTM
IV. Attach Pocket Cover (continued)2Attach Pocket Cover (cont'd)B. Use the pocket cover holes as guides to drill matching holes (drill size #28, 0.140” (4 mm) holesize) into the pocket base.Drill HolesC. Insert and tighten the two (2) pocket cover screws tosecurely fasten the cover in place.Note: The cover screws also act as a leveling mechanism for the cover. Finding the desired level position for the cover can be achieved by tightening orloosening the screws.LIMITED WARRANTYVIMCO will, at its option, repair or replace any unit that is defective in materials or manufacture within two years after purchase. Partial coverage is available for up toeight years after purchase. For warranty service, either return unit to place of purchase, or contact VIMCO Shading Systems (subsidiary of Lutron) by telephone toll-freeat 1-800-446-1503, or mail to VIMCO Shading Systems, 11520 Sun Shade Lane, Ashland, VA 23005, postage pre-paid. For complete warranty details, refer to the warranty sheet included with this system, or visit the VIMCO website at www.vimco.com.This warranty is in lieu of all other express warranties, and the implied warranty of merchantability is limited to two years from purchase.This warranty does not cover the cost of installation, removal or reinstallation, or damage resulting from misuse, abuse, or improper or incorrect repair, or damage from improper wiring or installation. This warranty does not cover incidental or consequential damages. VIMCO’s liability on any claim for damages arising out of or in connection with the manufacture, sale, installation, delivery, or use of the unit shall neverexceed the purchase price of the unit.This warranty gives you specific legal rights, and you may also have other rights which vary from state to state. Some states do not allow limitations on how long animplied warranty lasts, so the above limitation may not apply to you. Some states do not allow the exclusion or limitation of incidental or consequential damages, so theabove limitation or exclusion may not apply to you.Lutron, Sivoia, and the Sunburst logo are registered trademarks of Lutron Electronics Co., Inc. VIMCO and shading solutions by VIMCO are trademarks of Virginia Iron& Metal Company, Inc. 2003 Virginia Iron & Metal Company, Inc.Internet: www.vimco.com, www.lutron.comE-mail: info@vimco.comLutron Electronics Co., Inc.Made and printed in U.S.A.P/N 045-004 Rev. B 4/03shading solutions by VIMCOTM
SV-POCKET-1 Recessed Shade Pocket . Lutron Electronics Co., Inc. Made and printed in U.S.A. P/N 045-004 Rev. B 4/03 shading solutions byVIMCO TM LIMITED WARRANTY VIMCO will, at its option, repair or replace any unit that is defective in materials or manufacture within two years after purchase. Partial coverage is available for up to