Transcription
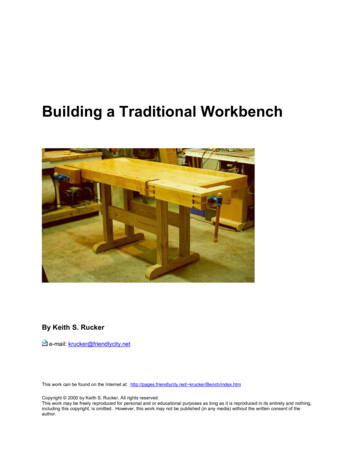
Building a Traditional WorkbenchBy Keith S. Ruckere-mail: krucker@friendlycity.netThis work can be found on the Internet at: http://pages.friendlycity.net/ krucker/Bench/index.htmCopyright 2000 by Keith S. Rucker, All rights reserved.This work may be freely reproduced for personal and or educational purposes as long as it is reproduced in its entirety and nothing,including this copyright, is omitted. However, this work may not be published (in any media) without the written consent of theauthor.
Table of ContentsTable of Contents. 2Introduction . 3The Design . 4The Top Design . 5Bill of Materials - Top . 6The Base Design. 7The Lumber. 8Milling the Lumber. 9The Top Slab. 11The Dog-Hole Back. 12Mathematical Calculations:. 14Making the Dog-Hole Strip . 16Making the Dog-Holes . 17Cutting the Notch . 19Cutting the Dovetail Pin . 19Gluing the Dog-Hole Strip to the Top . 20The Dog Hole Slot Cover. 21The End Caps . 22The Left End-Cap . 22The Right End Cap . 23Mounting the End Caps . 24The Tool Till . 25The Tool Till Apron . 25Tool Till Bottom . 26The Ramps . 27The Bottom Spacers . 28The Front Vise. 29Front Vise Spacer Block . 29The Front Vise Face Block . 30Boring the holes in the Face Block . 30Boring the holes in the bench . 31Preparing the Bench Face . 32Installing the Vise Hardware . 33The End Vise. 35The Face Piece. 35The Front Jaw . 36The Rear Jaw. 38The Back Runner. 38Assembling the End Vise. 38Fitting it up . 39The Dog-Hole Cover. 41The Guide Block . 42The Bench Runner. 44The Front Guide Block. 44Mounting the Top Caps . 47The Base . 51Flattening the Top . 55Finishing the Top. 56Details . 572
IntroductionIf you are going to use hand tools in your woodworking, perhaps the most important tool to haveis not the tools themselves but a good bench to do your work on. When I first started to set upmy shop, I had only been out of school for a little over a year, been married a little less than ayear and had just bought a new home. To help spell my situation out, we were poor. Eventhough the finances were not the best in the world, I began to accumulate a few basic tools andbegan making some of the much needed furniture in my new home. My first workbench waspretty simple. When we first moved into our new home, the previous owners had left behind acrudely made puppet stage, which was actually just several 2x4's screwed together and paintedwhite. Having no need for a puppet stage in my new "shop" (the two car garage on the front ofmy house), I disassembled the puppet stage and reassembled the lumber into the frame of abench. Nothing fancy here mind you, I just made a basic frame and put it all together withscrews. The top was made from some scrap 2x6's that were in the burn pile of a new housethat was being built down the street from mine (I did ask the contractor before taking them).The 2x6's were again screwed down top and presto, I had a bench. A couple of scrap pieces ofplywood made a shelf underneath to stack junk on. A couple of years later, a front vise wasbought and added to the bench.It was not a pretty bench and it was not really a great bench, but it was the only bench I had. Asmy woodworking improved and I started using more and more hand tools, I started to realizethat my thrown together bench was not good enough. Planing was particularly a pain. First,there was no good way to hold a board while planing. I screwed a couple of stops on the end ofthe bench for boards to hold against while planing but there was nothing on the other side tohold it tight. And, when I was planing, the whole bench racked back and forth resulting in muchwasted energy. The more work I did on this bench the more I realized I needed a new one.Shortly before my daughter was born (July 1997), I ordered a copy of "The Workbench Book" byScott Landis. The book arrived just a few days before my daughter did so as I was spending alot of time in the hospital waiting to go home with my new little bundle of joy, I spent many anhour reading my new book (Hannah, my newborn daughter, spent most of this time sleepinganyway so I had to do something to keep my busy). I must have read that entire book cover tocover at least twice before going home.I spent the next three years thinking about my bench and saving what I could so that I couldbuild one right. After three years of planning, I finally came up with a bench I think I will like.During that time, I had the opportunity to actually do work on several different types of benchesto see what I liked and didn't like. The result of all of my pondering on the subject was to build apretty traditional bench. The following collection of pages is a continuing saga of the step bystop process I went though to get it done. As I go along, I will discuss what I have learned alongthe way so that if you ever decide to build a bench, hopefully you can learn from my mistakes.3
The DesignAfter many years of using a totally inadequate bench for hand tools, I finally decided that thetime had come to build a "real" bench. After no telling how many hours of thinking andsketching, I finally decided on a pretty traditional design. My bench, will basically be pretty closein design to the Frank Klausz bench that has been well documented in both "The WorkbenchBook" by Scott Landis as well as in Fine Woodworking issue 53 (July/August 1985).The main difference between my bench and Franks is the front vise. Everything I have everread that Frank has written about his bench as well as what he told me while personally talkingwith him about it at a weekend workshop, Frank is adamant that the front vise should be of the"Dog-Leg" style. While it may work great for Frank, I just do not like that kind of vise. I havehad the opportunity to work on one for a while and it just did not suite my work habits. Perhapsthat greatest thing I do not like about the Dog-Leg vise is that it sticks out of the front of thebench, always getting in the way. It is also weaker by design. I decided instead to go with aplain front vise, where the front of the bench actually serves as the back of the vise. The onlyother differences in my bench and Franks is the dimensions. The only reason I changed themwas to better fit my shop. While I would love to have a bench that is 7' or 8' long, 6' was themaximum length that would work in my space. I also made my bench a little wider than Frank's,about three inches wider - not sure if this is good or bad, only time will tell.4
The Top DesignHere is the plan for the Bench Top. Also below is a copy of the bill of materials for theworkbench top. Again, this bill of materials is a bit rough right now but final dimensions shouldnot change much.5
Bill of Materials - TopTopPartNameQtyThicknessWidthLengthADog-Hole Strip12 5/8451BDog-Hole Back12 1/22 3/451CTop Slab32 1/25 3/466DDog-Hole Slot Cover111 1/251EApron11469FLeft Endcap13430 5/8GRight Endcap13428HTray Bottom11/28 1/266IRamps21/27 1/48JLeft Spacer11 1/22 3/425 1/8KRight Spacer11 1/42 3/426 1/2LFront Guide Block13322 1/4MGuide Block12 1/43 1/418OFront Vise12 5/8517 1/4PVise Spacer Block11 1/22 1/217 1/4Tail ViseRRear Jaw13 3/8413 1/2SFront Jaw13 3/8413 1/2TBack Runner11 1/21 1/223UFace Piece12 5/8423VRunner11119WBench Runner11 1/21 1/225XFront Top Cap115 3/823YEnd Top Cap113 3/813 1/26
The Base DesignHere is the basic plan for the bench base as well as the Bill of Materials. I built my base out ofSouthern Yellow Pine simply due economics. It would be better to build the base out ofhardwood. You can easily get by with lumber that has knots in it for the base as long it does nothave any structural defects.DrawingBa
6 Bill of Materials - Top Top Part Name Qty Thickness Width Length A Dog-Hole Strip 1 2 5/8 4 51 B Dog-Hole Back 1 2 1/2 2 3/4 51