Transcription
NetworX NX-6V2LED Keypad User Manual
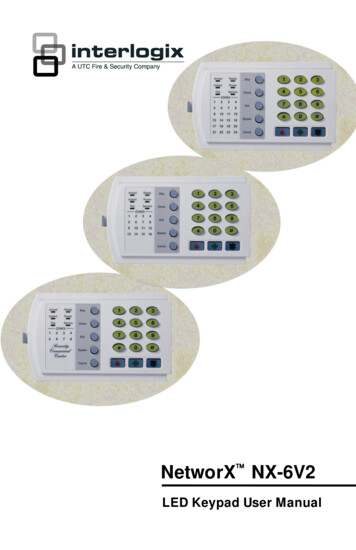
POWER Light is “on” w hen ACpow er is present; flashes toindicate a low batterycondition.READY Light is “on” w hen thesystem is ready to arm;flashes if ready to “force arm”.SERVICE Light is “on” toindicate a trouble conditionw ith your system.NX-6V2 SYSTEMKEYPADIncludes modelsNX-108E, NX-116E, NX-124EARMED Light is “on” w henarmed; “off” w hen disarmed;flashes to indicate a previousalarm.INSTANT Light is “on” w henthere is no entry/exit delay.FIRE Light is “on” to indicate firealarm; flashes to indicate atrouble condition w ith your firesystem.NUMERIC CODEENTRY KEYSPULL OUT ZONE ID TABZONE LIGHTS are “on” steadyto indicate bypass; slow flashfor zone fault; rapid flash forservice condition.5 FUNCTION KEYS performvarious functions.EMERGENCY ACTIVATION KEYSNOTE: Some of the features described above may or may not be available for your system. Check w ith your installation companyto find out how your system is programmed.
SECURITY SYSTEM NOTESInstalling/Service CompanyFor Service CallCentral StationDuress CodeFUNCTION CODESFunction CodeControls FunctionThis systemis is not partitioned.EMERGENCY ACTIVATION KEYS (check if enabled) Fire Abort Delay ( ) Auto Bypass ( ) Auto Instant Battery Test Auxiliary Emergency PolicePROGRAMMED FUNCTIONS Cancel Alarm Change Partitions Chime Communicator Test Forced Arming ( ) Group Bypass ( ) Quick Arm ( ) Re Exit Siren Test( ) These features should not be enabled on UL listed systems.ENTRY / EXIT DELAY TIMESExit Delay TimeEntry Delay TimeSecondary Exit Delay TimeSecondary Entry Delay TimeZONE DESCRIPTIONS010203040506070809101112131415161
THIS MANUAL IS FURNISHED TO HELP YOU UNDERSTAND YOUR SECURITY SYSTEMAND BECOME PROFICIENT IN ITS OPERATION. ALL USERS OF YOUR SECURITYSYSTEM SHOULD READ AND FOLLOW THE INSTRUCTIONS AND PRECAUTIONS INTHIS BOOKLET. FAILURE TO DO SO COULD RESULT IN THE SECURITY SYSTEM NOTWORKING PROPERLY. THIS BOOKLET SHOULD BE KEPT IN AN ACCESSIBLELOCATION FOR THE LIFE OF THE SECURITY SYSTEM. IF YOU DO NOT UNDERSTANDANY PART OF THIS MANUAL YOU SHOULD NOTIFY YOUR INSTALLING COMPANY.The SECURITY CONTROL can be turned on (ARMED) and of f (DISARMED) by entering a 4or 6 digit code into the Keypad Control, w hich is similar to a telephone keypad. If yourSecurity Control has been so programmed, you may be able to turn on (ARM) yourSystem by simply pressing the [STAY] or [EXIT] key. The sys tem must alw ays bedisarmed using a 4 or 6 digit code. The LED keypad includes up to 35 lights and a built-inelectronic sounder. These provide specific information relating to the status of thesecurity system w hich is described in the booklet. Understanding w hat the lights andsounds mean w ill help you to easily operate your system.READ THE ENTIRE MANUAL AND, IF POSSIBLE, PRACTICE ON THE KEYPADCONTROL WHILE YOUR PROFESSIONAL INSTALLER IS ON SITE.KEEP IN MIND, THE LEVEL OF SECURITY YOU WILL OBTAIN WITH THIS SYSTEMRELATES SPECIFICALLY WITH TWO MAJOR FACTORS:1.2.The quantity, quality, and placement of security devices attached to this system.The know ledge you have of the security system and how that know ledge isutilized in a w eekly test of the complete system.YOU SHOULD BE AWARE OF THE FOLLOWING FACTS WHEN PREPARING ASAFETY/SECURITY PLAN FOR YOUR HOME/BUSINESS. Your security system is an electronic device and is subject to failure or malfunction.Do not rely on it as your single source of security.Your system should be tested w eekly.Your system w ill not w ork w ithout pow er.Warning devices w ill need to be loud enough, w ired correctly, and properly placedto provide notification of an alarm event.Smoke and heat detectors may not detect heat and smoke in all situations.Use qualified security professionals to install and maintain your security system.It may be possible to arm the security system w ithout the backup battery connected.Your periodic test should be done w ith A.C. Pow er removed to verify the battery isconnected and adequately charged.Care should be taken to plug in and restrain the A.C. Transformer after testing.PLEASE READ THE FOLLOWING INFORMATION AND INSTRUCTIONS CAREFULLYBEFORE OPERATING YOUR SECURITY CONTROL SYSTEM. IF YOU DO NOTUNDERSTAND ANY PORTION OF THIS MANUAL, OR IF YOU HAVE ANY QUESTIONSABOUT YOUR SYSTEM, CONTACT THE INSTALLING COMPANY LISTED ON PAGE 1OF THIS BOOKLET.2
TABLE OF CONTENTSGLOSSARY OF TERMS .4UNDERSTANDING THE LIGHTS.5Armed Light .5Bypass Light.5Cancel Light.5Chime Light .5Exit Light .5Fire Light .5Instant Light .5Power Light.5Ready Light .6Stay Light .6Zone Light.6EMERGENCY ACTIVATION KEYS .6KEYPAD FUNCTIONS .7Arming Your System In The “Away” Mode.7Arming Your System In The “Stay” Mode .7Using The Quick Arm.8Disarming The System.8Cancel / Abort Feature .9Bypassing Zones.9Group Bypass .9Unbypassing .9Turning The Door Chime On And Off .9CHANGING USER CODES . 10ASSIGNING USER CODE AUTHORITY LEVELS. 10OTHER KEYPAD FUNCTIONS . 12Setting The Keypad Tone . 12Change Partition . 12View Alarm Memory . 12Test Function . 12Walk Test . 12Reset Function. 13Set System Date. 13Setting The System Clock. 13KEYPAD CONTROL TONES (BEEPS) . 14SERVICE MENU . 15EMERGENCY EVACUATION PLANS. 163
GLOSSARY OF TERMSAbort Delay: An option that allows a delay in reporting to the central station.There is a communicator delay of 30 seconds. It can be removed, or increasedup to 45 seconds at the option of the end user by consulting with the installer.Authority Level: The level of access an individual has when using an alarmpanel.Central Station: Location where alarm data is sent during an alarm report.Chime Feature: An option that allows the keypad to sound a ding -dongwhenever an entry/exit door is opened.Codes: Can be either User Codes (relating to a person) or Function Codes (atoggle switch to turn specific functions on/off). NOTE: A system may have either40 four-digit or six-digit codes, but not a mixture of the two.Duress Code: An option that allows a special code to be sent to the centralstation that indicates the alarm system is being operated under duress. Anyarming or disarming operation performed using the Duress PIN (in lieu of theUser PIN) will operate normally, without additional audible or visual indicators.Forced Arming: An option that allows the system to be turned on (ARMED) withone or more zones open. A system that is ready to be “force armed” will flashthe ready light. (Note: Those zones that are not ready will not create an alarm .)Function Code: A Function Code is either a four (4) or six (6) digit code that hasbeen programmed by the installer to operate a device.Group Bypass: An option that allows the user to bypass multiple zones with asingle operation.Instant/Delay: An option that allows an instant alarm condition for Entry/Exitdoors, or grants a delay to allow someone to enter/exit the building without analarm, or before entering a user code to disarm.Master Code: A master arm/disarm code that can program other user codes.Partitioned System: A system divided into multiple areas in which its own useror users control each area.Perimeter: The outer edge of the protected area.Quick Arm: An option that allows you to turn on (ARM) the security system bypressing either the [STAY] or [EXIT] key on the keypad control (for ARMING only)as programmed by the installing company.User Code: A four (4) or six (6) digit entry used to arm or disarm the system.4
UNDERSTANDING THE LIGHTSArmed LightThe armed light is “on” when the system is armed. The armed light is “off”when it is disarmed. The armed light will flash when there has been analarm during the previous arm cycle.Bypass LightThe b ypass light is “on” when any zone in this keypad’s partition is bypassed.The zone(s) that is bypassed will also be illuminated. If the b ypass light is“off”, no zones are bypassed.Cancel LightThe cancel light will flash during an abort delay time. If a code is enteredfollowed by the [CANCEL] key while this light is flashing, all abortable reportswill stop the communication process. Note: The abort feature must beenabled. Entering a code followed by the [CANCEL] key during or after analarm report to the central station will cause the cancel light to come on. It willstay on until the central station has received the cancel report. Note: Thecancel feature must be enabled. No additional keypad tones will be emitted.Chime LightThe chime light is “on” when the chime feature is “on”; “off” otherwise.Exit LightThe exit light is “on” during the exit delay. During the last 10 seconds of theexit delay, the exit light will flash rapidly and the keypads will beep rapidly asa warning to the user that the exit time is about to expire. (The user may wantto disarm the system if the exit light is flashing in order to prevent an alarm.The user may then re-arm the system and exit before the delay expires.)Fire LightA steady fire light means a fire zone has been faulted. A rapidly flashing firelight means that a fire zone is in a trouble condition.Instant LightThe instant light is “on” when there is no delay on your entry/exit door(s). Anytime the instant light is “on” and the exit delay has expired, the opening ofan entry/exit door will produce an immediate alarm. The instant light can betoggled on or off by pressing the [Stay] key while the system is armed. Whenthe instant light is “off”, the entry/exit door(s) is delayed.Power LightThe power light is on if the primary power is on. The power light will flash if thesystem has a low battery condition.5
Ready LightThe ready light is “on” when the system is ready to arm and “flashes” if readyto force arm. The ready light is off when the system is not ready to armbecause of a zone(s) being faulted.Stay LightThe stay light is “on” when the all interior (motion detector) zones arebypassed.Zone LightThe zone lights are “off” when everything is normal. A zone light will be “on” ifthe zone has been bypassed. If a zone light is “flashing”, that zone is in alarmor has been faulted. If a zone light is “flashing” rapidly, it means that the zoneis in a trouble condition. Trouble conditions are: Tamper Hardware Low Battery Loss of Supervision(A combination of Alarm/Fault and Tamper/Trouble will produce a rapid“flashing” light for a short period of time, follow ed by a slow “flashing” light.)EMERGENCY ACTIVATION KEYSNOTES: You must hold these keys for 2 seconds to activate thesefunctions. Your system may not be programmed for these activation keys(see page 1). You should press these keys only in an emergency situation thatrequires response by emergency personnel. If your system is programmed forthese functions, the following reports can be sent.Fire Key – This key can activate the fire alarm when pressed for 2 seconds. Ifyour system is connected to a monitoring center, an emergency report could besent to that center. The keypads sound a continuous beeping.Auxiliary Emergency Key – This key can activate the auxiliary alarm whenpressed for 2 seconds. If your system is connected to a monitoring center, anemergency report could be sent to that center. The keypads sound acontinuous beeping.Police (Panic/Hold-Up) Key - This key can sound a local audible alarm whenpressed for 2 seconds. If your system is connected to a monitoring center, anemergency report could be transmitted to that center. NOTE: Some Panic/HoldUp alarms are programmed to be silent at the protected site while reporting analarm to the monitoring center. Check with your installing company todetermine how your security system will respond to the Panic/Hold -Upactivation. If programmed for Silent Hold-up, the keypads will not sound.Otherwise, the keypads will sound a continuous beeping.6
KEYPAD FUNCTIONSARMING YOUR SYSTEM IN THE “AWAY” MODEAWAY is used when the user is away from the premise and wants the interiorprotected. Listed below are the steps to arm in the AWAY Mode:Step 1Step 2Close all protected doors and windows. Ready light will be on or flashing when all prote cted zones andsensors are secure. NOTE: If any zones are bypassed, a sensorin that zone can be violated without affecting the ready light. The security system will not arm if the ready light is not on orflashing. If the power light is off, you have no AC power. Restore power ifpossible. If not, contact your installing company listed on page 1 ofthis booklet for service. Enter your 4 or 6 digit user code to arm the system. The armed and exit lights will illuminate. You may now leave the building.Note: The keypads b eep slowly during an exit delay. During the last 10seconds of the exit delay, the keypads b eep rapidly and the exit light willflash rapidly as a warning to the user that the exit time is ab out to expire. Atthe end of the exit delay, the keypads b eep one longer tone (1 second). Theuser may wish to disarm and re-arm the system if more time is needed.ARMING YOUR SYSTEM IN THE “STAY” MODESTAY is used when the user is inside the premise and wants protection aroundthe perimeter. Listed below are the steps to arm in the STAY Mode:Step 1Close all protected doors and windows. Ready light must be on or flashing when all protected zones andsensors are secure. NOTE: If any zones are bypassed, a sensorin that zone can be violated without affecting the ready light. The security system will not arm if the ready light is not on orflashing. If the power light is off, you have no AC power. Restore power ifpossible. If not, contact your installing company listed on page 1 ofthis booklet for service.Step 2 Enter your 4 or 6 digit user code. If “Auto Bypass” is enabled, all interior zones will be bypassed ifyou do not leave through a designated entry/exit door. If AutoBypass is enabled, omit Step 3. When “Auto Instant” is enabled, if you do not leave through adesignated entry/exit door the instant light will illuminate indicatingthat the entry/exit doors no longer have an entry delay. If “AutoInstant” is enabled, omit Step 4.7
Step 3 Press the [STAY] key. The stay light will illuminate indicating that all interior zone s arebypassed. (All interior devices will bypass automatically, giving theuser freedom of movement within the interior area.) The b ypass light will illuminate if any zone(s) are bypassed. If anyzone(s) have been bypassed previously by the user, the light(s)corresponding to the bypassed zone(s) will illuminate, ale rting theuser that a zone(s) may be unprotected and can be faulted withoutan alarm.Step 4 To toggle from a “delayed entry” mode to an “Instant” mode, pressthe [STAY] key again. The instant light will illuminate indicating that the entry/exit doorshave no entry delay.USING THE QUICK ARM (Optional, see page 1)The Quick Arm feature may be used if it is enabled. Quick Arm will allow theuser to arm the security sys tem in the AWAY mode by pressing the [EXIT] key,or arm in the STAY mode by pressing the [STAY] key. The keypads beep duringthe exit delay; beeps rapidly for the last 10 seconds of the exit delay; and beeps1 second at the end of the exit delay. This feature is used for ARMING ONLY,and will not disarm the security system. This is ideal for a maid or baby sittercode, etc.CHANGING MODES WHILE SYSTEM IS ARMED Pressing the [STAY] key will turn on/off (toggle) a delay on entry/exitdoors and turn on/off (toggle) the instant light. (Optional) Press the [BYPASS] key at this time to turn on/off (toggle) alldesignated interior zones. (Optional) When armed, pressing the [EXIT] key will start the exit delay,enabling you to leave the building.IMPORTANTThe instant light needs to be off at this time if you plan on re-entering thebuilding; otherwise you will create an alarm. You may restore an entry delayby pressing the [STAY] key again.DISARMING THE SYSTEMWhen you enter the protected area through one of the designated Entry/Exitdoors, the keypad control will sound a continuous tone for the duration of theentry delay time, or until you enter a valid code. The red armed light will go offand the tone will stop. The security system is now DISARMED. If a valid code isnot entered before the end of the entry delay, an alarm will occur. (NOTE: If thered armed light is flashing during the entry delay, the alarm system has beenactivated in your absence. Leave the building immediately and call youralarm company and/or the police from a safe location.)8
CANCEL / ABORT FEATURE (Optional, see page 1)The cancel light will flash during an abort delay time. If a code is enteredfollowed by the [CANCEL] key while this light is flas hing, all abortable reportswill stop the communication process. Entering a code followed by the [CANCEL]key during or after an alarm report to the central station will cause the cancellight to come on. It will stay on until the central station has recei ved the cancelreport. No additional keypad tones will be emitted.BYPASSING ZONESIf you wish to bypass one or more zones, this must be done while the system isin the disarmed state. The following steps are used for bypassing zones:Step 1Press the [BYPASS] key.Step 2Enter user code if required (optional). The b ypass light flashes.Step 3Enter the digits indicating the zone you wish to bypass. (Example:Press the [1] key for zone 1, press [1] - [2] for zone 12.)Step 4Press the [BYPASS] key again.Step 5The corresponding zone light will illuminate indicating the zonehas been bypassed. Repeat steps 3 and 4 for any other zone(s)that need to be bypassed.Step 6Press the [BYPASS] key again -or- press the [#] key to exit theBypass Mode. The b ypass light will stop flashing upon exiting theBypass Mode.GROUP BYPASSBy pressing the [BYPASS] key, followed by the [0] key, then the [BYPASS] keyagain, all zones that are designated as group bypas s zones will be bypassed.Press the [BYPASS] key again to exit group bypassing.UNBYPASSINGTo manually unbypass zones, perform the bypassing procedure on a zone thatis already bypassed. The corresponding light for that zone will go off whenunbypassed. NOTE: All zones will automatically be unbypassed each time thesystem is disarmed.TURNING THE DOOR CHIME ON AND OFFThe door chime is turned on or off by pressing the [CHIME] key while the systemis in the disarmed state. If the chime is on the chime light will be illuminated. Ifthe chime is off, the chime light will be off. Each press of the [CHIME] key willtoggle the chime feature on/off and produce a momentary ding -dong sound.9
CHANGING USER CODESStep 1Your system must be in the Disarmed state to change user codes.Step 2Press [ ]-[5].Step 3Enter a “Master Arm/Disarm Code”.NOTE: For partitioned systems, someone changing the code ofanother person must have access to all or more partitions thanthe user being changed.Step 4The ready light will flash.Step 5Enter the 2-digit “user number”. You must always enter 2 digits,such as [0] - [3] for user 3, or [1] - [2] for user 12.Step 6Enter the new four (4) or six (6) digit “user code”.NOTE: To delete a user code, enter [ ]-[ ]-[ ]-[ ] for a 4-digit code,or [ ]-[ ]-[ ]-[ ]-[ ]-[ ] for a 6-digit code.Step 7The ready light will flash indicating you are back at Step 4 above. Ifthe code is rejected, the sounder will beep 3 times.Step 8If another “user code” needs to be programmed, return to Step 5.Step 9Press the [#] key while the ready light is flashing to exit the UserCode Programming Mode.ASSIGNING USER CODE AUTHORITY LEVELSAssign authority levels to users by following the steps below. Assign usercodes before assigning authority levels.Step 1Press [ ]-[6].Step 2Enter a “Master Arm/Disarm Code”.NOTE: Someone changing the authority of another person canonly add or remove partition authorization for partitions to whichthey have access.Step 3The ready light will flash.Step 4Enter the 2-digit “user number” to be assigned authority (The readylight is constant and the instant light will flash).Step 5Lights illuminated indicate the authority levels assigned to thiscode. An explanation of the lights is listed below. You may toggle(turn on/off) the authority level by pressing the number for thatauthority level.10
LIGHT12345678AUTHORITY LEVELS IF LIGHT 8 IS OFFReserved (Note: Do not change if on.)Arm OnlyArm Only After Clos ing TimeMaster Arm/Disarm (can program other codes)Arm/DisarmBypass ZonesOpen / Close ReportingIf this light is on, this code is programmed as afunction code. Do not change! Press [#] - [#] toexit.Step 6Press the [ ] key. The ready light will flash. This moves you to thepartition enable. (The user has access in partitions that areilluminated.)Step 7The illuminated numbers indicate each partition where the userhas access. To change any of the partitions where the user hasaccess, press numbers corresponding to areas where you want togive the user access or deny access. (Example: If zone light #2 islit, then the user is assigned access to partition #2. By pressing the[2] key, the light will go off, denying access to partition #2. Refer tochart shown below.LIGHT12PARTITIONS ASSIGNEDPartition 1Partition 2Step 8When the partitions are assigned, press the [ ] key. This returnsyou to Step 3 previously mentioned. At this point you may enteranother user number to assign authority level. Repeat Steps 4 - 8until you have assigned authority levels to all user numbers.Step 9Press the [#] key to exit the Assigning Authority Level Program.11
OTHER KEYPAD FUNCTIONSSETTING THE KEYPAD TONEStep 1Press [ ]-[0]. Keypad is now in the “Adjust Tone” mode.Step 2 Pressing the [1] key will make the keypad sounder go to highertones, pressing the [2] key will make the keypad sounder go to lower tones.Step 3 When the desired tone is reached, press the [#] key to set this toneand exit from the “Adjust Tone” mode.CHANGE PARTITION – OptionalStep 1Press [ ]-[1].Step 2Press a NUMBER key (1 or 2) to change partitions momentarily.Step 3If no other key is pressed, it will go back to its standard partition inten seconds.Step 4If another key is pressed, the system will remain in the newpartition until no keys have been pressed for 60 seconds.VIEW ALARM MEMORYStep 1Press [ ]-[3]. The zone(s) that created the last alarm will bedisplayed on the keypad.Step 2The ALARM MEMORY feature will flash those zones that createdalarms and will light steady those zones that were bypassedduring the last alarm.TEST FUNCTION – OptionalIf programmed, this function will perform a battery test, communicator test,and/or a siren test. No alarms will be sent and no reports will be sent unless acommunicator test is performed, at which time a test signal will be sent.Step 1Press [ ]-[4]. The test will be performed as programmed.Step 2If the siren test is performed, enter a user code to si lence the siren.WALK TESTIf enabled, it will permit a temporary walk-through test where all zones becomesilent and do not report alarms to the central station.Step 1Press [ ]-[Chime]-[user code]. During this test the chime light willflash on the LED keypad.Step 2Each time a zone is faulted, the zone light on the LED keypad willilluminate and the chime will sound. The number of the faulted12
zone(s) will be displayed on the LCD keypad.entered into alarm memory and the internal log.It will also beStep 3The keypad will begin to beep after 15 minutes in this mode. Thisbeeping indicates that the “Walk-Test” mode will be automaticallyexited in 5 minutes.Step 4To exit at any time during this mode, enter a user code. Otherwisethe AWalk-Test Mode@ will automatically exit after 20 minutes.RESET FUNCTIONThis function is used to reset Smoke Detectors, Zone Troubles, and ZoneTampers.Step 1Disarm the system if not disarmed.Step 2 Press [ ]-[7]. Resets have now been performed.Step 3If the keypad begins beeping, the reset did not execute properly.Enter your code to silence the keypad. Wait a few minutes andrepeat step 2 to attempt another reset. If the keypad still beeps afterrepeated attempts, please contact your installer.SET SYSTEM DATEStep 1Press the [ ]-[9]-[6].Step 2Enter the “Master Code”.Step 3Enter the “Day of Week “1 Sunday3 Tuesday2 Monday4 Wednesday5 Thursday6 Friday7 SaturdayStep 4Enter the “Month Code”. Must always01 January05 May02 February06 June03 March07 July04 April08 Augustbe two (2) digits.09 September10 October11 November12 DecemberStep 5Enter the “Day Code”. Must always be two (2) digits.Example: The 5 th would be entered as [0]–[5].Step 6Enter the last two digits of the “Year Code”.Example: For 2007 enter [0]–[7].SETTING THE SYSTEM CLOCKStep 1Press [ ]-[9]-[7].Step 2Enter the “Master Code “.Step 3Enter the “hour code” which must be two (2) digits. Note: Theclock is a 24-hour clock. Refer to the following table on page 14.Step 4Enter the “minutes code” which must be two (2) digits.Example: 7 minutes after would be entered [0]–[7].13
TimeHour CodeTimeHour CodeTimeHour Code12:00Midnight008:00 AM084:00 PM161:00 AM019:00 AM095:00 PM172:00 AM0210:00 AM106:00 PM183:00 AM03117:00 PM194:00 AM04128:00 PM205:00 AM0511:00 AM12:00Noon1:00 PM139:00 PM216:00 AM062:00 PM1410:00 PM227:00 AM073:00 PM1511:00 PM23KEYPAD CONTROL TONES (BEEPS)A sounder is built into the keypad. If programmed, your system keypad maysound for any of the following reasons: Beeps for all keypresses. Sounds a continuous tone during the Entry delay time. Pulses when a day zone is violated while the system is disarmed. Pulses when a FIRE zone has a trouble condition. Beeps 3 times for trying to arm with the “Ready” light off, if “Force Arming”has not been selected. Beeps for 1 second or emits a “ding-dong” sound for the “Chime” feature. Beeps during an exit delay; beeps rapidly for the last 10 seconds of an exitdelay; and beeps 1 second at the end of the exit delay. Pulses when the armed status changes and the AC power is off. Pulses when the armed status changes and any zone(s) are bypassed. Pulses when the armed status changes and a low battery is detected. Pulses when the armed status changes and a Tamper condition isdetected. Beeps to indicate Telephone Line Cut, if selected. Pulses when one or more of the following conditions are detected: Zone orBox Tamper, Low Battery, AC Power Fail, or Expander trouble. Beeps 3 times every minute indicating a low battery or missing transmitteris detected (if wireless device is in system). Entering code will suppressthe sounder for 12 hours.Entering a valid code will silence the keypad sounder when it is pulsing. Thearm/disarm state of your system will not change when entering a code tosilence a pulsing keypad sounder. Please contact your installer if a troublecondition exists.14
SERVICE MENUThe service light will be “on” if the s ecurity system requires service. If theservice light is “on”, press the [ ] key followed by the [2] key to determine theservice condition. One or more zone lights will illuminate indicating whatservice(s) is required. Call your service provider immed iately for theseproblems. Below is a listing of what each light means in a service condition.LIGHT1PROBLEMSYSTEM FAULT - Press the [1] key. The zone light(s) that isilluminated corresponds to the system fault(s) below:1 Over Current Fault5 Expander Low Battery2 Siren Trouble6 Expander Box Tamper3 Box Tamper7 Expander Trouble4 Expander Power8 Ground FaultNote: Faults 1 & 2 are global in nature and will affect all partitions ofa multi-partition system. Press the [#] key to return to the 1 of 8service lights.2ZONE TAMPER - Press th
6 Ready Light The ready light is "on" when the system is ready to arm and "flashes" if ready to force arm. The ready light is off when the system is not ready to arm because of a zone(s) being faulted. Stay Light The stay light is "on" when the all interior (motion detector) zones are bypassed. Zone Light The zone lights are "off" when everything is normal.