Transcription
XserveUser GuideIncludes software configurationand problem solving informationfor the Xserve
KKApple Inc. 2009 Apple Inc. All rights reserved.Under the copyright laws, this manual may not becopied, in whole or in part, without the written consentof Apple. Your rights to the software are governed bythe accompanying software license agreement.The Apple logo is a trademark of Apple Inc., registeredin the U.S. and other countries. Use of the “keyboard”Apple logo (Option-Shift-K) for commercial purposeswithout the prior written consent of Apple mayconstitute trademark infringement and unfaircompetition in violation of federal and state laws.Every effort has been made to ensure that theinformation in this manual is accurate. Apple is notresponsible for printing or clerical errors.Apple1 Infinite LoopCupertino, CA 95014-2084408-996-1010www.apple.comApple, the Apple logo, FireWire, Mac, Macintosh, Mac OS,and Xserve are trademarks of Apple Inc., registered inthe U.S. and other countries.Apple Remote Desktop, Finder, and the FireWire logoare trademarks of Apple Inc.Intel, Intel Core, and Xeon are trademarks of Intel Corp.in the U.S. and other countries.This product includes software developed by theUniversity of California, Berkeley, FreeBSD, Inc.,The NetBSD Foundation, Inc., and their respectivecontributors.Other company and product names mentioned hereinmay be trademarks of their respective companies.Mention of third-party products is for informationalpurposes only and constitutes neither an endorsementnor a recommendation. Apple assumes no responsibilitywith regard to the performance or use of theseproducts.Simultaneously published in the United States andCanada.019-1445/2009-02
Contents55566Preface: About This Guide7810Chapter 1: Xserve at a Glance121212131314141414141515151516Chapter 2: Starting Up the Xserve1717171718191919Chapter 3: Monitoring the XserveWorking with Mac OS X ServerIf You Have a Solid-State DriveIf You Have an Xserve RAID CardFor More InformationXserve at a Glance—Front PanelXserve at a Glance—Back PanelTurning On the Xserve for the First TimeConfiguring the Server SoftwareConfiguring the Lights-Out Management PortLocal and Remote Software SetupSerial Number for Remote SetupSetting Up More Than One XserveStarting Up the XserveRemote StartupChoosing a Startup Method from the Front PanelShutting Down the XserveBefore You Shut Down the XserveShutting Down the Xserve with a Keyboard and DisplayShutting Down the Xserve RemotelyForcing Shutdown from the Front PanelChecking the Status of Mac OS X Server ServicesChecking the Status of the RAID Card BatteryLocal and Remote MonitoringIdentifying the Xserve in a RackInterpreting the Xserve Status LightsOverall Xserve StatusSystem Identifier 3
202021212222222323232323232424Processor ActivityDrive Module StatusEthernet Link StatusPower Supply StatusGetting Detailed Hardware InformationUsing the Serial PortAbout Terminal Emulation SoftwareConnecting to the Serial PortAbout the Command-Line ToolsControlling Physical Access to the XserveControlling a Keyboard and MouseMonitoring the Xserve RemotelyUsing Server MonitorConnecting to the XserveUsing the Command Line252526262627272828282930Chapter 4: Updating or Installing Software on the XserveBefore You BeginSoftware Update and Installation OverviewChoosing the Best MethodGetting the Latest Software UpdatesReinstalling Server SoftwareUsing a Keyboard, a Display, and the Mac OS X Server Install DVDUsing a NetBoot Server to Install over the NetworkUsing Apple Remote Desktop or Other VNC SoftwareUsing Screen SharingUsing Another Xserve to Install on a Swapped Drive ModuleUsing Commands over the Serial Port to Install from the Optical Drive31313133Appendix: Troubleshooting34Regulatory Compliance Information4If You Don’t Find a SolutionProblems and SolutionsUsing Apple Xserve Diagnostics SoftwareContents
PrefaceAbout This GuideThis user guide shows you how to start up and shut downthe Xserve, install and configure server software, monitor thestatus of the Xserve, and solve problems.This guide contains information you might find useful after you install the Xserve:ÂÂ An overview of Xserve features, controls, and components, in Chapter 1ÂÂ Tips for configuring the Xserve when you start it up for the first time andinstructions for routine startup and shutdown, in Chapter 2ÂÂ How to check the status of the Xserve, in Chapter 3ÂÂ How to update or install the server software, in Chapter 4ÂÂ Solutions to some common problems you might encounter while working with theXserve and information about diagnostic software, in the AppendixWorking with Mac OS X ServerAs soon as you finish installing the Xserve, it’s ready to host all of the services providedby Mac OS X Server. For information about configuring and using Mac OS X Server, seeMac OS X Server: Getting Started on the Admin Tools disc. To learn more about the serversoftware, see the full set of documentation at www.apple.com/server/resources.If You Have a Solid-State DriveIf you purchased your Xserve with a solid-state drive, Mac OS X Server is alreadyinstalled on the drive and it is set up as the startup disk. 5
If You Have an Xserve RAID CardIf you purchased your Xserve with an Xserve RAID Card installed but no solid-statedrive, your startup disk is the volume on the enhanced JBOD RAID set on the drivemodule in bay 1. If you also have a solid-state drive, the solid-state drive is set up asthe startup disk and all three drive modules are available for creating RAID volumes.For information about creating RAID volumes or changing your RAID configuration,and for important information about the battery on your RAID card, see the RAID UtilityUser Guide (available at www.apple.com/xserve/resources.html).For More InformationFor information about opening the Xserve and replacing components, see the printedXserve Setup Guide that comes with the Xserve. A PDF version of the guide is alsoavailable at www.apple.com/xserve/resources.html.For more information about lights-out and remote server management, see the ServerMonitor onscreen help.The Apple Xserve Support website offers in-depth product information and technicalresources, including articles, discussions, and downloadable software updates. Visit thesite at bout This Guide
Xserve at a Glance1Use the illustrations in this chapter to become familiar withthe basic controls, features, and components of the Xserve.The illustrations on the following pages identify the Xserve controls, indicators,connectors, and other features.Note: Some components of the Xserve may look slightly different from the illustrationsshown here, depending on the configuration you purchased. 7
Xserve at a Glance—Front PanelEnclosure lockand status lightOn/standby buttonand lightDrive modulestatus lightDrive moduleactivity light8System identifierbutton/lightUSB 2.0portChapter 1 Xserve at a GlanceEthernet link light(Port 1)Ethernet link light(Port 2)System activitylightsOptical driveDrive modulebays (3)
On/standby button and lightPress to turn on the Xserve. Press for approximately five seconds to force the Xserve to shut downif all other shutdown methods fail. The light is bright white when the Xserve is on, and pulses whenthe Xserve is in sleep mode.Enclosure lock and status lightThe lock secures the Xserve cover and drive modules. It can be locked and unlocked with theenclosure key supplied with the Xserve.An option in the Security pane of System Preferences lets you disable a connected keyboard andmouse when the enclosure is locked. When this option is enabled and the enclosure is locked(the light is on), the Xserve doesn’t recognize a keyboard, mouse, or hot-pluggable storage device.Unlock the lock to use those devices.System identifier button and lightThe yellow system identifier light flashes if a problem is detected. You can also turn it on or offmanually by pressing the button, or turn it on remotely using Server Monitor. This indicator is usefulfor locating a particular unit in a rack with more than one Xserve. A second system identifier buttonand light are on the back of the Xserve.You also use the system identifier button to select an alternative method for starting the Xserveusing the front panel startup options; see “Choosing a Startup Method from the Front Panel” onpage 14.Ethernet link lightsTwo lights indicate whether the Xserve is connected to an Ethernet network. Each light representsone of the two built-in Ethernet ports: the bottom light for port 1 and the top light for port 2.Optical driveYou can use the slot-loading optical drive to install software on the Xserve.Drive modules and lightsYou can install up to three Serial ATA (SATA) or Serial Attached SCSI (SAS) drive modules in theXserve. These modules can be removed and installed while the Xserve is running. Each drive modulehas lights showing operating status and disk activity.System activity lightsThese lights indicate the activity level of the processors.You also use these lights to select an alternative method for starting the Xserve using the front panelstartup options; see “Choosing a Startup Method from the Front Panel” on page 14.USB 2.0 portProvides a USB 2.0 connection on the front of the Xserve. There are also two USB 2.0 ports onthe back panel. The enclosure lock must be unlocked for the Xserve to recognize some devicesconnected to these ports.Chapter 1 Xserve at a Glance9
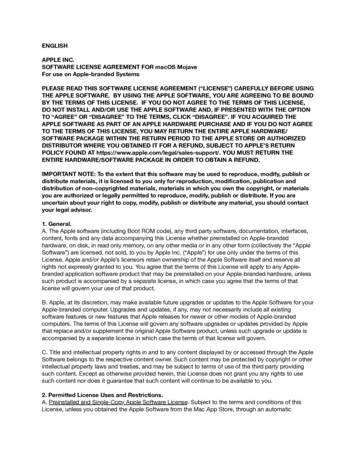
Xserve at a Glance—Back PanelSerial consoleportMini DisplayPortSystem identifierbutton/light10Expansionslot 2Ethernetport 2System information tag(pullout tab)Chapter 1 Xserve at a GlanceEthernetport 1FireWire 800ports (2)Expansionslot 1Power supplybay 1USB 2.0 ports (2)Power supplybay 2
Serial console portConnect a serial device or a computer with a serial port. This port supports RS-232 connections.See “Using the Serial Port” on page 22.Mini DisplayPortYou can connect a display to the Xserve using this port. If you have a DVI or VGA display, adaptercables are available separately.Expansion slotsYou can install two PCI Express (PCI-E) expansion cards in the Xserve. Slot 1 accepts 6.6 inch cards.Slot 2 accepts 9-inch cards. For information about installing cards, see the printed Xserve Setup Guidethat comes with the Xserve.Gigabit Ethernet portsConnect the Xserve to a high-speed Ethernet network using the two built-in Ethernet ports. Ethernetports adjust automatically to the transmission speed supported by the network. A green light in theupper left corner of each port indicates whether that port is connected to a live Ethernet network;a blue light on the right indicates activity.Always connect an Ethernet cable to the right port (port 1) first.USB 2.0 portsConnect USB devices, such as a keyboard or mouse. A USB 2.0 port is also located on the frontpanel. The enclosure lock must be unlocked for the Xserve to recognize some devices connectedto these ports.Power supply and power supply baysA removable power supply for the Xserve. The power cord connects here. You can install two 750watt power supplies for redundancy; either supply can take over the full load for the Xserve if theother supply fails or is removed.FireWire 800 portsConnect FireWire devices to the Xserve. The enclosure lock must be unlocked for the Xserve torecognize devices connected to these ports.System information tagThe Xserve serial number and the hardware (MAC) addresses of its built-in Ethernet ports are printedon this pullout tab. You’ll need the serial number when you install and set up the server softwareremotely.System identifier button and lightThe yellow system identifier light flashes if a problem is detected. You can also turn it on manually bypressing the button, or remotely using Server Monitor. This indicator is useful for locating a particularunit in a rack with more than one Xserve. A second system identifier button and light are on thefront panel.Chapter 1 Xserve at a Glance11
Starting Up the Xserve2This chapter shows how to start up and shut down theXserve, and includes information about configuringMac OS X Server the first time you start up the Xserve.Turning On the Xserve for the First TimeThe first time you turn on the Xserve, the Mac OS X Server setup assistant asks forsome basic information that Mac OS X Server needs in order to start up and connectto the network.Configuring the Server SoftwareBe ready to provide at least the following information the first time you turn on theXserve:ÂÂ A server administrator account name and passwordÂÂ Your Mac OS X Server software serial numberÂÂ Basic network settings, including IP address, subnet mask, and DNS serversÂÂ A user name, password, and network settings for the lights-out management portsÂÂ Whether the Xserve will host an Open Directory domain, join an existing domain,or run standalone using its local directoryFor a list of the information needed to fully configure the Xserve usingServer Assistant, see Mac OS X Server: Installation and Setup Worksheet on theMac OS X Server Install DVD (or on the server documentation website atwww.apple.com/server/resources).For information about setting up a standard or workgroup server, see Mac OS X Server:Getting Started on the Admin Tools disc. For information about setting up an advancedserver, including remote installation and setup and automated setup, see Mac OS XServer: Server Administration at www.apple.com/server/resources.12
Configuring the Lights-Out Management PortWhen you use the Server Monitor application to start up, shut down, or monitor anXserve, you communicate with the lights-out management processor in the Xserve.Either of the two built-in Ethernet connectors on the Xserve can function as both alights-out management port and a server Ethernet port. The lights-out managementport has its own administrator user name, password, and network settings. There areseveral ways to change these settings:ÂÂ Step through the networking panes of the Mac OS X Server setup assistantÂÂ In Server Monitor, choose Server Configure Local MachineÂÂ Use the ipmitool command-line tool in TerminalWhen you use Server Monitor to connect to an Xserve, you specify the IP address anduser account for the lights-out management port.Local and Remote Software SetupIf you connect a display and keyboard to the Xserve, you can use them to finish theserver software setup process locally.To set up the Xserve without a display or keyboard, you can use one of the followingmethods to connect to the Xserve and set it up remotely.Setup methodAvailabilityFor information, seeScreen SharingIncluded with Mac OS X andMac OS X Server version 10.5or later“Using Screen Sharing” onpage 28Server AssistantIncluded with Mac OS X Serverversion 10.5 or laterMac OS X Server: GettingStarted on the Admin Toolsdisc, or Mac OS X Server: ServerAdministration at www.apple.com/server/resourcesApple Remote DesktopSold separatelyMac OS X Server: ServerAdministration at www.apple.com/server/resourcesVNC viewer softwareSold separatelyMac OS X Server: ServerAdministration at www.apple.com/server/resourcesConnect to the serial port onthe XserveIncluded with the Xserve“Using Commands over theSerial Port to Install from theOptical Drive” on page 30Chapter 2 Starting Up the Xserve13
Serial Number for Remote SetupTo use Server Assistant to set up the Xserve remotely, you need to know the first eightcharacters of the Xserve hardware serial number.To find the Xserve serial number:mm Slide out the system information tag from the back panel by pulling the small tab.Setting Up More Than One XserveIf you’re setting up more than one or two Xserve systems, you should learn aboutMac OS X Server configuration methods that simplify the task of setting upmultiple servers. See the chapter about initial server setup in Mac OS X Server:Server Administration at www.apple.com/server/resources.Starting Up the XserveTo start up the Xserve:mm Press the on/standby button at the left end of the front panel.On/standby button and lightThe power indicator light turns on and the Xserve starts up. Status lights on thefront panel indicate network, processor, and drive module activity. If this is the firsttime you’ve turned on the Xserve, be sure to see “Turning On the Xserve for the FirstTime” on page 12.Remote StartupAfter you configure its lights-out management port, you can start up an Xserve ina remote location using the Server Monitor application. For information, see ServerMonitor Help.Choosing a Startup Method from the Front PanelYou can use the Xserve front panel controls to choose from alternative startupmethods that might be helpful in special circumstances.To choose a startup method from the front panel:1 With the power off, hold in the system identifier button while you press theon/standby button.2 Continue to hold in the system identifier button until the top row of blue lights blinkssequentially.14Chapter 2 Starting Up the Xserve
3 Release the system identifier button, and then press it again repeatedly to turn on thelight that corresponds to your chosen startup method:Start up fromdisc in optical driveStart up fromNetBoot serverStart up from firstavailable system on aninternal drive moduleSkip current startup diskand start up from anyother available systemStart up intarget disk modeReset NVRAM and start upfrom first bootable drive moduleNot usedStart up in diagnosticmode from a NetBoot server4 When you’ve made your choice, hold in the system identifier button until all lights inthe top row are on, and then release.The Xserve starts up using the chosen method.Shutting Down the XserveThere are several ways you can shut down an Xserve.Before You Shut Down the XserveIf the Xserve is hosting services provided by Mac OS X Server, open Server Admin orServer Preferences and stop the services. You can open these applications on the localXserve, or use them remotely from another computer.Shutting Down the Xserve with a Keyboard and DisplayTo shut down the Xserve using the keyboard and mouse:mm In the Finder, choose Apple ( ) Shut Down.Shutting Down the Xserve RemotelyTo shut down an Xserve with no connected keyboard and display, or an Xservein a remote location, you can use either the Server Monitor application or thecommand line.To shut down the Xserve using Server Monitor:mm Open the Server Monitor application, select the Xserve in the list, and click Shut Down.To shut down the Xserve from the command line:mm Open Terminal, log in to the Xserve using SSH, and enter a shutdown command: ssh -l user server sudo shutdown -h nowwhere user is the name of an administrator account on the Xserve and server is theDNS name or IP address of the Xserve.Chapter 2 Starting Up the Xserve15
For information about the shutdown command and other command-line shutdownoptions, enter man shutdown in Terminal or see Mac OS X Server: Command-LineAdministration at www.apple.com/server/resources.Forcing Shutdown from the Front PanelIf you can’t shut down the Xserve using the standard methods, you can force it toshut down by pressing the on/standby button on the front panel until the power lightturns off (approximately five seconds).16Chapter 2 Starting Up the Xserve
Monitoring the Xserve3You can check the status of the Xserve whether you’renearby or in a remote location.This chapter shows how to check whether the Xserve is operating normally, how toget details if the Xserve detects a problem, how to interpret the hardware status lights,and how to monitor conditions such as the various internal temperatures and powersupply voltages.Checking the Status of Mac OS X Server ServicesThis chapter is about monitoring Xserve hardware status. For information aboutsoftware status and how you can use the Server Admin application to check the stateof individual services hosted by Mac OS X Server on an Xserve, see the Mac OS XServer documentation suite at www.apple.com/server/resources.Checking the Status of the RAID Card BatteryIf you have an Xserve RAID Card, you can use RAID Utility to check the status ofthe write cache backup battery. If the battery isn’t fully charged, it is probablyundergoing normal charging or conditioning. For information about the battery,see the RAID Utility User Guide (at www.apple.com/xserve/resources.html) or theRAID Utility onscreen help.Local and Remote MonitoringIf you’re near the Xserve, you can glance at the status light on the front panel andknow immediately if the Xserve has detected a problem. See “Interpreting the XserveStatus Lights” on page 19.If you connect a display and keyboard, you can open the Server Monitor application toview detailed status information for critical components. See “Using Server Monitor” onpage 23. 17
You can also connect a management console to the Xserve serial port and manage theXserve using command-line tools. See “Using the Serial Port” on page 22.If you’re away from the server rack, you can use the Admin Tools disc to install serveradministration tools on a Mac OS X computer, turning it into an administratorcomputer. You can then use Server Monitor on the administrator computer to checkthe Xserve status, or have an email alert sent to interested individuals if the Xservedetects any of a variety of conditions. See “Using Server Monitor” on page 23.Identifying the Xserve in a RackIf you have several Xserve systems in a rack, you can use the system identifier lightsto flag and identify a particular Xserve. The light can help you return to the right serverwhen you walk around to the other side of the rack. You can also turn on the systemidentifier light from the Server Monitor application so you can find the Xserve inthe rack.Front system identifier button/lightRear system identifier button/lightTo turn the system identifier light on or off at the Xserve:mm Press the system identifier button on either the front or back panel.To turn on the system identifier light remotely:mm Open Server Monitor, choose the Xserve in the list, and click the “System identifierlight” button.18Chapter 3 Monitoring the Xserve
Interpreting the Xserve Status LightsYou can check the overall status of the Xserve and the status of some componentssuch as drive modules, network interfaces, and power supplies, just by glancing at theindicator lights on the Xserve.Overall Xserve StatusOn/standby button and lightEnclosure lock lightIndicator lightColorIndicatesOn/standby (front panel)WhiteThe Xserve is turned on.White pulsingThe Xserve is in sleep.YellowThe lock is engaged.When the enclosure is locked(the light is on), the Xservemight not recognize a keyboard,mouse, or hot-pluggablestorage device, dependingon a security preference. Forinformation, see “Controllinga Keyboard and Mouse” onpage 23.Enclosure lockSystem IdentifierFront system identifier button/lightRear system identifier button/lightChapter 3 Monitoring the Xserve19
Indicator lightColorIndicatesSystem identifierYellow, alternating betweenflashing and offOne of the following:ÂÂ The Xserve has detected analarm condition. Open ServerMonitor for information.ÂÂ The identifier light has beenturned on manually usingServer Monitor.Yellow flashingThe identifier light has beenturned on manually by someonepressing the front or rear systemidentifier button.Indicator lightColorIndicatesSystem activityBlue intermittentProcessor activity and load.ColorIndicatesProcessor ActivitySystem activity lightsDrive Module StatusDrive module status light (green)Drive module activity light (blue)Indicator lightDrive module status (upper LED) GreenDrive module activity (lowerLED)20The drive is on and working.YellowThe drive is working but hasdetected a warning condition.RedThe drive has failed.OffThe Xserve is currently notreading from or writing to thedrive.Blue intermittentThe Xserve is reading fromor writing to the drive. Don’tremove the drive if this light isflashing.Chapter 3 Monitoring the Xserve
Ethernet Link StatusEthernet link light (Port 2)Port 2 status light(green)Ethernet link light (Port 1)Port 2 activity light(blue)Indicator lightPort 1 status light(green)ColorPort 1 activity light(blue)IndicatesEthernet link status (front panel) GreenThe cable is connected and thelink is good (the Xserve cansend and receive). The lowerlight is for port 1, the upper forport 2.Ethernet link status (on rearconnector)GreenThe link is good (the Xserve cansend and receive).Ethernet activity (on rearconnector)Blue intermittentThe link is active. The light is onwhile data is being transferred.Power Supply StatusPower supply status lightChapter 3 Monitoring the Xserve21
Indicator lightColorIndicatesPower supply (rear panel, onpower supply)GreenAC power is available and thesupply is providing DC powerto the Xserve components.The Xserve is turned on.Green blinkingAC power is available butpower to Xserve componentsfrom this supply is on standby(usually because the Xserve isturned off).RedNo AC power is available to thissupply from the power cord, orthis power supply has failed.The other power supply isproviding power for the Xserve.Getting Detailed Hardware InformationYou can view detailed Xserve hardware (and software) configuration information usingSystem Profiler.To view system details from the Finder:mm Choose Apple ( ) About This Mac and click More Info.To view system details from the command line:mm Open Terminal and enter the system profiler command. For information about thecommand and its options, enter man system profiler.Using the Serial PortYou can connect a management console or a computer running terminal emulationsoftware to the Xserve serial port, and then monitor the system using command-linetools.About Terminal Emulation SoftwareYou can use the screen command in Terminal or a terminal emulation applicationsuch as ZTerm running on another computer to communicate through the Xserveserial port.Configure the console or terminal emulation software to operate at:ÂÂ 57.6 KB/s using 8 data bits with no parity22Chapter 3 Monitoring the Xserve
Connecting to the Serial PortYou can use a 9-pin serial null modem cable with a serial-to-USB adapter or a serialport concentrator to connect a Macintosh computer to the serial port.For information about the pin assignments for the serial port connector, see thespecifications appendix in the printed Xserve Setup Guide that comes with the Xserve.About the Command-Line ToolsFor information about using command-line tools to check the status of the Xserve, seeMac OS X Server: Command-Line Administration at www.apple.com/server/resources.Controlling Physical Access to the XserveYou can use the enclosure lock on the Xserve to:ÂÂ Prevent removal of drive modulesÂÂ Prevent opening the top coverÂÂ Disable a connected keyboard, mouse, or other USB device by setting a systempreferenceControlling a Keyboard and MouseYou can choose whether the enclosure lock disables a connected keyboard andmouse.To disable the keyboard and mouse:mm Open System Preferences, click Security, and click the checkbox “Disable mouse andkeyboard when Xserve enclosure lock is engaged.”Monitoring the Xserve RemotelyYou can check the status of an Xserve from a remote computer using the ServerMonitor application or the command line in Terminal.Using Server MonitorThe Xserve comes with the Server Monitor application. You can find Server Monitor in/Applications/Server/ and on the Admin Tools disc. You can use Server Monitor to:ÂÂ Check the current status of the Xserve and its components, includingÂÂ Drive module statusÂÂ Power supply status and system internal voltagesÂÂ Network interface status and activity levelÂÂ Temperatures of critical internal componentsÂÂ Cooling fan statusChapter 3 Monitoring the Xserve23
ÂÂ Review basic Xserve information, such asÂÂ UptimeÂÂ Mac OS X Server version running on the XserveÂÂ Amount and type of memory installed in each slotÂÂ Model and capacity of each drive moduleÂÂ Shut down, start up, or restart the XserveÂÂ Generate an Apple System Profiler report for the XserveÂÂ Send email alerts in response to changes in the status of the XserveYou can run Server Monitor on the Xserve or on any computer connected to the samenetwork.Connecting to the XserveTo add an Intel-based Xserve to the server list in Server Monitor, you use the networkaddress, user name, and password of the lights-out management port in the Xserve.For information about changing these settings, see “Configuring the Lights-OutManagement Port” on page 13.To add the local Xserve (the one on which Server Monitor is running) to the list, usethe IP address 127.0.0.1 and the local administrator’s user name and password.For information about using Server Monitor, see the Server Monitor onscreen help.Using the Command LineFor information about using SSH to connect to a remote Xserve and using commandline tools to check the status of the Xserve, see Mac OS X Server: Command-LineAdministration at www.apple.com/server/resources.24Chapter 3 Monitoring the Xserve
Updating or Installing Softwareon the Xserve4There are several ways to update or install server software onthe Xserve.An Xserve without a solid-state drive comes with Mac OS X Server installed on thedrive module in drive bay 1. An Xserve with a solid-state drive comes with Mac OS XServer installed there.Before You BeginIf your Xserve includes an Xserve RAID Card, you might want to reconfigure yourRAID volumes using the RAID Utility application before installing Mac OS X Server.In this case:ÂÂ If you don’t have a solid-state drive, the startup drive in bay 1 comes set up asan enhanced JBOD volume and the other two drive modules are available forexpanding that startup volume or creating other volumes.ÂÂ If you have a solid-state drive, Mac OS X Server comes installed there, so all threestandard drive modules are available for creating RAID volumes.WARNING: Many RAID reconfiguration activities other than expanding the existingvolume erase all
Serial console port Connect a serial device or a computer with a serial port. This port supports RS-232 connections. See "Using the Serial Port" on page 22. Mini DisplayPort You can connect a display to the Xserve using this port. If you have a DVI or VGA display, adapter cables are available separately. Expansion slots