Transcription
PROCEDURE130Suture and Staple RemovalBrian D. SchaadPURPO SE: Sutures and staples are placed to approximate tissues that have beenseparated. When wound healing is sufficient to maintain closure, sutures andstaples are removed.PREREQUISITE NURSINGKNOWLEDGE Wound healing is a nonspecific response to injury. Itinvolves the biologic processes of inflammation, collagenmetabolism, and contraction in an overlapping, integratedcontinuum. Wound healing is divided into three phases:inflammatory, fibroblastic, and remodeling. The conditionof the tissues and the mechanism of wound closure determine the relative duration of these phases and the endresult of the healing process. Factors influencing the choice of wound closure methodare determined by risk for infection, wound location, needfor tension, cosmetic considerations, age and condition ofthe patient, and cost. There are three types of sutures: nonabsorbable, absorbable (which dissolve in as little as 10 days), and slowlyabsorbable (which take up to 6 months to completelydissolve).4 In addition to conventional metal staples, absorbablestaples are available that are placed under the skin by thestapling device and absorb within a few months. The useof the absorbable staple has been found to save both timeand cost, with comparable cosmetic outcomes to conventional metal staples.1 Nonabsorbable sutures and staples must be completelyremoved to avoid further tissue inflammation, possibleinfection, and unnecessary discomfort to the patient. Retention sutures are a special type of suture made of verystrong material, with each stitch passing through a largeramount of tissue than conventional sutures. They may beused to reinforce a primarily closed and sutured incisionor to aid in the management of the open abdomen. Retention sutures reduce the risk of evisceration, allowingongoing dressing changes and gradual closure of theabdominal incision.3 Timing of suture and staple removal depends on the following (Table 130-1): Shape, size, and location of the incision Absence of inflammation, drainage, and infection The patient’s general condition Type of suture used Timing of suture removal may be prolonged in patientswith the following risk factors: Steroid use Irradiation treatment 1156 Cytotoxic agent useDiabetesRheumatoid arthritisTrace element imbalanceAdvanced ageEQUIPMENT Nonsterile gloves and mask Sterile gloves, towel, or drape Sterile swab with antiseptic cleaning solution accordingto facility’s policy (e.g., chlorhexidine) 4 4 gauze pads Suture removal kit with scissors and forceps (if no kit isavailable, obtain sterile scissor and forceps)or Staple remover Skin tape or adhesive skin strips (e.g., Steri-Strips) ofappropriate width Skin adherent (recommended because it helps with adherence and protects the periwound area)PATIENT AND FAMILY EDUCATION Explain the procedure to the patient and family. Reassurethe patient that he or she may feel a pulling or stingingsensation as the sutures or staples are removed. Assure thepatient that the wound is healing properly and that removalof the sutures or staples does not weaken the incision.Explain the use of adhesive skin strips if needed. Rationale: Explanation decreases patient anxiety and encourages patient and family cooperation and understanding ofprocedure. Instruct the patient and family on aftercare: pain medication, wound care, activity restrictions, and observation forsigns and symptoms of infection. Rationale: Educationfacilitates patient comfort, decreases risk for infection,and encourages prompt follow-up for treatment of possible infection.PATIENT ASSESSMENT ANDPREPARATIONPatient Assessment Obtain the history of the present injury and a medicalhistory. Rationale: This knowledge allows a better
130 Suture and Staple RemovalTABLE 130-1Timing of Suture RemovalLocation of SuturesExtremities, scalp, and trunkFacePalms, soles, back, and skin overmobile jointsRetention suturesDays Before Removal7–143–510–1414–21understanding of the nature of the injury and any factorscomplicating suture or staple removal. Assess patient allergies, especially to adhesive tape andpovidone-iodine, chlorhexidine, or other topical solutionsor medications. Rationale: Further tissue damage can beprevented. After determining when sutures or staples were placed,observe the wound for signs of gaping, drainage, inflammation, infection, or embedded sutures. Rationale: Findings may delay suture or staple removal.Procedure1157Patient Preparation Ensure that the patient and family understand preprocedural teachings. Answer questions as they arise, andreinforce information as needed. Rationale: Understanding of previously taught information is evaluated andreinforced. Verify that the patient is the correct patient using twoidentifiers. Rationale: Before performing a procedure, thenurse should ensure the correct identification of the patientfor the intended intervention. Administer pain medication as prescribed. Rationale:Pain medication promotes patient comfort and reducesactivity during suture or staple removal to provide a stablefield. Provide privacy and position the patient for comfortwithout undue tension on the suture line or staples. Rationale: Provides patient comfort and promotes cooperationduring procedure. Adjust the light to shine directly on the suture line orstaples. Rationale: Light is used to facilitate visibility.for Suture RemovalSteps1. Check order to confirm exact timing andother relevant information.2. HH3. PE4. Apply sterile drapes or towels over orunder the area as needed.5. Gently tug on the sutures to test thewound line before removal, to be sure thewound does not separate. If any doubtexists to the integrity of the suture line,apply a skin adherent and adhesive skinstrips between sutures before removingthem. Remove alternate sutures initially,until integrity of the incision is ensured;then remove the remaining sutures.5(Level E*)6. Clean the suture line with antiseptic skincleanser. The wound is considered clean,so when cleaning it, wipe from clean todirty, moving from the inner aspect to theouter margins of the wound.RationaleSpecial ConsiderationsEnsures appropriate treatment.Prescribing physician, advancedpractice nurse, or otherhealthcare professional maywant to leave some sutures inplace for an additional day ortwo to support the suture line.Provides protective barrier.Ensures that the wound is healedsufficiently before removal ofall sutures.If the patient has both retentionand regular sutures in place,retention sutures may remainin place for 14–21 days.Decreases the number ofmicroorganisms and reducesthe risk for infection.Be particularly careful to cleanthe suture line before removingmattress sutures, especially ifthe visible, contaminated partof the stitch is too small to cuttwice for sterile removal.Carefully remove encrusteddrainage to allow visualizationof all sutures to be removed.*Level E: Multiple case reports, theory-based evidence from expert opinions, or peer-reviewed professional organizational standards without clinical studies tosupport recommendations.Procedure continues on following page
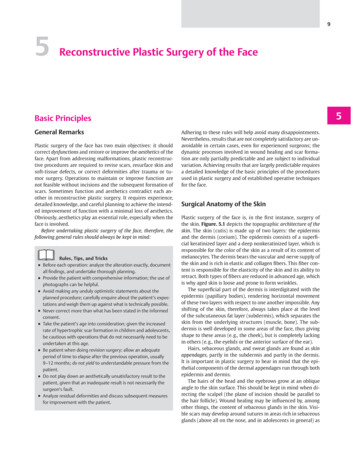
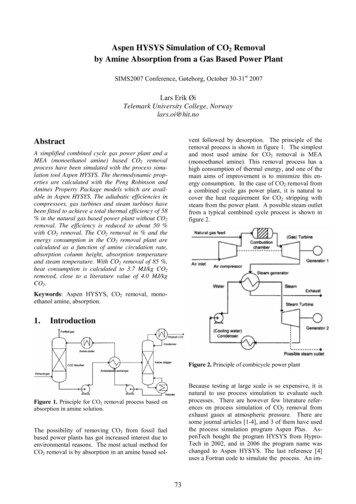
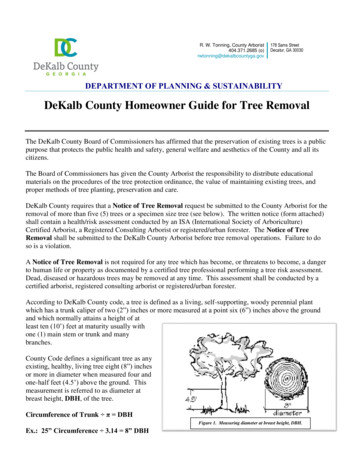
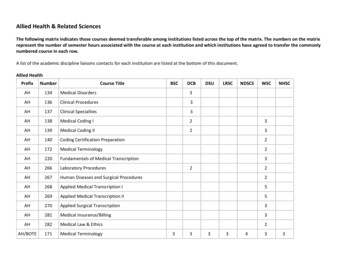
1158Unit VIIProcedureIntegumentary Systemfor Suture Removal—ContinuedStepsRationaleSpecial Considerations7. Use sterile techniques to remove runningsutures (Fig. 130-1)2:A. Use sterile forceps to grasp the knotand gently raise it off of the skin.B. Use the rounded tip of the sterilesuture scissors to cut the suture at theskin edge on one side of the visiblepart of the suture.C. Remove the suture by lifting thevisible end of the skin to avoiddrawing the contaminated portionthrough subcutaneous tissue.8. To remove mattress sutures (Fig. 130-2)6:A. Remove the small visible portion ofthe suture opposite the knot by cuttingit at each visible end and lifting thesmall piece away from the skin.B. Remove the rest of the suture bypulling it out in the direction of theknot.C. If the visible portion is too small tocut twice, cut once and pull the entiresuture out in the opposite direction.9. If the wound dehisces, apply butterflyadhesive strips or paper tape to supportand approximate the edges and call thephysician or physician extender.10. Wipe the incision line gently with gauzesoaked in antiseptic skin cleanser orprepackaged swab.2 (Level E*)11. Apply adhesive skin strips or paper tapeand a light, sterile gauze dressing, ifdesired. Leave strips in place for 3–5days or as ordered.12. Dispose of gloves and equipment inappropriate receptacles.13. HHVisible part of suture is exposedto skin bacteria and isconsidered contaminated.For running sutures, eachindividual section needs to becut to prevent the contaminatedsuture material from beingpulled through thesubcutaneous tissue.Prevents pulling it through andcontaminating subcutaneoustissue.6Adhesive strips may be used toreapproximate the woundedges until complete woundclosure occurs.Removes serous or bloodydrainage from the suture line.Wound dehiscence is thepremature opening of a woundalong a suture line.6Holds incision edges together,decreases transmission ofmicroorganisms, and decreasesirritation from clothing.*Level E: Multiple case reports, theory-based evidence from expert opinions, or peer-reviewed professional organizational standards without clinical studies tosupport recommendations.Figure 130-1 Removal of plain interrupted sutures with sterileforceps and scissors.Figure 130-2 Removal of interrupted mattress sutures withsterile forceps and scissors.
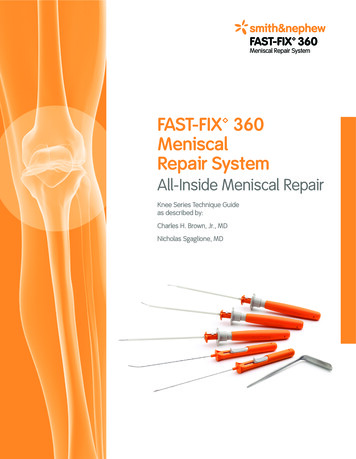
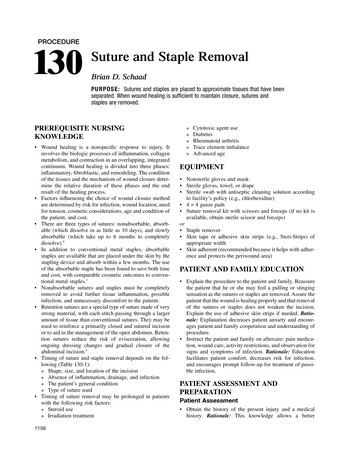
130ProcedureSuture and Staple Removal1159for Staple RemovalSteps1. Check order to confirm exact timing andother relevant information.2. HH3. PE4. Apply sterile drapes or towels over orunder the area as needed.5. Gently test the wound line beforeremoval of the staple to be sure thewound does not separate. If any doubtexists, apply a skin adherent andadhesive skin strips between staplesbefore removing them. Remove alternatestaples initially, until integrity of theincision is ensured, then remove theremaining staples.5 (Level E*)6. Clean the staple line with antiseptic skincleanser. The wound is considered clean,so when cleaning it, wipe from clean todirty, moving from the inner aspect tothe outer margins of the wound.7. Use sterile techniques to remove staples(Fig. 130-3).A. Gently place the tip of the stapleremover under the staple at its center.B. If the incision line is under tension,gently squeeze the opposite sidestogether with your free hand as eachstaple is removed.C. Compress the staple remover untilthe staple bends in the center and theedges lift out of the skin.D. Discard the staple and proceed to thenext staple.8. If the wound dehisces, apply butterflyadhesive strips or paper tape to supportand approximate the edges and call theprescribing physician, advanced practicenurse, or other healthcare professional.RationaleSpecial ConsiderationsEnsures appropriate treatment.Prescribing physician, advancedpractice nurse, or otherhealthcare professional maywant to leave some staples inplace for an additional day ortwo to support the staple line.Provides protective barrier.Ensures that wound is healedsufficiently before removal ofall staples.Decreases the number ofmicroorganisms and reducesthe risk for infection.Carefully remove encrusteddrainage to allowvisualization of all staples tobe removed.Provides approximation of woundedges until the physician,advanced practice nurse, orother healthcare professionalreassesses the wound.Monitor wound dehiscence forsign of infection.**Level E: Multiple case reports, theory-based evidence from expert opinions, or peer-reviewed professional organizational standards without clinical studies tosupport recommendations.Procedure continues on following pageFigure 130-3Staple removal.
1160Unit VIIProcedureIntegumentary Systemfor Staple Removal—ContinuedStepsRationaleSpecial Considerations9. Wipe the incision line gently with thegauze soaked in antiseptic skin cleanseror prepackaged swab.10. Apply adhesive skin strips or paper tapeand a light, sterile gauze dressing, ifdesired. Leave strips in place for 3–5days or as ordered.11. Dispose of gloves and equipment inappropriate receptacle.12. HHRemoves serous or bloodydrainage from the staple line.Holds incision edges together,decreases transmission ofmicroorganisms, and decreasesirritation from clothing.Expected OutcomesUnexpected Outcomes Wound remains infection free Function is preserved Appearance is restored Wound infection and possible sepsisLoss of functionAbnormal appearanceWound dehiscencePatient Monitoring and CareStepsRationaleReportable Conditions1. Retest range of motion andsensory perception after sutureor staple removal.2. Observe for wound discharge orother abnormal changes.Ensures no further damagewas imposed.3. Provide detailed patient andfamily education, includingwound care, medications, signsand symptoms of infection, whenthe patient can get the incisionwet, and follow-up instructions.4. Follow institutional standards forassessing pain. Administeranalgesia as prescribed.Facilitates patient and familycooperation.Allows for early treatment andprevents systemic infection.Identifies need for paininterventions.These conditions should be reported if theypersist despite nursing interventions. Altered range of motion Change in sensation, paresthesia,tingling Wound that is red, swollen, tender, orwarm Wound that begins to drain or fester Red streaks around the wound Tender lumps in the groin or under thearm Chills or fever Redness that surrounds the incision anddoes not gradually disappear or showsonly a thin line after a few weeks2 Continued pain despite paininterventionsDocumentationDocumentation should include the following: Patient and family education and aftercare instructions Date and time sutures were placed, and date and timesutures were removed Care of the wound after suture removal Location and appearance of wound Range of motion and sensory perception Pain assessment, interventions, and effectiveness
130 Suture and Staple RemovalReferences and Additional ReadingsFor a complete list of references and additional readings forthis procedure, scan this QR code with any freely availablesmartphone code reader app, or 61
130 Suture and Staple Removal 1157 Location of Sutures Days Before Removal Extremities, scalp, and trunk 7-14 Face 3-5 Palms, soles, back, and skin over mobile joints 10-14 Retention sutures 14-21 TABLE 130-1 Timing of Suture Removal understanding of the nature of the injury and any factors complicating suture or staple removal.