Transcription
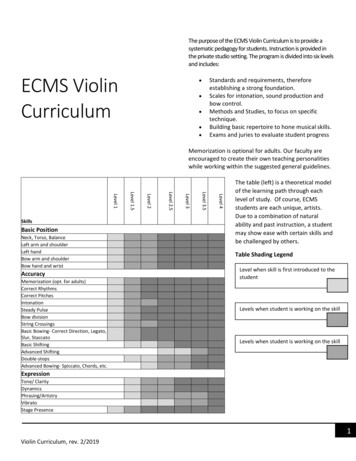
eCMS User GuideComdata ExpenseTrackEnhancement DescriptionThis change provides a way for Comdata ExpenseTrack to be implemented.Enhancement Licensing RequirementsNormal eCMS licensing applies; no additional licenses are required.System RequirementsRequires eCMS v.4.1 Service Pack 2, FP7 or later.CSP Reference: #1801384 – APP 180010 Copyright 2018 Computer Guidance Corporation - part of JDM Technology Group. All Rights Reserved.
eCMS User GuidePage 2Comdata ExpenseTrackTable of ContentsEnhancement Description. 1Enhancement Licensing Requirements . 1Normal eCMS licensing applies; no additional licenses are required. 1System Requirements . 1Set up the eCMS Connect Interface Connection to Comdata . 3
eCMS User GuideComdata ExpenseTrackSet up the eCMS Connect Interface Connection to ComdataeCMS Menu Path: Admin Application Installation eCMS Connect SetupThe eCMS Connect Interface for Comdata requires entries for Instance, Notification, a Portfolio Map, a Group, and aScheduler. This is accomplished using the various tabs of eCMS Connect.Page 3
eCMS User GuideComdata ExpenseTrackSelect the Setup Instance tab. To create a new Instance click the Add button (lower right). To edit or delete, click the Action button.Page 4
eCMS User GuideComdata ExpenseTrackDefine the Comdata instance. On add, enter a descriptive Instance Name and select Comdata from the Application Name dropdown.URL: There are two URLs available to use. For your testing phase, use the Test URL. Once the configuration setup is confirmed andyou are ready to produce live transactions, change this value to the Production URL. Test: https://w8cert.iconnectdata.com/VCWS Production: https://w6.iconnectdata.com/VCWSUser Id and Password: Supplied by Comdata.Email Sender: This address will be used as the “From” when notification emails are sent.Enable Notification: If you want to enable email notifications, check this box.Click the Save button to add/keep changes; Cancel to ignorePage 5
eCMS User GuideComdata ExpenseTrackSelect the Setup Notification tab. This setup is used by all eCMS Connect processes. Change only if necessary or not yet set up.Email Server and Email Port Number: Enter the IP address or DNS name of your network email server and the port it uses.Authorization Required: Check this box if your email system requires authorization.Domain\User Id and Password: When authorization is required, enter the authorized domain IP address or DNS name and the userid to use. Also provide the password for the user.TTLS Required: If your email system is using Transport LayerSecurity for the authentication protocol, check this box.Click the Save button to keep changes; Exit to ignorePage 6
eCMS User GuideComdata ExpenseTrackSelect the Setup Group tab. To create a new group click the Add button (lower right). To edit or delete, click the Action button. Edit can also be done using the Add button Setup Group popup window by selecting an existing group. Delete can also be done using the Delete Group button (lower right) by selecting the group to delete from the listdisplayed and confirming the deletion requestAn option is available to test the email notification distribution. Click the Send Test Mail button for the group thencheck with all the people set up as notification email recipients on the group to verify they received the test email.Page 7
eCMS User GuideComdata ExpenseTrackEnter the Group definition on Add or Edit.Group Name: To add, select “---Create New Group---” from the dropdown then enter a descriptive name for the new group. Toedit, pick a group name from the dropdown.Portfolio Name: On add, select the Comdata portfolio map.Available Services: On add, select COMDATA – ExpenseTrack.URL/Path: Not used for Comdata.Email Recipient(s): Enter zero or more valid email address(es). If notification is enabled for the Comdata Instance, an email will besent to the email address(es) every time the scheduler is run. If no address is entered, no email will be sent.Click the Save button to keep changes; Cancel to ignore.Page 8
eCMS User GuideComdata ExpenseTrackSelect the Scheduler tab. To create a new schedule click the Add button (lower right). To edit or delete, click the Edit record or Delete record Action button. To run the process on demand (ad hoc), click the Run ad hoc job Action button. To view the job logs of prior runs of this process, click the View logs Action button.Page 9
eCMS User GuideComdata ExpenseTrackDefine the Comdata Schedule The Comdata Schedule specifies when the Comdata interface information should be uploaded and downloaded. When the schedule is active, the process will be run automatically. On add, select the Comdata Available Group. On edit, the Available Group name will already be shown, and not selectable.Recurring Interval: Select Daily, Weekly, or Monthly. Daily is for every day. Weekly allows selection of which day(s) of the week torun the process. Monthly allows selection of the day of the month to run the process.Repeat Interval: If you want the process to run one time on the specified day, leave blank. Otherwise specify how many minutesto wait before the next run.Start Time and End Time: Select the hours the scheduler is to run the job. If the End Time is the same as the Start Time, the processwill repeat running as defined by the Repeat Interval for all 24 hours of the day. The example shows running the job every 30minutes all day, every day when activated.Active: To have the scheduler run automatically, check this box. Unchecked, only manual ad hoc running will be available.Click the Save button to keep changes; Exit to ignore.Page 10
eCMS User GuideComdata ExpenseTrackGo to Setup Instance.Page 11
eCMS User GuideComdata ExpenseTrackImporting expense recordseCMS Menu Path: Admin Application Installation eCMS Connect SetupWhen expense records are ready to importScheduler; Run Adhoc jobPage 12
eCMS User GuideComdata ExpenseTrackRan a query on APTXWKC to see records. This is not required – it is a way to verify data has been imported.Page 13
eCMS User Guide Page 7 Comdata ExpenseTrack Select the Setup Group tab. To create a new group click the Add button (lower right).To edit or delete, click the Action button. Edit can also be done using the Add button Setup Group popup window by selecting an existing group. Delete can also be done using the Delete Group button (lower right) by selecting the group to delete from the list