Transcription
November 2016
Table of ContentsIntroduction to Bluebeam Revu7How to Use This Guide7Default PDF Associations8Joining a Review Session9Review Session Layout10Reviewing Plans11Commenting Best Practices11Chapter 1: Interface12Interface Overview12Navigation13Status Bar14Command Bar e16Window16Help16Tabs17Properties Tab17Thumbnails Tab21Bookmarks Tab22Search Tab24Working with Profiles252
Preferences25General26Grid & Snap27Markup29Navigation30StudioChapter 2: Commenting & Markups3132Compatibility32Markup Overview32Markup Tools32Text Menu33Pen Menu33Lines Menu34Shapes Menu34Sketch Menu35Image and Image Menu35Hyperlink and Hyperlink Menu36Attachment36Stamp Menu36Measurement Setup37Calibrating a PDF38Working with Viewports38Measurement Tools39Measure Tool39Calibrate39Linear Menu39Area39Volume393
Cutout39Count39Geometric Menu39The Tool Chest40Using Tool Sets40Reusing Recent Tools40Permanently Saving a Tool to be Reused41Properties Mode vs. Drawing Mode42Pinning a Tool Set42Working with Stamps in the Tool Chest43Placing Stamps from the Tool Chest43Applying a Stamp from the Tool Chest to Multiple Pages43Applying a Stamp from the Tool Chest to Selected Pages44Working with Stamps in the Document Group44Flattening Stamps44Adding Not For Construction or Preliminary Stamp on Plans45Flatten Markups Tool46Markups List47Markups List Button Bar47Markups List48Expanded List49Collapsed LIst49Partially Collapsed List49Columns Menu50Context Menu51Chapter 3: Document Manipulation52Insert52Extract53Rotate53Crop534
Document Comparison54Comparing Two Versions of the Same Document or Drawing54Defining Documents A and B54Optionally Defining a Region54Aligning the Documents54Defining the Appearance of Markups55Choosing Other Options55Creating a Combined PDF from Multiple PDFsWhat needs to be included in a Combined PDF for a Session Plan Review5656Creating a PDF from an Existing File not a PDF57Creating PDF(s) from Multiple Existing Files Not PDFs58Stapler: Using Windows Explorer to Combine or Convert Files60Add Header and Footer Templates for SDDOT Plans61Numbering PDF Pages Using Headers and Footers for SDDOT Plans62Numbering PDF Pages Using Batch Processing - Headers and Footers65Batch Processing - Removing Headers and Footers67Editing Page Labels and Page Numbering69To change the name of a page label directly69To edit a page label’s numbering style69To apply a text only label70To remove page labels70Creating Page Labels from Page Region71Introduction to OCR (Optical Character Recognition)72Running OCR on a Single Document72Running OCR on Multiple Documents using Batch745
Chapter 4: Studio Session75Studio Session: Create, Share and Collaborate in the Cloud75Host a Studio Session75Start a Session76Manage a Session78Attendee Access78Manage Documents79Responses to Review Comments and Revisions80Rejecting Comments, Replying to the Rejected Comments and Alerting the84Reviewers That Made the CommentsCompleted Review Session Report85Finish a Session86Memorandum/Letter to Bid Letting87Appendix88Electronic PDF Plans88Document Untitled Viewports Message88PDF from Word or Excel with Bluebeam Revu89Adding “Not For Construction” as a Stamp90Removing the Stamp “Not For Construction”90Adding “Preliminary” as a Stamp (ROW Plans - Only)90Removing the Stamp “Preliminary” (ROW Plans - Only)90Numbering PDF Pages Using Header and Footers90Standard Plates in Bluebeam Revu 11x17 Sheets91Alternate Procedures for Comments Outside of the Studio Session92Bluebeam Revu Studio Session Procedures for SDDOT Projects936
Introduction to Bluebeam RevuThis is a guide for how to use Bluebeam Revu for your PDF markup and collaboration needs.Bluebeam Revu provides powerful and easy to use features for marking up Architecture,Engineering, and Construction (AEC) plan PDF documents. The Studio Session feature allowsusers from any location to participate in a collaborative review. Bluebeam makes use of AmazonWeb Services (AWS), commonly referred to as the Amazon Cloud. This service will host thedocuments for the Studio Session.There are two roles within a Bluebeam Studio Session. That of an initiator, and that of aparticipant. If you are going to initiate a Studio Session you need to have any tier of BluebeamRevu installed on your pc. However, to be a participant all that is required is Bluebeam Vu (afree PDF reader), though Bluebeam Revu can be used as well.InitiatorInstall Bluebeam RevuParticipantInstall free Bluebeam Vudownload (unless the participant already has BluebeamRevu)How to Use This GuideEach section of this reference guide will begin with a description of the topic that will becovered, followed by step-by-step instructions on how to accomplish it.7
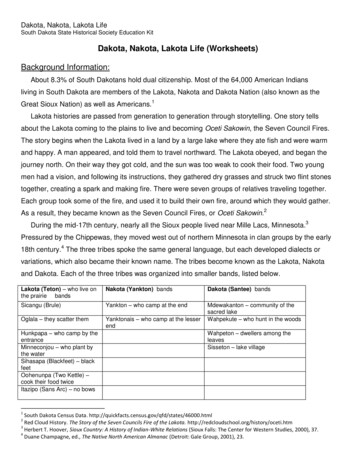
Default PDF AssociationsIn a mixed environment (using both Adobe Acrobat & Bluebeam Revu), a choice has to be madeas to which PDF reader is set as the default PDF reader. In most cases this is generally just a userpreference, but in a mixed environment leaving Adobe Acrobat as the default PDF reader isrecommended. This is recommended because Acrobat Shared Review invitations use the defaultPDF reader to open links to the Shared Review, while Bluebeam Studio Session invitations knowto use Bluebeam Revu regardless of whether or not it is the default PDF reader. In this scenario auser could navigate both invitations without running into any problems.In the case that you are NOT in a mixed environment, shown below are instructions for settingBluebeam Revu as your default PDF reader in Windows.Setting the default PDF reader in WindowsFrom within Bluebeam Revu, click the drop-down menu next tothe Bluebeam Revu symbol in the upper right corner of thescreen, then click on Administrator.On the Bluebeam Administratordialog, select the Revu tab. In theBluebeam Revu section check theUse as Default PDF Viewercheckbox, then click OK.8
Joining a Review SessionTo join a review session, click on the linkprovided in the Session invite.When the Internet Explorer windowappears. Check “Do not show me thewarning for this program again” and onthe next screen uncheck “Always askbefore opening this type of address” andclick on Allow. These windows shouldnot appear again.Bluebeam will launch. If this is your first timeinto a review session, create a Studioaccount.DOT Staff:Enter your State email address and apassword. Enter your name as you want it toshow up in the review comments (Do not leave yourcomputer number). Select “Remember password” andselect “Allow other users to see my e-mail”. Click OKOther Reviewers:Enter your email address and a password. Enter yourname as you want it to show up in the review comments.Select “Remember password” and select “Allow otherusers to see my e-mail”. Click OKIf this is not your first time in a review session, you mayhave to enter your studio log in information if you forgotto check “Remember Password”9
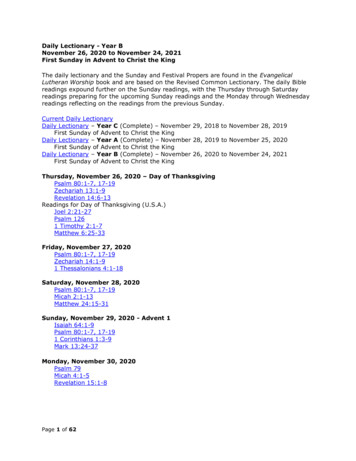
Review Session LayoutWhen you enter a Bluebeam review session you will see the Studio Session Tab located on theright hand side of the screen. This tab displays the attendees of the session, a list of the documentsin the session, and a record of all actions that take place on a review document. On the bottom ofthe screen you will see the list of all comments placed on a document. If this bottom tab is notopen, click on the blue half circle with the white dot in the middle. On the left of the screen you canhave the the Tool Chest open with your own comment tools or other options.Review Session TabTool Chest - Save yourown comment tools thatyou use in reviewsStatus in the ReviewSessionAttendeesMarkups List Button Barto Filter, Set Status andReply to commentsSplit Screen ButtonsAllowing Viewing ofMultiple Pages at theSame Time.Click here to open andclose Comment ListList of Comments/MarkupsDocuments in theReview SessionRecord, Notificationand Message CenterAll comments that are made get saved instantly to the Bluebeam review session; you do not need tomanually save any comments. You can only delete comments you have made. If someone elsehas made a comment that you would like respond to just right click on their comment on the plansor in the Markup List and select reply.You can leave and rejoin sessions as many times as you want as long as the review session hasnot been closed. The review session will be closed by the Project Manager (Host) in accordancewith the procedures shown in this manual.10
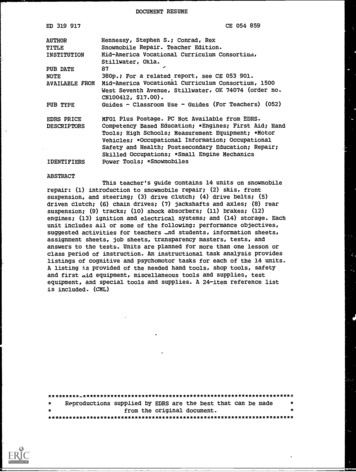
Reviewing PlansReviewers may print digital review documents topaper and mark them up; however, they musttransfer these comments onto the digital reviewdocuments. Any written comments that arereceived can be scanned to a PDF and attachedto the session documents using the attach filecommand. Please be careful when you place acomment or markup so that you do not cover up areas of notes or details that may need to bereview by other individuals.1. All reviewers must set your review status to “Reviewing” by clicking on the drop down arrowshown to the right. Note: If you leave the session and return your status will stay as Reviewing.2. Next select a document to review from the studio session tab. Note: There may be more thanone document is a session review. Example: DOT Plans and Utility Plans.3. Proceed to make comments using the various markup tools. Make comments on other reviewercomments by right clicking on the comment and selecting reply.4. After your review of the documents is completed set your status to “Finished”. This status letsthe Project Manager (Host) know which Reviewers have completed their reviews. Note: Youcan still enter the session if your status is set to Finished.5. If a review comment is rejected, the reviewer will receive an Alert email from the Consultant/Designer that rejected your comment. See pages 83-84 of this manual.Commenting Best PracticesA text note can be added to any of the other comment tools by double clicking on the markup afteryou place it. The text note box must be closed after the comment is made by clicking on the X inthe top right corner of the note. The example below shows a note being attached to the rectangletool.3. Close the textbox by clicking onthe X.1. Place Rectangle2. Double Click on the rectangle to place note.11
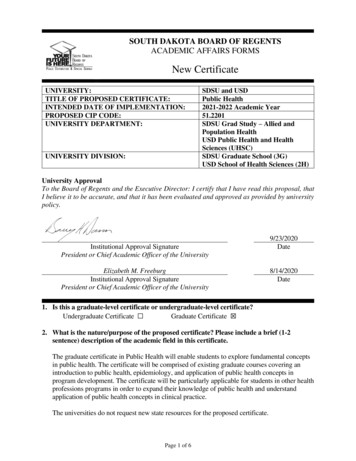
Chapter 1: InterfaceInterface OverviewAt the top of the Revu window you will see the Command Bar. The Command Bar provides accessto tools and commands organized by group. Below the Command Bar and to the right edge are optional Toolbars. These toolbars provide customizable, one-click access to the tools you need most.There are three Panels around the Main Workspace which contain a number of tabs. These tabsprovide quick access to tools for viewing, navigating, annotating and gathering information from aPDF. Revu provides Left, Right, and Bottom Panels and places commonly used tabs in them bydefault, but you can freely move any tab to any panel, and it is even possible to detach a tab into afloating panel for more flexibility. To detach a tab, click and drag it off the panel area. Once youcreate a floating panel, any number of tabs may be added to the panel.Left SideRight SideBottom12
Below the Main Workspace but above the bottom panel, notice the Navigation Bar, which containstools to help navigate documents. This bar is customizable like a Toolbar. At the very bottom of theapplication window, below the bottom panel, sits the Status Bar, which contains additional information and tools to help you interact with PDFs smoothly.NavigationThe Navigation Bar is located between Revu's Main Workspace and the Bottom Panel. The Navigation Bar enables efficient movement between pages and views in the Main Workspace.1. Unsplit: Eliminates the current split.2. Split Vertical: Engages MultiView and divides the workspace into two verticallyoriented splits.3. Split Horizontal: Engages MultiView and divides the workspace into two horizontallyorientedsplits.4. One Full Page: A single page of the PDF displays. The mouse wheel will zoom in andout of thepage.5. Scrolling Pages: Pages of the PDF files display in a column. The mouse wheel will scrollupand down the pages.6. Pan (Esc or Shift V): Click and drag to pan the image.7. Zoom (Z): Click to zoom in; hold Ctrl and click to zoom out.8. First Page (Home): Jump to the first page of the PDF.9. Previous Page (Ctrl Left): Go to the prior page of the document.10. Next Page (Ctrl Right): Go to the next page of the current document.11. Last Page (End): Jump to the last page of the document.12. Previous View (Alt Left): Go back to the previous view in the main workspace.13. Next View (Alt Right): Go to the next view in the main workspace.13
Status BarThe status bar is located at the bottom of the Revu desktop. The left side includes prompts to helpyou use the current command or tool. The right side includes the size of the current PDF page andthe current cursor position.To display the Status Bar: Press F8-or- On the Command bar, click View Interface Status Bar.There are six toggle buttons in the middle that switch features on and off:Grid (Shift G): Displays the visible grid to aid in placement of markups. The grid spacing is configured through the Preferences. Click Settings/Preferences/Grid & Snap.Snap (Ctrl Shift F9): Forces the cursor to move along the defined document grid. The grid spacing is configured through the Preferences. Click Settings/Preferences/Grid & Snap. The grid canbe made visible by toggling on the Grid button on the Status Bar or in Settings.Content: Toggles whether or not elements of markups will snap to underlying content. The snapwill connect to the endpoints or the midpoints of the elements. Change the settings for this option inPreferences. Click Settings/Preferences/Grid & Snap.Markup: Toggles whether markups will snap to other markups when they are created.Reuse: Enables the same markup to be added to the PDF without having to reselect the button onthe toolbar. This mode is helpful when adding the same markup onto the PDF sequentially.Sync: Synchronizes the two viewing windows when displaying the PDF in side-by-side Split Viewmode or in a detached window. This is useful when you need to compare two different versions ofthe same document. Moving the document in one window will automatically adjust the view in thesecond window14
Command Bar GroupsAs mentioned earlier, groups of menu buttons display in the center or the Command Bar and areinterchangeable depending on the Menu you have selected. There are nine menu groups:FileThe File group contains menus buttons associated with creating, combining, importing and exporting, and batch processing documents.EditThe Edit group provides menu buttons pertaining to object and text manipulation.ViewThe View group contains menu buttons to change the look of the workspace and open documents.DocumentThe Document group provides menu buttons for working with PDFs.15
MarkupThe Markup group contains menu buttons for adding markups to a PDF.MeasureThe Measure group contains the Measurement and Calibration tools plus quick access to thevarious measurement modes.WindowThe Window group includes menu buttons for controlling the main workspace window.HelpThe Help group contains menu buttons that link to help and other resources.16
TabsThe three attached panels and any floating panels you havecreated can hold a number of powerful, specialized tabs, whichprovide efficient access to a variety of Revu features. Thissection covers the most used tabs and the functionality eachenables.Properties TabThe Properties tab displays any attached files and metadataabout the currently active PDF. If a markup or group isselected, the Properties tab will display the specific appearanceof the selected markup or group. By default, the Properties tabappears in the right panel.To display the Properties tab, clickpress Alt P.properties or17
File Properties SectionsIf no markup is selected, the currently active file's properties are displayed in the Properties tab.File Attachments SectionThe File Attachments section lists any attachments saved in the current document. Click a file toselect it, then use the tools in the File Attachments button bar to open, save, or delete it. Doubleclick a file name to open it.File Attachments Button Bar1. Open: Opens the selected file.2. Save: Saves a copy of the selected file locally, outside of the document it's attached to.3. Add New: Uses an Open dialog to select a file from your computer to attach to thecurrent document.4. Delete: Removes the selected attached file from the document.18
File Properties SectionThe File Properties section displays, and allows editing of, the following metadata fields: Title, Author, Subject, Project, Revisor and Client.File Custom Properties SectionThe Custom Properties section displays, and allows editing of, additional custom metadata.To add a new field, click an empty cell in the Name column, type a name for the property, then clickin the corresponding Value column cell and add the value. To delete a custom row, click in eithercell and click Delete.Markup Properties SectionsWhen a markup is selected, the tab displays all of the parameters that are configurable for that particular markup.19
General SectionThe General section is different for differentmarkups, but will often contain a commentpreview window, Author and Subject fields,and a Lock checkbox to avoid accidentallymoving or changing the markup.Appearance SectionThis section contains settings pertaining to thedisplay style of the markup. See the sectionson individual markup tools for what specificappearance settings are available for that tool.20
Layout SectionThis section reports where the markup exists on the document page. Enter values to placemarkups precisely. If you move a markup by clicking and dragging, the change is reflected here.Options SectionThis section will also vary from markup to markup, but generally holds a quick menu to allow addingthe current tool to My Tools or any tool set in your tool chest and a button to make the current settings the default for that tool.Thumbnails TabThe Thumbnails tab displays small previews of PDF pages for quick navigation within a multi-pagedocument. By default, it appears in the left panel.To display the Thumbnails tab, clickThumbnails or press Alt T.21
Thumbnails Button Bar1. Reduce Thumbnail Size: Reduces the size of the thumbnail images.2. Increase Thumbnail Size: Enlarges the thumbnail images.3. Show/Hide Page Label: Toggles page labels on or off underneath the individualthumbnails.4. Create Page Label: The AutoMarkTM technology allows automatic Page Labelmodification based on Bookmarks or a specified Page Region on the PDF that isconsistent on each page.Bookmarks TabRevu recognizes existing bookmarks in PDFs and enables users to create and edit bookmarks aswell. Bookmarks contained in a PDF are displayed in the Bookmarks tab. For more information, seethe section on Working with Bookmarks.When generating PDFs from other file types using the Bluebeam PDF creation tools, certain content will be automatically transformed into bookmarks – for example, a Microsoft Word table ofcontents, worksheet labels from Excel and slide headers in PowerPoint . When using AutoCAD , Revit or SolidWorks , bookmarks can be created from layout sheets as well.To display the Bookmarks tab, clickor press Alt B.BookmarksLeft-pointing triangle icons along the right side of the bookmark list indicate bookmarks associated with the currentpage. A bookmark will not have this symbol if it links to anelement on a different page.22
Bookmarks Button BarThe Bookmarks button bar contains tools to organize and navigate bookmarks.1. Expand All: Expands the entire bookmarks list.2. Collapse All: Collapses the entire Bookmarks list.3. Save Collapse State: Saves the current Collapse/Expand state as the default (requiresthat the file be saved as well to retain this default across sessions).4. Create Bookmarks: Makes a new bookmark and allows you to specify the name,viewing scale and page range. With AutoMarkTM, bookmarks can automatically becreated from existing page labels or text found in a specific region on each page of thedocument.5. Add: Adds a bookmark to the current page, visible below the currently selectedbookmark in the bookmarks list.6. Delete: Deletes the selected bookmark(s).7. Action: Opens the Action dialog, which allows the user to insert a hyperlink into abookmark.8. Properties: Opens the Bookmark Properties dialog.9. Audit Bookmarks: Analyzes the bookmarks list to ensure the links still work.23
Search TabThe Search tab allows you to search for text in the current PDF, all open PDFs, PDFs in a folder, orin the files in the Recents list. You can perform a Text search or a Visual search. You can alsoSearch and Replace. To display the Search tab, clickSearch or press Alt 1 or Ctrl F.Text SearchText must be present in the PDF file for text search to find it. Scanned PDF files are images and donot contain any text, so they are not searchable. See Optical Character Recognition (OCR) for details on how to make scanned documents searchable.VisualSearchVisualSearch allows for the searching of graphical symbols in PDFs. To set the search criteria, define a rectangle around the symbol or graphic that you want to search for in the document.24
Working with ProfilesProfiles provide an easy way to store the toolbar, menus, and other display settings within Revu.Profiles can also be used to shape the User Interface of Revu for particular job functions within yourorganization. For example, you may create a simplified interface, turning off most of the toolbarswithin Revu, for those users within your organization who would only be viewing PDFs and not haveneed to edit PDFs. Additionally, you could turn on only the most basic markup functions without anyof the advanced editing functions and save a profile for basic markup users.button menu. The check next to theThe toolbar settings are available from the Profileprofile name indicates the currently active profile setting. To switch to a different profile, selectanother profile from the menu. Once selected, the Revu interface will update based on the settingsdefined in the new profile.PreferencesThe Preferences dialog enables customization of Bluebeam Revu settings. This section brieflydescribes some commonly used settings, organized by the section of the preferences dialog thatcontains it.To invoke the Preferences dialog: On the Command Bar, click Settings, then click Preferences.-or- Press Ctrl K.Some commonly changed preferences will be discussed in this section.25
GeneralUser: Each time a markup ismade, Revu records whomade it. This field definesthe name to use.Enable DocumentRecovery: If Revu quitsunexpectedly with this optionset, the next time Revu isstarted, it will attempt torecover unsaved changes tothe document(s) open in theprevious session.Allow Multiple Instances:This enables or disables theMulti-Revu feature.Enable Auto-Complete: Remembers previously entered text. Click the Manage button to edit theauto-complete history.26
Show Splash Screen: Enables or disables the Revu splash screen when Revu is first launched.Use Large Icons: The User Interface Icons will be displayed larger and support High ResolutionDisplays.Reset Hidden Messages: Resets the display of the dialog boxes where "Don't Show Again" wasselected.Tab Truncation: Determines if the file name in the opened tab, truncates the beginning or end ofthe name.Brightness: Sets the overall brightness of the Revu interface.Classic Mode: Switches to an emulation of the appearance of the default interface for Revu priorto version 6.Classic Menu: Switches the menus to classic menus.Grid & SnapUnits SectionApplication Units: Definesthe system of measurementto use for rulers andmeasurement dimensions.Grid SectionShow Grid: Provides controlover displaying the grid. AlsoSnap to Grid: Makes any points used to define a markup line up with the defined grid. Alsocontrolled by the Snap button on the Status Bar.Grid Spacing: Controls increments between grid units, which affects the snap-to resolution aswell as the spacing of the grid markers that are displayed on the PDF. A smaller increment makesa smaller grid, a larger increment makes a larger grid.27
SnapSnap to Content: Snaps markups to the underlying PDF vector content. A smallbox appears over the underlying PDF content when markups are being made. Thefollowing image demonstrates the behavior as a line markup is being drawn. Snapto Content does not snap to text or images in the PDF, only vector images such aslines and shapes. It is also controlled by the Content button on the Status Bar.Snap to Markup: Snaps the cursor to other markups in the PDF. This can also be controlled by theMarkup button on the Status Bar.With Snap to Markup enabled, two related behaviors will occur. The cursor will snap to points onother markups, like Snap to Content snaps to points in the PDF content. Revu will also display –and the cursor will snap to – guidelines that are based on lines in nearby markups.Snap to a pointGuidelines creating a PolygonGuideline creating aligned RectanglesSnap Color: Determines the color of the indicator box.Sensitivity: Move the slider to High to make the snap area smaller. Move the slider to Low tomake the snap area larger.28
MarkupReuse Markup Tools: If checked, the last markups used will remain selected so it can be usedover and over again. If unchecked, after a markup is placed Revu will switch back to pan mode.Dynamically Set as Default properties: Remembers the last property settings for a markup. Forexample, if the appearance properties for a rectangle markup were set to a Green color, 2 pointwide line, the next time that the rectangle markup is selected, these properties will be used.Autosize Text Box andCallout Markups: Fits thesurrounding text box to theentered text for a calloutsand text markups. Afterediting the text in a FreeText or Callout markup, thetext box will resizeautomatically to fit the text.Embed Fonts: Includesfonts used for markups inthe PDF.Show Author and Date inPop-Ups: Displays Authorand Date in popup noteswhen an markup is doubleclicked. The title and authorwill also appear when a notemarkup is added to a PDF.Print Pop-Ups: Check to print Notes and Comments popup boxes.Opacity: Opacity level that Notes and Comments popup boxes will be printed if Print Pop-Ups ischecked.Copy Selected Text into Text Markups: Any time a text markup is used, the annotated text willbe copied to the copy buffer so that it can be pasted into other applications. Text markups areHighlight, Underline, Squiggly line, and Strikethrough.Retain Layer Info when copying Markup: Layer information will be copied when you copy amarkup. If you copy a markup to another PDF, its layer will be created in the new PDF.29
Use Relative Paths for Hyperlinks and Actions: Set the default status for paths to be "relative"when Hyperlinks and Actions are created.Set 'Open in New Window' option for Hyperlinks and Actions: Set the option to open aHyperlink or Action in a new window when the Hyperlink or Action is created. This option onlyapplies when viewing PDFs in Acrobat or Reader. Revu already opens the links in a new tab.Default Image Encoding: Chooses the format in which embedded images and inserted imagemarkups are stored in the PDF.Drag Behavior for Shapes: Determines whether, when drawing certain shapes (polygons, areameasurement), a rectangle is used or whether the drag behavior sets control points for the Béziercurves used to define the shape. The effect will be either a rectangle is dragged, or a curve shapewill be drawn.NavigationMouse Wheel SectionSet how the mouse wheelbehaves in this section.Single Page Mode: Sets themouse wheel behavior in singlepage mode. Choose eitherZoom or Scroll.Continuous Mode: Sets themouse wheel behavior incontinuous mode. ChooseZoom or Scroll. This behavior isindependent of the Single Modesetting.Reverse Mouse Wheel whenZooming: Changes thedirection for when the mousewheel will zoom in versus zoom out.Sensitivity: Controls how much the zoom level changes per mouse wheel click.Enable Horizontal Mouse Wheel: Enables panning for mice that have tilt-able scroll wheels.30
Options SectionSynchronize Views: Synchronizes the viewing windows when displaying the PDF in side-by-sideSplit View mode. The Mode can be changed to sync by Document or by Page. For example, thisis useful when you need to compare two different versions of the same document. Moving thedocument in one window will automatically adjust the view in the other window(s). This can bequickly toggled on and off with the Sync button in the Navigation bar.Enable Horizontal Scrollbar: Toggles on and off the horizontal scroll bar at the bottom of thedocument tab.Show Vertical Scrollbar on Left: Displays the vertical scrollbar on the left side of the PDF pageinstead of the right.Lock Panning in Fit Width: Constrains panning to vertical movement when in Fit Width mode.This prevents the page from sliding sideways if the mouse is moved slightly horizontally.Maximum Zoom: Sets the maximum percentage the workspace will allow zooming of PDFs.Enable 3D Mouse: Enable 3D navigation with a 3D mouse.StudioAccountChange your account settings,create an account or login toStudio.Checkout on Open: If thisoption is selected, when aStudio Project file is opened, itis automatically checked out.GeneralEnable Sounds: Play soundswith studio events.Enable Flashing Alerts: Turnoff visible flashes with studioevents.31
Chapter 2: Commenting & MarkupsCompatibilityComments made in either Acrobat or Revu can be seen in both without any issue. If you addcomments to a PDF from within Adobe, you can open the PDF and see those comments even inRevu.Markup OverviewThe tools to create and edit markups can be found in the Markup and Measure groups of theCommand Bar, in the Text a
open, click on the blue half circle with the white dot in the middle. On the left of the screen you can have the the Tool Chest open with your own comment tools or other options. All comments that are made get saved instantly to the Bluebeam review session; you do not need to manually save any comments. You can only delete comments you have made.