Transcription
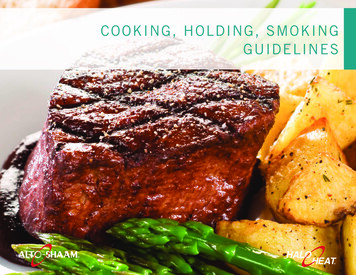
COOKING, HOLDING, SMOKINGGUIDELINES
Low-Temperature Cooking, Holding, Smoking GuidelinesContentsLow-Temperature CookingWelcome to Low-temperature Cooking . . . . . 1Cooking GuidelinesMeat and Nutrition . . . . . . . . . . . . . . . . . . . . 2Product Index . . . . . . . . . . . . . . . . . . . . . .Shrinkage Control and Cooking Time . . . . . . 3Beef . . . . . . . . . . . . . . . . . . . . . . . . . . . 20-23Labor and Equipment Cost Reduction . . . . . . 4Veal . . . . . . . . . . . . . . . . . . . . . . . . . . . . . .23Oven Characteristics . . . . . . . . . . . . . . . . . . 4Lamb . . . . . . . . . . . . . . . . . . . . . . . . . . . . .24Start-up . . . . . . . . . . . . . . . . . . . . . . . . . . . . 4Pork . . . . . . . . . . . . . . . . . . . . . . . . . . . 25-27Cooking, Holding, SmokingProcessed Meats . . . . . . . . . . . . . . . . . . . .Manual Control . . . . . . . . . . . . . . . . . . . .Deluxe Control . . . . . . . . . . . . . . . . . . . .5-67-10Operating Tips . . . . . . . . . . . . . . . . . . . . . . . . . 111927Poultry . . . . . . . . . . . . . . . . . . . . . . . . . . 28-31Fish . . . . . . . . . . . . . . . . . . . . . . . . . . . . . .32Miscellaneous . . . . . . . . . . . . . . . . . . . . 33-39Smoking GuidelinesFood SafetySmoked Beef . . . . . . . . . . . . . . . . . . . . . . .Determine if a Product isSufficiently Cooked . . . . . . . . . . . . . . . . . . 12Smoked Pork . . . . . . . . . . . . . . . . . . . . . 41-42Reheating . . . . . . . . . . . . . . . . . . . . . . . . . . 12General Holding Guidelines . . . . . . . . . . . . . 13Food Safety . . . . . . . . . . . . . . . . . . . . . . 14-1540Smoked Poultry . . . . . . . . . . . . . . . . . . . . .42Smoked Fish, Shrimp . . . . . . . . . . . . . . . . .43Cold Smoked Canned Tomatoes . . . . . . . . .44Cold Smoked Salmon . . . . . . . . . . . . . . . 44-45Cleaning and Preventative MaintenanceProtect Stainless Steel Surfaces . . . . . . . . . . 16Cleaning Agents . . . . . . . . . . . . . . . . . . . . . . 16Cleaning Materials . . . . . . . . . . . . . . . . . . . . 16Daily Probe/Prong Cleaning (Deluxe Control) 16Equipment Care & Cleaning . . . . . . . . . . . . . 17Preventative Maintenance Checklist . . . . . . . 18W164 N9221 Water Street P.O. Box 450 Menomonee Falls, Wisconsin 53052-0450 U.S.A.phone: (262) 251-3800 (800) 558-8744 u . s . a ./ canada fax: (262) 251-7067 (800) 329-8744 u . s . a . www.alto-shaam.comMN-29492 (11/16) Cooking, Holding, Smoking Guidelines Table of Contents
Deluxe IIManual 1767-SK1000-SK-I1000-SK/II
Low-temperature CookingWelcome to the cost saving convenienceof low-temperature cooking.In 1968, Alto-Shaam invented the first automatic, commercial cookand hold oven featuring the principle of Halo Heat. The heatingmethod provided by Halo Heat low-temperature cooking and holdingovens consist of an electric thermal cable that encircles the entirecooking and holding chamber. This creates a gentle blanket or HALOof radiant heat — surrounding food with a consistent and uniformtemperature with no air movement inside the oven compartment. Thisgentle heating concept cooks at low temperatures and at a high levelof humidity to preserve product moisture, flavor, and nutrition. HaloHeat ovens are designed to convert automatically from a cookingtemperature to a holding temperature where the product can remainuntil it is ready to be served.Read this booklet carefully. Halo Heat is a cooking system thatrequires minimal care once you have learned the basic principles.For best results with many products, we recommend you start yourcooking cycle the evening before — for serving the next day. In manyareas, off-peak power rates are also lower at night.If anything you cook in a Halo Heat low-temperature cooking andholding oven doesn’t meet your highest standards of quality, pleasecontact one of our food service professionals for help. Usually, only aminor change in procedure is required.Halo Heat is an entirely different system of cooking. Utilizing thisuniform heat source, Halo Heat reduces meat shrinkage; providesnatural enzyme (aging) action for more tender, flavorful meat; andpreserves natural juices along with nutritional values in all foods. HaloHeat cooking reduces energy cost, cuts back on labor and handling,and solves kitchen space problems. There is no mechanical ventilationor oven hood necessary in most areas so the ovens can be movedwherever they are needed.MN-29492 (11/16) Cooking, Holding, Smoking Guidelines 1
Low-temperature CookingMeat and NutritionMeat plays a significant role in the diet; therefore, one of the primarygoals in food preparation is proper nutrition. Meat is one of the bestsources of protein; is a rich source of B vitamins such as thiamine,riboflavin, and niacin; and includes fats, carbohydrates, minerals,pigments, enzymes and water.All of these elements are affected by cooking, but over-heatingdestroys many of them. Low-temperature Halo Heat cooking helpspreserve unstable, heat-sensitive vitamins and nutrients.A report on the Nutrient Analysis of Roast Beef, conducted bythe University of Wisconsin-Stout in July 1971, concluded, “ itis apparent that the Alto-Shaam cooking method results in lowermoisture losses. Even after a 24-hour holding period, the Alto-Shaamproduct is nutritionally equal to, and possibly better than beef roastcooked in a conventional oven and removed immediately aftercooking.”Fat contributes greatly to the flavor of meat. During the cookingprocess, fat not only melts, but also changes chemically. With lowtemperature cooking there is less chemical change and less fat meltresulting in a more flavorful finished product.Low-temperature cooking does not destroy these enzymes and,particularly in the hold cycle, creates this natural chemical actionto tenderize or age the meat right in the oven. For this reason, it isimportant to use fresh beef and it is essential to allow the productto remain in the hold cycle for at least the minimum amount of timesuggested in the individual procedure. The longer meat is left in thehold cycle the more tender it becomes, making the purchase of moreexpensive, aged meat unnecessary.Meat is 70% to 75% water. High temperatures cause this water toevaporate during cooking resulting in the loss of product moisture.Cooking at low temperatures in a Halo Heat oven retains the maximumamount of water content resulting in a juicier finished product and anextended holding life.Along with better nutrition, a more tender finished product, lessshrinkage and higher moisture content, meat will not require theaddition of as much salt as needed with conventional cookingmethods. Natural flavors are preserved. This is a significant factor intoday’s health conscious diets.The enzymes found in meat break down the tissues and act as naturaltenderizing agents. A premium price is paid for aged meats where thisenzyme action has already started, however, enzymes are destroyed byhigh temperatures.MN-29492 (11/16) Cooking, Holding, Smoking Guidelines 2
Low-temperature CookingShrinkage Control and Cooking TimeThere are two major factors controlling meat shrinkage orcooking losses.There are four major factors involved in determining cookingtimes for meat:1. The temperature at which meat is cooked:The higher the temperature at which meat is cooked the moreshrinkage will result. Over-cooked meat also results in higher losses.Higher temperatures and over-cooking draws moisture to the surfaceand this moisture evaporates or drips out of the meat.1. The degree of aging of the meat:Aged meat will cook faster, shrink more, and has a much shorterholding life than fresh meat.2. The internal temperature of the meat:Like over-cooking, as meat is brought to a higher internaltemperature shrinkage is increased. For these two reasons, it issuggested most cuts of red meat be cooked at 250 F (121 C) and thatall cooking be based on internal product temperature. The use of athermometer is encouraged.2. The internal temperature before cooking:Meat should be placed in a preheated oven directly from arefrigerated temperature of 38 F to 40 F (3 C to 4 C). Meat cookedfrom a frozen state will require approximately one and one-half totwo times the normal cooking time. In addition, freezing ruptures thetissue cells and creates additional moisture loss during the cookingprocess. This results in more shrinkage.3. The desired degree of doneness:The higher the degree of internal temperature required, the longerthe necessary cooking time. Cooking times in this guideline are basedon the most popular internal product temperatures.4. The quantity and quality of product.To Calculate Meat ShrinkagePrevent Bacteria GrowthStarting weight (weight of raw product)-Minus: Ending weight (weight of cooked product)Eq u a ls : A mo unt o f s hrinkag eA m o u n t o f s hrinkag e (to tal weig ht lo s t in c ook ing) D i v i d e d b y : Starting weig ht (weig ht o f ra w produc t)Eq u a ls : Percent o f s hrinkag eExample:Raw Beef Roast:Cooked Beef Roast:1 0 0 lb- 9 5 lb(45 k g)(-43 k g) Amount of shrinkage:5 .0 lb(2 k g)0.05 5%Shrinkage divided bystarting weight:1005.0Eq u a ls : Percent of shrinkage0.05 5%452.0The surface of raw meat may become contaminatedin processing, handling by the butcher or chef, or byother means. Food contamination can also be caused byunsanitary personal hygiene and work habits, uncleanslicers, knives, and probes, or by faulty operationalprocedures. It is important, therefore, that sanitaryprocedures be followed at all times during foodpreparation and handling. This is your main protectionin guarding against food contamination. For additionalinformation see the Cleaning and PreventativeMaintenance section of this manual.MN-29492 (11/16) Cooking, Holding, Smoking Guidelines 3
Low-temperature CookingLabor and Equipment Cost ReductionOven CharacteristicsHalo Heat ovens are easy to operate and maintain. After the raw productis placed in the oven and the controls are set, there is no need to check,stir, or adjust the time or temperature. Minimal time is spent attendingthe product during cooking. This advantage, combined with the automaticconversion to the hold cycle, frees key personnel to concentrate on othertasks including final product and presentation.The oven is equipped with a special, low-heat-density, heating cable.Through the Halo Heat concept, the heating cable is mounted againstthe walls of the cooking and holding compartment to provide an evenlyapplied heat source, controlled by an oven sensor. The design andoperational characteristics of the unit eliminate the need for a moisturepan or a heat circulating fan. Through even heat application, the foodproduct is cooked uniformly and provides the ability to hold foods forlonger periods of time.When cooking in a Halo Heat oven at a temperature of 250 F (121 C),outside venting and expensive exhaust hoods are not necessary in mostareas. Kitchens remain cooler, lowering energy costs by reducing theexchange of heated air. Because the ovens do not need outside venting,they can be put almost anywhere — in the corner of the kitchen, ona buffet line, or in a banquet room. The ovens can also be built into acounter or to save space, can be stacked in combination with another HaloHeat oven or holding cabinet of the same or similar dimension.Cooking at low temperatures also reduces the cleaning time. Most fooddoes not normally carbonize or burn onto the interior of the oven.Halo Heat reduces laborLoad ovenat closing Product does not need checking. Off-peak electrical rates are used. Key personnel can concentrate onother tasks.hoadOnyDistributes work loadsldReBefore initial use or after removing the appliance from storage:1. Remove all packing material from the appliance.2. Remove and wash any detachable items such as wire shelves, sideracks, pans, and drip pans with hot, soapy water. Dry with a cleandamp lint-free cloth.4. Clean the interior and exterior of the appliance with a mild soap andwater solution. Apply the solution with a clean damp cloth. Do notuse commercial or household cleaners that contain ammonia. Wipewith a clean, damp cloth to remove all detergent residue. Dry with aclean, lint-free cloth. Cooking takes place outside peakpreparation hours.Removeroaststhe nextdayStart-Up3. Remove all visible grease or oil from the appliance. Product can be cooked the nightbefore for serving the next day.LoadNotice: T he 300-TH/III is a countertop oven. When cooking a full loadin the 300‑TH/III, insert the food probe into the food on thelowest shelf.Carve,plateandserve5. Clean the appliance glass with glass cleaner or distilled vinegar.6. Install the side racks and wire shelves - position shelves with thecurved end up and toward the rear of the appliance. Re-install drippan.7. Operate the oven without food for a period of two (2) hours ata temperature of 300 F (149 C) to remove surface oils and anyaccompanying odor.The appliance is now ready for operation.MN-29492 (11/16) Cooking, Holding, Smoking Guidelines 4
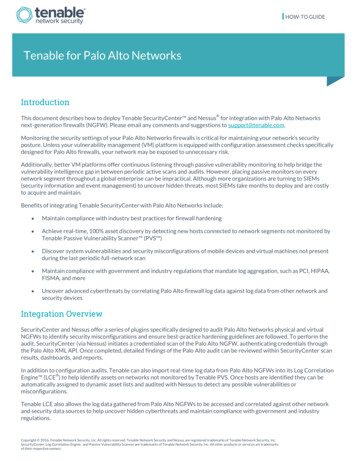
Manual Control Cooking, Holding, Smoking12345671IIoo121234561121012On/Off SwitchDigital DisplayHeat Indicator LightHolding Indicator LightHold Knob — Temperature range 60 F to 205 F (16 C to 96 C)Cooking Indicator Light1. Press the On/Off switch to the On (I) position.Control will display 0 F or 0 C.2. Set the holding temperature.Rotate the Hold Knob to the desired temperature. The set temperature will appear in theDigital Display and the Holding Indicator Light will illuminate.3. Set the cooking temperature.Rotate the Cook Knob to the desired temperature. The set temperature will appear inthe Digital Display and the Cooking Indicator Light will illuminate.Notice: The cooking mode is not active unless the timer is operating.4. Set the timer.Press the Up or Down Arrows to set desired cooking time, or to adjust the time whilethe appliance is cooking.To cancel the timer, press and hold the Time Cancel button.5. Preheat the oven for 30 minutes before loading food.6. If smoking, load the wood chip container.Take one container load of dry wood chips, no smaller than 1/2" (13mm), and soak thechips in water for 5-15 minutes. Shake excess water off the wood chips. Remove thewood chip container from the interior rear panel of the appliance. Place the moistenedchips in the wood chip container and replace the container in the oven.78910111234115678910Cook Knob — Temperature range 2 00 F to 325 F (93 C to 162 C)Smoke Timer Knob (60 minutes maximum)Smoke Indicator LightTemperature Display buttonUp and Down Arrows (to set and adjust cook time)Time Cancel8. Set the smoke timerThe smoke timer activates the heating element located inside the wood chip container.When the wood chip container is full and the smoke timer is turned clockwise as far as itwill turn, the wood chips will smoke for approximately forty-five minutes to one hour.To set the smoke timer, rotate the Smoke Timer Knob beyond the required length oftime, then immediately rotate it back to the correct setting.The Smoke Indicator Light will illuminate.Keep the oven door and door vents completely closed during the smoking cycle.Notice: When cold smoking, the cook temperature must be set to 0ºF (0ºC) before settingthe smoke time in order for the smoke process to work.Notice: The Heat Indicator Light illuminates when the timer is set and will remainilluminated until the oven reaches the set temperature. Press the Temperature Display button to toggle between the Settemperature and the set time. Press and hold the Temperature Displaybutton to display the Actual oven temperature.7. Load the oven with food and adjust the cooking time as needed.MN-29492 (11/16) Cooking, Holding, Smoking Guidelines 5
ManualControl Cooking, Holding, SmokingITo toggle between Fahrenheit ( F) and Celsius ( C)oThe factory default is Fahrenheit. To change to Celsius:I1. P ress and hold the Temperature Display button and the Down Arrow for5 seconds.2. The control will display C for 3 seconds and then show the temperaturein C.o3. Repeat to toggle to Fahrenheit.CNotice: I n the event of a power failure, the control will retain the C or Fsetting selected by the user.MN-29492 (11/16) Cooking, Holding, Smoking Guidelines 6
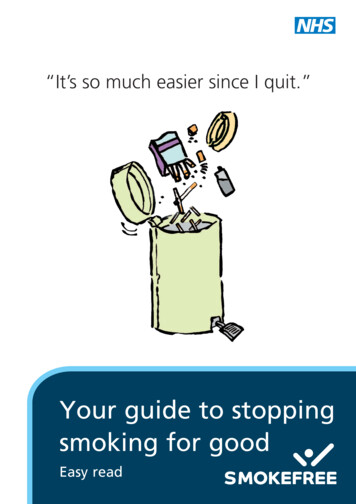
Deluxe Control Cooking, Holding, BCDE151a1b234567FGH1bIAB14On/Off Button - Upper CavityOn/Off Button - Lower CavityHeat Indicator LightLock Indicator LightPreheat Indicator LightLED DisplayReady Indicator LightUp and Down Arrow Buttons15891011121314151. Press the On/Off button.2. To cook with a preset programPress the desired Preset Program button (A-H) and then press the Start button to beginthe cooking cycle.3. To cook without a preset programA. Set the cooking temperature.Press the Cook button. The Preheat Indicator Light will illuminate and the last setcooking temperature will displayed. Press the Up or Down Arrow button to changethe cook temperature. To cook by time — Press the Time button. The time indicator will illuminateand the last set cooking time will be displayed. Press the Up or Down Arrowbutton to change the set time. The display will alternate between the set cookingtemperature and the elapsed time. To cook by probe — Press the Probe button. The probe indicator will illuminateand the last set internal product temperature will be displayed. Press theUp or Down Arrow button to change the set temperature. The display willalternate between the set cooking temperature, the elapsed time, and the probetemperature.B. Set the holding temperature.Press the Hold button. The cook indicator light will remain illuminated. Press the Upor Down Arrow button to change set hold temperature. The display will alternatebetween the set hold temperature and the amount of time the product has been inthe hold mode. The oven will remain in the hold mode until the On/Off button ispressed.C14Cook Button — Temperature range 2 00 F to 325 F (93 C to 162 C)Time ButtonProbe ButtonHold Button — Temperature range 60 F to 205 F (16 C to 96 C)Smoke ButtonStart ButtonCancel Program ButtonPreset Program Buttons A-HTo enable Probe Hold mode (optional when cooking by probe) — Press the Probebutton. The probe cooking temperature will be displayed. Press the Probe buttonagain to toggle to the Probe Hold temperature. The LEDs below the Probe and Holdbuttons will alternate, signaling the Probe Hold mode. Press the Up or Down Arrowbuttons to set the probe holding temperature.C. Preheat the oven for 30 minutes before loading food.D. If smoking, load the wood chip container.Take one container load of dry wood chips, no smaller than 1/2" (13mm), and soakthe chips in water for 5-15 minutes. Shake excess water off the wood chips. RemoveABCDEFGHIthe wood chip container from the interior rear panel of the appliance. Place themoistened chips in the wood chip container and replace the container in the oven.E. Load the oven with food and adjust the cooking time as needed.F. Set the smoke timer.Press the Smoke button. Press the Up or Down Arrow button to set the smoke timedesired.G. Start cooking cycle.Press the Start button.Note: When setting time or temperature, press the Up or Down Arrow button to change byincrements of one. Press and hold the button to increase by increments of ten.To stop an operation:Press and hold the Start button until the control beeps for two seconds, indicating theoperation has been canceled. The oven will remain in a power-on state.MN-29492 (11/16) Cooking, Holding, Smoking Guidelines 7
Deluxe Control Cooking, Holding, SmokingTo create a preset programPower fail detect:If the power fails while the oven is heating, the control will retain, in memory,the programmed operating conditions. When power is restored, the controlwill resume operating from the point where it was interrupted and the On/OffIndicator Light will flash, indicating that a power failure occurred. Acknowledgethe power failure by pressing the On/Off button. Pressing the On/Off button willdisplay the amount of time that the power was off. The control will stop countingthe amount of time the power has been off when it has been off for more than24 hours.A. Set desired cook and hold time and temperature, and smoke time.B. Press and hold desired Preset Program button (A-H). When the presetprogram has been saved, an alarm sounds for two (2) seconds and theindicator light illuminates.Note: O nly one preset program may be entered at a time. When enteringmultiple Preset Programs, turn the oven off and then back on betweeneach Preset Program to be entered. The values of subsequent programsdefault to the values of the last program entered. Change the values byentering desired cook and hold time and temperature, and smoke time.Notice: i f a power failure has occurred, it is strongly recommended that you ensurethe food is safe for consumption according to local health regulations.To erase a preset programTo set the date and time:All oven cavities must be Off.The oven must be in either the power-up hold mode or in the preheat mode. Theoven can not be running a preset program.Press and hold the Cancel button and the appropriate Preset Program button(A-H) to be erased. When the preset program has been erased, an alarm sounds forone (1) second.To set the time of day (HH:mm) Hours/minutes - press and hold the “A” PresetProgram button for three seconds, then press the Up or Down Arrow button.To set the year - press and hold the “B” Preset Program button for three seconds,then press the Up or Down Arrow button.To set the month and day (MM.dd) - press the “C” Preset Program button forthree (3) seconds, then press the Up or Down Arrow button.To turn oven control panel off:Press and hold the On/Off button until the oven beeps. The On/Off IndicatorLight will go out.Door open indicator:The display will flash “door” and a triple beep will alert the user. Press theOn/Off button to acknowledge error and disable the triple beep.Indicator lights:Each Preset Program button includes a green light whichindicates a requirement for additional programming by theoperator or the current operational state of the oven.The Cook, Time, Prob e, and Hold buttons include an amberindicator light to identify the information being displayed.GreenAmberABCDEFGHIMN-29492 (11/16) Cooking, Holding, Smoking Guidelines 8
Deluxe Control Cooking, Holding, SmokingProbe usage:When the oven probe remains inserted in the probe bracket, the LED temperaturedisplay will indicate the ambient air temperature inside the oven. To use the probefor cooking remove it from the bracket and wipe the full length of the metal probewith a disposable alcohol pad to clean and sanitize before using.Probe calibration:1. To verify the product probe calibration, place the probe in a glass of ice water.2. After allowing the temperature to stabilize, press the Probe button for five (5)seconds. Compare the reading against 32 F (0 C).3. If calibration is required, the unit must be in the power-up hold mode. Fromthe off state press the On/Off button. The appliance will begin to operate in thepower-up hold mode, press the Probe button for eight (8) seconds until theappliance beeps twice and a temperature is displayed. Adjust the probe offsettemperature by pressing the Up or Down Arrow button to increase or decreasethe temperature. Repeat step 2 to verify.4. Repeat steps 1 and 2 to verify the probe calibration accuracy.Only the tip of the probe senses the internal product temperature; therefore, itis important the tip be placed correctly in the product for internal temperatureaccuracy. Push the probe tip halfway into the product, positioning the tip at thecenter of the food mass, avoiding the bone. When inserting the probe into solidfoods such as meat roast or poultry breasts, push the probe in from a straightdownward position or in from the side to the center position. If placing into asemi-liquid or liquid product, the probe cable must be secured to keep the probepositioned properly. Do not let the probe tip touch the edges, bottom or side of acontainer. Tape the probe cable to the lip or edge of the container.Sous Vide cooking:With the oven in a preheat mode, press and hold the Probe button. After five (5)seconds, it will display “SouS” if in sous vide mode, or “ rE9” if in a regular probemode. If changes are desired, continue holding the Probe button for an additionalthree (3) seconds which will toggle the option.To display high/low probe temperatures:To display the recorded maximum or minimum probe temperature when cookingby probe, press the following buttons while the probe remains in the product:Highest Temperature: P ress the Prob e button and the Up Arrow button atsame time.Lowest Temperature: P ress the Prob e button and the Down Arrow button atsame time.CAUTIONTo maintain safe temperature levels, cold foodfor rethermalization or reheating must neverbe added to the oven while hot foods arebeing held.To enable Probe Hold (optional when cooking by probe): Press the Probe button to see the probe cooking temperature. Press the Probe button again to toggle to the probe holdtemperature.Note: T he indicator lights below Athe ProbeB A andC B HoldD CbuttonsEDwill alternate while the Probe Hold mode is active.FEGFHGIHI Press the Up or Down Arrow button to set the desired probehold temperature. Press the Start button to begin the cooking cycle.ABCDEFAGBCHIDEFGWhen cooking by probe, insert the probe into the rawproduct after the oven has been preheated.wait one (1) full minute to allow the probetemperature to decrease to the internal temperatureof the product. Press the Start button to beginthe cooking process after this probe temperatureH adjustmentIperiod. A false probe reading of theinternal product temperature will cause the oven todefault to a holding temperature.MN-29492 (11/16) Cooking, Holding, Smoking Guidelines 9
BDeluxe Control Cooking, Holding, SmokingCDEFGHLock and Unlock PresetsAIBCDEFGHIHACCP Documentation, Data Logger - OptionalThis oven meets the requirements of established HACCP criteria by providingautomated sampling, record keeping, set-point validation, recipe used, dates andtime. This data is retained for the last 30 days. This information can be displayedon screen or downloaded to a USB flash drive and then copied to your computer.The file format is a comma-separated variable (*.csv) that is opened using aspreadsheet software.Preset Program buttons A through H can be locked in order to prevent storing,altering or erasing a program.To lock the Preset Program buttons, press and hold the “I” Preset Programbutton until the oven beeps. Release the “I” Preset Program button. The indicatorlight on the “I” Preset Program button will illuminate. Oven preset A through Hare now locked.To download the data collected:1. All oven cavities must be Off.Notice: O nly the Preset Program buttons A through H are affected by this lockout. The oven can be used with the unprogrammed Cook, Probe, or Holdfunctions.2. It is recommended that an empty USB flash drive is used. Remove the cap ofthe USB port located on the right side of the control panel and insert the USBflash drive. Display will show “Usb”. If display does not show “Usb”, try againwith another flash drive or call Alto-Shaam Service.To unlock the Preset Program buttons, press and hold the Cancel Programbutton along with the “I” Preset Program button until the “I” Preset Programbutton light no longer illuminates. Release all buttons. The Preset Programbuttons are now unlocked.3. Press and hold the Start button until display shows “ XYZ”. The number atthe far right is the percentage of the download completed. The Start buttonindicator light will blink while the download is in process. When display shows“ 100”, the download is complete.Fahrenheit or Celsius selection4. Remove the USB flash drive and replace the cap on the USB port. When the USBis removed, the oven will beep for one (1) second, acknowledging the removal. ith the control in the off mode, press and hold the Up Arrow button until theWcurrent selection is displayed. Press Up or Down Arrow button to toggle betweenthe two (2) options. After each change the button must be released. The displaymust clear before the procedure can be repeated.Control panel Lock and UnlockHACCP Data SampleThe control panel can be locked at any time in order to prevent inadvertent or accidentalsetting changes.To lock the control panel, press and hold the Up Arrow button and then press the On/Offbutton. You will hear a brief beep and the panel Lock Indicator Light will illuminate.Release all buttons. The control panel is now locked.Note: T he control panel is locked with the exception of the On/Off button and Up orDown Arrow buttons. You are unable to turn the oven control off at this point.To unlock the control panel, press and hold the Down Arrow button and then pressthe On/Off button. You will hear three (3) beeps and the panel lock indicator light willextinguish. Release all buttons. The panel is now unlocked and ready for normal use.ABCDEFGBeeper volume selection With the control in the off mode, press and hold the Down Ar
MN-29492 (11/16) Cooking, Holding, Smoking Guidelines Table of Contents Low-Temperature Cooking Welcome to Low-temperature Cooking . . . .1 .