Transcription
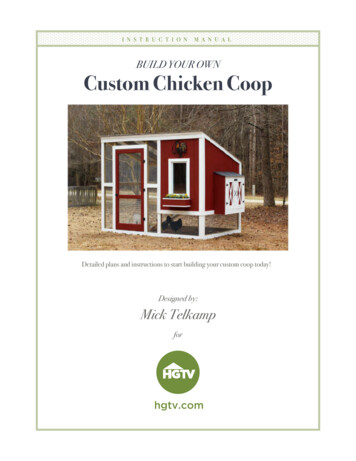
I N S T R U C T I O NM A N U A LBUILD YOUR OWNCustom Chicken CoopDetailed plans and instructions to start building your custom coop today!Designed by:Mick Telkampforhgtv.com
Front Layout and Cut List4869”11129”3WINDOWDOOR9982”77612”54All measurements are standard pine lumber unless otherwise specified.1(3) 2x4 x 8’ notched for 2x4s at ends andat 48” on center2(1) 2x4 x 8’ notched for 2x4s at ends and at 24”and 48” on center3(1) 2x4 x 8’ notched for 2x4s at ends and at 24”on center4(2) 2x4 x 10’5(1) 2x4 x 4’6(2) 2x4 x 45”7(2) 2x4 x 33¾”8(1) 2x4 x 38”9(2) 2x4 x 17¾”1/4” HardwareClothSidingHardware cloth and siding cut to size and attached once structure is fully assembled
Back6532114341/2”341/2”61(2) 2x4 x 6’ notched for 2x4s at ends and at 48” on center2(1) 2x4 x 6’ notched for 2x4s at ends and at 24” and 48”on center3(1) 2x4 x 6’ notched for 2x4s at ends and at 24” on center4(1) 2x4 x 4’5(1) 2x4 x 73½”(2) 2x4 x 10’61/4” HardwareClothSidingHardware cloth and siding cut to size and attached once structure is fully assembled
*Structural frame sides are doublethickness, with the shorter plank on theoutside.Top ViewINSIDEOUTSIDE1(2) 2x4 x 72¾” with parallel 18½ degreecuts at each end for 4:12 roof pitch2(2) 2x4 x 68½” with parallel 18½ degreecuts at each end for 4:12 roof pitch3(4) 2x4 x 69”4(5) 2x4 x 65”5(2) 2x4 x 30”1/4” HardwareClothSidingHardware cloth and siding cut to size and attached once structure is fully assembled
RoofFront4” overhangon front33120”2 1/2” overhangon back33123”231121”1/2Back23”20”1 1/2” overhangon sides1(4) 2x4” x 72¾” with parallel 18½ degreecuts at each end2(1) 2x4 x 68½” with parallel 18½ degree cutsat each end3(5) 26” x 84” ribbed roof panels
Coop EnclosureTop ViewInside Wall97(FLOOR)81324CHICKENACCESS12”62ACCESS DOORS56RUN112345(2) 2x4 x 65”(2) 2x4 x 39”(1) 2x4 x 23½”(1) 2x4 x 22”(1) 2x4 x 12”678(2) ¾” x 36” square dowel(1) 2x4 x 42”(1) 2x4 x 69”9(1) 4’ x 6’ x ¾” plywood notched for 2x4s at cornersSidingSiding cut to size and attached once structure is fully assembled
Nesting/StorageNesting/Storage Bump Out2b is not attached to bump out. Attach to coop to hang in place.7Nesting Box Insert7Place inside to line up with pass-through oncebump-out is attached to e FaceAttach each door to frame face with two 3” hingesPosition crossbucks last, then mark and cut “X” overlapon one piece.Attach to front of frame (flush on all sides)15131418191913171618201717201919181817
Nesting/Storage Materials1(2) 1x4 x 36”2(1) 1x4 x 34½”3(3) 1x4 x 10½”(1) 12” x 34½” ¾” plywood45(2) 1x4 x 367/16” with angle cut on one end at 181/2 degreesfor 4:12 roof pitch6(2) 1x4 x 38¾” with angle cut on one end at 181/2 degreesfor 4:12 roof pitch7(2) 26” x 15” ribbed roof panels(2) 12” x 39” siding with angle cut on one endat 18½ degrees for 4:12 roof pitch89(2) 1x4 x 13”10(2) 1x4 x 12”11(2) 12” x 12¾” ¾” plywood(2) 12” x 30” siding12(2) 1x2 x 34¾”1314(1) 1x2 x 28¾”(1) 1x2 x 34”151617181920(1) 1x5 x 34”(4) 1x4 x 285/8”(4) 1x4 x 8¾”(4) 1½” x ¼” x 23½” lattice molding(2) 15½” x 28½” siding
Access Doors/Ramp/Flower Box1Access Doors2331134522673(4) ¼” x 1½” x 34” latticemolding4(1) 18” x 39” siding5(1) 17” x 39” siding113Ramp(4) 1x4 x 10½”2Backing attached flush at outside edges2(4) 1x4 x 39”77777777676(2) 5/4 x6 x 60”Flower Box1414 is spacer attached to coop to secure.Top View81210891191011(2) 1x6 x 7¼”13(4) ¾” x 8½” square dowel with 45º miteron one end(2) ¾” x 25” square dowelwith opposing 45º miters oneach end14(1) 1x6 x 22”(1) 1x6 x 23”(1) 1x6 x 24½”121312(1) 1x6 x 6½”1213128(9) ¾” x 11” square dowels
14 is spacer attached to coop to secure. 12 13 (1) 1x6 x 22” (4) ¾” x 8½” square dowel with 45º miter on one end (2) ¾” x 25” square dowel with opposing 45º miters on each end 9 (2) 1x6 x 7¼” (1) 1x6 x 23” (1) 1x6 x 24½” (1) 1x6 x 6½”