Transcription
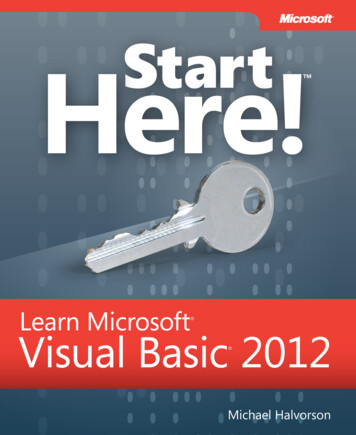
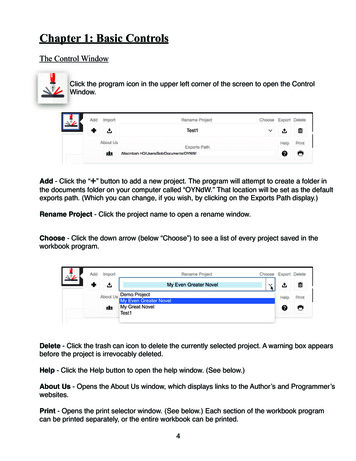
Chapter 1: Basic ControlsThe Control WindowCl the program icon in the upper left corner of the screen to open the ControlClickWindow.WiAdd - Click the Ò Ó button to add a new project. The program will attempt to create a folder inthe documents folder on your computer called ÒOYNdW.Ó That location will be set as the defaultexports path. (Which you can change, if you wish, by clicking on the Exports Path display.)Rename Project - Click the project name to open a rename window.Choose - Click the down arrow (below ÒChooseÓ) to see a list of every project saved in theworkbook program.Delete - Click the trash can icon to delete the currently selected project. A warning box appearsbefore the project is irrevocably deleted.Help - Click the Help button to open the help window. (See below.)About Us - Opens the About Us window, which displays links to the AuthorÕs and ProgrammerÕswebsites.Print - Opens the print selector window. (See below.) Each section of the workbook programcan be printed separately, or the entire workbook can be printed.4
Save: There is no Save button because work is automatically saved every time a Þeld ischanged.There are also no separate data Þles. The data for all projects is contained within the program.So, to back-up your data, duplicate the entire OYNdW application folder.Back-Up - When you click on the Export button, you will be given two choices to back up yourwork:1. Export All Projects - Export every project in the program. You will have the option tochoose an exports folder. The export generates 15 Þles in .fmp12 (Filemaker) format.The Þles can only be used with the Outlining Your Novel Workbook program. All projectsare saved together in these 15 Þles.2. Export One Project - You may choose to export only the currently selected project.This is a good way to save a backup of a work in progress. Then you can always goback to a previous version.Note: Exporting is also a good way to exchange projects with another writer who also has theOutlining Your Novel Workbook program.Note: This export is different from exporting scenes for use in Scrivener. The scene exportbutton is found on the All Scenes layout.Import - You may import any exported Þles, either projects that were exported as a group orindividual projects. Caution: Be sure to delete a project before you try to import the sameproject. You canÕt have two projects with the same name or project ID number. The program willcheck and warn you about this.!5
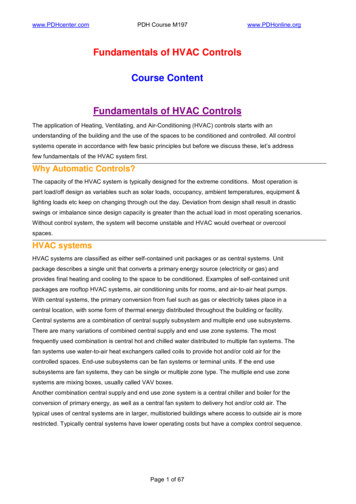
Help ScreenThere are three ways to navigate to the Help screen:1) Use the drop-down menu at top of the screen to select Workbook/Help.2) Use the Section Arrows on the upper right side of the screen to click through the 29workbook layouts to reach the Help and About Us layouts.The Help screen is 1 click on the left arrow from the Þrst screen in the program.3) Click the Help button in the Control Window.The Help window has three tabs:1) Workbook - This tab has links to outlining instructions from the workbook.2) Overview - Help on how to use the program.3) Navigation - Indicates locations of all navigation buttons and menu items.6
Help/Workbook TOC:The workbook tab displays a Table of Contents. Each title is a link to a pop-up window withoutlining instructions reprinted from the workbook. Click outside the pop-up window to close it.There is an arrow next to each chapter title. The arrows are links that will switch the display tothe Þrst layout for that chapter.Note that the six buttons on the Navigation Bar correspond to the seven chapters listed in thetable of contents. Chapters 3 and 4 about Characters have been combined into one button onthe Navigation Bar.Creative ExercisesAt the end of the Þrst six categories, there is a section called Creative Exercises. Thesesections contain helpful suggestions and questions for your consideration. There are also linksto online resources. Click the round blue buttons to open a web browser to additionalinformation.7
Help / Overview:The Overview tab displays a mini-guide about the program.Users Manual - Right click to open the guide. Windows users, select 'Export Þeld contents" fromthe contextual menu. Mac users, select 'Open in Preview.'Help / Navigation:The Navigation tab reviews the four ways to navigate through the program.8
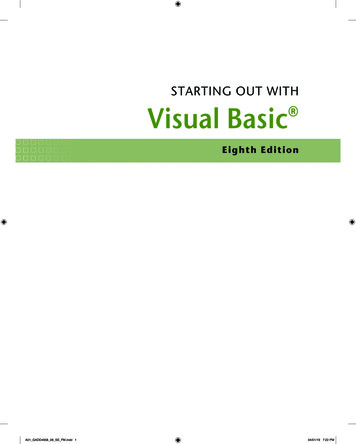
The Print WindowClick the Print button in the Control Window to open the Print Selector screen.Mark any check boxes for the sections to be printed.Clicking the check box for any category (blue text) will select all sections in that category.Individual sections in any categories may also be selected or deselected.Clear Chapters - Deselect the category titles.Clear All Sections - Deselect every section.Cancel - End the printing request and close the Print Window.Format for: - For most users, choose ÔPagesÕ to send to PDF or ÔContinuousÕ to sent to printer.Print - Send the selected sections to the printer, after choosing the print format option.Note that some operating systems will allow the sections to be sent to .pdf Þles instead.(See the next page about Print Options.)Any text typed into Þelds in the selected sections will also be printed.To print out a completely blank workbook, create a new unused project, and then select everycategory to be printed. It will be many pages long.!9
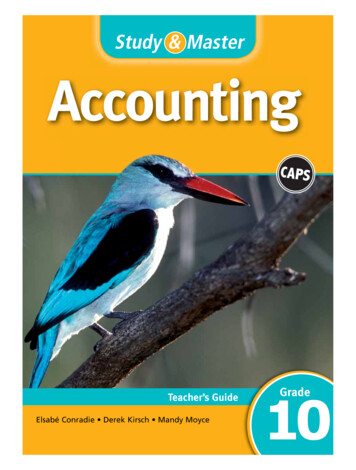
Print Options:[New in v1.98]Before printing select either ÔPagesÕ or ÔContinuousÕ.Pages - This option may work best for sending theselected sections to a PDF Þle.A print setup Þle opens before printing to set the pagesize.Then a print control window opens before each newsection so you can name it and set the destination. Notethat the print control window will open before each sectionthat is checked. If youÕve checked Þve sections, thatÕs theminimum number of times the control window will openduring the export to PDF process. Some longer sectionsare broken into multiple pages, so the print control windowmay open more times than the number of checkedsections.Continuous - This option will work best for sendingdirectly to a printer. The print setup window opens once to set page size and the print controlwindow opens once for other printer speciÞc features. A warning indicator shows how many pages will be printed for theScenes Checklist. 1 page for each scene. [New in v1.98]10
workbook layouts to reach the Help and About Us layouts. The Help screen is 1 click on the left arrow from the Þrst screen in the program. 3) Click the Help button in the Control Window. The Help window has three tabs: 1) Workbook - This tab has links to outlining instructions from the workboo