Transcription
MultitrackStudioBremmers Audio DesignManualVersion 10.3, February 2022https://www.multitrackstudio.com
Copyright (C) 2001-2022 Bremmers Audio Design.The content of this manual is subject to change without notice. Although every precaution has been taken in thepreparation of this manual, the author assumes no responsibility for errors or omissions. Neither is any liabilityassumed for damages resulting from the use of the information herein.ZTX Time Stretch/Pitch Shift technology licensed from Zynaptiq GmbH, http://www.zynaptiq.com/ztx/, (c)Zynaptiq GmbHEffect presets by Christian C. Thompson, www.christiancthompson.comVST and ASIO are trademarks of Steinberg Soft- und Hardware GmbH.LAME MP3 encoder by mp3dev.org (included in macOS version)Windows and Windows 11/10/8/7/Vista/XP are trademarks of Microsoft.Mac, macOS and iPad are trademarks of Apple.All other trademarks are the property of their respective owners.
Contents1. Introduction Overview Quick Start: Recordinga Song2. Songs Songs Song Properties Song Versions Songlists3. Transport Control Transport Control Overview Bar andMarkers VariSpeed4. Recording Recording Audio Recording MIDI Recording Multiple Takes Alternate Takes Partial Takes Punch In/Out Sound on Soundrecording Loop Recording Delay BeforeRecording Click Track Monitoring Practice Mode5. Playback and Mixing Playback and Mixing Tracks Groups Effect Returns Master Labels Collapsing MixerSections Mixer SectionTemplates6. Mastering and Mixdown Mastering Preparing MIDI Tracks Offline Mixdown Realtime Mixdown Reference Files7. Effects Effects Auto Wah Automated Fader Band Effect Chorus Compressor Convolutor Deesser Doubler Dynamics7. Effects (continued) Echo EQ Exciter Flanger Guitar Amp Master Limiter Mid/Side Effect Multi Effect Multiband Compressor Noise Gate Parallel Effect Phase Inverter Phaser Reverb Rotor Saturator Stereo Effect Stereo Imager Transposer Tremolo Tuner Vibrato Vocal Tuner AU Plugins LV2 Plugins VST Plugins Automatic DelayCompensation External SidechainRouting Audio to MIDI Plugins8. MIDI Instruments MIDI Instruments MultitrackStudioInstruments Wheel Organ SoundFont Player Sampler Matrix Sampler Multi Instrument External MIDIInstrument AU Instrument Plugins LV2 InstrumentPlugins VST InstrumentPlugins9. MIDI Effects MIDI Effects Arpeggiator AU MIDI Effect Plugins LV2 MIDI EffectPlugins VST MIDI EffectPlugins10. Automation Automation Mixer Automation Effect Automation11. Editing Editing Editing Tracks Editing Audio Tracks Vocal Pitch Correction Editing MIDI Tracks Editing Notes Pianoroll Editor Score Editor Drum Editor Editing Controllers MIDI Pattern Editing Tempo/Time SignatureEditing Song Editor Multi MIDI Editor Multitrack Editing Chords and Lyrics12. Audio and MIDI Devices Devices ASIO Drivers Windows Drivers Windows XP Drivers Mac Audio/MIDIDevices MIDI Output Control Compensating for driverissues13. Remote Control Remote Control Remote ControlSettings Remote Control Bar MultitrackStudioRemote Phone/tablet WebBrowser14. Audio and MIDI Files Audio Files MIDI Files15. Touch and Pen Touch and Pen Touch Pen Microsoft Surface16. Keyboard Shortcuts Keyboard Shortcuts(Windows) Keyboard Shortcuts(Mac)17. Preferences18. Tools19. Miscellaneous Plugin Manager Patch Editor Patchmap Files Meters Dither20. Requirements21. Troubleshooting
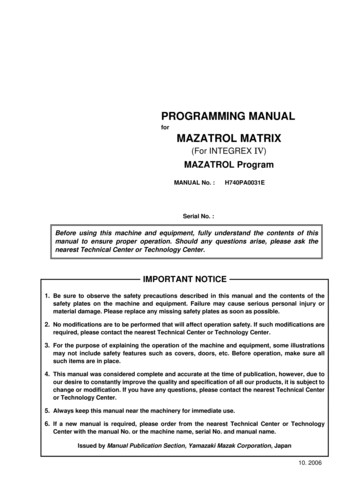
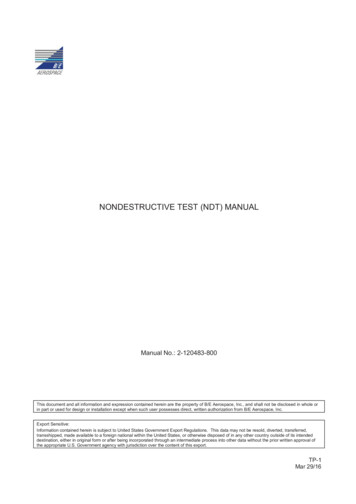
1 Introduction1.1 OverviewMultitrackStudio is a virtual multitrack studio. You can record and play audio and MIDI tracks, edit them, andmixdown to stereo.The straightforward and uncluttered user-interface has been designed with tape-based recording in mind. Mixersections are oriented horizontally (as opposed to the more familiar vertical layout), allowing them to include aneditor as well. The editing tools are aimed at correcting mistakes. MIDI tracks have been made to look like audiotracks as much as possible.The large number of high quality effects and the built-in General MIDI compatible MultitrackStudio Instrumentsmake it possible to do software-only mixing and mastering. All track, mixer and effect settings can be stored in asong file and recalled any time.Using a songlist you can play a sequence of songs. This way you can preview your CD project without having tomix the individual songs down to stereo files first.Tip: MultitrackStudio features a context-sensitive help system: pressing the F1 key (Windows) / Shift-Command? (Mac) will show help on the item the mouse points to.The main windowMultitrackStudio main window1.2.3.4.5.6.7.Menu buttonsRecording optionsEditing optionsTransport controlsOverview barMIDI trackMIDI Instrument slot8.9.10.11.12.13.Editor Preview paneAudio track with its editor openedEffect Return sectionEffect slotsMaster sectionGarbage BinTracks (6,9) contain audio or MIDI files. Tracks can be switched to playback or record mode using their Play andRec buttons. Clicking the transport's Start/Stop button (4) will start recording / playing back all trackssimultaneously.Effects can be loaded in effect slots (11) by clicking the slot's down arrow. MIDI Instruments can be loaded inMIDI Instrument slots (7) in the same way. Tracks and effects etc. can be removed by dragging and droppingthem onto the Garbage Bin (13).Clicking an Editor Preview pane (8) opens a track's editor.
The complete setup can be saved as a song using the Song menu (1). The Mix Down menu's 'Mix down to audiofile' option can be used to mix the song down to a single audio file.1.2 Quick Start: Recording a SongNote: after installing the program you can go to the Studio menu's Devices option to select the audio and MIDIdevices you want to use.Follow these steps to record a song and make a CD:Step 1: Make new SongMake a new (empty) Song using the Song- New menu option. A new (empty) folder is created automatically.Step 2: Add Click Track (optional)If you're recording a song from scratch you'll probably want to add a click track (metronome). Use the Add Trackmenu's Click Track option to do this. Note that you can tap the tempo on the space bar.Step 3: Add audio or MIDI trackAdd a Track with an empty audio or MIDI file using the Add Track menu. Use a mono audio file if you'rerecording a mono source like a microphone.Step 4: Record the trackClick the track's Rec button. If you're recording audio a Recording Level Fader now appears at the top of thewindow (provided your sound device supports this). Alternatively you can click the Input button to get access torecording level controls.Note: depending on the sound device there may be a dedicated software control panel or hardware knobs to setthe recording level. Please refer to the sound device's manual.Now you can start recording by starting the Transport. You will hear the Click Track, which was created in step 2,while recording. Stop the transport when you're done.Step 5: Record more tracksAdd more tracks (using the Add Track menu) and record them (repeat step 3 and 4). You will hear the previouslyrecorded tracks while recording a new one. At this stage it is quite common to add Reverb to vocal tracks usingan Effect Return section.Step 6: Mix down to master fileNow you can fine-tune the individual track's volume levels and add any effects. If your song sounds fine you canmix it down to a single .wav file using the Mix Down menu's Mix down to audio file option. This new file can beused for burning a CDR.Note (Pro edition only): make sure it's a 16 bit stereo file if you want to burn it to CDR. CD burning softwaretypically can't read 24 bit (or higher) files.Step 7: Play back master file (optional)Use the Mix Down menu's Playback mixed down file option to play back and verify the master file.Step 8: Burn CDRNow you can burn the file recorded in step 6 to a CDR using the software that came with your CD-writer.
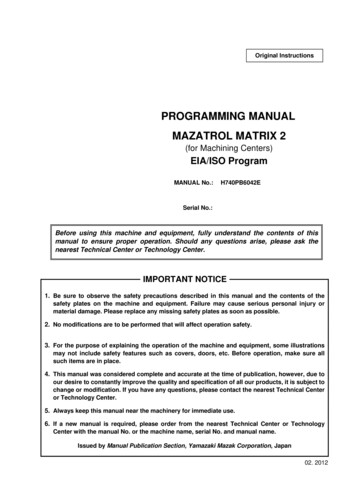
2 Songs2.1 SongsMultitrackStudio project files are called "songs". A song file (.hdr file extension) contains all information that isrequired to reproduce the mix you made. This includes: The number of tracks and other mixer sections.The position of all their knobs, effects, names of audio/MIDI files etc.Sample Rate usedSong CommentsChords and LyricsMarkersA song file does not include any audio or MIDI data, it contains only references to the audio/MIDI files used bythe tracks (ie. these audio/MIDI files are needed in order to play back the song). All filenames that are stored inthe song file have a relative path whenever possible. This way projects can easily be moved to other drives orfolders.Note: The devices used for playing audio and MIDI are NOT part of the song file. This way songs can be used onany computer.Mac note: Finder will show the song files as Radiance files. If you want to be able to open songs by doubleclicking you can Ctrl-click a song, choose Get Info and change the "Open with" field to MultitrackStudio.The currently opened song is shown in the main window's title bar.The Song menuThe Song menu contains the following options (note that some options are described in other chapters): New: In the New Song window you can type the name ofthe new song. It will be placed in a folder having the samename automatically unless you browse for a folderyourself. The Template box (Pro edition only) lets you apply atemplate. The Template box also allows for creating newtemplates: the Save current as template. option createsa template based on the current song. Templates includealmost everything related to the song, except for the audioNew Song window (Pro edition)and MIDI data in the tracks. New songs will have emptyaudio/MIDI files.There's a special "Identical to current" template which creates a new song identical to the current one.This can be convenient for live multitrack recording.Open: Open a song file.Save: Save the song file and all MIDI files and edited audio files (.aem files) opened in tracks.Rename: Rename the song.Close: Close the song.Comments: Read or write text which is stored in the song file. You can use this to document the project.Import Song: Import a zipped song (ie. a song exported using the Export Song option).The Song menu offers several export options:Note: the most important export function has its own button in the main window: Mix Down.Export MIDI TracksThis tool merges any combination of the currently loaded MIDI tracks in a single MIDI file. You can use it to moveyour MIDI tracks to third party notation software etc. The current versions of the tracks are used (ie. the MIDIfiles are not read from disk), so you can temporarily edit MIDI channels, or quantize tracks if necessary.
The resulting file is a format 1 MIDI file by default. You can use the "Format 0" option if you need a format 0 file(certain hardware can import format 0 only, for example).If a MIDI channel is used by multiple tracks a message will appear. You can choose 'Export as-is' or 'MergeTracks'. The first option is best if the file is to be imported in a notation program etc. The latter option can beused if the file is meant to be played back by a (General MIDI) media player. Note that you'll have to make surethere's just one track playing notes to a particular MIDI channel at any time.Lyrics, Chords and Markers appear in the list if available, and they're checked by default. Lyrics can optionally bestored using UTF8 encoding, this is typically used for Asian languages.Note: Chords are stored in Yamaha XF style. The file isn't a full blown XF file.Export Audio StemsNote: this feature is available in the Pro edition only.This tool can export MIDI tracks using a software instrument, audio tracks andgroups. An audio file will be created for each track or group. You can use thisif you're going to have your tracks mixed by someone who doesn't useMultitrackStudio.If "Include track effects" is on any audio effects in the track effect slots will beincluded. Exported groups include track en group effects regardless of thisoption."Optimal bit depth" (on by default) makes each file use the lowest bit depththat won't cause any loss of quality for that track. A 16 bit file will be used 16bit track if "Include track effects" is off, for example. 32 bit float files will beused otherwise.Note: groups are rendered using the tracks that are routed to the group beingrendered. Solo buttons may affect the result. Fancy sidechaining (using othertracks) may not work as expected."Export Audio Stems" windowNote: if a MIDI track has multiple streams only the first stream will be exported. You can click the track's filename box and choose Split Streams to split it into multiple single-stream tracks.Export Song"Export Song" saves the song in a .zip file. This makes it easy to move the song to another computer or to iPad.The zip file only contains files that are required to playback the song, ie. the files found by the Clean up SongFolder tool aren't included.Exporting to MultitrackStudio for iPadZipped MultitrackStudio songs can be imported in MultitrackStudio for iPad, provided you take care of a coupleof things: MIDI files containing multiple streams (instruments) are not supported. Click the track's file name box andchoose 'Split streams' first. There can't be more than 16 tracks (32 if Extension Pack is present, 64 if the Track Pack is present). Song sample rate can't be higher than 48 kHz.MultitrackStudio for iPad doesn't support the following features (but the song will be usable nonetheless): No Groups, just one Effect Return (Pro Extension supports either an extra Effect Return or up to 8Groups). Just two output channels in the Song Properties -- 'Outputs' setting (unless Pro Extension is available). Just three effect slots per mixer section. No VST / LV2 plugins, no macOS AU plugins, No Sampler or Wheel Organ. No Doubler, Exciter, Mid/Side Effect, Multi Effect, Parallel Effect or Stereo Effect effects. Convolutor, Dynamics, Phase Inverter, Transposer and Vocal Tuner are part of Pro Extension.
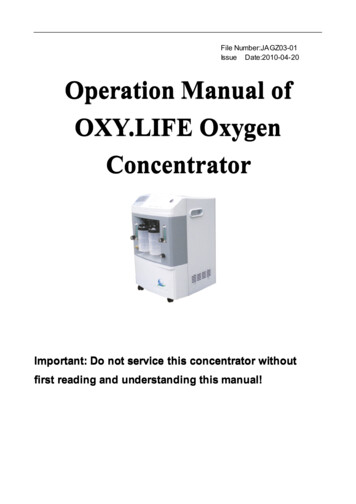
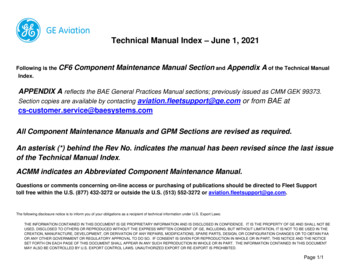
Sidechaining is part of Pro Extension. Sidechain effects don't have a slot that processes the sidechaininput signal. Automation is part of Pro Extension.The zip file can be moved to iPad using iTunes File Sharing.2.2 Song PropertiesIn the Song Properties window, reached via the Song menu'sProperties option, you can change mixer and sample ratesettings. It also shows file related information.The Sample Rate box specifies the sample rate to be usedfor audio recording/playback. Usually the default value (44.1kHz) will be used, as this is the value used on CDs. Thebottom entry of the drop down list lets you make the currentvalue the one to be used for new songs.Outputs (Pro edition only) determines the number of audiooutputs. This is always an even number, the minimum valueSong Properties windowis two (stereo), the maximum value is 140. If the value isgreater than 2 all Tracks, Group and Effect Return sections will have an Output Selector. Note that the Outputsvalue can exceed the number of outputs the audio device actually has. Any mixer sections using these nonexisting outputs will not be heard.The window also shows some non-editable properties. These include: The total playing time of the song The total occupied disk space The file name, playing length and occupied disk space of each track's file (via the More button)Clean up Song FolderThe Clean up Song Folder tool analyzes the folder that contains the current song, and lists all MultitrackStudiorelated files which are not required to play back a song file. You can delete these files in order to preserve diskspace.Note: Any alternate or partial takes appearing in a track's file options menu appear in the list, and can bedeleted. Once deleted the take will no longer be available.Note: song version files (.hdrversion) and any tracks used by the versions appear in the list as well. If you deleteaudio files used by a version this version will no longer play back correctly.2.3 Song VersionsVersions of the song can be created, and reverted to, later. These versions include the song file and the MIDIand .aem files opened in the tracks.Typical applications of versions include: Create a version before making major changes to the song, so you can revert to the old version if it's notsuch a good idea after all. Try different mixes and store as versions. Note that you can not only change mixer settings, but edit audioand MIDI tracks as well. Create a version of any mixes you send to someone, just in case they later feel the old one was better.Create VersionThe Song menu's Create Version option pops up the Create Version dialog which lets you type a name for theversion to be created. If there are modifications in the song which haven't been saved yet you can choosewhether you want to include the modifications in the version or not. This can come in handy if you open a songand start tweaking the mix: if you think you're onto something good you can still create a version of the song as itwas when you opened it, just in case the new mix appears to be not so good after all.
Revert to VersionThe Song menu's Revert to Version item lists all available versions. Tooltips show information about theversions, like the date it was created. You can revert to a version by clicking it. If there's no version that equalsthe song in its current state a version equaling the current state will be created. These automatically createdversions are named "Autosave Version 1" etc.AutosaveSome versions are created automatically: Autosave (safety backup): This version is created every 15 minutes. If the computer crashes you canopen the song again and revert to this version in order to minimize the amount of work lost. The version iscreated when the transport is stopped. Autosave (discarded version): This version is created if you choose to discard the changes when thesong is closed. If you regret this you can open the song again and revert to this version.Note 1: Autosave versions aren't created until the song has been saved for the first time.Note 2: Audio files themselves are not stored in the version files, so if you edit an audio file using a third partyeditor all versions using that file will be affected. You can make a copy of a file and edit the copy to avoid this.Note 3: The versions mechanism assumes there's only one song in a folder (ie. it assumes every versions itfinds in the song's folder is a version of the current song). This is likely the case with MultitrackStudio 5 or newer,but you might want to make sure this is the case with songs you created with older versions before reverting to aversion.Note 4: Some third-party demo version VST / AU plugins pop up a 'demo limitation' message window when theplugin settings are written to file. These messages will appear whenever a version is created.Under the hoodA version file (.hdrversion file extension) is a song file which also contains the .mid and .aem track data.2.4 SonglistsUsing a songlist you can play a sequence of songs. You can use this to preview your CD project without havingto mix the individual songs down to stereo files first.Note that using songlists is not required.A songlist file (.lml file extension) contains references to song files. When a playing song is finished, the nextsong can automatically be opened and played. When the last song is finished the transport will be stopped.Creating or opening a songlistThe Songlist menu is not visible if no songlist is opened. The Song menu's Songlist item contains New and Openoptions. After using one of these the Songlist bar will appear.Songlist Bar (3 songs)The Songlist Bar will be placed at the top of the window. A button with the song's file name is shown for eachsong in the songlist, the yellow one being the song currently opened. Clicking a button will open thecorresponding song. The songs can be reordered by dragging and dropping the buttons. Opening or reorderingsongs is not possible while the transport is running.Songs can be added and removed using the Song menu: New or Open will add a song to the Songlist, Close willremove the current song from the songlist and Rename will update the name of the current song.The Play All button determines whether all songs will be played back consecutively. It's on by default. You canturn it off if you're going to do some work on a song, in order to avoid going the next song inadvertently.
The Songlist menuThe Songlist bar contains the Songlist menu, which offers the following options: New, Open, Save, Save As, Rename, Close Comments: Read or write text which is stored in the songlist file. You can use this to document theproject. Songlist Properties: Show the songlist's properties. This includes: The song file name, playing length and occupied disk space of each song The total playing time of the songlist The total occupied disk spaceCollecting the songlist properties might take a few seconds as all songs have to be analyzed.
3 Transport3.1 TransportThe transport controls are similar to a tape recorder's transport controls. There's a position indicator and rewind,fast forward, home (to start of song) and start/stop buttons.The transport controlsWhen the transport is started all tracks that are in playback mode will play back, and all tracks that are in recordmode will record. If there are no tracks that are in either playback or record mode the transport will not start.Tip: you can hit the space bar instead of clicking the start/stop button.Position IndicatorThe position indicator shows the current transport position. It can show eitherhours:minutes:seconds or bar:beat. On clicking the position indicator a menuappears which allows for choosing hours:minutes:seconds or bar:beat. Thebar:beat option is available only if at least one track contains a MIDI file. That'sbecause tempo information is stored in MIDI files.After clicking the position indicator menu's Type Value option a new position canbe typed. Hours:minutes:seconds values (separated by colons) are interpretedright to left, so you don't have to enter hours or minutes if the time you enter isless than 60 seconds. But if you want to enter minutes you should enter secondsTransport menuas well. Zero values can be omitted (you can enter 12: instead of 12:00).Bar:beat values are interpreted left to right, so you can enter plain bar numberseasily (12 instead of 12:1).The seconds and beat values can be real numbers (like 1.462). Press Enter to accept the new value, or Esc tocancel the operation.The position indicator's maximum value is 10 hours at 44.1 kHz sample rate (4 hours and 30 minutes at 96 kHz).Loop modeIf the Loop button is engaged the transport will loop the looping region (assuming you've set a valid region). Youcan click the position indicator and use the Set Loop Start/Set Loop End options to set the looping region. Theseoptions can also be reached by rightclicking the overview bar. The Loop button appears dimmed if it's engagedbut there's no valid looping region.The Overview Bar shows the looping region.Overview Bar showing looping regionYou can select a looping region and start the transport in one go by drawing it on the Overview Bar whilepressing the Alt key (Windows) / Option key (Mac). In this case the Loop button will be engaged automatically,and it will be disengaged automatically when transport stops.3.2 Overview Bar and MarkersOverview BarThe Overview Bar is closely related to the transport. It is a large slider indicating the current transport position.The slider thumb can be moved using the mouse. Double clicking anywhere starts the transport from thatposition, clicking the thumb stops it. The overview bar also shows the markers.
Overview Bar with three markers, green triangle is most recent start positionThe most recent transport start position appears in the upper half as a green triangle. If you click it the transportmoves back to that position, double clicking it starts the transport at that position.The current editor view area is indicated by a thin line. It's only visible while the editors are scrolling horizontally.MarkersMarkers are used to name certain parts of a song (for instance Intro, Verse 1, Verse 2, Solo, Verse 3).Navigating through a song becomes significantly easier using markers. The position indicator menu features anAdd Marker option which adds a marker at the current transport position. If there's a marker at the currentposition a Delete Marker option is presented instead.Alternatively markers can be added by rightclicking the overview bar. Most editors allow for adding markers byright-clicking the time grid-area (where the needle handle lives).An easy way to add markers "on-the-fly" is to press Ctrl M (Windows) / Option-M (Mac) at the appropriate timeswhile the song is playing. This takes the grid snap setting into account, so accurately adding markers on-the fly iseasy when using a grid spacing of one bar while the "Snap" button is engaged.The markers appearing on the overview bar can be left-clicked to jump to the corresponding transport position.They can be right-clicked to delete, rename, quantize to the grid, move it to the current transport position, or typea new position. Renaming can also be done by double clicking the marker. Markers can be dragged to a newposition.3.3 VariSpeedNote: this feature is available in the Pro edition only.VariSpeed acts like a tape recorder's speed control. An important application is recording instruments whicharen't in tune with existing tracks. Speed Only mode can be used to slow the music down to make transcriptionor practicing easier. The VariSpeed controls are hidden by default, they can be made visible by clicking theposition indicator and choosing "Show VariSpeed Control".VariSpeed controlThe box offers a choice of several VariSpeed modes: Off: No VariSpeedTape style - 1 semitone (T1): Change pitch up to 1 semitone, speed changes accordingly.Tape style - 2 semitones (T2): Change pitch up to 2 semitones, speed changes accordingly.Tape style - half speed (TH): Run at half speed ( /- 1 semitone). Audio tracks and software instrumentssound one octave lower at half speed, External MIDI Instruments don't. Speed Only (SO): Change speed (50%.150%) without changing pitch. Recording isn't possible usingSpeed Only mode, VariSpeed will be turned off automatically if you try to do so.The rotary knob controls speed / pitch. It can be turned while the transport is running, but not while recording.The tape-style modes work exactly like a tape recorder's speed control: if speed increases pitch goes up, ifspeed decreases pitch goes down. If you want to record an instrument and its pitch is different from your song'spitch you can use VariSpeed to change the song's pitch. After recording the track you can switch off VariSpeedand the recorded track's pitch will be equal to the song's pitch.VariSpeed also works with MIDI tracks. Tracks using an External MIDI Instrument are detuned using Pitch Bendmessages (the pitch bend range is assumed to be 2 semitones).Note that VariSpeed consumes CPU power, so it should be switched off when it's not needed.
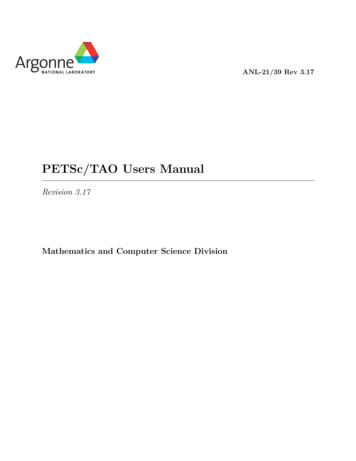
4 Recording4.1 RecordingThe first thing to do when starting to record a track is to add a track with an audio or MIDI file that will contain therecording. You can do this using the Add Track menu.Add Audio Track window (Pro edition)Add MIDI Track windowIf the track contains an audio file (like the default .wav format), the track will record audio (using a microphone ora line input), if it contains a MIDI file (.mid) the track will record MIDI (usually a keyboard). See the Audio filesand MIDI files paragraphs for more information on supported file types.To record a track you should click its Rec button (it turns red) and start the transport.If you want to wait a certain amount of time until recording starts (to give you time to walk to the mic for instance)you can use the Delay Before Recording option.Recording optionsFour buttons at the top of the main window provide access to the most frequently used recording options: Input: Show the Windows audio recording settings (Windows) / System Preferences audio settings (Mac).If your audio device comes with a control panel application you can click down arrow menu's "Browse fordevice control panel." option and open the control panel. Now you can access the control panel via thedown arrow menu's "Device control panel" option. If "Button shows device control panel" is checked it willpop up on clicking the Input button itself. Mon: Soft Monitoring Punch: Punch In/Out SoS: Sound on Sound recordingA Recording Level fader appears next to the Input button while an audio track's Rec button is engaged. Thisfader sets the level of all input channels. Use the Input button if you need to set per-channel levels. TheRecording Level fader only appears if the sound device supports this.The Rec button pops up the Recording Options menu which offers more options. The buttons move to the menuautomatically if the main window is too small to show them all. The menu's options are described in the followingparagraphs.Recording options, with Recording Level fader4.2 Audio RecordingIf you want to record using a microphone you should connect it to your sound device's Mic input. Keyboards, micpreamps or mixer outputs should be connected to the Line input.Input assignmentA small down pointing triangle appears on the right hand side of an audio track's Rec button. Clicking thistriangle pops up the input channel selector. The input channel is displayed on the Rec button itself. The inputchannel selector features small level meters if at least one audio track Rec button is engaged.
Recording LevelsThe Level Meter starts working upon clicking the track's Rec button (it turns red). Youcan now set the recording level. The way this can be done this depends on yoursound device. A Recording Level Fader appears next to the Input button if the sounddevice supports this. The In
Note: after installing the program you can go to the Studio menu's Devices option to select the audio and MIDI devices you want to use. Follow these steps to record a song and make a CD: Step 1: Make new Song Make a new (empty) Song using the Song- New menu option. A new (empty) folder is