Transcription
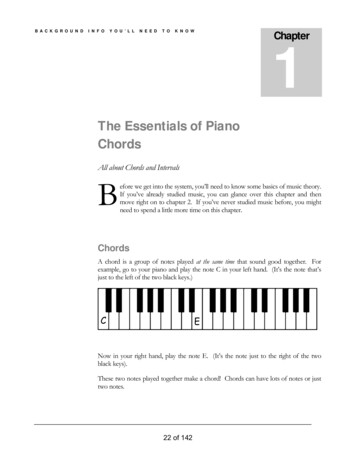
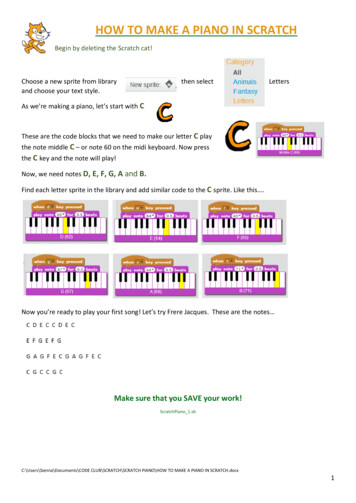
HOW TO MAKE A PIANO IN SCRATCHBegin by deleting the Scratch cat!Choose a new sprite from libraryand choose your text style.then selectLettersAs we’re making a piano, let’s start with CThese are the code blocks that we need to make our letter C playthe note middle C – or note 60 on the midi keyboard. Now pressthe C key and the note will play!Now, we need notes D, E, F, G, A and B.Find each letter sprite in the library and add similar code to the C sprite. Like this .Now you’re ready to play your first song! Let’s try Frere Jacques. These are the notes Make sure that you SAVE your work!ScratchPiano 1.sbC:\Users\Sienna\Documents\CODE CLUB\SCRATCH\SCRATCH PIANO\HOW TO MAKE A PIANO IN SCRATCH.docx1
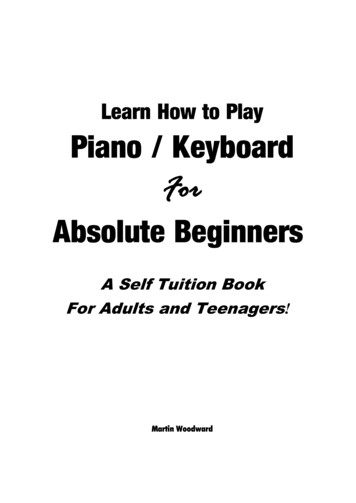
FLASHING PIANO KEYS!Let’s add some code to make our piano keys flash when they are played!First, we need to give each sprite a second costume. Let’s start with the C note.Select the sprite.Now you have two sprites.Select Costumes.Let’s edit the second sprite.Select duplicate.Use the paint pot to change the colourNow we need some new code blocks to make the sprite change costume when the key is pressed.This code blocks says: Puton the second costumeThis code blocks says: How longto wear this costumeThis code blocks says: Put onthe first costumeThis is how your code looksnow.Once you’re happy that your code is working you can amend each sprite in a similar way.Do you notice a small problem?Sometimes the sprites are wearing the wrong costume! We can easily fix this by telling the sprites whichcostume to put on at the start. We’ll use this code block.Add a new code block to each sprite to make sure that the ‘correct’costume is selected at the start, like this:Make sure that you SAVE your work!ScratchPiano 2.sbC:\Users\Sienna\Documents\CODE CLUB\SCRATCH\SCRATCH PIANO\HOW TO MAKE A PIANO IN SCRATCH.docx2
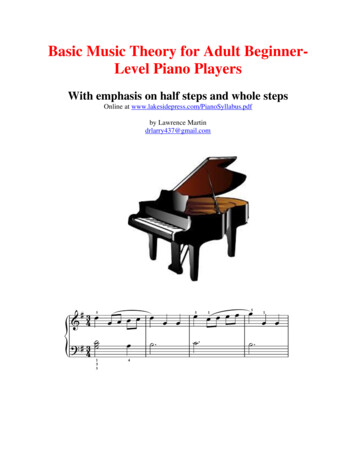
LET’S MAKE THIS PHYSICAL!Let’s make our code physical by making a keyboard and using a Makey Makey to play our piano.The Makey Makey looks like this.Hmmm, I don’t see any letters for our keys and I don’t see enoughconnectors for our piano – we need to connect 7 piano notes. We willhave to change our code just a little.On the back of the Makey Makey there are some‘sockets’ where we can insert jumper wires, like this:We can use A, D, F and G here for our notesand then use up, down and left on the frontfor B, C and E.We’ll also need a physical keyboard – but we’ll get to that. Let’s change our code first.We only need to change the code for the notes B, C and E. Like this:Now it’s time to make our keyboard! You will need: 1 sheet A4 paper 1 sheet A4 card (optional) Aluminium foil Scissors glueYou can get as fancy as you want; you can make something that looks like a real keyboard or just write themusical notes on a sheet of paper. Or just attach pieces of tin foil to the croc clips or get even morecreative! Putting a person on the end of the croc clips also works, touch their hand to play the piano keys!C:\Users\Sienna\Documents\CODE CLUB\SCRATCH\SCRATCH PIANO\HOW TO MAKE A PIANO IN SCRATCH.docx3
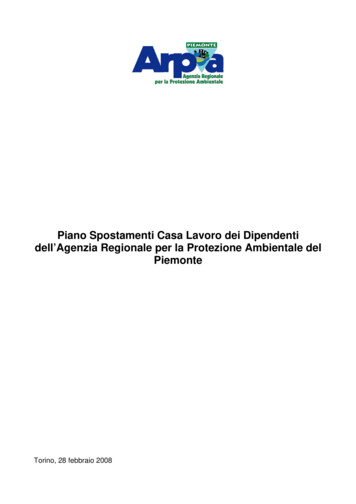
MAKE A MAKEY MAKEY PIANO!You can use anything to make a piano – fruit, tin foil anything that will conduct.You can easily find an image of piano keys on the Internet.To make a simple piano. Stickstrips of foil to the paper. Makesure the strips go all the way tothe top of the paper – so the crocclips can connect.If you want to make something a little stronger, you can stick the image of the piano keys to card. Then,make a small slit on each key and feed the strip of foil through from the back.Slit cut in card,foil comesthrough frombackFoil runs down back ofcard, through slit to thefront.Now we can wire up the Makey Makey to our piano keys. Turn the Makey Makey over so that you areworking on the back.Connect jumper wires to the A, D, F and G sockets on the back of the MakeyMakey. It helps if you use the same colour croc clips to connect to the other end ofthe jumper wires.Remember, we have to connect B to the up arrow – redin this photo. Connect C to the down arrow – white inthis photo and E to the left arrow – grey in this photo.(Don’t forget, you are working on the back of the MakeyMakey so left is on the ‘wrong’ side!).C:\Users\Sienna\Documents\CODE CLUB\SCRATCH\SCRATCH PIANO\HOW TO MAKE A PIANO IN SCRATCH.docx4
Connect the croc clips from the Makey Makey to the foil coming from the piano keys.Connected toDOWN arrowConnected toUP arrowConnected toLEFT arrowConnected to A, D, F and G viajumper wiresConnect your Makey Makey to your computer. (It may take a couple of minutes for the driver to install ifthis is the first time you have used it). You have already tested and checked your piano. It should play thecorrect notes when you press the up, down, left arrows and A, D, F and G keys. Now, you can ‘play ‘ yourpiano keys by touching the foil Hmmm .not working? Just one more thing to do. You must connect a crocclip to the EARTH and hold the other end as you touch the keys to completethe circuit. I always try to use black for the EARTH so that I know which croclead it is.Want to see a video of my piano? Follow this cuments\CODE CLUB\SCRATCH\SCRATCH PIANO\HOW TO MAKE A PIANO IN SCRATCH.docx5
HOW TO MAKE A PIANO IN SCRATCH Begin by deleting the Scratch cat! Choose a new sprite from library then select Letters and choose your text style. As were making a piano, lets start with C These are the code blocks that we need to make our letter C play