Transcription
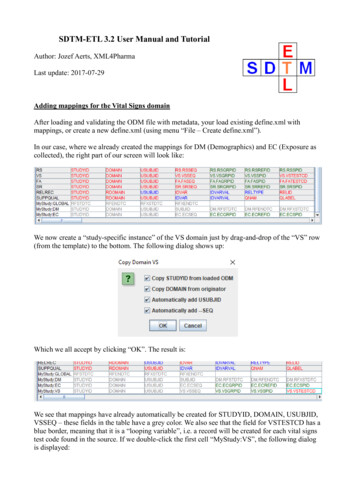
SDTM-ETL 3.2 User Manual and TutorialAuthor: Jozef Aerts, XML4PharmaLast update: 2017-07-29Adding mappings for the Vital Signs domainAfter loading and validating the ODM file with metadata, your load existing define.xml withmappings, or create a new define.xml (using menu “File – Create define.xml”).In our case, where we already created the mappings for DM (Demographics) and EC (Exposure ascollected), the right part of our screen will look like:We now create a “study-specific instance” of the VS domain just by drag-and-drop of the “VS” row(from the template) to the bottom. The following dialog shows up:Which we all accept by clicking “OK”. The result is:We see that mappings have already automatically be created for STUDYID, DOMAIN, USUBJID,VSSEQ – these fields in the table have a grey color. We also see that the field for VSTESTCD has ablue border, meaning that it is a “looping variable”, i.e. a record will be created for each vital signstest code found in the source. If we double-click the first cell “MyStudy:VS”, the following dialogis displayed:
Also displaying the looping structure, which essentially is “One record per subject per vital signstest code”. This can be visualized by clicking the “Validate” button:We will keep this for now, and come back later and extend this when necessary.It is always a good idea to first provide the mapping for the looping variables. So we will developthe mapping for VSTESTCD first.Generating the mapping for VSTESTCDIf we look into the ODM tree, we find:
and see that vital signs are only collected in the “Treatment” visit, which is a repeating visit. Furtherexpanding the tree view leads to:We observe that some of the fields have a cyan background color, meaning that they do alreadyhave an “SDTM annotation”, i.e. the developers of the study design already annotated these withSDTM information, stating where the data point will later be used in SDTM. For example, if wehold the mouse of “Systolic Blood Pressure”, a tooltip is displayed:We can now start developing the mapping for VSTESTCD.
First drag-and-drop from one of the appropriate entries from the ODM tree to the cell“VS.VSTESTCD”. If we e.g. take “Systolic Blood Pressure” and drag-and-drop it, the followingdialog shows up:Now, we do not want to import the value of the data point from the set of clinical data, we want toimport its data point code, and will then map that to SDTM.So, we check the checkbox “Import XPath expression for another ItemData attribute” (secondcheckbox). This leads to:What is happening here? When getting the clinical data, the software will pick up the identifier ofthe data point (in our case it is “IT.SYSBP”) and will use that for mapping to VSTESTCD.Now, we do have of course more vital signs collected than just the systolic blood pressure, and wealso want to get the others too. In order to get them, click the checkbox “Generalize for all Items”.
This will select all the data points in the group “Vital Signs”, including “Vital Signs Date”, “VitalSigns” time and so on. These two are not vital signs of course, so we will want to exclude them, oralternatively, we only want to include the data point codes that really represent.This can easily be done using one of the buttons “Except for ” or “Only for ”. If we use “Onlyfor ” the following dialog is displayed:We than select only these items that really represent a vital signs test code, i.e.:
We do not select “Vital Signs Date”, “Vital Signs Time”, “Vital Signs DateTime”, and “WeightUnits” as these do not represent vital signs test codes.Clicking OK now leads to:Stating that we will have 5 different vital signs test codes.If we had the case that vital signs would also have been collected in other visits (study-events) than“treatment”, we should select the checkbox “Generalize for all StudyEvents” and use the button“Except for ” or “Only for ” and then select the visits in which vital signs have been collected.This will then take care that these visits are also taken into account.Clicking “OK” then leads to a new dialog:
Stating that there is an SDTM codelist for VSTESTCD in SDTM, and that we can map our 5 testcodes in our ODM to the SDTM codelist. Using the wizard for this will simplify our work a lot, sowe click “Yes”, leading to:For each of the entries on the left (our ODM codes) we can now easily map to an SDTM “vitalssigns test code”, by a simple selection on the right. For example, for “Systolic Blood Pressure”:In many cases, just typing the first character of the desired test code, allows to find the desired testcode. This will e.g. lead to:
For the last row “MISSING VALUE”, we should also make a choice. Usually, one will select the“NULL” value, i.e. scroll to the bottom of the list and select the last entry which is the empty entry:With the result:The case of a “missing value” should however never occur in practice, as VSTESTCD is a “loopingvariable” and we iterate only over data points that represent one of these 5 test codes.Clicking “OK” then generates the mapping script:
If needed, one can then still adapt the mapping script manually. In many cases, this will not benecessary.One then accepts the mapping script (which is then stored in the underlying define.xml) by clickingthe “OK” button.One can now do a first test, by using the menu “Transform – Generate Transformation (XSLT)Code for SAS-XPT”1. This leads to:Most of the EDC vendors ( 90%) use the “classic” ODM export, with “non-typed ItemData”. Onlya few use the “Typed ItemData” flavor of ODM. If you have doubts, ask your EDC vendor which ofboth is exported, or just try both here – if you have the wrong one, the output will simply be empty.The following dialog is displayed after clicking “OK”:If one does not want to use SAS-XPT as the output format, but use the new Dataset-XML format, one of course usesthe menu “Transform – Generate Transformation (XSLT) Code for Dataset-XML”1
Showing you the generated XSLT. If you want to use it for offline SDTM generation, you can saveit now. You can also skip this step by using the menu “Options – Settings” and checking “Skipdisplay of generated XSLT”.Then click the button “Execute Transformation (XSLT) Code”, leading to:
Now select an input file with ODM clinical data (as exported from your EDC system) by using thefirst “Browse” button. For example:
leading to:In most cases, you will not need to check the checkbox “Metadata in separate ODM file”. This willonly be the case e.g. when you need “decoded” codelist values, or the “description” or “questiontext” of a data point.If you already want to generate SAS-XPT datasets, also check the checkbox “Save Result SDTMtables as SAS XPORT file”, and then select a directory where these need to be written to. Duringtesting however, this will usually not be necessary, as the generated SDTM tables will be displayed
by the software itself.All the other options will be explained later.Clicking “Execute Transformation on Clinical Data” starts the transformation. In case of verycomplicated mappings and large amounts of data this can take a few minutes.In our case, the results display after a few seconds:Showing that 17 vital signs data points have been collected for the first subject (1001). Remark that“VSSEQ” has been generated automatically, this does not need to be programmed by the user.Continuing with VSORRESOnce the mapping for VSTESTCD has been developed (which can be a bit more challenging whenthe tests are divided over different forms), generating the mapping for VSORRES is pretty easy.Select the cell “VS.VSORRES” and then drag-and-drop one of the tree nodes representing a vitalsigns test to the cell “VS.VSORRES”. Again, a dialog is displayed.
This time we must import the value of the data point, not the code. So, we let the checkbox“Import for ItemData Value attribute ” selected. We also see that the system remembers the“generalization” with the 5 inclusions, so there is nothing to be changed there.Also notice the line “ODM ItemDef Length” (near the bottom) stating that in the ODM the valuehas been declared as of a maximum length of 3, whereas in SDTM the value from the template is80. So, not a bad idea to check the checkbox “Set SDTM Variable Length to ODM ItemDefLength” which will set the value for the maximum length in SDTM to 3 too:Clicking “OK” leads to:After accepting the mapping script, testing on our clinical data leads to:
We also see that something is not entirely ok. In the ODM, it was defined that the maximum length(as text) is 3, but we see that there are values that are of length 4. Although this can be automaticallycorrected when generating the SAS-XPT files, it is not a bad idea to set the maximum length forVSORRES to 4 already now in the underlying define.xml.In order to do so, select the cell VS.VSORRES and then use the menu “Edit – SDTM VariableProperties”. This leads to:Checking the box “New Length” allows us to set the new maximum length to 4:Clicking “OK” updates the variable properties.When we then hold the mouse over the cell “VS.VSTESTCD” we see:
And see that the maximum length has indeed been updated.Generating the mapping for VSTESTGenerating the mapping for VSTEST is almost identical to the one for VSTESTCD.Drag-and-drop one of the vital sign test entries from the ODM tree to the VS.VSTEST cell, thenselect to use the “ItemOID” from the clinical data:The system still knows about our 5 different vital sign test, so we can just continue, leading to:Accepting with “Yes” then leads to:
Which can then easily be completed to:Which then automatically generates the mapping script:And after testing using Transform – Generate Transformation ”, leads to:
Nice! We are making good progress Generating other mappings for Vital Signs - VSORRESUIf we now look at our table again, we seeThat we still need to add the information for “VSORRESU” (original result units) and forVSSTRESC, VSTRESN (standardized results, character and numeric) and VSSTRESU(standardized result units). We will start with VSORRESU (original units).We see at the ODM side that for systolic and diastolic blood pressure, the units are not provided.The reason is that the value is always mmHg (UCUM notation2: mm[Hg]). For “Weight” however,the field in the EDC system was essentially a free text field, as we can see from the ODM:And when we ask for the associated codelist using the menu “View – Item CodeList Details” weget nothing. We can also see that there was no codelist, by selecting “Weight Units” andinspecting the line at the bottom:So, what were the reported weight units? In order to see them, use the menu “View – ODMClinicalData”. This leads to:Unfortunately, CDISC and FDA do not allow units in UCUM notation yet, which would simplify many things, such asautomated unit conversions.2
And clicking “View ODM Clinical Data” then shows us a table:And we see that “kg” has always been used. If we had found a multitude of different units here, wewould have had to read some extra code, e.g. taking into account the different ways of writing“kilogram” and “pounds”.Inspecting the collected data is always a good idea when the item was a free text item and needs tobe standardized.In order to provide the mapping for VSORRESU, again drag-and-drop one of the vital signs entriesfrom the ODM to the VS.VSORRESU cell, and select to import the “ItemOID”, leading to:
Continued by the dialog:And when accepting with “Yes”, the mapping wizard is displayed:Which we can easily complete, as typing the first character already leads us to the neighbourhood ofwhat we need. The result will be:
Leading to the mapping script:Suppose now that we want to read the value for “weight unit” from the ODM, and add the valuehere. We can easily do so by adding some extra scripting. We first drag-and-drop “Weight Units” to“VSORRESU”. As there is already a mapping present, the system asks us:
In our case, it is a good idea to append the mapping to the top of our script, so we select “Append toexisting mapping at top”. We can also give a new name to the new variable that is then created, e.g.:After clicking “OK”, we get:
However, this time, we only want to import the value for “Weight Units”, so do not want to“generalize for all items” (within the group), so we must unselect that checkbox:And after clicking “OK” we get:Which will generate a script that we will need to complete. Clicking “OK” leads to:Such a “template” script is extremely useful when one needs to “categorize” collected data thatcomes as free text into categories or coded values, as is the case here.In our case however, it is only about “weight”, so we can remove that template script again, as wewill just “pick up” the value as it was collected. This leads to:
The first set of lines takes the collected value for VSORRESU, the other lines “hardcode” the value,as it was not collected, but e.g. prescribed by the protocol.There is now still one line we need to correct, which is the line in the “if” statements that is aboutweight units. We change it into:Saying that for “Weight”, we will take the collected value, and not the hardcoded value.Running the scripts then leads to:
Later, we will also learn how to create “Value lists” for VSORRES for the individual tests. See thetutorial “Working with the WhereClause in define.xml 2.0“. With SDTM-ETL, generating valuelists is extremely easy, whereas it is a nightmare with some of our competitor software offerings.Creating the mapping for VSPOSVSPOS (Vital Signs Position) is a “permissible” variable, meaning that one can omit it when nodata was collected for it, which is the case here. We will however still add it to demonstrate the useof “Origin” in define.xml.Suppose that it was stated in the protocol that the vital sign tests blood pressure and pulse must betaken in sitting position. For “weight”, “height” (which is not collected here) this of course doesn’tmake sens
SDTM-ETL 3.2 User Manual and Tutorial. Author: Jozef Aerts, XML4Pharma. Last update: 2017-07-29. Adding mappings for the Vital Signs domain. After loading and validating the ODM file with metadata, your load existing define.xml with mappings, or create a
